background image

The recorder illustrations appearing in this instruction manual are
of the HR-J745EK.

HR-J745EK

(Hi-Fi)

HR-J249EK

(Monaural)

VIDEO CASSETTE RECORDER

INSTRUCTIONS

LPT 0002-056C

TM

PAL

SPATIALIZER

3R PICTURE

q

STANDBY/ ON

REW

FF

TV PROG /

JOG

SHUTTLE

VIDEO (MONO)L – AUDIO – R

AUTO SP/LP TIMER

TIMER

TV PROG

COUNTER

RESET

SP/ LP

SCE

NE FIN

DER

PROG CHE

CK

TV VOL.

C.MEMORY DISPLAY

DAILY

AUX

ADD TIME

C.RESET

CANCEL

DATE

STOP

START

AUDIO MONITOR

(MONITOR)

TV/VCR

TV

SAT

VCR

TIMER

WEEKLY

A

1

2

4

5

3

6

8

0

7

9

B

PUSH JOG

MULTI BRAND

REMOTE CONTROL UNIT

TV

PROG.

PRO

G/ME

NU

OK

EXPRESS PROGRAMMING

2

4

1

3

SEE

QUICK SET UP GUIDE

ON REAR SIDE

SEE

QUICK SET UP GUIDE

ON REAR SIDE

CONTENTS

SAFETY FIRST

2

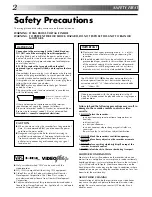
Safety Precautions ...................... 2
Some Do's And Don'ts ............... 3

INSTALLING YOUR NEW RECORDER 4

Basic Connections ..................... 4

INITIAL SETTINGS

6

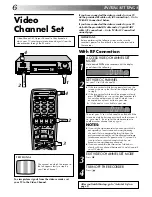
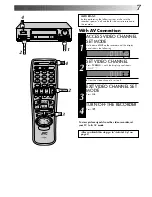
Video Channel Set ..................... 6
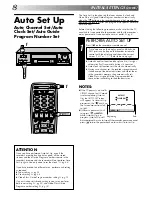
Auto Set Up ............................... 8
Video Plus+ Setup .................... 10

PLAYBACK

12

Basic Playback ......................... 12
Playback Features .................... 13

RECORDING

18

Basic Recording ....................... 18
Recording Features .................. 19
B.E.S.T. Picture System ............. 20

TIMER RECORDING

22

Video Plus+ Timer Recording ... 22
Regular Timer Programming ..... 24

EDITING

28

Edit To Or From Another Video
Recorder .................................. 28
Edit From A Camcorder ............ 30

SYSTEM CONNECTIONS

31

Connection To A Stereo System
(HR-J745EK only) ..................... 31
Connection To A Satellite
Receiver ................................... 32

SPECIAL FEATURES

34

TUNER SET

38

Auto Channel Set ..................... 38
Manual Channel Set ................. 40

CLOCK SET

46

TROUBLESHOOTING

48

QUESTIONS AND ANSWERS

50

SPECIFICATIONS

51

INDEX

52

Summary of Contents for HR-J249EE

Page 1: ...IDE ON REAR SIDE SEE QUICK SET UP GUIDE ON REAR SIDE CONTENTS SAFETY FIRST 2 Safety Precautions 2 Some Do s And Don ts 3 INSTALLING YOUR NEW RECORDER 4 Basic Connections 4 INITIAL SETTINGS 6 Video Channel Set 6 Auto Set Up 8 Video Plus Setup 10 PLAYBACK 12 Basic Playback 12 Playback Features 13 RECORDING 18 Basic Recording 18 Recording Features 19 B E S T Picture System 20 TIMER RECORDING 22 Video...

Page 2: ...late and the safety caution are on the rear of the unit WARNING DANGEROUS VOLTAGE INSIDE WARNING TO PREVENT FIRE OR SHOCK HAZARD DO NOT EXPOSE THIS UNIT TO RAIN OR MOISTURE Safety Precautions Video tapes recorded with this video recorder in the LP Long Play mode cannot be played back on a single speed video recorder The STANDBY ON button does not completely shut off mains power from the unit but s...

Page 3: ...on or has a standby mode Switch off using the switch on the equipment and make sure that your family knows how to do this Special arrangements may need to be made for infirm or handicapped people DON T use equipment such as personal stereos or radios so that you are distracted from the requirements of road safety It is illegal to watch television whilst driving DON T listen to headphones at high v...

Page 4: ...V 3 The connection method you use depends on the type of TV you have RF CONNECTION To Connect To A TV With NO 21 pin AV input connector SCART a Disconnect the TV aerial cable from the TV b Connect the TV aerial cable to the ANT IN jack on the rear panel of the recorder c Connect the provided RF cable between the RF OUT jack on the rear panel of the recorder and the TV s aerial connector Before ope...

Page 5: ...t provided Back of HR J745EK Back of HR J249EK ATTENTION If you have finished all the necessary connections go to Video Channel Set on page 6 then perform Auto Set Up on page 8 do NOT press the button on the recorder remote control to turn on the recorder s power before you start Auto Set Up ...

Page 6: ...o not appear clearly press TV PROG or to set the video recorder to a vacant channel between 22 and 69 which is not occupied by any local station in your area Then set your TV to UHF channel 36 and check if the two vertical white bars appear clearly on the screen if so go to step 3 If not re set the video recorder to another vacant channel and try again NOTES If you set the video recorder to a chan...

Page 7: ...lay panel shows the following SET VIDEO CHANNEL 2 Press TV PROG until the display panel shows OUT Now the video channel is set to off EXIT VIDEO CHANNEL SET MODE 3 Press OK TURN OFF THE RECORDER 4 Press With AV Connection q TV PROG STOP 2 1 1 2 4 5 3 6 8 0 7 9 2 4 1 3 4 TV PROG 4 To view picture signals from the video recorder set your TV to its AV mode After you finish this step go to Auto Set Up...

Page 8: ...order s memory then automatically sets Video Plus assigned Guide Program number for those stations according to the broadcast area q 1 2 4 5 3 6 8 0 7 9 2 4 TV PROG TV PROG 1 1 INITIAL SETTINGS cont ATTENTION Once you have performed Auto Set Up even if the recorder s memory backup has expired all the stored stations and their Guide Program numbers remain in the recorder s memory and the recorder w...

Page 9: ...V and select its VIDEO channel or AV mode then make sure that all necessary stations have been stored in the recorder s memory by using the TV PROG button s If station names ID Z pg 44 have also been stored in the recorder s memory the station name will be displayed at the top left corner of the screen for about 5 seconds when the recorder is tuned to a different station If you want to set the tun...

Page 10: ...2 Press MENU twice ACCESS GUIDE PROG SET SCREEN 3 Press PUSH JOG fi to move the highlight bar pointer to GUIDE PROG SET then press OK The Guide Prog Set screen appears 5 GUIDE PROG SET GUIDE PROG TV PROG 1 1 AUTO SET BY VIDEO PLUS MANUAL SET 5 MENU EXIT MAIN MENU MODE SET AUTO CH SET MANUAL CH SET GUIDE PROG SET CLOCK SET 5 MENU EXIT INITIAL SETTINGS cont Perform the following steps to check if th...

Page 11: ...or a few seconds Input the correct PlusCode number Repeat steps 4 and 5 as necessary CLOSE MENU 6 Press MENU and selection is complete If you already know the Guide Program number for a station 1 After step 3 press PUSH JOG The GUIDE PROG number begins blinking 2 Enter the Guide Program number using the NUMBER keys or PUSH JOG fi then press PUSH JOG The TV PROG number begins blinking 3 Enter the p...

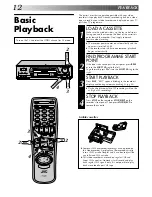
Page 12: ...ress FF or turn the SHUTTLE ring to the right START PLAYBACK 3 Press PLAY BEST appears blinking in the recorder s display panel during automatic tracking Z pg 20 Playback picture quality of LP recordings will not be as high as SP recordings STOP PLAYBACK 4 Press STOP on the remote or STOP EJECT on the recorder s front panel Then press STOP EJECT to remove the cassette Turn on the TV and select the...

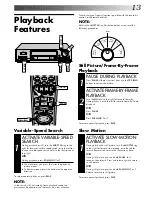
Page 13: ... procedures R e v e r s e R e v e rse Reverse Slow Pla y F o r w a r d s e a r c h p l a y slow motion s e a r c h Still Slow Motion ACTIVATE SLOW MOTION PLAYBACK 1 During playback or still picture turn the SHUTTLE ring to the right for forward slow motion or to the left for reverse slow motion refer to the illustration above OR During still picture press and hold PAUSE for 2 seconds then release ...

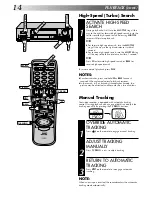
Page 14: ...TLE ring all the way to the right for forward high speed search or to the left for reverse high speed search Releasing SHUTTLE resumes still picture playback OR For forward high speed search turn the SHUTTLE ring all the way to the right and release it within 1 second For reverse high speed search turn the SHUTTLE ring all the way to the left and release it within 1 second OR Press FF for forward ...

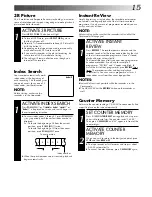
Page 15: ...utton lit Depending on the type of tape used picture quality may be better with 3R Picture set to off If you use this recorder as the player for editing be sure to turn off 3R Picture before starting The setting will remain effective even though you turn on off the recorder Counter Memory Returns to the counter reading of 0 00 00 to conveniently find a specific place on the tape automatically SET ...

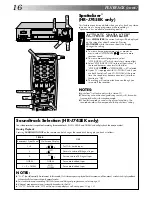
Page 16: ... stereo source or view a stereo programme while recording it SpatializerW has no effect on recording quality ACTIVATE SPATIALIZERW 1 Press SPATIALIZER the current setting will be displayed on the screen for about 5 seconds Pressing SPATIALIZER while the screen shows the display changes the setting To view a stereo programme such as movies or music select SPATIALIZER to create more spacious sound T...

Page 17: ... want the power to be turned off automatically when the counter reads 0 00 00 instead of at the beginning of the tape press C MEMORY so that the M mark appears before pressing REW Repeat Playback Your video recorder can automatically play back the whole tape 20 times repeatedly START PLAYBACK 1 Press PLAY ACTIVATE REPEAT PLAYBACK 2 Press PLAY and hold for over 5 seconds then release The Play indic...

Page 18: ... speed Picture quality of LP recordings will not be as high as SP recordings START RECORDING 4 Press and hold RECORD and PLAY on the remote control or press RECORD on the recorder PAUSE RESUME RECORDING 5 Press PAUSE Press PLAY to resume recording STOP RECORDING 6 Press STOP on the remote control or STOP EJECT on the recorder Then press STOP EJECT to remove the cassette q SP LP 3 STOP EJECT 6 P A ...

Page 19: ...lets you record for from 30 minutes to 6 hours selectable in 30 min increments and shuts the recorder off after recording is finished START RECORDING 1 Press RECORD on the recorder ENGAGE ITR MODE 2 Press RECORD again blinks and 0 30 appears on the front display panel SET RECORDING DURATION 3 If you want to record for more than 30 minutes press RECORD to extend the time Each press extends recordin...

Page 20: ...T then press PUSH JOG to set to ON RETURN TO NORMAL SCREEN 5 Press MENU START RECORDING 6 Press and hold RECORD and PLAY on the remote or RECORD on the recorder The recorder spends approximately 7 seconds assessing the condition of the tape then begins recording When the BEST indicator begins blinking that means adjustment is complete Pressing the recorder s RECORD button while BEST is displayed d...

Page 21: ...condition of the tape and after approximately 7 seconds re enters RECORD PAUSE 2 Press PLAY to start recording If you want to bypass the B E S T system and begin recording immediately set B E S T to OFF in step 4 on page 20 Playback The recorder assesses the quality of the tape once you initiate playback When watching a tape recorded with B E S T set to ON it is recommended that you leave B E S T ...

Page 22: ...the display panel Press CANCEL to backspace and input a valid PlusCode number If ERROR GUIDE PROG appears on the screen see ATTENTION Regarding Guide Program Number Set on page 23 TIMER RECORDING Before performing Video Plus Timer Recording Be sure to read Video Plus Setup Z pg 10 Insert a cassette with the safety tab in place The recorder will come on automatically Turn on the TV and select the V...

Page 23: ...eiver Users To timer record a satellite broadcast using Video Plus perform steps 1 6 and before the selected programme begins select the appropriate channel on the satellite receiver Then set the receiver s timer If your satellite receiver doesn t have a timer leave the unit s power switched on 6 1 2 4 5 3 6 8 0 7 9 2 4 1 3 OK WEEKLY TIMER 5 DAILY PUSH JOG NUMBER SP LP 4 MENU 6 TIMER ADD TIME ATTE...

Page 24: ... The current date appears on screen The date you enter appears in its place SP SP P1 START STOP SP ON DATE TV PROG 25 12 MENU EXIT P1 START STOP 21 00 SP ON DATE TV PROG 25 12 MENU EXIT TIMER RECORDING cont 5 1 2 4 5 3 6 8 0 7 9 2 4 1 3 START 2 3 PROG 1 4 S T O P D A T E Now available from some TV stations PDC Programme Delivery Control is a service designed to assure safe accurate timer recording...

Page 25: ...als Monday Friday Either WEEKLY or DAILY appears on the screen Pressing the button again makes the corresponding indication disappear q 1 2 4 5 3 6 8 0 7 9 2 4 1 3 OK WEEKLY TIMER TV PROG SP PDC P1 START STOP 21 00 22 00 SP ON DATE TV PROG 25 12 1 BBC 1 MENU EXIT SP LP 7 TIMER 9 8 6 9 D A I L Y NOTES You can programme this recorder to timer record as many as 8 programmes If you try to programme th...

Page 26: ...ion you input is deleted REVISE PROGRAMME INFORMATION 2 Input the appropriate data using the START STOP DATE and TV PROG buttons on the remote control TIMER RECORDING cont Timer Warning WARNING TIMER RECORDING TO START SOON CANCEL If you have programmed your recorder to timer record a programme or a series of programmes a warning appears on screen to tell you that the recording is to start in 5 mi...

Page 27: ... In this case make sure the mode is not engaged then set the tape speed manually during timer programming There may be some noise at the point on the tape where the recorder switches from SP to LP mode If you perform timer recording with both PDC and the Auto SP LP Timer activated and the programme goes beyond its originally scheduled length there may be times when the programme cannot be recorded...

Page 28: ...he recording deck When Using Your Video Recorder As The Recording Deck connect its AV2 IN or AV1 IN OUT connector to the source player SET RECORDING DECK S INPUT MODE 2 Set to AUX With this video recorder press NUMBER key 0 and or TV PROG to select depending on the connector being used AU 1 for the AV1 IN OUT connector or AU 2 for the AV2 IN connector START SOURCE PLAYER 3 Engage its Play mode STA...

Page 29: ...ver RF Cable provided 21 pin SCART Cable not provided Player RF Cable provided VIDEO CHAN NEL or AV mode 21 pin SCART Cable not provided Another recorder Another recorder 21 pin SCART Cable not provided Player Your recorder Your recorder TV Receiver TV Receiver Recorder Recorder Player RF Cable provided VIDEO CHAN NEL or AV mode VIDEO CHAN NEL or AV mode VIDEO CHAN NEL or AV mode ...

Page 30: ...O OUT connectors to the recorder s rear panel AV2 IN or AV1 IN OUT connectors via the optional cable adapter When using a Hi Fi camcorder connect its AUDIO OUT L connector to the recorder s rear panel AV2 IN or AV1 IN OUT connectors via the optional cable adapter SET RECORDER S INPUT MODE 2 For HR J745EK owners Press NUMBER key 0 and or TV PROG so that F AU appears in place of a preset position nu...

Page 31: ...can record them independently of the TV set and play them back through the connected stereo system When listening to sound through the connected stereo system turn the TV s volume down completely CAUTIONS This recorder has a dynamic range of more than 80 dB with regards to its Hi Fi audio capability It is recommended that you check the maximum level if you are going to listen to the Hi Fi audio si...

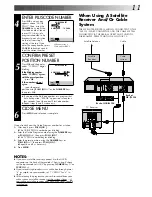
Page 32: ... simple connection to a satellite receiver NOTES When connecting your recorder to a TV equipped with 21 pin SCART connectors follow the illustration above using the cables shown in gray For details check your satellite receiver s instruction manual Satellite Receiver Unit Mains outlet Satellite Cable Outdoor Unit Aerial Back of HR J745EK Back of HR J249EK TV Aerial cable ANT IN RF OUT ...

Page 33: ...33 RF OUT ANT IN PAUSE EXT 2 EXT 1 Back of TV Aerial terminal 21 pin SCART connectors ...

Page 34: ...SPATIALIZER CANCEL ST NICAM HI FI M 1 23 45 NORM REMAIN 1 00 0 1 3 14 2 5 6 7 9 11 13 15 10 12 8 4 SPECIAL FEATURES On Screen Dispiay NOTES When you use this recorder as the player for editing be sure to set O S D to OFF before starting During playback the operation mode indicators may be disturbed depending on the type of tape being used A B CODE A U D I O M O N I T O R FF REW You can choose whet...

Page 35: ...el as required To listen to the Standard regular monaural audio while receiving a NICAM broadcast press AUDIO MONITOR until NORM appears on the front display panel Tape Position Indicator The tape position indicator appears on screen when from the Stop mode you press FF REW or perform an Index Search The position of 5 in relation to 0 beginning or end shows you where you are on the tape O S D Z pg...

Page 36: ...ing down enter your TV s brand code using the NUMBER keys then press STOP JVC has four codes If the TV does not function with one code try entering another You don t have to repeat this step until you replace your remote control s batteries TRY OPERATING TV 2 Press on the remote to turn the TV off If it goes off try other operations The button TV VCR button TV PROG button TV VOL fi button and Mute...

Page 37: ...this step until you replace your remote control s batteries TRY OPERATING SATELLITE RECEIVER 2 Press on the remote to turn the satellite receiver off If it goes off try other operations The button TV PROG button NUMBER buttons on the remote can all be used to operate the satellite receiver The NUMBER buttons will not work with JVC satellite receivers using code 13 With satellite receivers using Co...

Page 38: ...r to record TV programmes Auto Channel Set automatically assigns all receivable stations in your area TURN ON THE RECORDER 1 Press ACCESS MAIN MENU SCREEN 2 Press MENU twice PERFORM AUTO CHANNEL SET 3 Move the highlight bar pointer to AUTO CH SET by pressing PUSH JOG fi then press OK The Auto Set screen appears and remains on screen while the recorder searches for receivable stations As Auto Chann...

Page 39: ...tored in order and the station names may not be stored correctly 5 5 PR CH ID PR CH ID 01 26 BBC1 08 02 33 BBC2 09 03 23 ITV 10 04 30 CH4 11 05 37 CH5 12 06 13 07 14 5 EDIT CANCEL DELETE MENU EXIT 5 5 MENU PUSH JOG IMPORTANT Depending on the reception conditions the station names may not be stored correctly and auto Guide Program Number Set may not work properly If the Guide Program numbers are no...

Page 40: ...nual Ch Set screen appears INPUT CHANNEL 4 The number 21 appears blinking to the right of CH Press the NUMBER keys to input the channel number you want to store For fine tuning adjust ment press PUSH JOG until the channel number begins blinking then press PUSH JOG fi While tuning F or F appears ENTER NEW CHANNEL INFORMATION 5 Press OK and the Confirmation screen appears Repeat steps 3 through 5 as...

Page 41: ...W POSITION 2 Press PUSH JOG fi to move the station to the new preset position then press OK Example If you moved the station in position 3 to position 7 the stations originally in positions 4 7 each move up one space Repeat steps 1 and 2 as necessary CLOSE CONFIRMATION SCREEN 3 Press MENU SELECT ITEM 1 Press PUSH JOG fi until the item you want to delete begins blinking DELETE CHANNEL 2 Press CANCE...

Page 42: ...sary CLOSE CONFIRMATION SCREEN 4 Press MENU Set Stations A OK MENU TUNER SET cont NOTE First perform step 1 of the above procedure SELECT STATION NAME CHARACTER 2 Press PUSH JOG and the first letter of the station name begins blinking ENTER NEW CHARACTER 3 Press PUSH JOG fi to cycle through the characters A Z 0 9 space and stop when the desired one is indicated then press PUSH JOG to enter Enter t...

Page 43: ...1 Press PUSH JOG fi until the channel you want to tune begins blinking ACCESS MANUAL CH SET SCREEN 2 Press OK three times The Manual Ch Set screen appears PERFORM TUNING 3 Press PUSH JOG fi until the picture is its clearest Then press OK The Confirmation screen appears Repeat steps 1 through 3 as necessary CLOSE CONFIRMATION SCREEN 4 Press MENU Fine Tuning Channels Already Stored MENU ...

Page 44: ...RAI2 RAI2 RAI3 RAI3 RB1 RB1 RB3 RB3 Rikisutvarpid S RKPS RTBF 1 RTB1 RTBF 2 RTB2 RTE 1 RTE1 RTL RTL RTL 2 RTL2 RTP RTP STATION NAME ID SAT SAT 1 SAT1 Scottish TV SCOT SC4 SC4 SDR SDR SDR1 SDR1 SFB1 SFB1 SFB3 SFB3 SKY Sky One SKY1 Sky Net SKYN Sport SPRT SR 1 SR1 Super RTL SRTL STV Test STVT STV 1 STV1 STV 2 STV2 Suedwest3 SW3 SWF 1 SWF1 Schweiz4 SWZ4 TYNE TEES TEES Text TEXT TF1 TF1 TNT int TNT TR...

Page 45: ...lneston 62 55 59 65 Midlands Ridge Hill 22 28 25 32 Sutton Coldfield 46 40 43 50 The Wrekin 26 33 23 29 Waltham 58 64 61 54 North Belmont 22 28 25 32 Emley Moor 44 51 47 41 BBC1 BBC2 ITV CH4 North West Caldbeck 30 34 28 32 Winter Hill 55 62 59 65 North East Bilsdale West Moor 33 26 29 23 Chatton 39 45 49 42 Pontop Pike 58 64 61 54 Scotland Angus 57 63 60 53 Black Hill 40 46 43 50 Sandale 22 Caldbe...

Page 46: ... automatic adjustments at regular intervals by reading data from a PDC signal The Just Clock option appears in the Clock Set and Auto Clock Set screens and can be set ON or OFF the default setting is ON Press OK until the Just Clock setting begins blinking then press PUSH JOG fi to change the setting IMPORTANT If you turn off Just Clock off the accuracy of your recorder s built in clock may be red...

Page 47: ...he hour then press OK The minutes display begins blinking Repeat the procedure to set the minutes day month and year SET JUST CLOCK 5 The default setting is ON Set as desired by pressing PUSH JOG fi then press OK If you set to OFF you can disregard the next step as you won t be able to receive regular clock adjust ments SET CLOCK DATA SOURCE PRESET 6 The recorder is preset to receive clock setting...

Page 48: ... s channel selector is not set to the VIDEO channel the recorder s VIDEO channel has not been correctly set If you re using the AV connection the TV receiver is not set to the AV mode This is normal The automatic tracking mode is engaged The automatic tracking mode is engaged Automatic tracking is engaged The video heads may be dirty CORRECTIVE ACTION If you are using the RF OUT connec tion set th...

Page 49: ...gaged Timer recording is in progress The timer is engaged but there s no cassette loaded The loaded cassette has had its Record Safety tab removed TIMER has been pressed when there are no programs in memory or the timer record information has been programmed incorrectly The end of the tape was reached during timer recording The recorder s preset positions have been set incorrectly OTHER PROBLEMS C...

Page 50: ...computers External electronic noise or interference could cause malfunctioning In such cases switch the recorder off and unplug the mains power cord Then plug it in again and turn the recorder on Take out the cassette After checking the cassette operate the unit as usual RECORDING Q When I pause and then resume a recording the end of the recording before the pause is overlapped by the beginning of...

Page 51: ...scan system HR J249EK Signal to noise ratio 45 dB Horizontal resolution 250 lines Frequency range 70 Hz to 10 000 Hz Normal audio 20 Hz to 20 000 Hz Hi Fi audio HR J745EK only Input Output 21 pin scart connector x 2 IN OUT x 1 IN x 1 RCA connector x 1 IN x 1 OUT x 1 HR J745EK only SPECIFICATIONS TUNER TIMER TV channel storage capacity 99 positions AUX position AU Tuning system Frequency synthesize...

Page 52: ...corder or camcorder for editing Z pg 30 HR J745EK only 0 AUDIO Input Connector L enables easy connection of audio output mono from an other recorder camcorder or other source for editing Z pg 30 HR J745EK only AUDIO Input Connector R enables easy connection of audio output Hi Fi from another recorder camcorder or other source for editing Z pg 30 HR J745EK only AUTO SP LP TIMER Button engages Auto ...

Page 53: ...te recorder TV or second video recorder for dubbing Z pg 31 HR J745EK only 1 Mains Power Cord supplies power to recorder Z pg 4 2 ANT IN Connector enables connection of aerial Z pg 4 3 AV2 IN Connector enables connection of satellite receiver or second recorder input recordable when AU 2 selected Z pg 32 28 4 AV1 IN OUT Connector enables AV connec tion to TV or second recorder input recordable whe...

Page 54: ...ILL SLOW RECORD RECORD PAUSE PLAY FF REW VARIABLE SHUTTLE SEARCH 8 4 0 6 10 20dB NORM L R M SP LP EP REMAIN REVIEW 3 4 5 1 8 9 0 6 7 2 7 Instant REVIEW Indicator blinks after timer recording and shows how many programmes have been timer recorded Z pg 15 8 Audio Mode Indicator displays audio output mode currently selected Z pg 16 9 Cassette Loaded Mark lights once a cassette is inserted remains lit...

Page 55: ...g 9 46 7 Instant REVIEW Indicator blinks after timer recording and shows how many programmes have been timer recorded Z pg 15 8 Cassette Loaded Mark lights once a cassette is inserted remains lit until cassette ejected or power turned off 9 Tape Speed Indicators display mode of record ing light during Record or Play mode Z pg 18 0 Tape Remaining Time Indicator displays time remaining on tape when ...

Page 56: ...racking Button enables disables auto tracking mode during playback Z pg 14 Digit Entry Button is used in controlling connected TV Z pg 36 0 AUDIO MONITOR Button changes output sound mode Z pg 16 TV Mute Button mutes sound of con nected TV Z pg 36 Rewind REW Button rewinds the tape Z pg 12 initiates high speed reverse search Z pg 14 Play Button same as button on recorder Z pg 12 Record Button same ...

Page 57: ...Button same as button on recorder Z pg 13 p Stop Button same as button on recorder Z pg 12 Q PROG CHECK Button accesses Program screens displays to check the program that you have programmed next program s information screen appears each time button is pressed Z pg 26 W OK Button enters selections made in on screen menus Z pg 10 E TV VOL fi Button controls volume of con nected TV Z pg 36 Installin...

Page 58: ...MEMO ...

Page 59: ...MEMO ...

Page 60: ...VICTOR COMPANY OF JAPAN LIMITED ...

Reviews: