background image

CONTENTS

SAFETY FIRST

2

Safety Precautions .................................... 2

INSTALLING YOUR NEW RECORDER
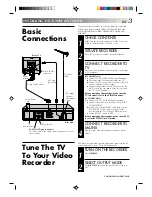
3

Basic Connections ................................... 3
Tune The TV To Your Video Recorder ...... 3
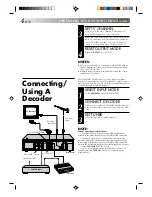
Connecting/Using A Decoder .................. 4

INITIAL SETTINGS

5

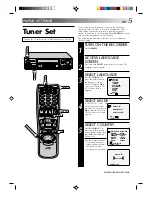
Tuner Set .................................................. 5
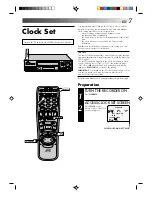
Clock Set ................................................. 7

PLAYBACK

9

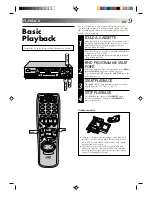
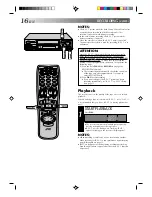
Basic Playback ......................................... 9
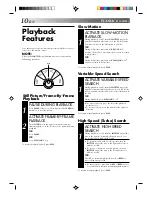
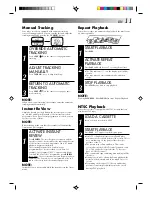
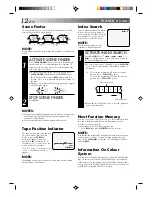
Playback Features .................................. 10
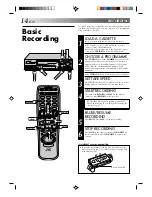
RECORDING

14

Basic Recording ..................................... 14
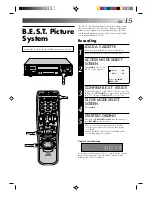
B.E.S.T. Picture System ........................... 15
On-Screen Displays ............................... 17
Recording Features ................................ 18

TIMER RECORDING

20

Information On ShowView .................... 20

Guide Prog. Number Set ..................... 20
When Using A Satellite Tuner .............. 21

ShowView Timer Recording ................... 22
Regular Timer Programming .................. 24

Check And Cancel Programmes .......... 25
Auto SP/LP Timer ................................. 25
PDC/VPS Recording ............................ 25
Timer Warning .................................... 25

EDITING

26

Edit To Or From Another Video
Recorder ................................................ 26
Edit From A Camcorder ......................... 27
Audio Dubbing ...................................... 28

REMOTE CONTROL

30

Multi-Brand Remote Control .................. 30

USING THE CONFIRMATION SCREEN

31

Storing Channels Manually .................... 31
Delete A Channel .................................. 31
Change Station Channel Position ........... 31
Set Stations ............................................ 32
Fine-Tuning Channels Already Stored .... 32

TV STATION AND ID LIST

33

TROUBLESHOOTING

34

QUESTIONS AND ANSWERS

36

INDEX

37

SPECIFICATIONS

Back Cover

HR-J638E/EH

VIDEO CASSETTE RECORDER

INSTRUCTIONS

PU30425-1883

PAL

FF

REW

SHUTTLE

AUTO SP / LP

TIMER

TIMER

VIDEO(MONO)L–AUDIO–R

SP/LP

– TV PROG. +

OPERATE

AUDIO 

DUBBING

TV PROG /

JOG

6

q

SP 
LP
EP

M

D

VIDEO

D

I T R

W

+8

4
0

6

10

–20dB
NORM

L 1

2 R

REMAIN

SCE

NE FIN

DER

PROG CHE

CK

TV VOL.

OPERATE

MODE

CLOCK

CH SET

C.MEMORY

DISPLAY

DAILY

AUX

ADD TIME

C.RESET

CANCEL

DATE

STOP

START

AUDIO MONITOR

(MONITOR)

TV/VIDEO

TV

VCR

TIMER

WEEKLY

A

1

2

4

5

3

6

8

0

7

9

B

PUSH JOG

MULTI BRAND

REMOTE CONTROL UNIT

TV

PROG.

PRO

G

OK

EXPRESS PROGRAMMING

STORE

2

1

3

ENGLISH

EN

Summary of Contents for HR-J638E

Page 1: ... Audio Dubbing 28 REMOTE CONTROL 30 Multi Brand Remote Control 30 USING THE CONFIRMATION SCREEN 31 Storing Channels Manually 31 Delete A Channel 31 Change Station Channel Position 31 Set Stations 32 Fine Tuning Channels Already Stored 32 TV STATION AND ID LIST 33 TROUBLESHOOTING 34 QUESTIONS AND ANSWERS 36 INDEX 37 SPECIFICATIONS Back Cover HR J638E EH VIDEO CASSETTE RECORDER INSTRUCTIONS PU30425 ...

Page 2: ... SHOCK HAZARD DO NOT EXPOSE THIS UNIT TO RAIN OR MOISTURE Safety Precautions n Only cassettes marked VHS can be used with this videorecorder n HQ VHS is compatible with existing VHS equipment n ShowView is a trademark applied for by Gemstar Develop ment Corporation The ShowView system is manufactured under licence from Gemstar Development Corporation PAL CAUTION n When you are not using the record...

Page 3: ...AV1 IN OUT socket on the rear panel of the recorder and the TV s 21 pin SCART connector c Set the RF TEST switch to OFF Before operating the recorder make sure the TV is set to the VIDEO or AV mode CONNECT RECORDER TO MAINS 4 Plug the end of the mains power cord into a mains outlet It s essential that your video recorder be properly connected Follow these steps carefully THESE STEPS MUST BE COM PL...

Page 4: ...21 pin SCART cable SET TUNER 3 Follow the procedure starting on page 5 NOTE When Connecting A Satellite Tuner if you don t have a decoder connect the satellite tuner directly to the video recorder s AV2 IN DECODER connector if you have a decoder first connect the decoder to the decoder input of the satellite tuner then connect the satellite tuner s output to the recorder s AV2 IN DECODER connector...

Page 5: ...CT MODE 4 AUTO CH SET is the necessary mode for this procedure so simply press OK to enter the selection The Country select screen appears SELECT COUNTRY 5 Press PUSH JOG fi to place the pointer next to your country s name then press OK to initiate Auto Channel Set As the recorder searches for receivable stations it displays broadcasts from the stations for a few seconds as it locates them Tuner S...

Page 6: ...alternately for 5 seconds each The stations located in the selected country appear at the top of the list RETURN TO NORMAL SCREEN 7 Press CH SET Depending on the reception conditions the stations may not be stored in order and the station names may not be stored correctly Using the Confirmation screen you can skip or add channel positions enter station names and perform other operations Refer to p...

Page 7: ... The Just Clock option appears in the Clock Set and Auto Clock screens and can be set ON or OFF the default setting is ON Press OK until the Just Clock setting begins blinking then press PUSH JOG fi to change the setting IMPORTANT If you turn off Just Clock off the accuracy of your recorder s built in clock may be reduced which could adversely effect timer recording Both Auto and Manual clock sett...

Page 8: ...on 1 Press PUSH JOG fi to set the channel position to the number representing the station transmitting clock setting data then press OK START CLOCK OPERATION 6 Press CLOCK 6 q 1 2 4 5 3 6 8 0 7 9 1 3 2 OK Manual Clock Set NOTES Auto Clock and Just Clock require a PDC signal and will not operate with a VPS signal Just Clock when set to ON enables adjustment of the recorder s built in clock every ho...

Page 9: ...ess REW or turn the SHUTTLE ring to the left and release it To go forward press FF or turn the SHUTTLE ring to the right and release it START PLAYBACK 3 Press PLAY BEST appears blinking in the recorder s display panel for 5 seconds Z pg 15 STOP PLAYBACK 4 Press STOP on the remote or STOP EJECT on the recorder s front panel Then press STOP EJECT to remove the cassette Compact VHS camcorder recordin...

Page 10: ... all the way to the right for forward high speed search or to the left for reverse high speed search For forward search with a visible picture turn the SHUTTLE ring all the way to the right and release it within 1 second For reverse search with a visible picture turn the SHUTTLE ring all the way to the left and release it within 1 second OR Press FF for forward high speed search or REW for reverse...

Page 11: ...e playback the picture will be distorted and there may be a loss of colour Depending on the type of TV the top and bottom portions of superimposed displays may be cut off during NTSC playback OVERRIDE AUTOMATIC TRACKING 1 Press SP LP on the remote to engage manual tracking ADJUST TRACKING MANUALLY 2 Press TV PROG or to adjust tracking RETURN TO AUTOMATIC TRACKING 3 Press SP LP on the remote to re ...

Page 12: ...omatically when the counter reads 0 00 00 instead of at the beginning of the tape press C MEMORY so that the M mark appears before pressing REW ACTIVATE SCENE FINDER 1 Press SCENE FINDER The recorder starts forward high speed search for 5 seconds and then fast forwards 10 minutes on the counter This cycle is repeated until the end of the tape is reached To start Scene Finder in the reverse directi...

Page 13: ...ar or the display may blink on occasion Soundtrack Selection Your video recorder is capable of recording three soundtracks HI FI L HI FI R and NORM and will play back the one you select During Playback Pressing AUDIO MONITOR on the remote control changes the soundtrack being played back as follows NOTES L R should normally be selected In this mode Hi Fi stereo tapes are played back in stereo and t...

Page 14: ...e used to select a channel SET TAPE SPEED 3 Press SP LP Check the SP LP indicator on the recorder display panel to confirm the selected tape speed START RECORDING 4 Press and hold RECORD and PLAY on the remote control or press RECORD on the recorder PAUSE RESUME RECORDING 5 Press PAUSE Press PLAY to resume recording STOP RECORDING 6 Press STOP on the remote control or STOP EJECT on the recorder Th...

Page 15: ... is the case go to step 4 If not press PUSH JOGfi to place the pointer next to B E S T then press PUSH JOG to set to ON CLOSE MODE SELECT SCREEN 4 Press MODE START RECORDING 5 Press and hold RECORD and PLAY on the remote or press RECORD on the recorder The recorder spends approximately 7 seconds assessing the condition of the tape then begins recording When the BEST indicator begins blinking that ...

Page 16: ...RECORD PAUSE mode The recorder then automatically checks the condition of the tape and after approximately 7 seconds re enters RECORD PAUSE 2 Press PLAY to start recording If you want to bypass the B E S T system and begin recording immediately set B E S T to OFF in step 3 on page 15 Playback The recorder assesses the quality of the tape once you initiate playback When watching a tape recorded wit...

Page 17: ...ter Memory indicator 11 Audio mode display 12 Tape remaining time indicator 13 Timer warning display q6 PR 12 ABCD SP 23 59 31 12 96 WARNING TIMER RECORDING TO START SOON CANCEL ST HIFI M 9 59 59 NORM REMAIN 9 59 0 4 3 8 12 2 5 6 13 1 TURN ON THE RECORDER 1 Press OPERATE ACCESS MODE SELECT SCREEN 2 Press MODE The O S D B E S T screen appears SELECT MODE 3 The pointer should already be next to O S ...

Page 18: ...equired To listen to the Standard regular monaural audio while receiving a NICAM broadcast press AUDIO MONITOR until NORM appears on the front display panel J638EH only NOTE O S D must be set to ON or the on screen displays will not appear Z pg 17 A U D I O M O N I T O R To Record NICAM Stereo And Bilingual Programmes J638EH only The NICAM audio programme will be recorded on the Hi Fi audio track ...

Page 19: ...ding ITR This easy method lets you record for from 30 minutes to 6 hours selectable in 30 min increments and shuts the recorder off after recording is finished START RECORDING 1 Press RECORD on the recorder ENGAGE ITR MODE 2 Press RECORD again ITR blinks and 0 30 appears on the front display panel SET RECORDING DURATION 3 If you want to record for more than 30 minutes press RECORD to extend the ti...

Page 20: ...station names and channel positions may be incorrect if you stored or skipped channels In this case re perform Guide Prog Number setting 6 q 1 2 4 5 3 6 8 0 7 9 1 3 2 OK NUMBER CH SET CANCEL Guide Prog Number Set MAKE LIST OF STORED STATION NAMES AND CHANNEL POSITIONS 1 Ex ACCESS CH SET MODE MENU SCREEN 2 Press and hold CH SET for over 2 seconds The Language screen appears Press OK to access the C...

Page 21: ...T When entering a ShowView number for ARD When Using A Satellite Tuner Preparation 1 Connect the satellite tuner to the AV2 IN DECODER connector on the rear of your recorder 2 Set the AV2 SELECT switch to AV2 To Record Satellite Broadcasts 1 Select the appropriate channel on the satellite tuner 2 Press NUMBER key 0 to set your recorder s input mode to AUX2 3 Start recording Z pg 14 steps 3 6 To Re...

Page 22: ... TIMER PROGRAM MING SCREEN 1 Press PROG The front display panel looks like this ENTER SHOWVIEW NUMBER 2 Press the NUMBER keys to enter the ShowView number of a programme you wish to record If you make a mistake press CANCEL and then input the correct number The ShowView number you enter appears on the front display panel ACCESS SHOWVIEW PROGRAM SCREEN 3 Press OK and the ShowView Program screen app...

Page 23: ...ess the Stop time is delayed by 5 minutes meaning that 5 minutes of recording time is added You can easily compensate for anticipated programme schedule delays this way To Timer Record Weekly Or Daily Serials after pressing OK in step 3 press WEEKLY NUMBER key 9 for weekly serials or DAILY NUMBER key 8 for daily serials Monday Friday You can programme this recorder to timer record as many as 8 pro...

Page 24: ...any as 8 programmes If you try to programme the recorder to record a ninth PROGRAM FULL appears on screen and FULL appears on the front display panel To record the extra programme you must first cancel any unnecessary programmes Z pg 25 If you don t know the SowView number for the programme you wish to record use the following procedure to set your recorder to timer record the programme Remember t...

Page 25: ...recording with both PDC VPS and the Auto SP LP Timer activated and the programme goes beyond its originally scheduled length there may be times when the programme cannot be recorded in its entirety Approximately 150 minutes Approximately 60 minutes Total 210 minutes SP mode LP mode ACCESS PROGRAMME SCREEN 1 Press PROG CHECK Each time you press the next program s information appears Press OK and wa...

Page 26: ...der press NUMBER Key 0 or TV PROG to select depending on the connector being used AU 1 for the AV1 IN OUT connector or AU 2 for the AV2 IN connector When using the AV2 IN connector make sure the AV2 SELECT switch is set to AV2 START SOURCE PLAYER 3 Engage its Play mode START RECORDING DECK 4 Engage its Record mode NOTE All necessary cables can be obtained from your dealer 1 2 4 5 3 6 8 0 7 9 1 3 2...

Page 27: ...efer to the camcorder s instruction manual for operating procedure SET RECORDER S INPUT MODE 2 Press NUMBER key 0 F AU appears in place of a channel number START CAMCORDER 3 Engage its Play mode START RECORDER 4 Engage its Record mode NOTE Connections made to the front panel AUDIO VIDEO input connectors automatically override those made to the rear panel AUDIO VIDEO input connectors 1 2 4 5 3 6 8 ...

Page 28: ...der and press PAUSE when you find the point where you want to start dubbing ENGAGE AUDIO DUBBING 4 Press AUDIO DUBBING To perform audio dubbbing with audio mixing press AUDIO MONITOR to select L R at this point Audio dubbing with audio mixing is not possible if you re using a monaural audio component or if you don t have an audio mixer START DUBBING 5 Engage the audio component s Play mode then pr...

Page 29: ... dubbing Audio dubbing is also possible using the rear panel AV1 IN OUT or AV2 IN connector When using these connectors make sure to select the correct input mode in step 2 Connections made to the recorder s front panel are given priority over those made to the rear panel connectors Audio dubbing cannot be performed on a cassette that has had its record safety tab removed When playing back an audi...

Page 30: ...ONTROL Control Your TV Using Addi tional Buttons The NUMBER keys on the remote can also be used to select the TV s channel by setting the remote control to the TV mode 1 Set the TV VCR switch to TV 2 Use the NUMBER keys and the DIGIT ENTRY button the PUSH JOG button the DISPLAY button or the OK button to select the TV s channel With televisions under Code 01 03 04 06 07 10 or 11 the DIGIT ENTRY bu...

Page 31: ...SITION 3 Press PUSH JOG fi until an open position in which you want to store a channel begins blinking then press OK The Manual Ch Set screen appears INPUT CHANNEL 4 The number 01 appears blinking beneath CH Press the NUMBER keys to input the channel number you want to store For fine tuning adjustment press PUSH JOG until the item beneath CH begins blinking then press PUSH JOG fi While tuning F or...

Page 32: ...the first letter of the station name begins blinking ENTER NEW CHARACTER 3 Press PUSH JOG fi to cycle through the characters A Z 0 9 space and stop when the desired one is indicated then press PUSH JOG to enter Enter the remaining characters the same way maximum of 4 After entering all characters press OK Repeat steps 1 through 3 as necessary If you make a mistake press PUSH JOG until the incorrec...

Page 33: ...UPER NDR NDR NED1 NED1 NED2 NED2 NED3 NED3 NEWS NRK NRK ODE ODEON ORF1 ORF1 ID STATION NAME ORF2 ORF2 ORF3 ORF3 OWL3 OWL3 PREM PREMIERE PRO7 PRO7 RAI1 RAI1 RAI2 RAI2 RAI3 RAI3 RET4 RETE4 21 TELE21 RTBF RTBF1 or 2 RTL RTL RTL2 RTL2 RTL4 RTL4 RTP RTP S4 SCHWEIZ4 SAT1 SAT1 SBS SBS SHOW SHOW SIC SOCIEDADE SKY SKY CHANNEL SKYN SKY NEWS SPRT SPORT SRTL SUPER RTL STAR STAR TV SVT1 SVT1 SVT2 SVT2 SW3 SUED...

Page 34: ... 7 The playback picture is blurred or interrupted while TV broadcasts are clear POSSIBLE CAUSE If you re using the RF OUT connec tion the TV receiver s channel selector is set to the wrong video channel If you re using the AV connection the TV receiver is not set to the AV mode This is normal The automatic tracking mode is engaged The automatic tracking mode is engaged Automatic tracking is engage...

Page 35: ...cally ejected and and on the display panel won t stop blinking 5 blinks for 10 seconds and the Timer mode is disengaged 6 The cassette is automatically ejected the power shuts off and and won t stop blinking 7 ShowView does not timer record properly POSSIBLE CAUSE The clock and or the timer have been set incorrectly The timer is not engaged Timer recording is in progress The timer is engaged but t...

Page 36: ...recording the end of the recording before the pause is overlapped by the beginning of the continuation of recording Why does this happen A This is normal It reduces distortion at the pause and resume points Q Can the video recorder indefinitely remain in the Record Pause mode A No The video recorder goes to its Stop mode auto matically after 5 minutes to protect the heads Q What happens if the tap...

Page 37: ...RD Button Z pg 14 6 PAUSE Button Z pg 10 7 TV PROG Dial Z pg 14 JOG Dial Z pg 10 8 SHUTTLE Ring Z pg 10 9 VIDEO and AUDIO Input Connectors Z pg 27 0 TV PROG Buttons Z pg 5 SP LP Tape Speed Button Z pg 14 Infrared Beam Receiving Window Display Panel Z pg 38 REVIEW Button Z pg 11 AUTO SP LP TIMER Button Z pg 25 STOP EJECT Button Z pg 9 PLAY Button Z pg 9 VIDEO MONO L AUDIO R FF REW SHUTTLE AUTO SP L...

Page 38: ...tte Loaded Mark Instant Timer Recording Z pg 19 Tape Speed Indicators Z pg 14 Timer Indicator Z pg 23 Clock Counter Tape Remaining Time Display Z pg 7 Channel Mode Display Z pg 5 Audio Mode Indicator Z pg 13 PLAY STILL FORWARD SLOW FF STILL REVERSE SLOW REW RECORD FF VARIABLE RECORD PAUSE SHUTTLE SEARCH REW VARIABLE AUDIO SHUTTLE SEARCH DUBBING REVERSE PLAY AUDIO DUBBING PAUSE INDEX cont The indic...

Page 39: ...DISPLAY Button Z pg 13 q MODE Button Z pg 15 w ADD TIME Button Z pg 23 e DAILY Button Z pg 23 r WEEKLY Button Z pg 23 t AUX Button Z pg 26 y TIMER Button Z pg 23 u TV PROG Button Z pg 5 i DATE Button Z pg 24 o TV VCR Switch Z pg 30 p TV VIDEO Button Z pg 5 Q Fast Forward FF Button Z pg 9 W PAUSE Button Z pg 10 E STOP Button Z pg 9 R PROG CHECK Button Z pg 25 T OK Button Z pg 5 Y TV VOL fi Button Z...

Page 40: ...ng system DA4 Double Azimuth head helical scan system Signal to noise ratio 45 dB Horizontal resolution 250 lines Frequency range 70 Hz to 10 000 Hz Normal audio 20 Hz to 20 000 Hz Hi Fi audio Input Output 21 pin scart connectors IN OUT x 1 IN DECODER x 1 RCA connectors VIDEO IN x 1 AUDIO IN x 1 AUDIO OUT x 1 TUNER TIMER TV channel storage capacity 99 positions AUX position AU Tuning system Freque...

Reviews: