background image

Page 1

May 29, 2003 3:24 pm

— 1 —

ENGLISH

EN

VIDEO CASSETTE RECORDER

HR-J798AH

INSTRUCTIONS

LPT0796-001A

Printed in China

COPYRIGHT © 2003 VICTOR COMPANY OF JAPAN, LTD.

0603-MN-PJ-BJ

CONTENTS

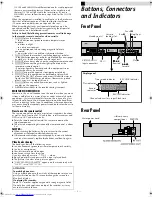
Buttons, Connectors and Indicators................................................ 2

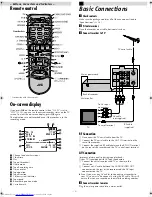
Basic Connections ......................................................................... 3

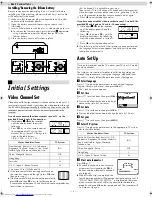
Initial Settings ............................................................................. 4 

Video Channel Set ................................................................. 4
Auto Set Up ........................................................................... 4
Language Setting.................................................................... 5
Clock Setting.......................................................................... 5

Playback...................................................................................... 5

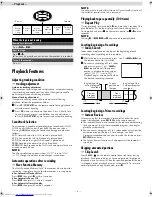
Basic Playback....................................................................... 5
Playback Features .................................................................. 6

Recording .................................................................................... 7

Basic Recording ..................................................................... 7
Recording Features ................................................................ 7

Timer Recording ........................................................................... 8

Express Timer Programing ....................................................... 9
Checking, cancelling or changing program settings ................. 9
Program overlap warning display........................................... 9

Other Functions.......................................................................... 10

Checking tape position ........................................................ 10
Changing display information .............................................. 10
Function settings .................................................................. 10
Satellite Auto Recording....................................................... 11
Multi-Brand Remote Control ................................................ 11
Changing Remote Control Code........................................... 12

Editing....................................................................................... 12

Information on Multi-System Compatibility .................................. 13

Tuner Setting ............................................................................. 14

Specifications............................................................................. 16

Safety Precautions

The rating plate and the safety caution are on the rear of the unit.

WARNING: DANGEROUS VOLTAGE INSIDE
WARNING: TO PREVENT FIRE OR SHOCK HAZARD, DO NOT 

EXPOSE THIS UNIT TO RAIN OR MOISTURE.

Cassettes marked “VHS” (or “S-VHS”) can be used with this video 

cassette recorder. However, S-VHS recording is not possible with 

this model.

This model is equipped with SQPB (S-VHS QUASI PLAYBACK) 

that makes it possible to play back S-VHS recordings in the SP 

mode with regular VHS resolution.

HQ VHS is compatible with existing VHS equipment.

G-

CODE

 is a trademark of Gemstar Development Corporation and 

is registered in the following countries: Australia, China, Hong 

Kong, Japan, South Korea, New Zealand, and Taiwan. S

HOW

V

IEW


is a trademark of Gemstar Development Corporation and is 

registered in the following countries: Austria, Belgium, Czech 

Republic, Denmark, Finland, France, Germany, Greece, 

Hungary, Iceland, Italy, Luxembourg, Netherlands, Norway, 

Poland, Portugal, Russia, Slovakia, South Africa, Spain, Sweden 

and Switzerland. The G-

CODE

/S

HOW

V

IEW

 system is manufactured 

under license from Gemstar Development Corporation.

CAUTION

When you are not using the recorder for a long period of 

time, it is recommended that you disconnect the power cord 

from the mains outlet.

Dangerous voltage inside. Refer internal servicing to qualified 

service personnel. To prevent electric shock or fire hazard, 

remove the power cord from the mains outlet prior to 

connecting or disconnecting any signal lead or aerial.

ATTENTION

1. This recorder can also receive SECAM colour television signals 

for recording and playback.

2. Recordings made of SECAM television signals produce 

monochrome pictures if played back on another video recorder 

of SECAM standard, or do not produce normal colour pictures if 

played back on another video recorder of PAL standard.

3. SECAM prerecorded cassettes or recordings made with a SECAM 

video recorder produce monochrome pictures when played 

back with this recorder.

POWER SYSTEM:

This set operates on voltage of AC110 V – 240 V

d

 (Rating), AC90 V – 

260 V

d

 (Operating), 50 Hz/60 Hz with automatic switching.

Caution on Replaceable lithium battery

The battery used in this device may present a fire or chemical burn 

hazard if mistreated. Do not recharge, disassemble, heat above 

100°C or incinerate.

Replace battery with Panasonic (Matsushita Electric), Sanyo, Sony 

or Maxell CR2025. Danger of explosion or Risk of fire if the battery 

is incorrectly replaced.

Dispose of used battery promptly.

Keep away from children.

Do not disassemble and do not dispose of in fire.

IMPORTANT

Please read the various precautions on this page before installing 

or operating the recorder.

It should be noted that it may be unlawful to re-record pre-

recorded tapes, records, or discs without the consent of the owner 

of copyright in the sound or video recording, broadcast or cable 

programme and in any literary, dramatic, musical, or artistic work 

embodied therein.

The 

1

 button does not completely shut off mains power from the 

unit, but switches operating current on and off. “

`

“ shows electrical 

power standby and “ 

!

 “ shows ON.

Video tapes recorded with this video recorder in the LP (Long Play) 

or EP (Extended Play) mode cannot be played back on a single-

speed video recorder.

HR-J798AH_EN.fm  Page 1  Thursday, May 29, 2003  3:24 PM

Summary of Contents for HR-J798AH

Page 1: ...CAUTION 䡲 When you are not using the recorder for a long period of time it is recommended that you disconnect the power cord from the mains outlet 䡲 Dangerous voltage inside Refer internal servicing to qualified service personnel To prevent electric shock or fire hazard remove the power cord from the mains outlet prior to connecting or disconnecting any signal lead or aerial ATTENTION 1 This recor...

Page 2: ...ve it from a cold place to a warm place or under extremely humid conditions just as water droplets form on the surface of a glass filled with cold liquid Moisture condensation on the head drum will cause damage to the tape In conditions where condensation may occur keep the recorder s power turned on for a few hours to let the moisture dry How to use the remote control The remote control can opera...

Page 3: ...V aerial cable to the ANT IN terminal on the rear of the recorder C Connect the supplied RF cable between the RF OUT terminal on the rear of the recorder and the TV s aerial input terminal AV Connection improves picture quality during tape playback If your TV is equipped with AV input connectors A Connect the aerial recorder and TV as shown in the illustration B Connect an AV cable between the AUD...

Page 4: ...ecorder until the display panel shows the following B Press OK then press PR until the display panel shows the following Now the video channel is set to off C Press OK to finish video channel set If Auto Set Up or Tuner Set has not previously been performed the Language Select screen appears and Auto Set Up function takes place automatically Auto Set Up The Auto Set Up function simplifies installa...

Page 5: ... screen display is reset automatically Select the appropriate colour system with PAL MESECAM and NTSC in Function settings If the cassette s record safety tab has been removed playback begins automatically B Start playback Press 4 MENU EXIT MAIN MENU FUNCTION SET TUNER SET INITIAL SET MENU EXIT INITIAL SET CLOCK SET LANGUAGE G CODE SHOWVIEW SETUP MENU EXIT INITIAL SET CLOCK SET LANGUAGE G CODE SHO...

Page 6: ...he play indicator on the display panel starts blinking slowly To stop playback press 8 on the remote control or 0on the recorder NOTE Pressing 4 3 5or 9 also cancels repeat playback Locating beginning of recordings Index Search Index codes are placed on the tape at the beginning of each recording when recording on this recorder A While the tape is not running press w or e 2or 6 on the remote contr...

Page 7: ...a Digital stereo sound decoder NICAM as well making reception of stereo and bilingual broadcasts possible When the channel is changed the type of broadcast being received will be displayed on the TV screen for a few seconds To listen to a stereo programme press AUDIO until HIFI L R appears on the screen To listen to a bilingual programme press AUDIO until HIFI L or HIFI R appears on the screen To ...

Page 8: ... Guide Prog number Press rt or the Number keys to select the Guide Program number as shown in the TV listing then press OK or e D Input receiving channel number Press rt or the Number keys to select the number of the channel on which the Guide Program number s broadcasts are received then press OK or e If the satellite broadcast is received on your recorder s auxiliary channel L 1 or F 1 select L ...

Page 9: ...E Return to normal screen Press repeatedly until no Program screen is shown F Reengage timer recording standby mode Press The recorder turns off automatically and is displayed on the display panel When AUTO TIMER is set to ON 墌 10 the timer recording standby mode automatically resumes when you turn off the recorder Program overlap warning display If PROGRAM OVERLAPPED appears you have another prog...

Page 10: ...ntaining much noise NOTE Select EDIT when you are editing tapes After you finish editing the tapes select AUTO 䡵 PAL MESECAM AUTO PAL MESECAM Select the appropriate colour system for recording or playback AUTO Usually set to this mode The appropriate colour system PAL or MESECAM will be selected depending on the playback or recording signals If the AUTO mode does not work properly select either of...

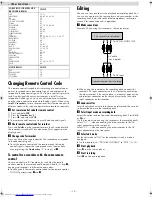
Page 11: ...TV NOTES Some unit s brands have more than one code If the unit does not function with a specified code try other codes Depending on the type of unit some or all functions cannot be operated using this remote control It s not possible to operate a unit not equipped with a remote sensor It s not possible to set the remote control for two units at the same time Once you have set the remote control t...

Page 12: ...ce player and your recorder as the recording deck Refer also to the other components instruction manuals for connection and its operations A Make connections Example When using this recorder as the source player When using this recorder as the recording deck connect this recorder s AV input connectors to the AV output connectors on the other recorder If the source player is monaural connect the au...

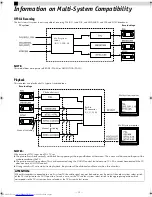
Page 13: ...cted if the TV does not have a V HOLD control During search still or frame by frame playback the picture will be distorted and there may be a loss of colour ATTENTION When this recorder is connected to a multi system TV the audio signal may not be heard or may be noisy if the colour system select switch of the TV is adjusted to the AUTO position In such a case set the TV s colour system select swi...

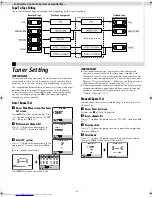
Page 14: ...or those channels may be incorrect Select the appropriate TV system for those channels Refer to TV System Selection When you see the picture but the audio can t be heard or sounds unnatural 墌 15 Since your recorder memorises all detected stations even if the reception condition is poor some of those stored stations may produce a noisy picture To delete those stations refer to Delete A Channel 墌 15...

Page 15: ...s rt to place the pointer next to CH EDIT then press OK or e C Select channel to fine tune Press rt until the channel you want to tune begins blinking then press OK twice The FRQ number for that channel starts blinking D Perform tuning Press rt until the picture becomes clearer then press OK or e Repeat steps C and D as necessary E Return to normal screen Press MENU TV System Selection When you se...

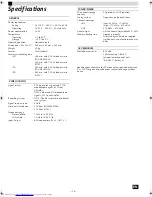
Page 16: ... PAL type colour signal and CCIR monochrome signal 625 lines 50 fields NTSC colour and EIA monochrome signals 525 lines 60 fields Recording system DA 4 Double Azimuth head helical scan system Signal to noise ratio 45 dB Horizontal resolution 250 lines PAL MESECAM 220 lines NTSC Frequency range Normal audio 70 Hz to 10 000 Hz Hi Fi audio 20 Hz to 20 000 Hz Input Output RCA connectors IN x 2 OUT x 1...

Reviews: