background image

INSTRUCTIONS

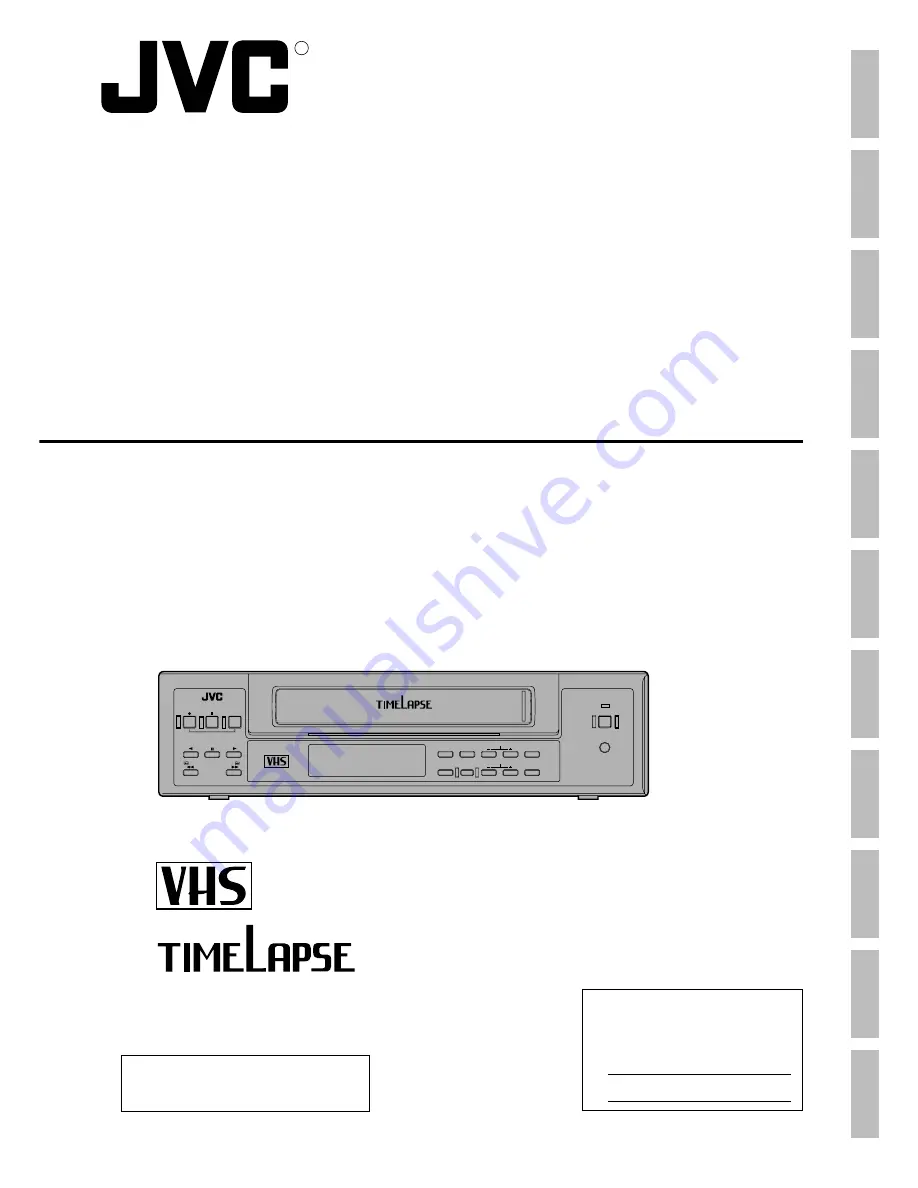
VIDEO CASSETTE RECORDER

SR-L910UA

R

SL96150

REC

PLAY

FF

REW

REVERSE

PAUSE/

STILL

REC

CHECK

STOP/EJECT

COUNT/

CLOCK

TIME

MODE

TIMER

REC

AL/PL

RESET

MENU

VIDEO CASSETTE RECORDER

SHIFT/TRACKING

SET/V.LOCK

RESET

/CANCEL

OPERATE

SR-L910UA

OPE. LOCK

For Customer Use:
     
Enter below the Serial No. which is
     located on the rear of cabinet. Retain
     this information for future reference.
     
     Model No.            SR-L910UA
     
     
Serial No.

Before operating this unit, please read
the instructions carefully to ensure the 
best possible performance.

INTRODUCTION

CONTROLS AND

CONNECTORS

PREPARATION

RECORDING

PLAYBACK AND

SPECIAL-EFFECTS

PLAYBACK

TROUBLE-

SHOOTING

CONNECTIONS

MONITOR

ON-SCREEN

DISPLAY

SETTING OF THE

FUNCTION MENU

SWITCHES

APPENDIXES

OPTIONAL SA-K97U

RS-232C

INTERFACE BOARD

Summary of Contents for SR-L910UA

Page 1: ...low the Serial No which is located on the rear of cabinet Retain this information for future reference Model No SR L910UA Serial No Before operating this unit please read the instructions carefully to ensure the best possible performance INTRODUCTION CONTROLS AND CONNECTORS PREPARATION RECORDING PLAYBACK AND SPECIAL EFFECTS PLAYBACK TROUBLE SHOOTING CONNECTIONS MONITOR ON SCREEN DISPLAY SETTING OF...

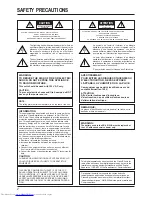
Page 2: ...AR L UTILISATEUR SE REFERER A UN AGENT QUALIFIE EN CAS DE PROBLEME CAUTION TO REDUCE THE RISK OF ELECTRIC SHOCK DO NOT REMOVE COVER OR BACK NO USER SERVICEABLE PARTS INDIDE REFER SERVICING TO QUALIFIED SERVICE PERSONNEL WARNING TO REDUCE THE RISK OF FIRE OR ELECTRIC SHOCK DO NOT EXPOSE THIS APPLIANCE TO RAIN OR MOISTURE This unit should be used with 120 V AC only CAUTION To prevent electric shocks...

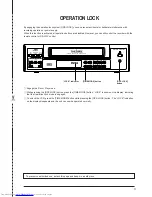
Page 3: ... buttons are disabled However you can still control the recorder with the remote control or RS 232C control OPERATION LOCK 1 Engage the Rec or Play mode 2 While pressing the OPE LOCK button press the TIME MODE button LOCK is shown on the display indicating that the Operation Lock mode is engaged 3 To unlock the VCR press the TIME MODE button while pressing the OPE LOCK button The LOCK indication o...

Page 4: ...4 ...

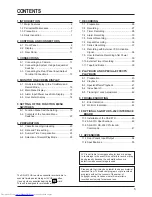
Page 5: ...Activation Signal 38 7 9 How to Restore Recording After Power Failure 39 7 10 External Timer Recording 39 7 11 Tape End Buzzer 39 8 PLAYBACK AND SPECIAL EFFECTS PLAYBACK 8 1 Preparation 40 8 2 Playback 40 8 3 Special Effects Playback 41 8 4 Index Search 42 8 5 Tracking V Lock Adjustment 42 9 TROUBLESHOOTING 9 1 Error Indication 43 9 2 No Error Indication 44 10 OPTIONAL SA K97U RS 232C INTERFACE BO...

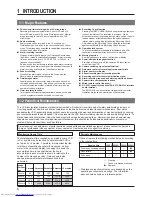
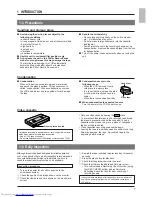
Page 6: ...ator Superimposes the year month date minute and second on the image during recording Also allows you to use the menu screen to display the number of alarms alarm time and the number of the power failures 5 Timer recording function Two types of timer recording are available based on the date up to 8 programs or based on the day of the week 1 1 Major Features 1 INTRODUCTION 1 2 Periodical Maintenan...

Page 7: ... tape is required Use a T 120 tape or shorter Do not use extended tapes 130 minutes or more such as T 130 Erasure prevention tab Condensation 5 Condensation occurs in the following cases When the VCR is moved from a cold place to a warm place In a room that has just been heated or in an area directly exposed to a cooler When there is excessive humidity 5 When condensation is expected to occur Turn...

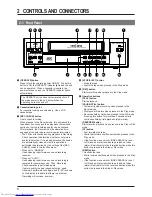
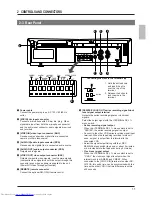
Page 8: ...in judged defective head cleaning is performed once again and E 09 is shown on the display to indicate that there is a problem Recording will continue however 4 STOP EJECT button Stops the tape Ejects the tape when pressed in the Stop mode 5 REC button Starts recording when pressed in the Stop mode 6 Operation buttons PLAY button Starts playback PAUSE STILL button Temporarily stops recording when ...

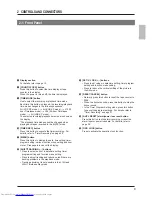
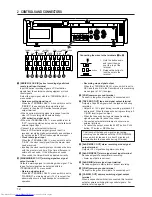
Page 9: ...ion menu setting and hour meter Press again to cancel the display SHIFT TRACKING buttons Press to select an item in date time setting timer program setting and function menu setting Press to adjust tracking and reduce noise if there are tracking problems in the play back mode Tracking adustment is not possible in the L12H and L24H Timelapse Play mode 2 CONTROLS AND CONNECTORS SET V LOCK buttons Pr...

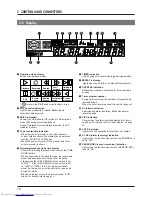
Page 10: ...odes Playback Recording Rewind Fast forward Timelapse playback Still Record pause Rewind search Fast forward search Reverse playback mark in the Rec Pause mode is shown in red 2 Cassette indication Lights when a cassette is loaded Blinks when a cassette is being ejected 3 SP EP indication Shows the VHS standard SP mode or VHS extended mode EP during recording playback During Timelapse Recording Pl...

Page 11: ...e unit Power Off Video Throughput function 7 REMOTE remote connector Connect the optional RM G30U remote control 8 SERIES CLOCK OUT series recording signal clock reset signal output terminal Outputs the series recording signals or clock reset signals Select the output signal with the TERMINAL SEL 1 menu switch Series recording signal output When the TERMINAL SEL 1 menu switch is set to SERIES the ...

Page 12: ...larm or sensor recording COM common ground terminal Connect to the ground terminal of a connected unit CAM SW OUT camera switching signal output terminal When a sequential switcher is connected this terminal outputs camera switching timing control signals For details refer to page 54 9 SERIES CLOCK IN series recording signal clock reset signal input terminal Input the series recording signals VCR ...

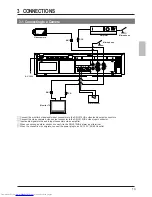
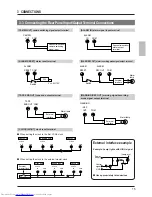
Page 13: ...nsor Monitor TV 1 Connect the monitor s video audio input connectors to the SR L910UA s video audio output connectors 2 Connect the video camera s video output connector to the SR L910UA s video input connector 3 Input audio signals to the audio input connectors via an amplifier 4 When connecting an alarm sensor connect it to the SR L910UA s alarm input terminal 5 When the connection is complete c...

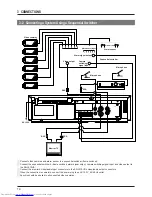
Page 14: ...sequential switcher s frame switcher alarm signal output camera switching signal input and video output to the SR L910UA 3 Connect the monitor s video audio input connectors to the SR L910UA s video audio output connectors 4 When the connection is complete connect the power plug to an AC 120 V 50 60 Hz outlet 5 Synchro should be applied to all connected video cameras Sequential switcher Video outp...

Page 15: ...l input COM Vcc 5V 12V Vcc ALARM RESET Switch COM TAPE END OUT External interface Alarm lamp External interface example Example Lamp lights with HIGH signal Relay Lamp etc Power supply Control signal GND 5 Use appropriately rated devices 3 CONNECTIONS CLOCK IN OUT clock reset terminal 5 When setting the clock to the first VCR s clock COM CLOCK IN COM CLOCK OUT First VCR Second VCR Last VCR COM CLO...

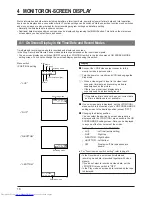
Page 16: ...o the monitor s video input connector 1 Turn the power on monitor and VCR and engage the Stop mode 2 When a video signal is input to the video input connector time date and recording mode are superimposed on the picture If there is no signal input display data is superimposed on a black background If the date and time have not been set correct date and time indications are not available 5 If no on...

Page 17: ...m rotating time CLOCK ADJUST Displays the date time setting screen Set the date and time before using this unit MAIN MENU PROGRAM TIMER FUNCTION ALARM IN POWER LOSS HOUR METER CLOCK ADJUST PRESS SHIFT SET PRESS MENU TO END 4 MONITOR ON SCREEN DISPLAY SHIFT buttons MENU button Main menu screen SET buttons Operation 5 Connect the VCR s video output connector to the monitor s video input connector 1 ...

Page 18: ...lect ALARM IN To display power failure data select POWER LOSS 4 Press the SET or SET button to display the selected data alarm input or power loss When 10 or more alarm input or power loss data items have been stored subsequent data will replace earlier items beginning from the second item 5 Press the MENU button twice to end menu operation and restore the normal screen Resetting alarm input power...

Page 19: ...SHIFT button to select FUNCTION 3 Press the SET or SET button The ON SCREEN MODE setting screen is displayed Only one menu switch is available in the ON SCREEN MODE setting screen This switch POSITION allows you to select the screen position of the on screen display and to switch it ON OFF 4 Press the SET or SET button to enter the selected position 5 To display another setting screen press the SH...

Page 20: ...ecording Check is activated with the REC CHECK button head cleaning is performed once and recording resumes The error indication E 09 is shown on the display for 10 seconds Automatic Recording Check is not performed at the beginning of a tape set to record repeatedly AUTO If picture quality is found to be defective when Recording Check is activated with the REC CHECK button head cleaning is perfor...

Page 21: ...out 72 minutes during L24H mode TERMINAL WARN SEL 2 REC Select the signal to be input or output to the SERIES CLOCK IN OUT terminals on the rear panel SERIES Set to this position to input or output a series recording signal EXT Set to this position to start or stop the recording with the VCR activation signal input from an external control device C ADJ Set to this position to input or output a clo...

Page 22: ... the beginning and restarts recording EJECT The tape is ejected RS 232C parameter setting BAUD RATE 1200 2400 4800 9600 This screen is displayed on the on screen setting screen only when the optional RS 232C board SA K97U is installed Select the RS 232C data transfer speed from 1200 bps 2400 bps 4800 bps or 9600 bps Turns the sensor recording function on or off Sensor recording is enabled in the S...

Page 23: ...ng slot Auto power on When a cassette is loaded the power automatically turns on and the cassette indication appears Auto play When a cassette with no erasure prevention tab is loaded playback starts automatically Unloading 5 Press the EJECT button The cassette is ejected If the power is not on when the EJECT button is pressed power is automatically switched on and the cassette is ejected Once the...

Page 24: ...et 7 End date and time setting Press the MENU button twice The normal display is restored and the set date and time are shown on screen The time count starts from 00 seconds Note If you press the OPERATE button after setting the date and time without first pressing the MENU button the set date and time are canceled Menu switch POSITION set to L UP 1 Turn the power on 2 Press the COUNT CLOCK button...

Page 25: ... to the table below for more information on each mode Each time the TIME MODE button is pressed the recording playback mode changes in the following order 2H VHS SP mode 6H VHS EP mode L12H 12 hour Timelapse mode L24H 24 hour Timelapse mode 2H VHS SP mode The selected recording or playback time mode is shown on the display The SP or EP indicator lights SP indicator Lights when the recording playba...

Page 26: ...e tape ends during recording When set to STOP the Stop mode is engaged When set to REW the tape is rewound to the beginning When set to REPEAT the tape is rewound to the beginning and recording re starts repeat recording When set to EJECT the tape is ejected 5 CAMERA SW Factory setting OFF Sets the switching timing for cameras connected to an external sequential switcher To switch cameras after ea...

Page 27: ...ECK function menu switch OPERATE button REC CHECK button STOP EJECT button REC button PLAY button PAUSE STILL button Note If the VCR is left in the Record Pause mode for more than 5 seconds the transition between scenes may be distorted when recording is re started 1 Press the OPERATE button to turn the operating mode on The OPERATE indicator lights 2 Insert a cassette with safety tab in place The...

Page 28: ...ton to move the cursor arrow to PROGRAM TIMER in the main menu then press the SET or SET button The daily timer program setting screen is displayed DAILY is shown on the second line of the daily timer program setting screen If the date and time have not been set the date and time setting screen will be shown Once the correct date and time have been set repeat steps 2 and 3 n When the weekly timer ...

Page 29: ...o shift the blinking to the right Month Day Start time hour Start time minute Stop time hour Stop time minute Record mode Select the next program No Press the SHIFT button to move the blinking to the left 2 Press the SET or SET button to set the value for the blinking item Press the SET button to increase the value and the SET button to decrease it n Set the Month Day Start time hour Start time mi...

Page 30: ...econd line n Press the SHIFT or SHIFT button to move the cursor arrow to DAILY and press the SET or SET button The weekly timer program setting screen is shown 2 Select the day of the week you want to record on Press the SHIFT or SHIFT button to set the cursor arrow to the day of the week to be set Press the SHIFT button to move the cursor arrow down and the SHIFT button to move it up 3 Set the se...

Page 31: ...timer program setting screen then press the SET or SET button 2 Press the SHIFT or SHIFT button to set the cursor arrow to the number of the day when timer recording is not to be executed 3 Engage the Cancel Program Setting mode Press the SET or SET button When the SET button is pressed the month blinks When the SET button is pressed the day blinks 4 Set the data Press the SET or SET button to set...

Page 32: ...te the VCR first press the TIMER REC button n Timer recording Power is turned on about 20 seconds before recording is programmed to start and the VCR enters the Record Pause mode Recording starts about 2 seconds before the programmed start time n If no cassette is loaded The TIMER and indications blink Ä Load a cassette with safety tab in place Cassettes with no tab are ejected n When the TAPE END...

Page 33: ...menu switches Menu switches for alarm sensor recording mode setting 5 During alarm recording the AL indication is lit on the display After alarm recording is complete the AL indication blinks on the display to show that an alarm signal has been input During alarm recording the ALARM indication is shown on screen An index code VISS is recorded at the start point of the alarm recording as an alarm c...

Page 34: ...enu switch TAPE END MODE on the alarm sensor recording mode setting screen STOP The tape stops REW The tape is rewound to the beginning and stops REPEAT Recording continues from the beginning of the tape EJECT The tape is ejected 6 After setting the function menu switches press the MENU button twice The normal screen is restored Check the time and data shown on the monitor s on screen display n If...

Page 35: ...e alarm cue signal index code will not be recorded correctly if alarm input lasts for less than 10 seconds When sensor recording duration is set with an external switcher set the sensor recording duration to MANUAL To sound the buzzer during sensor recording set BUZZER to ON Set the operation mode at tape end in the case when sensor recording is executed even once with the menu switch TAPE END MOD...

Page 36: ...Recording Check function This function automatically checks recording quality at the beginning of the tape during repeat recording To activate the Auto Recording Check function set the REC CHECK function menu switch in the VTR mode 1 setting screen to AUTO Operation of the Auto Recording Check function The recorded section at the beginning of the tape is automatically played back in the Repeat Rec...

Page 37: ...ing for all connected VCRs TERMINAL SEL 1 REC REMAIN Set to SERIES VTR mode 2 setting screen VTR MODE 2 SUMMER TIME OFF TERMINAL SEL 1 SERIES TERMINAL SEL 2 WARN REC REMAIN OFF PRESS SHIFT SET PRESS MENU TO END Rear panel Video input signal First VCR Second VCR Last VCR Video output Audio output Monitor TV Audio input signal Output a series recording signal from the SERIES CLOCK OUT terminal to st...

Page 38: ...ith a safety tab in place and engage the Stop mode the Pause mode or turn the operating mode off When a VCR activation signal ground input is input to the rear panel s SERIES CLOCK IN terminal recording starts automatically and continues for as long as the activation signal is input When the activation signal stops the Stop mode is engaged When the activation signal is input again recording starts...

Page 39: ...ction does not work when the Timer Record mode is engaged 2 Set the function menu switch AUTO REC to ON Power is supplied from the external timer at the specified time and recording starts When set to ON a buzzer sounds when the tape ends during recording To set the buzzer sound on set the function menu switch TAPE END BUZZER to ON 5 Select the tape end buzzer output timing with the REC REMAIN fun...

Page 40: ...play starts automatically auto play function 4 Press the PLAY button to start play The play indicator is shown on the display and the Play mode is engaged When the play mode is set to the VHS Standard 2H or VHS Extended 6H mode playback operates as follows Cassettes recorded in the VHS Standard or Time laps mode are played back in the VHS Standard mode Cassettes recorded in the VHS Extended mode a...

Page 41: ... if the VCR remains in the Still mode for 5 minutes approx Shuttle search reverse and fast forward playback Fast forward shuttle search Press the FF button during playback The rewind search indicator is shown on the display and the Reverse Shuttle Search mode is engaged No sound is output Reverse shuttle search Press the REW button during play The fast forward search indicator is shown on the disp...

Page 42: ...n index code is searched in the Fast Forward mode or the Rewind mode the Stop mode is automatically engaged when the code is located The VISS indicator is shown on the display whenever the Index Search mode is engaged Index Search does not function in the Auto Rewind mode When the picture moves up and down in the Still mode Press the V LOCK button to minimize vertical jitter 8 5 Tracking V Lock Ad...

Page 43: ...ding check inferior recording performance Insufficient capacity of the built in battery for backup Displayed only in the operating off mode No video signals input to the VIDEO IN connector Error indication E 01 E 02 E 03 E 04 E 05 E 06 E 07 E 09 E 10 E 11 VCR operation The operating mode is turned off The operating mode is turned off The operating mode is turned off The operating mode is turned of...

Page 44: ...set correctly Is the timer properly programmed q Is the TIMER indication lit Is the TIMER indication lit This is normal q Is the clock set q Is the POSITION function menu switch set to OFF Is the function menu switch TAPE END MODE in the alarm sensor recording mode setting screen set to STOP EJECT or REW If so when the tape ends during recording in the case when alarm recording is executed even on...

Page 45: ...e board turn the power off and unplug the power cord from an AC outlet 1 Detach the top cover Remove the 5 screws securing the top cover and lift it off 2 Detach the plate in the VCR Remove the 2 screws on the rear panel Detach the plate from the inside of the VCR 3 Connect the SA K97U s connector to the VCR Insert the SA K97U connector into the connector CN607 on the board in the VCR using a tool...

Page 46: ... p CPU 3 TXD Transmit data VTR CPU 4 DTR Data terminal ready VTR CPU 5 GND Signal ground 6 DSR Data set ready VTR p CPU 1 2 3 4 5 6 9 5 Mode 5 Character length 5 Data rate 5 Parity check 5 Stop bit Non synchronized 8 bits 1200 2400 4800 9600 bps switched with function menu switch set to 9600 bps before shipment No 1 bit Data format Output level ON 5 V or more OFF 5 V or less ...

Page 47: ... 7 8 9 A B C D E F 0 Data 0 ENTER TIMER ON SCREEN VISS FRAME CODE ON ON FWD COUNT 1 COMPLE Data 1 CLEAR TIMER ON SCREEN VISS REC DEVICE AL PL TION ERROR OFF OFF REV CHECK TYPE RESET 2 ERROR Data 2 PRG CLK ROM VER HOUR METER COUNT SENSE RESET 3 CASSETTE Data 3 SHFT EJECT SEARCH OUT VISS 4 Data 4 SHFT ON SCREEN SELECT 5 NOT Data 5 SET PL AL COUNT TARGET SENSE 6 ALARM Data 6 CLEAR SET TL STATUS TL ST...

Page 48: ...e same as when locally controlled on the VCR Before transmitting either of the following commands 13 or 14 first transmit REC DUB REQUEST FAH and confirm that ACK is returned by the VCR 13 REC CAH Starts recording The VCR returns ACK 14 REC PAUSE CBH Engages Record Pause mode The VCR returns ACK To re start recording transmit REC FAH CAH To cancel Record Pause transmit STOP 3FH The VCR will enter ...

Page 49: ...B3H To search for a designated INDEX point on the tape The VCR starts INDEX search after returning ACK When the specified point is reached the VCR returns COMPLETION 01H If the end or beginning of the tape is reached before the specified point the VCR returns NOT TARGET 05H This command differs from commands 15 and 16 only in that the FF ABH or REW ACH command is included separately 10 OPTIONAL SA...

Page 50: ...selected with SHIFT 4 CANCEL 67H Cancels program data in timer programming or engages the Cancel Program mode Setting procedure is the same as when using the VCR controls Be sure to transmit commands 1 byte at a time with ACK 0AH confirmation from the VCR after each transmission 5 On screen setting command 1 ON SCREEN ON 70H Activates time date on screen indication ON SCREEN OFF 71H Deactivates on...

Page 51: ... 33H 30H 34H 35H 7 HOUR METER SENSE D2H VCR returns the hour meter data in 5 bytes eg 12345 hours 31H 32H 33H 34H 35H 8 TL STATUS SENSE D6H VCR returns Timelapse mode data in 6 bytes The contents of each byte are as follows 1st 2nd byte Recording playback mode Correspondence of the code and the mode is the same as that described in 2 2 Recording playback mode setting commands 2 MODE 7EH 3rd byte 5...

Page 52: ... BIT is 1 0 Not defined Always 0 1 REC Mode VCR is in the Record mode 2 Eject A cassette is being ejected 3 Not defined Always 1 4 Stop Mode VCR is in the Stop mode 5 REW Mode VCR is in the Rewind mode 6 FF Mode VCR is in the Fast Forward mode 7 Play Mode VCR is in the Play mode 5th byte BIT Status when BIT is 1 0 Speed Code 0 VCR s current tape running mode See below 1 Speed Code 1 VCR s current ...

Page 53: ...he 1st byte of the transmitted command In this case it is not necessary to input CLEAR Check whether the transmitted command is acceptable to the VCR or not TXD 7EH 30H 32H RXD 0AH 0AH 0AH Time 41H 0AH 33H 0AH 40H 0AH 3 Commands reference chart VCR setting commands Page 5 Recording playback mode 49 MODE SHIFT 49 MODE 49 5 Timelapse VCR operation mode 49 TL STATUS 49 5 Date and time setting 50 DATE...

Page 54: ... V 12 V HV 12 V output impedance 4 7 kohms Record mode repeat recording ON auto rewind ON Tape end Manual operation Warning Warning reset HV 12 V output impedance 4 7 kohms Record mode repeat recording OFF auto rewind OFF ALARM IN Alarm signal input ALARM REC OUT Alarm recording mode signal output TAPE END OUT Tape end signal output WARNING REC OUT Warning signal Rec mode signal output ALARM RST I...

Page 55: ...t 5 Horizontal resolution 5 Video S N Audio system 5 Number of tracks 5 Line input 5 Mic input 5 Line output 5 Frequency response 5 Audio S N 5 Wow and flutter Luminance FM recording Color down converted direct recording NTSC type color signal EIA monochrome signal 525 lines 60 fields 33 35 mm sec 2H mode SP 11 12 mm sec 6H mode EP 2 hours VHS Standard mode 6 hours EP mode 12 24 hours Timelapse mo...

Page 56: ...Printed in Japan 1998 VICTOR COMPANY OF JAPAN LIMITED SR L910UA VIDEO CASSETTE RECORDER SL96150 is a registered Trademark owned by VICTOR COMPANY OF JAPAN LTD is a registered Trademark in Japan the U S A the U K and many other countries ...

Reviews: