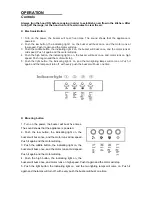
background image


READ AND SAVE THIS INSTRUCTIONS 

FOR DOMESTIC COOKING ONLY   

Installer: Leave this manual with the homeowner. 

Homeowner: Cleaning, Maintenance and Operating 

instructions on the coming pages.


RANGE HOOD ITEM NO.: K1012/K1012A 


REFERED MODEL NO.: 3503A/3503D


  MOTOR WITH UL CERTIFICATE


Summary of Contents for 3388C

Page 1: ...R DOMESTIC COOKING ONLY Installer Leave this manual with the homeowner Homeowner Cleaning Maintenance and Operating instructions on the coming pages RANGE HOOD ITEM NO K1012 K1012A REFERED MODEL NO 3503A 3503D MOTOR WITH UL CERTIFICATE ...

Page 2: ...cted fans must always be vented to the outdoors 7 Do not use this unit with any separate solid state speed control device 8 To reduce the risk of fire use only metal ductwork 9 This unit must be grounded TO REDUCE THE RISK OF A RANGE TOP GREASE FIRE A Never leave surface units unattended at high settings Boilovers cause smoking and greasy spillovers that may ignite Heat oils slowly on low or mediu...

Page 3: ...verload which will automatically shut off the motor if it becomes overheated The motor will restart when it cools down If the motor continues to shut off and restart have the hood serviced 7 For best capture of cooking impurities the bottom of the hood should be a minimum of 24 and a maximum of 33 above the cooking surface 8 Two installers are recommended because of the large size and weight of th...

Page 4: ... fixing support 1 Slidery duct fixing support 7 Mounting Screws 4 x 50mm 10 Mounting Screws 4 x 8mm 9 Drywall Anchors 2 for φ8 holes 2 Mounting Screws 4 x 35mm for φ8 holes 2 Washer for φ8 holes 1 Aluminum Flex Duct DUCT FIXING SUPPORT SLIDERY DUCT FIXING SUPPORT VENT MOUNTING SCREWS 4 X 8MM MOUNTING SCREWS 4 X 35MM WASHER DRYWALL ANCHORS MOUNTING SCREWS 4 X 50MM ALUMINUM FLEX DUCT MOUNTING BRACKE...

Page 5: ... 24 A maximum of 33 above cooktop is highly recommended for best capture of cooking impurities Distances over 33 are at the installer and users discretion INSTALL THE DUCTWORK NOTE To reduce the risk of fire use only metal ductwork 1 Deside where the ductwork will run between the hood and the outside 2 A straight short duct run will allow the hood to perform most efficiently 3 Install the Aluminum...

Page 6: ...screws 4x50mm into the anchors and install the hook on the wall as shown INSTALL SLIDERY DUCT FIXING SUPPORT 1 Calculate the final height of the U shaped section drill 2 holes of Ø8mm on a suitable place in line with the slidery duct fixing support 2 Put the drywall anchors into the holes and fix the mounting screws 4x50mm into the anchors and install the hook on the wall as shown The rest two par...

Page 7: ...ch is stands on two sides of the motor PREPARE THE HOOD Screw 4x8mm Note On stainless steel hoods carefully remove the plastic protective film from all exterior surfaces of the hood and decorative flues prior to final installation 3 Pick out the hood from the carton 4 Install the vent into the duct connector of the cooker hood 5 Fix the extensive pipe onto the vent ...

Page 8: ...holes on the back of the hood Level the hood with 2 mounting screws 4 35mm with washer Use drywall anchors provided 4 Measure the height of the glass to the slidery duct fixing support Adjust the height of the chimney according to the height Then use the duct fixing suppor with two screws 4x8mm to fix the chimneys Shown as in the pic 5 Put the chimney on the hood use two screws 4x8mm to fix the ch...

Page 9: ...ar water Wipe dry with a clean soft cloth to avoid water marks z For discolorations or deposits that persist use a non scratching household cleanser or stainless steel polishing powder with a little water and a soft cloth z For stubborn cases use a plastic scouring pad or soft bristle brush together with cleaser and water Rub lightly in direction of polishing lines or grain of the stainless finish...

Page 10: ... the motor will stop 5 Push the light button the indicating light 4 on and the two lighting lamps will come on Push it again and the lamps will turn off with every push the buzzer will buzz one time z Blue ring button 1 Turn on the power the buzzer will buzz five times The sound shows that the appliance is powered 2 Push the low button the indicating light on the buzzer will buzz once and the moto...

Page 11: ... COOL WARRANTY We will warrant this product free from defects in material and quality for one year and motor for 5 years If any problems occur from correct usage please contact the service department for under warranty service This warranty does not cover the following The filter mesh and bulb Commercial use Amendment of the date of manufacture on the rating plate Damaged caused to the body by usa...

Page 12: ...K Star International Group Inc K Star Electronic Appliance Inc Toll Free 800 893 2168 Email info kstarus com http www kstarus com ...

Reviews: