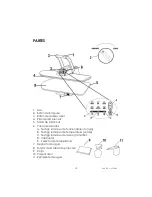
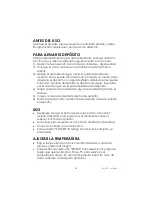
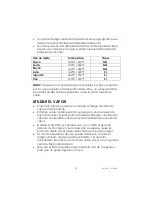
background image


Steam press 

Prensa de planchar 

USK STP 1 

120V~60Hz 1350W


Summary of Contents for USK STP 1

Page 1: ...Steam press Prensa de planchar USK STP 1 120V 60Hz 1350W ...

Page 2: ...when not in use Be careful to avoid spilling water on the appliance when filling 8 Do not operate the appliance with a damaged cord or plug or after the appliance has been dropped or damaged in any manner To avoid the risk of electric shock do not disassemble the appliance take it to a qualified serviceman for examination and repair Incorrect reassembly can cause a risk of electric shock when the ...

Page 3: ... INSTRUCTIONS To avoid a circuit overload do not operate another high wattage appliance on the same circuit If an extension cord is absolutely necessary a 10 ampere cord should be used Cords rated for less amperage may overheat Care should be taken to arrange the cord so that it cannot be pulled or tripped over SAVE THESE INSTRUCTIONS POLARIZED PLUG INSTRUCTIONS This appliance has a polarized plug...

Page 4: ...3 Burst of steam button 4 Pressing plate 5 Ironing board 6 Control panel A Power light red B Ready light green C Steam ready light yellow D ON OFF switch E Temperature selector 7 Water tank 8 Ironing board cover 9 Pressing cushion 10 Spray bottle 11 Water beaker ...

Page 5: ... spilling water onto the steam press when filling 5 Slide the water tank back in 6 When pressing unplug the appliance before refilling USE Make sure the locking knob is in the open position UNLOCK allowing free movement of the pressing plate before plugging in the appliance Lift the pressing plate to the fully raised up position Plug the appliance into an electric outlet Press ON OFF and the red p...

Page 6: ... CONTROL Steam is produced only when the yellow steam ready light is on The green ready light goes off when the unit has reached the desired temperature The yellow steam ready light will come on when the unit is ready to produce steam If this is the first time you are using the steam press or you have been storing it for some time lift the pressing plate into the raised position and press the burs...

Page 7: ... stubborn wrinkles Lower the pressing plate until it is about two inches from the garment Press the burst of steam button for about 3 5 seconds After releasing the burst of steam button you may fully lower the pressing plate NOTE Do not press the burst of steam button when the pressing plate is in its lowest closed position After a few seconds lift the handle and raise the pressing plate back to t...

Page 8: ...ON OFF the red power light will go out Disconnect the plug from the outlet Leave appliance in open position Wait for the steam press to cool completely approximately 30 minutes When cool lower the pressing plate onto the ironing board pushing the handle to its lowest position Turn the locking knob to the locked position This should prevent the steam press from opening while being moved or stored L...

Page 9: ...t against the ironing board for about 10 seconds You will hear a warning beep If the pressing plate is left in the open up position without use after approximately 15 minutes the unit will be automatically shut off In either case to restore the unit you have to press ON OFF again TROUBLE SHOOTING PROBLEM CAUSE SOLUTION Steam press cannot be opened with the handle Locking knob is in locked position...

Page 10: ...ection to a higher temperature Wait for the steam ready light to come on If not use spray misting bottle as directed Water drips from the pressing plate Burst of steam button has been pressed too long Don t press the burst of steam button more than 5 seconds continuously The handle will not move into the automatic maximum pressure position Item on the ironing board is too thick to use this pressur...

Page 11: ...olo y también cuando el aparato no esté en uso Tenga cuidado de no derramar agua en el aparato durante el llenado 8 No utilice el aparato si el cable o el enchufe están dañados o si el aparato se cayó o está dañado Para evitar el riesgo de choque eléctrico no desarme el aparato Llévelo a un centro de servicio autorizado para que lo examinen y o reparen Si lo vuelva a montar el aparato de forma inc...

Page 12: ...otro aparato de alto vataje en el mismo circuito Si resulta absolutamente necesario usar un cable de extensión se debe usar un cable de 10 amperios Los cables con tensiones nominales menores pueden sobrecalentarse Se debe cuidar de poner el cable de extensión de modo tal que no pueda ser arrancado o provocar tropiezos GUARDE ESTAS INSTRUCCIONES INFORMACIÓN SOBRE EL ENCHUFE POLARIZADO Para reducir ...

Page 13: ...r 5 Tabla de planchar 6 Panel de mandos A Testigo luminoso de funcionamiento rojo B Testigo luminoso de temperatura verde C Testigo luminoso del vapor amarillo D Interruptor E Selector de temperatura 7 Depósito de agua 8 Funda de la tabla de planchar 9 Cojín 10 Vaporizador 11 Recipiente de agua ...

Page 14: ... ver el nivel de agua en la parte delantera del depósito 4 Tenga cuidado de no derramar agua en el aparato durante el llenado 5 Vuelva a colocar el depósito dentro del aparato 6 Durante el planchado desenchufe el aparato antes de rellenar el depósito USO Asegúrese de que el botón de bloqueo está en la posición abierta UNLOCK para poder mover fácilmente la placa superior Enchufe el aparato Levante ...

Page 15: ...que la placa superior se enfríe UTILIZAR EL VAPOR El aparato produce vapor sólo cuando el testigo amarillo del vapor está encendido El testigo verde de temperatura se apaga cuando el aparato haya alcanzado la temperatura deseada El testigo amarillo del vapor se encenderá cuando el aparato esté listo para producir vapor Si utilice el aparato por primera vez o si no utilizó el aparato durante mucho ...

Page 16: ...aparato Si la temperatura está bastante elevada puede utilizar la función de doble vapor pulsando el botón de doble vapor 3 para eliminar las arrugas Baje la placa superior hasta que quede a cerca de 2 pulgadas de la prenda Pulse el botón de doble vapor durante unos 3 5 segundos Cuando deje de pulsar el botón de doble vapor puede bajar del todo la placa superior NOTA No pulse el botón de doble vap...

Page 17: ...ATO Puede dejar el agua en el depósito ya que no goteará cuando el aparato esté guardado de forma horizontal Pero cuando guarde el aparato por un largo periodo se recomienda vaciar el depósito pulsando el botón de doble vapor Pulse el botón POWER El testigo rojo de funcionamiento se apagará Desenchufe la clavija de la toma de corriente Deje el aparato en posición abierta Espere a que el aparato es...

Page 18: ...char es amovible Puede limpiarla con detergente suave y agua templada DISPOSITIVOS DE SEGURIDAD Su aparato cuenta con varios dispositivos de seguridad Si deja la placa superior cerrada en la tabla de planchar durante unos 10 segundos el aparato se apagará automáticamente Se oirá una señal acústica Si la placa superior queda en posición abierta levantada sin estar utilizada durante unos 15 minutos ...

Page 19: ...a temperatura elegida no es suficiente Si conviene para la prenda elija una temperatura más alta Espere a que el testigo amarillo del vapor se encienda Puede también utilizar el vaporizador como arriba indicado Agua sale de la placa superior Pulsó el botón de doble vapor durante mucho tiempo No pulse el botón de doble vapor durante más de 5 segundos seguidos No se puede cerrar el asa hasta la posi...

Page 20: ... Back cover page last page Assembly page 20 20 K070502 ...

Reviews: