background image

ZHEJIANG KAYO MOTOR CO., LTD.


www.kayomoto.us 


KAYO MOTO 


T2


SERVICE MANUAL 


W W W . K A Y OMOTO.US 


Summary of Contents for T2

Page 1: ...ZHEJIANG KAYO MOTOR CO LTD www kayomoto us KAYO MOTO T2 SERVICE MANUAL W W W K A Y OMOTO US...

Page 2: ...r slightly from production models Preface In this manual it contains words like Danger Warning Caution please read the manual carefully and follow the instructions closely when performing inspections...

Page 3: ...DANGER WARNING and CAUTION are as follows Danger you should pay attention on the dangers that may cause severe injuries or death Warning you should notice of the dangers that may cause injuries or ve...

Page 4: ...thods 39 Electric parts inspection 40 Electric parts inspection and replacement 41 Vehicle troubleshooting 50 Possible failures and troubleshooting methods 51 Engine maintenance manual 55 Main perform...

Page 5: ...ZHEJIANG KAYO MOTOR CO LTD www kayomoto us 4 Vehicle profile Vehicle component and location 8 VIN number 12 Specification 13 Circuit diagram 15 Fasteners torque table 17...

Page 6: ...1 Front fender 10 Front brake caliper 2 Headlight 11 Front fork 3 Handlebar 12 Fuel tank 4 Vent pipe 13 Carburetor 5 Fuel tank cap 14 Gear shift lever 6 Fuel tank petcock 15 Pedal 7 Air filter 16 Chai...

Page 7: ...e No Name 18 Rear fender 24 U shape rocker arm linkage 19 Muffler 25 Triangle rocker arm rear linkage 20 Seat 26 Rear brake oil cup 21 Rear shock 27 Brake pedal 22 Rear brake disc 28 Muffler pipe 23 R...

Page 8: ...1 Front fender 10 Front brake caliper 2 Headlight 11 Front fork 3 Handlebar 12 Fuel tank 4 Vent pipe 13 Carburetor 5 Fuel tank cap 14 Gear shift lever 6 Fuel tank petcock 15 Pedal 7 Air filter 16 Chai...

Page 9: ...us 8 No Name No Name 18 Rear fender 24 U shape rocker arm 19 Muffler 25 Triangle rocker arm 20 Seat 26 Rear brake oil cup 21 Rear shock 27 Brake pedal 22 Rear brake disc 28 Muffler pipe 23 Rear brake...

Page 10: ...ZHEJIANG KAYO MOTOR CO LTD www kayomoto us 9 VIN number VIN number Located on frame plate Frame plate Located on frame head tube Engine number Located on engine crankcase body 1 2 3...

Page 11: ...10L engine parameter Engine type Single cylinder four stroke air cooled vertical Clutch type Wet multi plate Cylinder diameter stroke 65 5 66 2mm method of lubrication Pressure lubrication splash lub...

Page 12: ...th reservoir L 430mm Rear swing arm Aluminum handlebar Aluminum alloy tapered handlebar material 7075 28 6mm Front rear rim Front 1 60 21 rear 2 15 18 Black aluminum rim Bright silver hub Front brake...

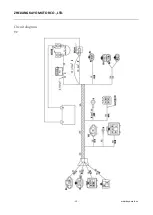
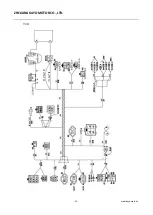
Page 13: ...ZHEJIANG KAYO MOTOR CO LTD www kayomoto us 12 Circuit diagram T2...

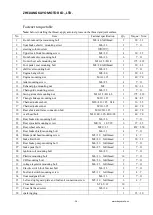
Page 14: ...ZHEJIANG KAYO MOTOR CO LTD www kayomoto us 13 T2 G...

Page 15: ...ustment bolt M10 40 1 25 S14 2 36 55 17 Chain adjustment nut M10 1 25 2 40 70 18 Rear shock and frame connection bolt M10 50 1 25 1 40 70 19 oval head bolt M10 42 1 25 10 28 1 40 70 20 Rear brake disc...

Page 16: ...ZHEJIANG KAYO MOTOR CO LTD www kayomoto us 15 OPERATION INSTRUCTIONS Check before riding 19 Starting steps 22 Vehicle run in 24 Vehicle cleaning 24 Storage and use of vehicles 25...

Page 17: ...he fuel tank switch is open If the fuel tank switch is OFF there is no fuel in the carburetor and the engine cannot run If fuel is low in the tank switch the tank to the RES position and refuel immedi...

Page 18: ...ng points for damage or wear If any please replace Check the master cylinder calipers for damage or wear if any please replace Note Do not leave brake reservoirs open for extended periods of time Note...

Page 19: ...nditions Riding with over or under inflated tires will affect operation and ride comfort and may result in irregular tire wear and loss of control 8 Check spoke tension Pinch the two adjacent spokes w...

Page 20: ...hand pull in clutch handlebar 3 the right hand pull in the brake handle 4 kick the kickstart lever down in a smooth rapid motion 5 once the engine starts up release the kickstart lever and fold back...

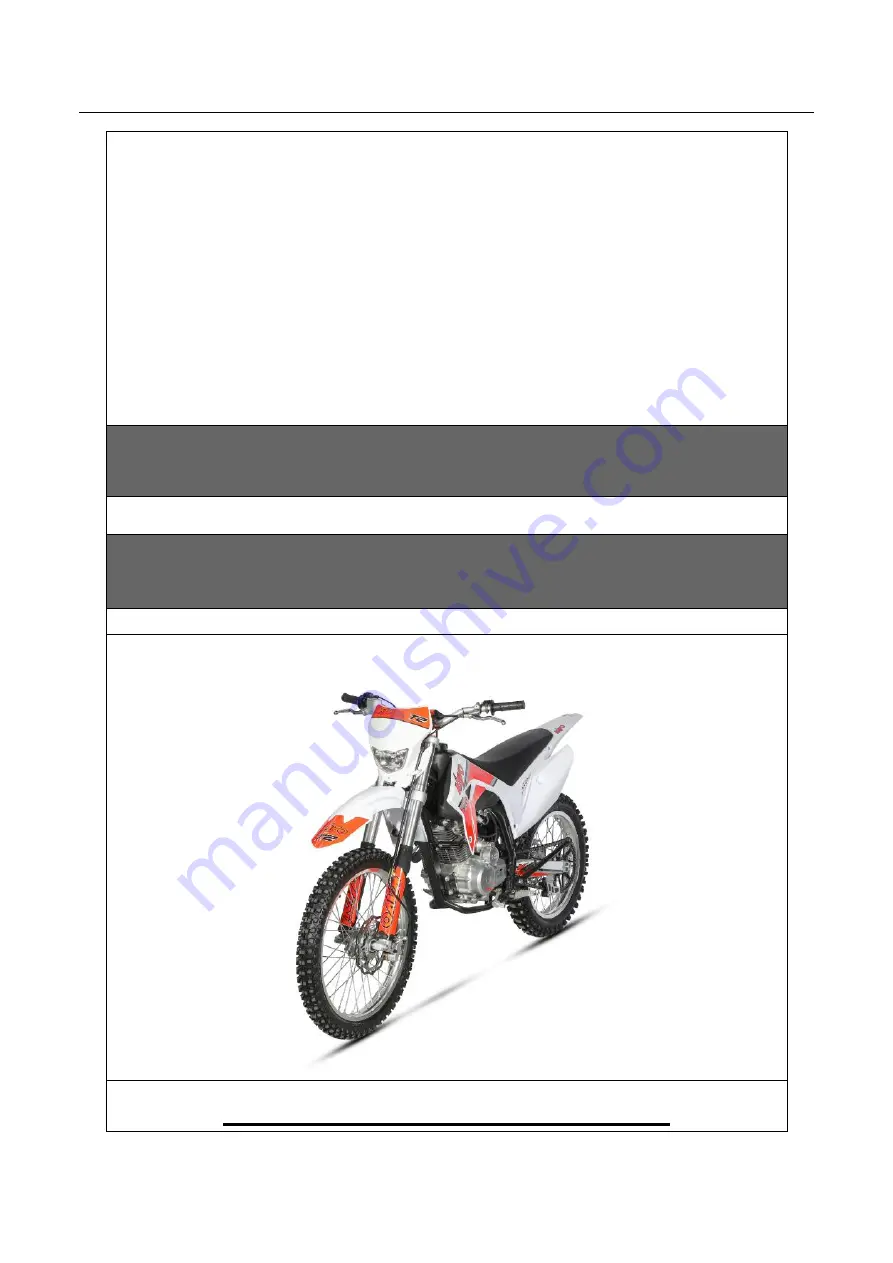
Page 21: ...ZHEJIANG KAYO MOTOR CO LTD www kayomoto us 20...

Page 22: ...ut for no longer than 5 10 seconds 3 7 10h stage Use motorcycles at 75 100 throttle 4 Above 10h Increase the speed to 60 80km h until the engine s performance is fully utilize Danger when driving plea...

Page 23: ...e the chain 8 Apply oil to all unpainted metal surfaces to avoid rusting 9 Keep motorcycle wheels floating when storing motorcycles If this condition cannot be met cardboard or padding can be used und...

Page 24: ...ZHEJIANG KAYO MOTOR CO LTD www kayomoto us 23 Routine maintenance Maintenance periodic table 27 Specific maintenance content 28...

Page 25: ...hecking chain tension Oil all moving parts such as chains handles etc and check for smooth operation Check the front disc brake fluid level Checking the free travel of the brake lever Check if the ste...

Page 26: ...h and snaps back quickly Check whether the throttle cable has a free play of 10 20mm If the free play is too little adjust as follows Loosen the lock nut at the end of the throttle cable Rotate the ad...

Page 27: ...Throttle screws and air screws allow idle speed adjustment of the carburetor The steps are as follows Turn the air screw clockwise until it reaches the top of its stroke and reverse one and a quarter...

Page 28: ...e engine Recommended oil brands and brands are Shell lubricants SJ 10W 40 Maximum oil capacity 1000ml Oil Change Lubricants need to be changed regularly to ensure the life of the engine The replacemen...

Page 29: ...right protective plate fixing screw upper right protective plate fixing screw Connecting bolt muffler 11 Crankshaft connecting rod and bearing For the inspection adjustment and replacement of this ite...

Page 30: ...e system is too worn you should replace the corresponding parts immediately to avoid causing a safety accident The specific replacement should be performed after consulting the KAYO dealer caliper bra...

Page 31: ...m from shifting If the center of the rim is offset some spokes can be stretched which will easily deform or cause the rim to break If the inspection shows that the tire center is slightly off center y...

Page 32: ...e of the gas lines please replace the fuel hose immediately to avoid leaks DANGER Riding a motorcycle with a broken hose may cause a fire by starting the engine so if you find a problem with the fuel...

Page 33: ...tment Fix bike and keep front fork suspended Loosen upper plate retaining bolts Rotate adjusting nut to right position Tighten steering shaft nut Recheck the steering repeat above process if necessary...

Page 34: ...le the chain transfers engine output power to wheel The chain needs inspection and maintenance frequently to ensure its normal use Adjust chain tension On a stand with rear wheel suspended Measure dis...

Page 35: ...ace it Min thread height 3 mm Tire pressure use barometer test tire pressure Recommend tire pressure front 2 23bar rear 2 77 bar 27 Battery inspection Remove seat use multimeter to test the positive a...

Page 36: ...ZHEJIANG KAYO MOTOR CO LTD www kayomoto us 35 Vehicle settings Specific settings and methods 39...

Page 37: ...handle is completely relaxed Throttle screw so that the engine speed as low as possible Adjust the air screw to increase the engine speed as much as possible Repeat the above steps until the desired...

Page 38: ...ZHEJIANG KAYO MOTOR CO LTD www kayomoto us 37 Electric parts inspection Electric parts inspection and replacement 41...

Page 39: ...ectors can be conducted as the table shows black red Black white green On Off Conduction is normal If doesn t connected replace it Installation In reverse order of disassembly meter Electric lock Mete...

Page 40: ...table shows Conduction is normal headlight switch wiring table blue black brown white Distance light Lower beam OFF stop switch wiring table Black white green stop On eletric switch wiring table yello...

Page 41: ...headlight and main cable connector Take off the headlight Inspection Check whether the terminals of the headlight connector can be conducted as the table shows blue green white brown distance light L...

Page 42: ...ect the left and right turn lights from the main cable Inspection Check whether the terminals of the turn lights connector can be conducted as the table shows orange green blue Left turn light Right t...

Page 43: ...ion Installation in reverse order of disassembly Inspection and replacement of rear turn signal Disassembly The steps for removing the rear left and right turn lights are as below Disconnect the left...

Page 44: ...ion in reverse order of disassembly brown green yellow green stoplight anti fog light tail light Inspection and replacement of licence lamps Disassembly The license plate light is removed as below Dis...

Page 45: ...replaced Installation Installation in reverse order of disassembly relay Inspection and replacement of steady voltage rectifier Disassembly The steady voltage rectifier is removed as below Remove seat...

Page 46: ...er needs to be replaced Installation Installation in reverse order of disassembly igniter Inspection and replacement of ignition coil Disassembly Remove seat cushion Remove oil tank Disconnect the ign...

Page 47: ...r is removed as below Remove the headlight Disconnect sensor from main cable Remove the fixing nut Take out the sensor Inspection Check whether the sensor is normal through the instrument if the senso...

Page 48: ...ZHEJIANG KAYO MOTOR CO LTD www kayomoto us 47 Vehicle Troubleshooting Possible failures and troubleshooting methods 51...

Page 49: ...flates the tire then dry the air filter and remove the exhaust pipe Blow dry with fan When everything is done the owner should add new oil to the engine before driving Because the moisture in the cran...

Page 50: ...ntre Engine sound abnormally Ignition problem Contact KAYO Service Centre overheating See the engine overheating section Tempering of exhaust pipe Carbon deposits in the combustion chamber Contact KAY...

Page 51: ...too soft Insufficient front fork oil level Add proper amount of prong oil Warning Request for the same oil The viscosity of the fork oil is too low Replace with front fork oil with suitable viscosity...

Page 52: ...rcycle inclines to one side Chassis bent Contact KAYO Service Centre Improper steering adjustment Check and readjust Steering shaft bent Contact KAYO Service Centre Problems with fork Contact KAYO Ser...

Page 53: ...ZHEJIANG KAYO MOTOR CO LTD www kayomoto us 52 Engine maintenance manual Main performance parameters 56 Use and Maintenance 57 Engine failure checklist 61...

Page 54: ...ression ratio 9 6 1 d Ignition advance angle 15 e Lubricating system pressure lubrication splash lubrication f Valve clearance cold 0 01mm 0 03mm g Ignite type CDI Clutch type Manual Wet Multi Plate G...

Page 55: ...peed up after waiting engine running for 1 3 mins Clutch lever Choke When electric starting it the start time for once should be less than 5 seconds and restart should be done after 10 seconds If it c...

Page 56: ...be replaced in advance if the oil quality changes 2 Check the engine oil before driving everyday If the oil level is below the bottom line of the oil level window you should make up the lubricating oi...

Page 57: ...YO MOTOR CO LTD www kayomoto us 56 to specified idle speed 6 Repeat the procedure of 3 4 5 until the idle screw is tightened or relaxed and the rotate speed does not decrease Now the idle adjustment i...

Page 58: ...clutch is running at idle speed the noise should be smooth and consistent When refueling and returning fuel the slight rattling sound of the clutch is a normal phenomenon When the rotation speed is s...

Page 59: ...re replace CDI failure replace Magneto coil is broken or solder spot fall off Replace Or repair welding Poor line contact or breakage Check connect Pneumatic aspect cylinder has low compression spark...

Page 60: ...oo much carbon deposit between spark plug electrodes Eliminate carbon deposit 4 engine overheat Fault clues fault cause elimination methods Overload or long time running at high speed To operate in lo...

Page 61: ...ion plate thickness replace Different spring elasticity Adjust same set spring 7 Gear shifting problem Clues Failure cause troubleshooting Failure shifting Fork broken or deformed Replace fork Hook or...

Reviews: