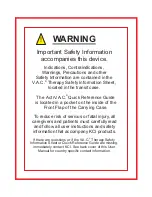
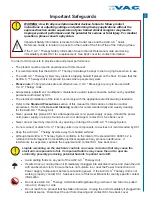
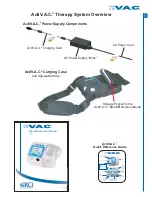
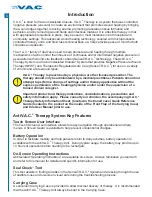
background image

340076 Rev B

July 2007

International User Manual

English

®

A

c

ti

Summary of Contents for ActiV.A.C.

Page 1: ...340076 Rev B July 2007 International User Manual English Acti...

Page 2: ...s device Indications Contraindications Warnings Precautions and other Safety Information are contained in the V A C Therapy Safety Information Sheet located in the transit case To reduce risk of serio...

Page 3: ...igation Buttons 9 Power the ActiV A C Therapy Unit On or Off 10 Therapy On or Off 10 Audio Pause 10 Changing Languages 11 On screen Operating Instructions 11 Battery Charging Indicator Light 13 Batter...

Page 4: ...ions 57 Customer Contact Information Back Cover Settings Guide 28 Settings Guide Confirmation 30 Seal Check Overview 31 How to Use Seal Check When Starting Therapy 32 Finding the Leak Using Seal Check...

Page 5: ...and contact KCI Please note Standard Precautions Care and Cleaning See back cover WARNING As with all prescription medical devices failure to follow product instructions or adjusting settings and per...

Page 6: ...ing dressing tubing SensaT R A C Pad Specific features are detailed in the Patient Feature Identification section of this manual Touch Screen User Interface USB Data Port Power Connection Battery Char...

Page 7: ...essure Mode Indicator with time and date Screen Guard Pause Alarms or Alerts Battery Level Indicator Help Button Therapy On Off Power On Off Power Connection Touch Screen Canister Acti Please consult...

Page 8: ...Screen Guard is available to help prevent unintentional changes In order to facilitate mobility and help patients return to daily activities battery operation is available with the ActiV A C Therapy U...

Page 9: ...od multi lumen tubing connector and SensaT R A C Pad The USB Data Port is to be used with non powered memory sticks and drives only No AC or battery powered drives computers computer equipment or othe...

Page 10: ...reens Help activates the feature Screen Guard to help prevent unintentional changes This feature should be used when cleaning the Touch Screen User Interface To release Screen Guard press 1 and then 2...

Page 11: ...to the previous screen of that particular procedure Back goes to the next screen of that particular procedure Next stops action in progress Cancel leaves that particular screen Exit Navigation Button...

Page 12: ...enced for 60 minutes Audio Pause On Off Audio Pause Patient Mode Jun 22 2006 15 38 58 23 Continuous 0 mmHg Therapy Off 58 23 A Countdown Timer and Audio Pause Indicator will be displayed in the upper...

Page 13: ...an browse the various that are available Choose from instructions and for alarm descriptions and their suggested resolutions Operating Instructions Help Screens Operation Cleaning Alarms instructions...

Page 14: ...ff and then on immediately contact KCI See back cover of this User Manual for country specific contact information P may ower cords present a tripping hazard Ensure that all cords are out of areas whe...

Page 15: ...should also be up as the Charging Cord Connector is plugged into the Power Connection on the ActiV A C Therapy Unit The battery level is shown on the bottom of the Touch Screen User Interface When the...

Page 16: ...ster in place Canister Latch Guide Canister Stabilization Bumpers Canister Latch Release Silicone Seals Canister is always applied straight on and straight off theActiV A C Do not twist or turn canist...

Page 17: ...ound or at least once a week to control odor A 2 Slide both tubing clamps toward the tubing connector picture See 2 3 Tightly close both tubing clamps Several clicks should be heard See picture 3 4 Di...

Page 18: ...talled Install the new canister onto the unit by sliding the opening n the canister over the Canister Latch Ensure he anister is installed directly onto the unit See Do not twist or turn the canister...

Page 19: ...the Tubing Storage Pocket 6 Unzip the Tubing Storage Pocket Zipper See picture 6 7 7 Unzip the Center Zipper on the back of the case Undo the Hook and Loop Fastener on the Access Flap and fold the Ac...

Page 20: ...in the canister over the Canister Latch Guide Do not twist or turn the canister as it is being installed See picture Push the canister onto the therapy unit An audible click should be heard See pictur...

Page 21: ...the tubing is not pinched as it is put in the Tubing Storage Pocket 15a 18 When finished close the Front Flap 17 Turn the Carrying Case front side up Open the Front Flap and restart V A C Therapy by...

Page 22: ...the therapy unit Inserting the Therapy Unit into the Carrying Case 5 Close the Center Zipper 6 Wrap any excess tubing into a bundle Put the tubing into the Tubing Storage Pocket on the bottom of the C...

Page 23: ...tion H has a built in Multi function Hook located under a flap on the back of the case The case can be used with the Shoulder Strap removed the loose Buckles connected over the top of the case and the...

Page 24: ...out feature Common Screen Control Buttons accesses screens when available Help activates the feature Screen Guard to help prevent unintentional changes This feature should be used when cleaning the T...

Page 25: ...ular procedure Back goes on to the next screen of that particular procedure Next stops action in progress Cancel leaves that particular screen Exit Navigation Buttons acknowledges the action is comple...

Page 26: ...shown below Warning Message OK Power the ActiV A C Therapy Unit On or Off ActI On Off Therapy Utilities Clinician Mode Jun 22 2006 15 38 Continuous 0 mmHg Therapy Off Press and hold the button for ap...

Page 27: ...the screen the clinician can Settings Settings changed manually take immediate effect when therapy is on Settings Pressure Continuous Intermittent Exit Intensity Change settings Change Toggle between...

Page 28: ...ty Low Medium High Press to change levels Green crescent changes with each setting Default setting is Low From the Clinician Mode Home screen press then to access th Therapy then e Intensity button Ne...

Page 29: ...tinuous to switch between and Therapy Continuous Intermittent Press Settings cont Press to return to the Settings screen Exit Intermittent Settings Exit Intermittent _ _ On Time Minutes On Time Minute...

Page 30: ...creen Next Use the buttons to select from the available wound type selections _ Select Wound Cancel Next Back _ Partial Thickness Burns If settings were changed with V A C Therapy off press to start t...

Page 31: ...s an option this screen will appear If Intermittent is not an option the Confirm screen will appear see next page Select Mode Press when finished with this screen Next Use the buttons to select from t...

Page 32: ...rmittent _ _ On Time Minutes On Time Minutes Off Time Minutes Off Time Minutes 2 5 Settings take effect after is pressed OK Settings Guide Intensity default is low Intensity can only be changed using...

Page 33: ...indication of the leakage rate The Tool appears three 3 different ways 3 the Leak Alarm screen after Seal Check 1 When therapy is started from the Clinician Mode Home screen discussed on the followin...

Page 34: ...Drape material to seal the leak area Seal Audio Application Instructions When finished with this screen press to return to the Clinician Mode Home screen Exit Therapy Start About Exit Leak Rate Low Hi...

Page 35: ...also note the No of foam pieces in patient chart and on the drape Dressing Canister Exit Choose or Canister Dressing Log on the screen to access Therapy Start this screen Item to Log Press Press to l...

Page 36: ...ces and time date Last recorded on 15 55 12 06 06 4 _ Cancel Starting Therapy cont Logged information will appear in Therapy History as follows Where the numeral after Dressing Changed is the number o...

Page 37: ...Therapy History Use the buttons to scroll through the Therapy History Report _ Holding these b will rapidly scroll through the Therapy History Report uttons _ History _ Exit dd mm yy Time Event 12 06...

Page 38: ...rting Therapy History If the above steps do not resolve the problem contact KCI See back cover of this User Manual for country specific contact information Ensure that the Infrared Data Port on the re...

Page 39: ...spective screen Cancel Help Menu Help Menu Operating Instructions Contact Information About Exit Clinician Mode Only authorized caregivers should access Clinician Mode Select Cancel unless authorized...

Page 40: ...Interface Region Settings Pressure Unit Date Format Brightness Utilities Time Date Region Settings AC Light Exit Brightness From the Clinician Mode Home screen press then press to access this screen...

Page 41: ...efault From the Clinician Mode Home screen Region Settings press then press to access this screen Utilities Clinician Utilities cont Changing Pressure Units and Date Format Pressing switches between m...

Page 42: ...ion that requires patient or caregiver attention Alerts will be accompanied by a audible tone Press for more information An will be displayed on the Touch Screen User Interface when the ActiV A C Ther...

Page 43: ...will be accompanied by a repeating audible tone This alarm may be silenced for two 2 minutes during troubleshooting by pressing Audio Pause Battery Critical Alarm On Off On Off If not press to restart...

Page 44: ...V A C Therapy Unit detects that the canister is full and should be replaced This alarm will be accompanied by a repeating audible tone This alarm may be silenced for two 2 minutes during troubleshooti...

Page 45: ...hat the canister is fully engaged and latched An audible click should be heard when canister is properly installed 5 Press on this screen to return to the Home Screen Reset WARNING Under clinician sup...

Page 46: ...the Home screen will be displayed the Seal Check Tool ActiV A C Therapy Unit will Pressing on this screen to return to the Home screen Reset Flashing oval green The patient s only access to the Seal...

Page 47: ...as not resolved the ActiV A C Therapy Unit will take several minutes to re identify that a leak exists before the will reappear and provide the opportunity to continue troubleshooting a leak using the...

Page 48: ...ervision replace V A C Dressing with alternate dressing if therapy is interrupted for more than two hours Blockage Alarm Therapy Interrupted Blockage Alert 1 Ensure both clamps on the dressing and can...

Page 49: ...he wound site may resolve this alert If the alert is cleared by lowering the unit normal use may resume 4 Press to return to the screen Exit Home This al r screen appears when the e t ActiV A C Therap...

Page 50: ...chnical fault within the ActiV A C Therapy Unit Several different types of system errors may occur A number will appear in the yellow alarm box that represents the diagnostic code of the technical fau...

Page 51: ...ode This al screen appears when the ert ActiV A C Therapy Unit has reached its service time limit Once the Service Timer has expired this alert will appear every time the unit is powered up When Days...

Page 52: ...tubing An audible click should be heard when installing a new canister Occasionally you may not hear an audible click If the canister is properly installed the canister cannot be removed by gently pu...

Page 53: ...pecific procedures Diagnostic Procedures MRI HBO X Ray CAT Scan CT Dye Tests Fluoroscopy Ultrasound Therapy Unit Compatible Therapy Unit Compatible NOT X X X X X X X WARNING It is important to note th...

Page 54: ...roperly use an alcohol based sanitizer follow these steps Apply about teaspoon of the product to the palm of the hand Rub hands together covering all surfaces of the hands until they are dry If hands...

Page 55: ...on screen instructions to unlock Do not use any liquid to clean the Touch Screen User Interface Use a soft non abrasive cloth to clean the Touch Screen User Interface Pressing too hard may damage the...

Page 56: ...This page left intentionally blank 54 ActI...

Page 57: ...are pending trademark applications in at least one country where this product work is commercialized Most KCI products referred to herein are subject to patents or patent applications For additional...

Page 58: ...ified with respect to Electrical Shock Fire and Mechanical Hazards Only in accordance with UL 60601 1 and to CAN CSA C22 2 No 601 1 Standards including JIS amendment by Underwriters Laboratory Inc Tri...

Page 59: ...e 4 F to 140 F Relative Humidity Range 0 95 non condensing Operating Conditions Temperature Range 41 F to 104 F 5 IEC Classification Medical Equipment Equipment not suitable for use in presence of fla...

Page 60: ...masterDE kci medical com Ireland KCI Medical Ltd T 353 0 14659510 T free 1800 333377 F 353 0 14659500 E mail postmastIE kci medical com Italy KCI Medical Srl T 39 02 457 1741 F 39 02 457 1742 10 E mai...

Reviews: