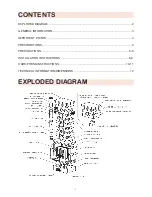
background image

K20

Installation Instructions

Care and firing instructions

Summary of Contents for K20

Page 1: ...K20 Installation Instructions Care and firing instructions ...

Page 2: ... EXPLODED DIAGRAM 2 GENERAL INFORMATION 3 IMPORTANT POINTS 3 PRECONDITIONS 4 PREPARATIONS 5 6 INSTALLATION INSTRUCTIONS 6 9 CARE FIRING INSTRUCTIONS 10 11 TECHNICAL INFORMATION DIMENSIONS 12 2 EXPLODED DIAGRAM ...

Page 3: ... associated requirements for production inspections IMPORTANT POINTS Contact the Planning and Building Committee in your municipality concerning the building notice It is also recommended that you contact a certified chimney sweep prior to installation NOTE Read through all of the installation instructions before beginning the installation Make sure that you get the right dimension and length of t...

Page 4: ...of the hearth plus 100 mm on each side see illus page 5 The floor plate can consist of natural stone concrete clinker tiles or 0 7 mm steel plate OUTDOOR AIR SUPPLY For the combustion of wood supply air is required The K20 can be provided with an external air supply which is recommended for properties with mechani cal ventilation A sheet metal drum is used for drawing an outdoor air duct The conne...

Page 5: ...atives for connecting the flue Alternative 1 Rear connection Alternative 2 Top connection Height from the floor to the centre of the flue at the rear 1905 mm Height from the floor to the height of the connection top 2170 mm Outer diam of the rear top sleeve connection 150 For so called top connection of the chimney this has to be done after the stove has been installed We will return to this at th...

Page 6: ...ed for rear connection Alternative 3 Preparation for a new top connection chimney Erection of fire wall where applicable Outdoor air supply if so required Hearth floor plate unless a floor plate or floor stone is to be installed afterwards 1 Assemble element no 1 in mortar Fill the crack in the wall with mortar NOTE Check that the elements are level 2 Install the fan box and the enclosed electrici...

Page 7: ...ally with the help of a spirit level is on the hearth s sealing plate Tip The stove is vertical and horizontal when the door stays open at an opening angle greater than 90 95 degrees and when it closes automatically at an opening angle less than 85 90 degrees Where applicable connect outdoor air to the hearth 6 Protect the hearth from damp and mortar by wrap ping it in plastic during installation ...

Page 8: ...st After this fit the 90 degree pipe on to the 390 mm pipe Finish by sliding the pipe in the wall with the 90 degree pipe NOTE Rear connection through a flammable wall If the flue is to be run through a flammable wall the connection pipe must be enclosed by a fire resist ant lined shaft Masterboard Minerit or similar and fireproof insulation that is at least 100 mm thick Thus there must not be any...

Page 9: ... after the stove has been rendered and painted 14 Install the 500 mm long pipe Then assemble element no 9 in mortar Make sure that the insulation is completely sealed between the pipe and element 9 The pipe must protrude approx 50 mm above ele ment no 9 15 Install the hearth plates in the number order shown in the illustration Finish by installing the log guard The stove is now ready for rendering...

Page 10: ...etals which are very harmful for both people and the environment BEFORE FIRING WHEN THE STOVE IS NEW During the first week firing can be started carefully Start with one to two fires during the first couple of days A particular smell will occur during the first firings in the stove This is the cast iron s paint and rust proof ing hardening Ventilate as required and ensure that there is good air ex...

Page 11: ... eliminate the down draught and avoid the nuisance of smoke entering the room in the initial stage If the premises are equipped with mechanical venti lation i e if there are one or more fans to evacuate the air from the building there may be such a large negative pressure in the building that it could be dif ficult to light the stove We suggest that you turn off the ventilation temporarily or open...

Page 12: ...ICATION DIMENSIONS AND PERFORMANCE Height 2170 mm Width 920 1020 mm Depth 570 mm Weight K20 850 Kg Height centre rear connection 1905 mm Height top connection 2170 mm Outer dimensions connection 150 mm Efficiency 83 Nominal output 7 kW Output 5 10 kW ...

Reviews: