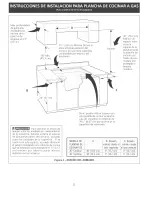
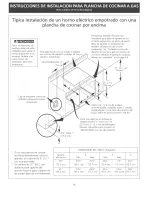
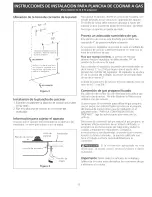
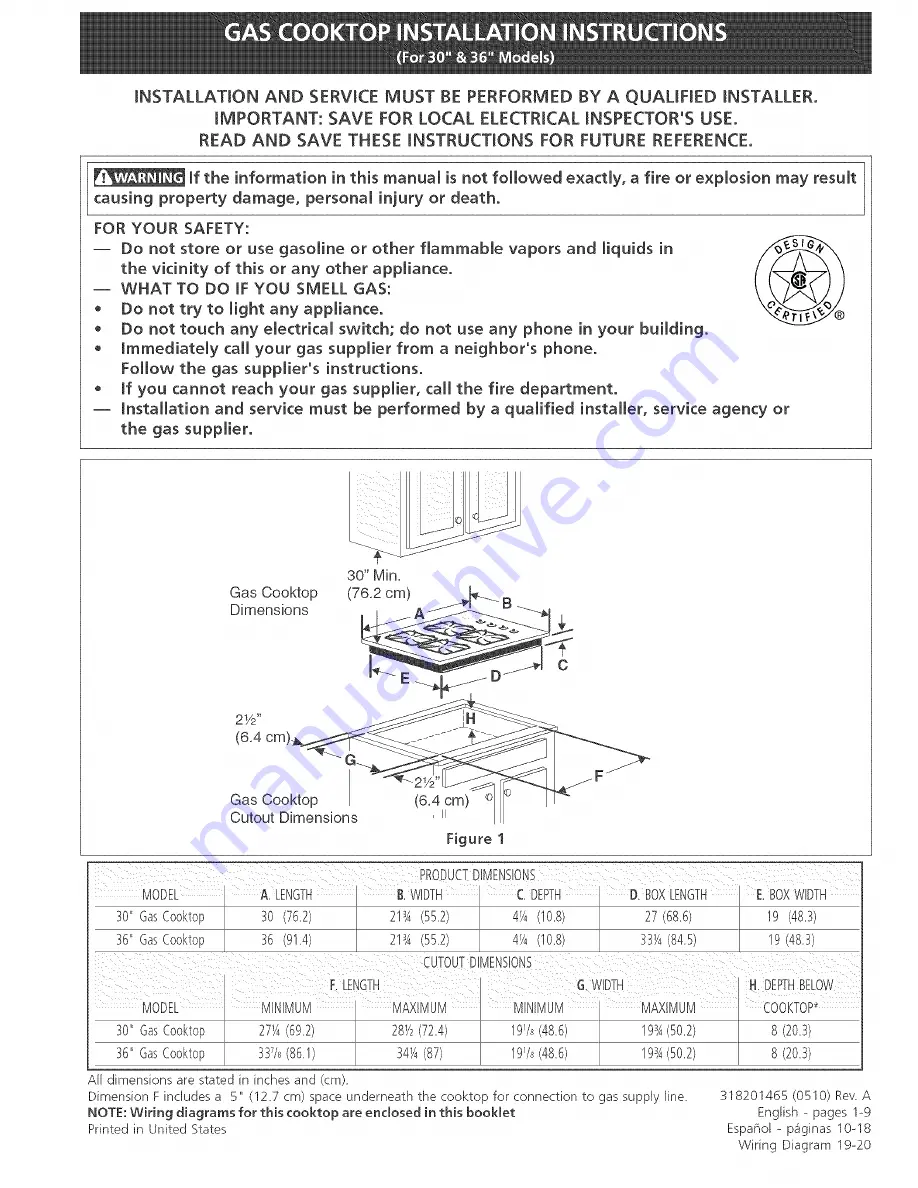
background image

Summary of Contents for 3243 - 36 in. Sealed Gas Cooktop

Page 1: ...from a neighbor s phone Follow the gas suppIier s instructions mfyou cannot reach your gas supplier caI the fire department mnstaiiation and service must be performed by a qualified installer service agency or the gas supplier Gas Cooktop Dimensions 21 2 Gas Cooktop 6 4 cm Q Cutout Dimensions u Figure 1 30 GasCooktop 30 76 2 21sA552 4_ 4 10 8 27 68 6 I9 48 3 36 GasCooktop 36 91 4 2134 55 2 4_ 4 10...

Page 2: ...gas and generating heat there are certain safety precautions you should follow You will find them in the Use and Care Guide read it carefully Be sure your cooktop is installed and grounded properly by a qualified installer or service technician This cooktop must be electrically grounded in accordance with local codes or in their absence with the National Electrical Code ANSI NFPA No 70 latest edit...

Page 3: ...otected Wood or Metal Cabinet _To eliminate the risk of burns or fire from reaching over heated surfaces cabinet storage space located above the cooktop should be avoided If cabinet storage is provided risk can be reduced by installing a range hood that projects horizontally a minimum of 5 I 2 7 cm beyond the bottom of the cabinets Drawers Cannot BeUsed with This Cooktop Since Burner Box Extends 3...

Page 4: ...l Oven 14 _ 18 45 7 cm Max _ Manifold Pi 61 2 5 16 5 cm Flare 12 7 cm Min Union Flexible Connector Cabinet sides or filler panel Cabinet Flare Union A A 120V 60Hz Grounded Outlet Pressure Regulator Manual Shutoff Valve To be accessible for shut off valve opera tion 4 10 2 cm Right Side of Cabinet ...

Page 5: ...cooktop models See Typical Gas Cooktop Installation Over an Electric Builtqn Oven Installed Under the Counter on previous page 32 Min 81 3 cm 36 91 4 cm Use 3 4 1 9 cm plywood installed on two runners flush with toe plate Must be capable of supporting 150 Ibs Cut an opening in wood base minimum 9 22 9 cm x 9 22 9 cm 2 5 1 cm from left side filler panel to route armoured able to junction box 4 1 2 ...

Page 6: ...the cooktop and must remain in series with tile supply line For proper operation the maximum inlet pressure to the regulator must be no more than 14 of water column W C pressure For checking the regulator the inlet pressure must be at least I or 2 5 kPa greater than the regulator manifold pressure setting The regulator is set for 4 of manifold pressure the inlet pressure must be at least 5 Tile ga...

Page 7: ...losing Do not block access to the shutoff valve The valve is for turning on or shutting off gas to the appliance Shutoff Valve Open position Figure 6 Once regulator is in place open the shutoff valve in the gas supply line Wait a few minutes for gas to move through the gas line Check for leaks After connecting the cooktop to the gas supply check the system for leaks with a manometer If a manometer...

Page 8: ...enough to cause burns Instal Burner Caps This cooktop is equipped with sealed burners as shown see Figure 8 A Unpack your burner heads and burner caps B Place burner head over each gas orifice matching the head with the orifice size Be careful not to damage the electrode while placing the head over the orifice Make sure electrode fits correctly into slot in burner head C Place a burner cap on each...

Page 9: ...trol knob insert a thin bladed screw driver into the hollow valve stem and engage the slotted screw inside Flame size can be increased or decreased with the turn of the screw To increase flame size turn the screw counterclockwise and to decrease turn clockwise Adjust flame until you can quickly turn knob from HI to LOWESTPOSITIONwithout extinguishing the flame Flame should be as small as possible ...

Page 10: ... al departamento de bomberos La instalad6n y el servicio t_lefonico deben set realizados pot un instalador calificado pot un servicio tecnico certificado o pot el abastecedor de gas Dimensiones de ia parriiia de cocinar 21 2 _ 6 4 30 M_n 76 2 cm _ B Dimensiones del hueco de 6 4 cm II ia parriiia de cocinar Figura 1 A ALTURA B ANCHURA C PROFUNDIDAD D LARGO DELACAJAE ANCHO DELACAJA 30 76 2 213A 55 2...

Page 11: ...lor deben seguirse ciertas medidas de seguridad Vienen con el Manual del Usuario Lea atentamente el manual AsegQrese que ta plancha de codnar sea instalada y puesta a tierra correctamente pot un instalador o t_cnico calificado La plancha de cocinar debe conectarse el_ctricamente a tierra de acuerdo con los c6digos locates o de no existir con et c6digo eI6ctrico ANSt NFPA No 70 Qitima edid6n en los...

Page 12: ...icie deberia evitarse el espacio de almacenamiento del armario ubicado sobre las unidades de la superficie Si se cuenta con este espacio se puede disminuir el peligro instalando una cubierta de cocina que se extienda horizontalmente en 5 12 7 cm mfnimo pot sobre la parte inferior delantera en los armarios No es posible utilisar caiones con esta parrilla de cocinar porque la caja de empalme se exti...

Page 13: ...ti Conector Uni6n Cabinet sides or filler panel n 18 45 7 cm Max _ I i 61 2 5 13 5 cm 2 7 cm Min Uni6n 120V 60Hz Uni6n Toma de corriente a tierra A _j regulador de presi6n 4 10 2cm Lado derecho del armario V_lvula de cierre manual Debe de set accessible para el funciona miento de la valvula de cierre Armario del homo de pared 13 ...

Page 14: ...do instaJado deba o de mostrador en la pagina 4 32 81 3 cm Minimo Caja de empalme a tierra de 208 240 voltaje para homo empotrado Utilice 3 4 1 9 cm de madera contrachapada instalada sobre 2 ruedas perpendicular a una cima de contorno de pJaca Debe de poder sostener 150 bs _ orte una abertura en la basa de madera mfnimo 9 229 cm x 9 22 9 crn 2 El cm de entrepano enador izquierdo para conducir el c...

Page 15: ...n de entrada m_xima ha ia el regulador no debe exceder 14 de presion de la columna de agua Para controlar el regulador la presi6n de entrada debe set de al menos I o 2 5 Kpa mayor que el ajuste de la presi6ndelmQItipledelregulador EIreguladorseajustaa 4 de la presi6n del m01tiple la presion de entrada debe de set de al menos 5 La Ilnea de suministro de gas por el horno deberla tener un tubo de 1 2...

Page 16: ...No bloquee las entradas de la valvula de cierre La valwJla sirve para abrir o cerrar el paso del gas al artefacto AbJerta Figura 6 Abra la v_lvula de cierre en el tubo de suministro de gas Espere unos minutos para que el gas pase a traves del tubo de gas Verifique si hay fugas Luego de conectar la cocina al gas verifiqueelsistemaconunmanOmetro Sinocuenta con 6ste instrumento de la vuelta al sumini...

Page 17: ...onsibilidad y la obligaci6n del consumidor reemplazarlo por el enchufe de pared a tierra de tres patas correspondiente No debe bajo ninguna circunstanda cortar o ret rar a tercera pata tierra de cable de encend do Desconecte el cable del suministro electrico del enchufe de pared antes de reparar la plancha de cocinar Verifique la operad6n Refiera al Manual del Usuario que viene con la plancha de c...

Page 18: ...el v_stago del agujero de la valvula y encaje el tornillo ranurado El tamafio de la llama se puede aumentar o disminuir girando el tornillo Gradue la llama hasta que se pueda girar rapidamente hacia abajo desde HI hasta LOWEST POSITIONsin apagar la llama La llama debefia ser Io mas baja posible y estable sin apagarse E Si se desea ajustar otro quemador repita los pasos de A a D descritos hasta que...

Page 19: ... UL STYLE HODO UL STYLE UL L CAUTION LABEL ALL WIRES PRICQ TO DISCONNECTICN WHEN SERVICING CONTROLS WIRIM ERROR CAN CALS_E iMPROPER AN DANGEROUS OPERAEION VERIFY PROPER OPERATION AFTER _RVICING AViSO E IOb_TE TOGOS LOS ALAMBRES ANTES DE OESC_NECTAR PAR REALiZAR ET MANTENIMIENTB DE LOS CCNTROLEBERROR DE ALAMRRAJE PBED_ CAUSAR UN FUNCIONAMIENTB INCORRECTO Y PELIGROBOVERIObE S EL FUNC ONAMIENTB ESTA ...

Page 20: ... PilzD C J R N LJNCIUXr_N I 0 I C _I C v G O VROk_ SI FI UN ISX H EN O E91 _ C O DI IU D v 1 1iN v N O AVE T t SS NENT E J0i ETER CIiAO _ Fli AV N_ i_ D_ NCI4EN_N_ D_ C_UX CJ kiN_ E_r_uR D_ _ _NCI_i I_Ui C USEI_ U_ _ Ol_i_AI ON DANGEi_USF V_I_ I _ iEl LF B_ F0_ 0NN_NEN_ D_ i A_P R_ I APSES 0UTE RF_ARA i0N C IRE E_R Jl I I ONi JN S J d S i_ ENC CENIF_ Ni ENC DE j d_SEl_ O J _Z_d E DEliECliC F I I I...

Reviews: