background image

Summary of Contents for 79036673401

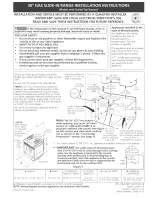
Page 1: ...9 cm clearance for door depth when 1 5 16 purchase optional side panels see figure 30 x 12 333 cm on left corner and clear wide cooktop 76 2cm X Recommended area for rim as shown in the Countertop 0 5cm wall connection of manual Recommended shut off valve outside the Preparation section see page 3 area for electrical cut out area as wall oulet mentionned on page 4 For cutouts below 22 7 8 581 cm a...

Page 2: ...ake sure the wall coverings around the range can withstand the heat generated by the range Do not obstruct the flow of combustion air at the oven vent nor around the base or beneath the lower front panel of the range Avoid touching tile vent openings or nearby surfaces as they may become hot while the oven is in operation This range requires fresh air for proper burner combustion Never leave child...

Page 3: ...ts Provide an adequate Gas Supply When shipped from the factory this unit is designed to operate on 4 10 16 cm water column 0 kPa Natural gas manifold pressure A convertible pressure regulator is connected to the range manifold and MUST be connected in series with the gas supply line If LP Propane conversion kit has been used follow instructions provided with the kit for converting the pressure re...

Page 4: ...iance li Shutoff Valve Open position Figure 6 Once regulator is in place open the shutoff valve in the gas supply line Wait a few minutes for gas to move through the gas line Check for leaks After connecting the range to the gas supply check the system for leaks with a manometer If a manometer is not available turn on the gas supply and use a liquid leak detector or soap and water at all joints an...

Page 5: ...ked by a qualified electrician to make sure the receptacle is properly grounded Where a standard 2 prong wall receptacle is installed it is the personal responsibility and obligation of the consumer to have it replaced by a properly grounded 3 prong wall receptacle Do not under any circumstances cut or remove the third ground prong from the power cord Disconnect electrical supply cord from wall re...

Page 6: ...e cooktop overhang slightly touches the countertop Tile cooktop must not support the unit 13 Then carefully screw in the front two leveling legs similar to 1 until the cooktop overhang touches slightly the countertop 14 1fthe range is not level pull unit out and readjust leveling legs or make sure floor is level Installation For 29 Cutout Wide Opening 1 You must replace the actual side trims by ne...

Page 7: ... Burners and Oven Adjustments 9 5 1 Electric Ignition Burners Operation of electric igniters should be checked after range and supply line connectors have been carefully checked for leaks and range has been connected to electric power The oven burner is equipped with an electric control system as well as an electric oven burner igniter If your model is equipped with a waist high broil burner ignit...

Page 8: ...ew Replace oven bottom Oven _ Burner Tube _ Orifice Hood Figure 12 9 5 3 Air Shutter BroiJ Burner The approximate flame length of the burner is inch distinct inner blue flame To determine if the broil burner flame is proper set the oven to broil If flame is yellow in tease air shutter opening size see 2 in Figure 12 If tile entire flame is a distinct blue reduce the air shutter opening size To adj...

Page 9: ...crete 1 Unfold paper template and place it flat on the floor with the back and side edges positioned exactly where the back and sides of range will be located when installed Use the diagram below to locate brackets if template is not available 2 Mark on the floor the location of the 4 mounting holes shown on the template For easier installation 3 16 0 5 cm diameter pilot holes 2 1 27 cm 1 3 cm dee...

Page 10: ...tenimiento deben set efectuados pot un instalador calificado la agencia de servicio o el proveedor de gas Aparatos JnstaJados en el estado de _71assachusetts Este Aparato solo puede ser instalado en el estado de Massachusetts por un plornero o ajustador de gas Jicenciado de Massachusett Este aparato se debe instaJar con un largo conector flexible de gas de tres 3 pies 36 pulgadas Una va lvula manu...

Page 11: ...el calor generado pot la estufa No obstruya et flujo del aire de combustion en a ventilaci6n de homo ni tampoco alrededor de la base o debajo dem panel inferior delantero de la estufa Evite tocar lasaberturaso a_reascercanas de la ventilaciOn ya que pueden estar muy calientes duranteelfuncionamientodel homo La estufa requiere aire fresco para la combustion apropiada de los quemadores Nunca deje ni...

Page 12: ...ordes de la abertura del mostrador 12 Propordone un suministro de gas adecuado Cuando se env a de la fabrica Esta unidad ha sido ajustada para operar con un m01tiple de admisi6n para gas natural de 4 0 16 cm 0 kPa Un regulador de presion convertible esta conectado a la valvula distribuidora y DEBEser conectado con la tuberia del suministro de gas Si el juego de conversi6n del propano LP Propano se...

Page 13: ...abra la valvula enlalineadelsuministrodegas Esperealgunos minutos para que el gas pueda moverse a trav6s de la linea de gas Compruebe para saber si hay fugas de gas Despues de conectar la estufa con la fuente de gas compruebe el electrodomestico para saber si hay fugas con un manometro Siun mantOmetronoest_disponible girela fuente de gas y utilice un detector I quido de fugas o jab6n y agua en tod...

Page 14: ...ra ta seguridad personal este aparato debe set puesto a tierra apropiadamente El cable del suministro electrico de esta estufa esta equipado con un enchufe de tres patillas para puesta a tierra que coincida on un enchufe de pared estandar con puesta a tierra de tres patillas para minimizar la posibilidad que se produzcan descargas electricas EI cliente debera encargar a un tOcnico para asegurarse ...

Page 15: ...er la unidad 13 Entonces enrosque on cuidado en la frente las dos patas niveladoras semejante a 11 hasta que la plancha de cocina toque ligeramente el mostrador 14 Si la estufa no es plana tira la unidad fuera y aiusta de nuevo las patas niveladoras o asegures _de que el piso este nivelado tnstalaciOn Para un Recorte de Abertura Ancho De 29 1 Usted debe substituir los paneles laterales reales por ...

Page 16: ...electrka La operac ion de los encendores electricos debe de ser revisada despOesde que la cocina y los conectores de la I nea de suministro haya sido cuidadosamente revisada para descartar fugas y que la cocina haya sido conectada a la coriente el _ctrica El quemador del horno est equipado con un sistema de control electrico asi como un encendedor de quemador de horno electrico Sisu modelo esta eq...

Page 17: ...ierre Niveiacidn de ia estufa Nive e a estufa y ajuste a a tura de a estufa antes de nsta ar a en a abertura j Figure 13 1 Coloque una parilla del homo en el centro del homo 2 Ponga un nivel sobre la parrilla figura 10 Tome dos lecturas con el nivel puesto diagonalmente en una direcci6n y despues en la otra Nivele la estufa si es necesario ajustando las 4 patas niveladoras con una Ilave de tuercas...

Page 18: ...stufa seran colocados cuando sea instalada Use el diagrama siguiente para ubicar los soportes si no se dispone de la plantilla 2 Marque en el piso la ubicacion de los 4 agujeros de montaje como se muestra en la plantilla Para facilitar la instalacion se pueden taladrar aguieros piloto de 3 16 0 5 cm de dia y 1 2 1 3 cm de profundidad en el piso 3 Saque la plantilla y coloque los soportes en el pis...

Page 19: ... td IN ERRUPfOR E IUZ S H RNO _ AHPE FOUR S _ A _ _ I PIC_OR DE CERRSJO NrEI _RUIS EU_ LAHaE FOUR z HC UR v_R C IGY 4 _8_j _ BK 4Nt _ 14 14 W 14 R 4 NO NC BK 14 o L R 6 R 6 BRKE IGNITER ENCENDiDO DE IORNEAR E_ECTRONiC OVEN CONTRO CONTRO EIECTRONICO DE HORNO CONTR01E EiECTRONIOUE ES 335 6 5 15 i _C OOOOOrbc O001 i i 7y _1 V 14 L I vt4 i FEHPERA FLJRE PROSE i SONDA DE E_IPER _TURA SONDE rl_ RH SUE i...

Page 20: ... _ I IE BI _NCO BI ANO O i ORfSNGE NARAJ_C O_ANGE I Y I Y _l _ O APIAR I I O JAUN CAUT ON AlJl A _ R S PFilOFi I0 DI CONN CFION WII N _5EF _ IC N NTRO i W_R NG ERROR CAN CAU5_ I HPROPER AND DANGEROUS OPERAT ON VER FY PROPER OPERAT iON AFTER SERV I C I NG AViSO ETIQUETE TOOOS LOS ALAMBRES ANTES DE EESCONECTAR P_R _A I ZAR I MANIENIM INIO 1 I O_ CON ROI I _ EFtR Fe D ALAMBRA E PUEDE CACSAR UN FUNCIO...

Reviews: