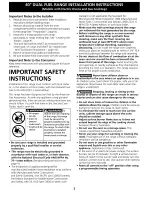
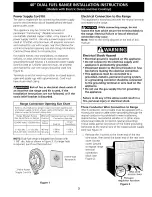
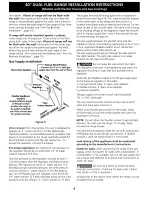
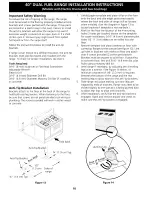
background image

Summary of Contents for 79074503990

Page 1: ...rvice must be performed by a qualified installer service agency or the gas supplier 40 1 8 Min 101 9 cm Min Min 45 7 cm Min 33 cm Min Grounded 24 Min Wall Outlet 61 cm Min 24 1 2 Max 62 2 cm Max Do not pinch the power supply cord between the range and the wall 9 28 1 8 71 4 cm with handle 1 36 91 4 cm with feet extended NOTE 24 61 cm minimum clearance between the cooktop and the bottom of the cabi...

Page 2: ...ome Installation 1982 Manufactured Home Sites Communities and Setups ANSI Z225 1 NFPA 501A latest edition or with local codes Make sure the wall coverings around the range can withstand the heat generated by the range Before installing the range in an area covered with linoleum or any other synthetic floor covering make sure the floor covering can withstand heat at least 90 F 32 C above room tempe...

Page 3: ...in NOTE Dual fuel range is shipped from factory with 1 1 8 dia hole as shown in figure 3 If a larger hole is required punch out the knockout 3 Wire Power Supply Cord Kit 3 Wire Wall Receptacle Figure 1 3 Electrical Connection to the Range This appliance is manufactured with the neutral terminal connected to the range While connecting range do not loosen the nuts which secure the terminal block to ...

Page 4: ...he terminal block and connect the other wires to the outer terminals Match wires and terminals by color red wires connected to the right terminal black wires connected to the left terminal 6 Replace the 3 nuts on the terminal block see fig 4 7 Lower the terminal cover and replace the 3 screws Block Silver Colored Terminal 1 1 8 Dia Direct Connection Hole Punch out knockout for 1 3 8 Dia Cord Kit H...

Page 5: ...Copper Wire White Wire Neutral Cable from Conduit Appliance Connector or CSA listed Figure 6 4 Wire Electrical System example Junction Box Center Line of Range 20 _ _ _ m_ 41 50 8 cm 7 Max _ _ 17 8cmMax _ _ Center _ Line of Locate Electrical Hook up Range Inside Shaded Area Figure 7 J Range Placement To eliminate the risk of burns or fire by reaching over heated surface units cabinet storage space...

Page 6: ... Figure 9 This valve should be located in the same room as the range and should be in a location that allows ease of opening and closing Do not block access to the shutoff valve The valve is for turning on or shutting off gas to the appliance Open the shutoff valve in the gas supply line Wait a few minutes for gas to move through the gas line The gas supply between the shutoff valve and the regula...

Page 7: ... responsibility for the conversion Moving the Appliance for Servicing and Cleaning Turn off the range line fuse or circuit breakers at the main power source and turn off the manual gas shut off valve Make sure the range is cold Remove the service drawer and open the oven door Lift the range at the front and slide it out of the cut out opening without creating undue strain on the flexible gas condu...

Page 8: ... range 3 Firmly grasp the range and gently lay it on its back on the cardboard corners 4 Remove and save the 4 shipping bolts from the skid Discard skid 5 Install 4 shipping bolts as leveling legs 6 Lay a large piece of cardboard in front of the range Carefully stand the range upright on cardboard 7 Adjust the leveling legs to a point where the range base does not touch the floor Leveling the Rang...

Page 9: ...eration of the electronic oven controls once more Refer to the Use and Care Guide for operation Follow the instructions for the Clock Timer Bake Broil Convection some models and Clean some models functions When checking oven element operation do not touch the elements They will be hot enough to cause serious burns Bake After setting the oven to 350 F 177 C for baking the lower element in the oven ...

Page 10: ...ide edges positioned exactly where the back and sides of range will be located when installed Use the diagram in figure 13 to locate brackets if template is not available 2 Mark on the floor the location of the 4 mounting holes 2 holes per bracket shown on the template For easier installation 3 16 4 8 mm diameter pilot holes 1 2 1 3 cm deep can be drilled into the floor 3 Remove template and place...

Page 11: ...NOTES 11 ...

Page 12: ...el servicio de mantenimiento deben ser efectuados por un instalador calificado la agencia de servicio o el proveedor de gas 28 1 8 71 4 cm con 40 1 8 Min B tirador 101 9 cm Min 13 Min 36 45 7 cm Min 33 cm Min A 91 4 cm pierna extendida Tomacorriente de 24 Min pared puesto a tierra 61 cm Min 24 1 2 M_tx 62 2 cm M_tx No pellizque el cordon electrico entre la estufa y la pared No selle la estufa a lo...

Page 13: ...te 3280 Anteriormente el Federal Standard for Mobil Home Construction and Safety t tulo 24 HUD parte 280 o cuando tal est_ndar no se aplica el Standard for Manufactured Home Installation 1982 Manufactured Home sites Communities and Setups ANSI Z225 1 NFPA 501A edici6n m_s reciente o con los c6digos locales Asegt_rese de que el material que recubre las paredes alrededor de la estufa pueda resistir ...

Page 14: ... electrico Vea la placa de serie de la cocina para informaci6n sobre el regimen de kilovatio 120 240 Volts 120 208 Volts Minimo regimen de amperios de ensamblaje del cord6n 0 16 5 Kw 0 12 5 Kw 40 Amp 16 6 22 5 Kw 12 6 18 5 Kw 50 Amp Diametro pulgadas de abierta de conexi6n de cocina Dimensi6n Conexi6n agujero directo Connexi6n 1 3 8 pulg 1 1 8 pulg 1 3 8 pulg 1 3 8 pulg NOTA La estufa bi energi_i ...

Page 15: ...donde se quit6 el tornillo de puesta a tierra vea figura 4 5 Conecte el alambre neutro blanco del cord6n el_ctrico de cobre al terminal de color de plata en el centro del bloque y conecte los otros alambres al los terminales laterales Conecte los alambres y terminales emparejando los colores los alambres rojos conectsdos al terminal derecho los alambres negros conectados al terminal izquierdo 6 Re...

Page 16: ...rn 20 _ _ pAREI m _4 _ 50 8 cm i _ s O c I 7 M_x 17 8 cm M_ix _ _ CL _ de la Z Ubique Io electrico estufa dentro del area sombreada Figura 7 Estufa Emplazamiento Para eliminar el riesgo de quemadu ras e incendios al tocar superficies soDrecalen aaas se GeDe evitar colocar espacio para armarios de almacenamiento sobre las estufas con elementos al descubierto Si se instalan armarios sobre la estufa ...

Page 17: ...as Espere unos minutos a que el gas se mueva por el tubo El suministro de gas entre la v_lvula de cierre y el regulador se puede conectar con tuber a r gida o con tuber a flexible union met_lica conectada y aprobada por la AGA CGA donde los cOdigos locales permiten La tuber a del suministro de gas puede pasar por la pared lateral delarmarioderecho Elarmariolateral derecho es un lugar ideal para la...

Page 18: ... conversi6n apropiada puede resultar en lesiones graves y daflos a la propiedad La instalaci6n y el servicio de mantenimiento deben ser efectuados por un instalador calificado la agencia de servicio o el proveedor de gas La mudanza del aparato para reparaciones o limpieza Apague la corriente el_ctrica a la estufa a la fuente de poder principal y apague la v_lvula de cierre manual de gas Aseg0rese ...

Page 19: ...tufa 2 Tome las 4 esquinas de cart6n de la caja de empaque Col0quelas una encima de otra Repita esta operaci0n con las otras 2 esquinas Coloque las esquinas Iongitudinalmente en el piso detr_fls de la estufa para apoyarla 3 Sujete firmemente la estufa y suavamente recu_stela en su respaldo en las esquinas de carton 4 Quite y guarde los 4 pernos de empaque de la corredera Descarte la corredera 5 In...

Page 20: ... que Ud verifique el funcionamiento de los controles del horno una vez m_s V_ase el Manual del Usuario para la operaci6n Siga las instrucciones par el Reloj Minutero Cocer Asar Covecci6n algunos modelos y las funciones de limpieza algunos modelos AI verificar el funcionamiento de elemento de horno no toque los elementos EIIos tendr_n el calor bastante para causar las quemaduras serias Cocer Bake D...

Page 21: ...trasero colocados exactamente donde la parte trasera y los lados de la estufa ser_n colocados cuando sea instalada Use el diagrama figura 13 para ubicar los soportes si no se dispone de la plantilla 2 Marque en el piso la ubicaci6n de los 4 agujeros de montajecomose muestraen la plantilla Para facilitar la instalaci6n se pueden taladrar agujeros piloto de 3 16 4 8mm dedi_m y 1 2 1 3 cm de profundi...

Page 22: ...NOTAS 22 ...

Page 23: ...D ROJO FII_HED DA _ODO UL m_ I I0 150 3321 O ORANGE NARAJA Y YELLOW AMARILLO _ 12 15_ 332_ BR BROWN MORENO BL BLUE AZUL 3 14 150 3321 PK PINK ROSA GY GREY GRAY 4 16 150 3321 V V I OLET V I OLETA 5 18 150 3321 B W BLACK WH TE NEGRO BLAk O 6 18 125 3173 OR BL ORANGE BLUE NARANJA AZLL 7 18 200 312_ _B io_ _o_ COLOR CODE COOIGOS BE COLOR 9 18 200 3304 OVEN CIRCUIT CIRCUITO DE HORNO DOOR LATCH SWITCH I...

Page 24: ...24 ...

Reviews: