background image

Summary of Contents for Elite 790.9715 series

Page 1: ...Use Care Guide English Models 790 9715 _ Ke Elite Ct F C mllimmlli _ Color number P N A04475902 Rev A Sears Brands Management Corporation Haft man Estates IL 60179 U S A www kenmore com ...

Page 2: ... service technician to clean or maintain this appliance or to instruct the user in correct appliance installation operation and main tenance 6 Service calls to correct appliance installation not performed by Sears authorized service agents or to repair problems with house fuses circuit breakers house wiring and plumbing or gas supply systems resulting from such installation 7 Damage to or failure ...

Page 3: ...ce Do not remove model serial number plate Proper Installation Be sure your appliance is properly installed and grounded by a qualified technician in accordance in the United States with the National Electrical Code ANSI NFPA No 70 latest edition and local code requirements and in Canada with CSA C22 1 PART 1 latest edition and local code requirements Install only per installation instructions pro...

Page 4: ...a power failure If the power fails always turn off the unit If the unit is not turned off and the power resumes the appliance will not operate and an error message will be displayed Once the power resumes and the oven funct on Electronic controllers can be damaged by cold temperatures When you use your appliance for the first time or if it has not been used for a long period of time make sure that...

Page 5: ...and grasp the rack with both hands to reposition Do not let pot holders contact the hot oven element or interior of the oven Do not use a broiler pan without its insert Broiler pan and grid allow dripping fat to drain and be kept away from the high heat of the broiler Do not cover the broiler grid or oven bottom with aluminum foil Exposed fat and grease could ignite Do not touch a hot oven light b...

Page 6: ...Automatic oven door light switch 12 SelFclean door latch 13 Broil element 14 Manual cleaning oven interior 15 Self cleaning oven interior 16 Convection bake cooking system 17 Oven interior light with removable cover 18 Adjustable interior oven rack s 19 3 piece handle 20 Stainless steel oven door with window 21 Bake element 22 Storage drawer 23 Auxiliary oven vent 24 Main oven vent 25 7 single rad...

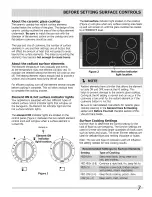
Page 7: ...icator lights Your appliance is equipped with two different types of radiant surface control indicator lights that will glow on the backguard the Element On indicator light and the hot surface indicator lights The element ON indicator lights are located on the control panel Figure 1 between the two radiant element control knob and will glow when a surface element is turned ON etement on Element ON...

Page 8: ... The cookware material determines how evenly and quickly heat is transferred from the surface element to the pan bottom The most popular materials available are Aluminum Excellent heat conductor Some types of food will cause it to darken Anodized aluminum cookware resists staining pitting If aluminum pans slide across the ceramic glass cooktop they may leave metal marks which will resemble scratch...

Page 9: ...N indicator lights will glow when one or more elements are turned ON A quick glance at these indicator lights when cooking is finished is an easy check to be sure all surface elements are turned OFF See Recommended Setting for Surface Element table on Figure 2 Do not place plastic items such as salt and pepper shakers spoon holders or plastic wrappings on cooktop when it is in use These items coul...

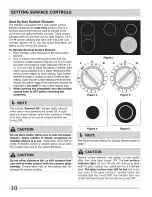
Page 10: ...he surface heating area 3 When cooking has completed turn the surface control knob to OFF before removing the cookware Figure 2 Figure 1 Figure 3 The surface Element ON indicator lights will glow when one or more elements are turned ON A quick glance at these indicator lights when cooking is finished _san easy check to be sure all surface elements are turned OFF Do not place plastic items such as ...

Page 11: ...dge element correctly 3 When cooking has completed turn the surface control knob to OFF before removing the cookware The BRIDGE element may also be used in combination with the left rear single element Figure 6 Because these elements have 2 different controls one element can be used to cook while the other element may be used to keep food warm Figure 2 Figure 1 Figure 3 Do not place plastic items ...

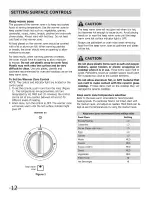
Page 12: ... HI and LO for different levels of heating 2 When done turn the control to OFR The warmer zone will remain warm until the hot surface indicator light goes off etement on The keep warm zone will not glow red when it is hot but becomes hot enough to cause burns Avoid placing hands on or near the keep warm zone until the keep warm zone hot surface indicator light is OFR Always use potholders or oven ...

Page 13: ...ons Some models are equipped with a blower which runs in baking and self cleaning mode to keep all internal components at a cool temperature The blower may keep running even if the oven has been turned OFF until the components have cooled down Air circulation in the oven Tf using 1 rack Figure 2 place in center of oven If using multiple racks Figure 3 stagger cookware as shown For best air circula...

Page 14: ...ing cycle start time 6 Set clock pad Use to set the time of day 7 Lockout pad Use to lock the oven door and the control panel pads 8 Bake pad Use to select the bake cooking feature 9 Broil pad Use to select the broil cooking feature 10 Keep warm padmUse to keep the dishes and food warm until served 11 Convect convert pad Use to convert a regular recipe temperature to a convection temperature 12 Co...

Page 15: ...nd the control beep once 3 Press SELF CLEAN to switch between the 12 and 24 hour time of day display The display will show either 12h or 24h 4 Press START to accept the change or press CANCEL to reject the change 5 Reset the correct time as described in To set the Clock above Please note that if the 24 hour time of day mode was chosen the clock will now display time from 0 00 through 23 59 hours S...

Page 16: ... DELAY START and SELF CLEAN pads control the Silent Control operation feature The Silent Control operation feature allows the oven control to be operated without sounds or beeps whenever necessary If desired the control can be programmed for silent operation and later returned to operating with all the normal sounds and beeps To change control from normal sound operation to silent control operatio...

Page 17: ...e oven for Convection Bake and temperature to 375 F 1 Arrange interior oven racks and place food in oven 2 Press CONVECT BAKE CONV BAKE will flash and 350 will appear in the display If a Convection Bake of 350 F is needed press START 3 Press 3 7 5 CONV BAKE will keep flashing and 375 will appear in the display 4 Press START CONV BAKE will stop flashing and the fan icon will appear in the display A...

Page 18: ...essCONVECT ROAST CONV ROAST will flash and 350 will be displayed 3 Press 3 7 5 CONV ROAST will flash and 375 will appear in the display 4 Press START CONV ROAST and 375 will appear in the display The convection fan icon will come on A beep will sound once the oven temperature reaches 375 R U P ess ng CANCEL w fl stopthefeatu eatany t me SETTING CONVECTION CONVERT The CONVECT CONVERT pad is used to...

Page 19: ...Timed Convection Bake 12 24 hours in advance set the control for the 24 hour time of day display mode To program the oven for a delayed BAKE start time example baking at 350 F starting at 5 30 and baking for 30 minutes 1 Be sure that the clock is set with the correct time of day 2 Arrange interior oven racks and place the food in the oven 3 Press BAKE 350 will appear and BAKE will flash in the dis...

Page 20: ...xtinguisher DO NOT put water or flour on the fire Flour may be explosive and water can cause a grease fire to spread and cause personal injury PressingCANCEL will stop the feature at any time To 1 3 4 6 7 set a Broil of 500 F Place the broiler pan insert on the broiler pan available by mail order Then place the food on the broiler pan insert DO NOT use the broiler pan without the insert DO NOT cov...

Page 21: ...urn ON automatically after Timed Bake has finished 4 To turn the Keep Warm feature OFF at any time press CANCEL Note The KEEPWARN feature will automatically turn OFF after 3 hours PressingCANCEL will stop the feature at any time SETTING MY FAVORITE The Ny Favorite pad is used to record and recall your favorite recipe settings This feature may store and recall from 1 to 3 different settings The My ...

Page 22: ...lidays The maximum delay time is 11 hours 59 minutes 6 The oven will turn ON and begin heating 7 Press and hold both the BAKE TIME and DELAY START pads for at least 3 seconds SAb will appear in the display Once SAb appears in the display the oven control will no longer beep or display any further changes and the oven is properly set for the Sabbath feature You may change the oven temperature once ...

Page 23: ... or the Broil temperature To adjust the oven temperature higher 1 Press BAKE for 6 seconds 0 will appear in the display 2 To increase the temperature use the number pads to enter the desired change Example 30 F 30 The temperature may be increased as much as 35 E 3 Press START to accept the temperature change and the display will return to the time of day Press CANCEL to reject the change if necess...

Page 24: ...or liner outside the oven door gasket and the small area at ii the front center of the oven bottom These areas heat ii suffidently to burn soil on Clean with soap and water See additional cleaning information for the oven door in the General Care Cleaning section DO NOT HAND CLEAN OVEN DOOR GASKET DO HAND CLEAN DOOR What to Expect during Cleaning While the oven is in operation the oven heats to te...

Page 25: ...NCEL 2 The oven door can only be opened after the oven has cooled down for approximately 1 HOUR DOOR LOCKED is no longer displayed TO START THE DELAYED SELF CLEAN CYCLE The SELF CLEAN and DELAY START pads controls the Delayed Self Clean operation The automatic timer will turn the oven ON and OFF at the time you select in advance To set the control for the Self Cleaning Cycle to start at a delayed ...

Page 26: ...eoven rackwhileoven is cool Forraremeats position broiler pan closer tothe element upper position Forwell done foodssuch as chicken lobster tails orthick cutsofmeat position the pan further from the element toa bowerposition See table belowforrecommended position Rare steaks auxiliary oven 3 Well done foods such as chicken and lobster Broil Stop Position 2 Turn the Temperature Control Knob to BROI...

Page 27: ...ot removed follow the cooktop cleaning instructions below Cooktop Broiler Pan Insert Gentle scouring with a soapy scouring pad will remove most spots Rinse with a some models Door Liner 1 1 solution of clear water and ammonia If necessary cover difficult spots with an Oven Bottom ammonia soaked paper towel for 30 to 40 minutes Rinse with clean water and a damp cloth then scrub with a soap filled s...

Page 28: ...ces The cleaner can damage these surfaces Porcelain has a smooth finish and is a type of glass fused to metal Oven cleaners can be used on all interior oven surfaces To Clean the Oven Bottom Clean using hot soapy water a mild abrasive cleanser a soap filled abrasive pad or oven cleaner following oven cleaner manufacturer s instructions General Cleaning Remove soils using hot soapy water Do not all...

Page 29: ... or they may crack it I I Cleaning recommendations for the ceramic glass cooktop Before cleaning the cooktop be sure the controls are turned to OFF and the cooktop is COOL DO NOT use a cooktop cleaner on a hot cooktop The fumes can be hazardous to your health and can chemically damage the ceram c g ass surface For light to moderate soih Apply a few drops of CookTop Cleaning Creme directly to the c...

Page 30: ...r parts Special care and cleaning are required for maintaining the appearance of stainless parts Refer to the General Care Cleaning table for detailed cleaning instructions Removing and replacing the main oven door If equipped with hinge style A The door isheavy Forsafe temporarystorage laythe door fiat with the inside of the door facing down To Remove Oven Door 1 Open oven door completely horizon...

Page 31: ...ing recommendations 1 Do not close the oven door until all the oven racks are fully in place 2 Do not hit the glass with pots pans or any other object 3 Scratching hitting jarring or stressing the glass may weaken its structure causing an increased risk of breakage at a later time Changing oven light Be sure the oven is unplugged and all parts are COOL before replacing the oven light bulb Do not t...

Page 32: ...ficult spots with an ammonia soaked paper towel for 30 to 40 minutes Rinse with clean water and a damp cloth Remove all cleaners or the porcelain may become damaged during future heating DO NOT use spray oven cleaners on the cooktop To Replace Storage Drawer 1 Align the glide latches on both sides of the drawer with the slots on the drawer 2 Push the drawer back into the appliance Flammable materi...

Page 33: ...baking needs Set oven temperature 25 F 12 C lower than recommended Cakes not done in Oven too hot Set oven temperature 25 F 12 C lower than the center recommended Incorrect pan size Use pan size suggested in recipe ii Pan not centered in oven Use proper rack position and place pan so there is 5 1cm to 10 2cm 2 to 4 _ of space on all sides of pan Cakes not level Range not level Place a marked glass...

Page 34: ...or tighten bulb See Changing Oven Light section in this Use Care Guide work Electrical power outage Check house lights to be sure Call your local electric companyfor service Surface unit does No power to the appliance Check steps under Entire Range or Oven Does Not Operate in not heat this Before you Call checklist Incorrect control setting Make sure the correct control is on for the surface unit ...

Page 35: ... all products Think of us as a talking owner s manual Power surge protection against electrical damage due to power fluctuations 250 Food Loss Protection annually for any food spoilage that is the result of mechanical failure of any covered refrigerator or freezer Rental reimbursement if repair of your covered product takes longer than promised 25 discount off the regular price of any non covered ...

Page 36: ...6667 wwwokenmore com in Canada 1 800 469 4663 www sears ca Call anytime for the location of your nearest Sears Parts Repair Service Center 1 800 488 1222 U S A 1 800 469 4663 Conodo To purchase a protection agreement on a serviceable product 1 800 827 6655 U S A 1 800 361 6665 Conodo Au Canada pour service en fran_ ais 1 800 LE FOYER Mc 1 800 533 6937 wwwosearsoca Para pedir servicio de reparaci6n...

Reviews: