background image

Sears Brands Management Corporation 

Hoffman Estates, IL 60179 U.S.A.

www.kenmore.com 

www.sears.com

Sears Canada Inc. 

Toronto, Ontario, Canada M5B 2C3

www.sears.ca

Kenmore

®

P/N W10884766B

Gas Range
Estufa a gas
Cuisinière à gaz

Installation Instructions
Instrucciones de instalación
Instructions d’installation

English/Español/Français

IMPORTANT:
Installer:

 Leave installation instructions with the homeowner.

Homeowner:

 Keep installation instructions for future reference.

IMPORTANTE:
Instalador:

 Deje las instrucciones de instalación con el propietario.

Propietario:

 Conserve las instrucciones de instalación para referencia futura.

IMPORTANT :
Installateur :

 Remettre les instructions d’installation au propriétaire.

Propriétaire :

 Conserver les instructions d’installation pour référence ultérieure.

Summary of Contents for W10884766B

Page 1: ... d installation English Español Français IMPORTANT Installer Leave installation instructions with the homeowner Homeowner Keep installation instructions for future reference IMPORTANTE Instalador Deje las instrucciones de instalación con el propietario Propietario Conserve las instrucciones de instalación para referencia futura IMPORTANT Installateur Remettre les instructions d installation au pro...

Page 2: ...instructions If you cannot reach your gas supplier call the fire department Installation and service must be performed by a qualified installer service agency or the gas supplier TABLE OF CONTENTS RANGE SAFETY 2 INSTALLATION REQUIREMENTS 4 Tools and Parts 4 Location Requirements 4 Electrical Requirements 6 Gas Supply Requirements 6 INSTALLATION INSTRUCTIONS 8 Unpack Range 8 Install Anti Tip Bracke...

Page 3: ... or licensed by the State of Massachusetts Acceptable Shut off Devices Gas Cocks and Ball Valves installed for use shall be listed A flexible gas connector when used must not exceed 4 feet 121 9 cm Tip Over Hazard A child or adult can tip the range and be killed Install anti tip bracket to floor or wall per installation instructions Slide range back so rear range foot is engaged in the slot of the...

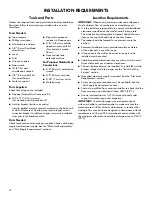
Page 4: ...or where range is to be installed must be sealed Cabinet opening dimensions that are shown must be used Given dimensions are minimum clearances The anti tip bracket must be installed To install the anti tip bracket shipped with the range see the Install Anti Tip Bracket section Grounded electrical supply is required See the Electrical Requirements section Proper gas supply connection must be avail...

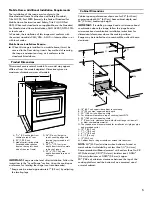
Page 5: ... hood or microwave hood combination above the range follow the range hood or microwave hood combination installation instructions for dimensional clearances above the cooktop surface Range may be installed next to combustible walls with zero clearance NOTE 24 61 0 cm minimum when bottom of wood or metal cabinet is shielded by not less than 1 4 6 4 mm flame retardant millboard covered with not less...

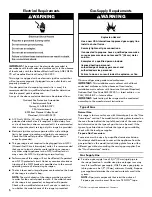
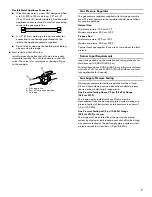
Page 6: ...ads will operate Check with a qualified electrician if you are in doubt as to whether the metal chassis of the range is grounded Gas Supply Requirements Observe all governing codes and ordinances IMPORTANT This installation must conform with all local codes and ordinances In the absence of local codes installation must conform with American National Standard National Fuel Gas Code ANSI Z223 1 late...

Page 7: ...essure 35 5 cm WCP Contact local gas supplier if you are not sure about the inlet pressure Burner Input Requirements Input ratings shown on the model serial rating plate are for elevations up to 2 000 ft 609 6 m For elevations above 2 000 ft 609 6 m ratings are reduced at a rate of 4 for each 1 000 ft 304 8 m above sea level not applicable for Canada Gas Supply Pressure Testing Gas supply pressure...

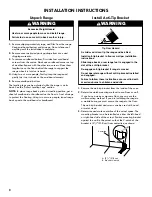
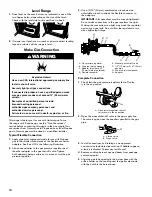
Page 8: ...ip bracket from the inside of the oven 2 Determine which mounting method to use floor or wall If you have a stone or masonry floor you can use the wall mounting method If you are installing the range in a mobile home you must secure the range to the floor This anti tip bracket and screws can be used with wood or metal studs 3 Determine and mark centerline of the cutout space The mounting bracket c...

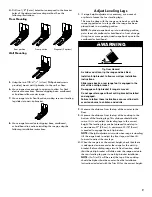
Page 9: ... counter to the floor 3 Measure the distance from the top of the cooktop to the bottom of the leveling legs This distance should be the same If it is not adjust the leveling legs to the correct height The leveling legs can be loosened to add up to a maximum of 1 2 5 cm A minimum of 3 16 5 mm is needed to engage the anti tip bracket NOTE If height adjustment is made when range is standing tilt the ...

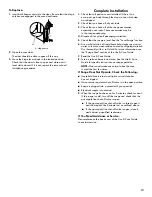
Page 10: ...ulator and cause a gas leak Do not allow the regulator to turn when tightening fittings Complete Connection 1 Check that the gas pressure regulator shut off valve is in the on position 2 Open the manual shut off valve in the gas supply line The valve is open when the handle is parallel to the gas pipe 3 Test all connections by brushing on an approved non corrosive leak detection solution If bubble...

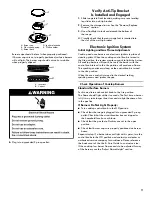
Page 11: ...rol knob is turned to the Lite position When the oven control is turned to the desired setting sparking occurs and ignites the gas Check Operation of Cooktop Burners Standard Surface Burners Push in and turn each control knob to the Lite position The flame should light within 4 seconds The first time a burner is lit it may take longer than 4 seconds to light because of air in the gas line If Burne...

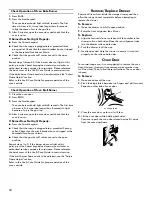
Page 12: ...utlet Check that the circuit breaker has not tripped or the household fuse has not blown Check that the gas shut off valves are set to the open position Repeat steps 1 to 3 If the burner does not light at this point press the Cancel keypad and contact your dealer or authorized service company for assistance Please reference the back cover of the Use Care Guide to contact service If the broil burne...

Page 13: ... caused by shipping material Dry thoroughly with a soft cloth For more information see the Range Care section of the Use Care Guide 7 Read the Use Care Guide 8 Turn on surface burners and oven See the Use Care Guide for specific instructions on range operation NOTE Odors and smoke are normal when the oven is used the first few times If Range Does Not Operate Check the Following Household fuse is i...

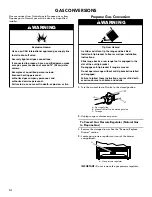
Page 14: ...s If connected to propane have a qualified person make sure gas pressure does not exceed 14 36 cm water column Examples of a qualified person include licensed heating personnel authorized gas company personnel and authorized service personnel Failure to do so can result in death explosion or fire WARNING Tip Over Hazard A child or adult can tip the range and be killed Install anti tip bracket to f...

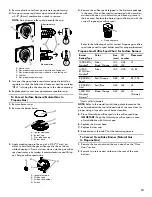
Page 15: ...lacement Propane Gas Orifice Spud Chart for Surface Burners Burner Rating Type Color Size mm ID number Placement 15 000 BTU Stacked Silver Black Orange 1 05 0 32 L105 L32 LF 14 200 BTU Ultra Stacked Silver 1 05 L105 LF RF 8 000 BTU Semi Red Orange 0 85 L85 RR CTR 5 000 BTU Auxi Red Blue 0 65 L65 LR 1 200 BTU Stacked Simmer Black Orange 0 32 L32 LF Simmer Not in all kits models NOTE Refer to the mo...

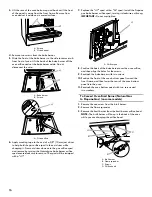
Page 16: ... with a 56 spud Install the Propane gas bake burner orifice spud turning it clockwise until snug IMPORTANT Do not overtighten 8 Position the back of the bake burner over the oven orifice and then align the holes for the screws 9 Reattach the bake burner with two screws 10 Position the front of the oven bottom panel toward the front frame and then lower the rear of the oven bottom panel into the ov...

Page 17: ...RTANT You may have to adjust the low setting for each cooktop burner Checking for proper cooktop flame is very important The small inner cone should have a very distinct blue flame 1 4 to 1 2 6 4 to 13 mm long The outer cone is not as distinct as the inner cone Propane gas flames have a slightly yellow tip 4 Refer to Complete Installation in the Installation Instructions section of this manual to ...

Page 18: ... ST N A 1 75 175 17 000 BTU White Blue 1 90 190 9 200 BTU White Black 1 35 135 8 000 BTU White Yellow 1 25 125 5 000 BTU White Orange 1 00 100 1 200 BTU Black 0 52 52 NOTE Refer to the model serial rating plate located on the oven frame behind the top left hand side of the oven door for proper sizing of spuds for each burner location 5 Place Propane gas orifice spuds in the orifice spud bag IMPORT...

Page 19: ...bottom panel toward the front frame and then lower the rear of the oven bottom panel into the oven 11 Reattach the oven bottom panel with two screws and two washers To Convert Oven Broil Burner Propane Gas to Natural Gas on some models 1 Remove one screw from the broil burner 2 Remove the flame spreader 3 Remove the broil burner from the broil burner orifice hood NOTE The broil burner will hang in...

Page 20: ...n the center of the valve stem The valve stem is located directly underneath the control knob If the Low Flame Needs to Be Adjusted 1 Light one burner and turn to lowest setting 2 Remove the control knob Hold the knob stem with a pair of pliers Use a small flat blade screwdriver to turn the screw located in the center of the control knob stem until the flame is the proper size Turning the screw cl...

Page 21: ...sted locate the air shutter near the center rear of the drawer cavity behind the access panel Loosen the locking screw and rotate the air shutter until the proper flame appears Tighten locking screw 5 Push the Cancel keypad when finished 6 Reinstall the oven bottom and the storage drawer see the Remove Replace Drawer section Adjust Oven Broil Burner Flame if needed Press BROIL and then press the S...

Page 22: ...uerte No almacene o use gasolina u otros líquidos y vapores inflamables cerca de este u otro aparato electrodoméstico PASOS QUE USTED DEBE SEGUIR SI HUELE A GAS No trate de encender ningún aparato electrodoméstico No toque ningún interruptor eléctrico No use ningún teléfono en su casa o edificio Llame inmediatamente a su proveedor de gas desde el teléfono de un vecino Siga las instrucciones de su ...

Page 23: ...etts Reemplace con dispositivos de cierre aceptables las llaves de gas y las válvulas de bola instaladas para el uso deben estar en la lista Si se usa un conector de gas flexible no debe exceder de 4 pies 121 9 cm Peligro de Vuelco Un niño o un adulto puede volcar accidentalmente la estufa y resultar muerto Instale el soporte anti vuelco al piso o a la pared según las instrucciones de instalación ...

Page 24: ... en donde se instalará la estufa deben estar selladas Deben usarse las dimensiones de la abertura del armario que se muestran Las dimensiones proporcionadas son los espacios mínimos Debe instalarse el soporte antivuelco Para instalar el soporte antivuelco que se envía con la estufa vea la sección Instalación del soporte antivuelco Se requiere un suministro eléctrico conectado a tierra Consulte la ...

Page 25: ...ombinación de microondas y campana para ver las medidas de los espacios sobre la superficie de cocción La estufa puede instalarse próxima a paredes combustibles con una separación cero NOTA 24 61 0 cm como mínimo cuando la base del armario de madera o de metal esté protegida por madera moldeada retardante de llama de al menos 1 4 6 4 mm cubierta con una lámina de acero no inferior a N 28 MSG acero...

Page 26: ...ya que puede causar la desconexión del GFCI durante el funcionamiento normal El rendimiento de esta estufa no se verá afectado si funciona en un circuito protegido con un GFCI Sin embargo se puede producir el inconveniente de la desconexión ocasional del GFCI debido a la naturaleza del funcionamiento normal de las estufas de gas electrónicas La hoja con especificaciones técnicas y el diagrama de c...

Page 27: ...fa Debe incluir una válvula de cierre Instale una válvula manual de cierre de gas en un lugar fácilmente accesible No bloquee el acceso a la válvula de cierre La válvula es para encender o apagar el gas a la estufa Regulador de presión de gas Deberá usarse el regulador de la presión de gas suministrado con esta estufa Para el funcionamiento adecuado la presión de entrada al regulador deberá ser co...

Page 28: ...vuelco del interior del horno 2 Decida qué método de montaje usará en el piso o en la pared Si tiene piso de piedra o de mampostería puede usar el método de montaje en la pared Si instala la estufa en una casa rodante deberá fijar la estufa al piso Este soporte antivuelco y los tornillos se pueden usar con vástagos de madera o de metal 3 Determine y marque la línea central del espacio del recorte ...

Page 29: ... 3 Mida la distancia desde la parte superior de la superficie de cocción hasta la parte inferior de las patas niveladoras La distancia debe ser la misma De lo contrario regule las patas niveladoras para corregir la altura Las patas niveladoras pueden aflojarse para agregar hasta un máximo de 1 2 5 cm Se necesita un mínimo de 3 16 5 mm para enganchar el soporte antivuelco NOTA Si regula la altura c...

Page 30: ...e la válvula de cierre del regulador de la presión de gas esté en la posición de abierta 2 Abra la válvula de cierre manual de la línea de suministro de gas La válvula está abierta cuando la manija está paralela al caño de gas 3 Pruebe todas las conexiones aplicando con un pincel una solución aprobada para detección de fugas que no sea corrosiva Si aparecen burbujas indica que existe una fuga Corr...

Page 31: ...ición Lite Encendido Cuando se gira el control del horno hasta el ajuste deseado se producen chispas y se enciende el gas Verifique el funcionamiento de los quemadores de la superficie de cocción Quemadores de superficie estándar Empuje hacia adentro y gire cada perilla de control hasta la posición Lite Encendido La llama debe encenderse en menos de 4 segundos La primera vez que encienda los quema...

Page 32: ...es con conexión a tierra Verifique que el disyuntor no se haya desconectado ni se haya fundido un fusible de la casa Verifique que las válvulas de cierre de gas estén en la posición abierta Repita los pasos 1 a 3 Si en este punto el quemador no se enciende presione el botón Cancel Cancelar y póngase en contacto con el distribuidor o una compañía de servicio autorizada para solicitar asistencia Con...

Page 33: ...nte con un paño suave Para más información vea la sección Cuidado de la estufa del Manual de uso y cuidado 7 Lea el Manual de uso y cuidado 8 Encienda los quemadores de superficie y el horno Vea el Manual de uso y cuidado para obtener instrucciones específicas sobre el funcionamiento de la estufa NOTA Es normal que haya olores y humo cuando el horno se usa las primeras veces Si la estufa no funcio...

Page 34: ...ceder una columna de agua de 36 cm 14 y debe ser verificada por una persona calificada Ejemplos de una persona calificada incluyen personal de servicio del sistema de calefacción con licencia personal autorizado de la compañía de gas y personal autorizado para dar servicio No seguir estas instrucciones puede ocasionar la muerte explosión o incendio Peligro de Vuelco Un niño o un adulto puede volca...

Page 35: ...r y tienen una muesca en el área hexagonal Reemplace el tornillo de los orificios de gas natural con el tornillo de los orificios de gas propano Consulte la tabla que sigue para ver los valores nominales correctos de los orificios de gas propano y la tarjeta del soporte del tornillo para ver la ubicación correcta Tabla de los tornillos de los orificios de gas propano para quemadores de superficie ...

Page 36: ...üeta de la parte frontal del horno Levante la parte posterior del quemador de hornear fuera del orificio del horno y reserve el quemador de hornear No desconecte el cable 6 Aplique cinta adhesiva protectora al extremo de un sacatuercas de 3 8 10 mm para ayudar a mantener el tornillo de los orificios de gas natural en el sacatuercas mientras lo cambia Presione el sacatuercas hacia abajo sobre el to...

Page 37: ...mirando hacia arriba y las muescas hacia la parte posterior del horno 8 Ubique el quemador para asar contra el techo del horno y sujételo con un tornillo 9 Vuelva a colocar el cajón de almacenamiento Vea la sección Retire vuelva a colocar el cajón 10 Vuelva a colocar la puerta del horno Vea la sección Puerta del horno 11 Vuelva a colocar las rejillas del horno Complete la instalación de gas natura...

Page 38: ... convertir quemadores de superficie de gas propano a gas natural 1 Retire la tapa del quemador 2 Retire la base del quemador Peligro de Vuelco Un niño o un adulto puede volcar accidentalmente la estufa y resultar muerto Instale el soporte anti vuelco al piso o a la pared según las instrucciones de instalación Deslice la estufa hacia atrás de modo que la pata trasera quede enganchada en la ranura d...

Page 39: ...ra ver el tamaño correcto de los tornillos para cada ubicación de quemador 5 Coloque los tornillos de los orificios de gas propano en la bolsa de tornillos de los orificios IMPORTANTE Conserve los tornillos de los orificios de gas propano en caso de que se haga la reinstalación con gas propano 6 Vuelva a colocar la base del quemador 7 Vuelva a colocar la tapa del quemador 8 Repita los pasos 1 a 7 ...

Page 40: ... base del horno con dos tornillos y dos arandelas Para convertir el quemador de asar a la parrilla del horno de gas propano a gas natural en algunos modelos 1 Retire uno tornillo del quemador para asar a la parrilla 2 Retire el dispersor de llama 3 Retire el quemador para asar a la parrilla de la campana del orificio del quemador para asar NOTA El quemador para asar colgará en la parte posterior d...

Page 41: ...sulte Complete la instalación en la sección Instrucciones de instalación de este manual para completar este procedimiento Cómo regular la altura de la llama Cómo regular la llama de quemadores de superficie Regule la altura de la llama de los quemadores superiores La llama baja de los quemadores de la superficie de cocción debe ser azul y de aproximadamente 1 4 6 4 mm de alto Las llamas de gas pro...

Page 42: ...Ubique el regulador de presión de gas en la parte posterior del compartimiento del cajón IMPORTANTE No retire el regulador de presión de gas 3 Verifique el quemador de hornear del horno para ver si la llama es adecuada a Retire las rejillas del horno b Para retirar la base del horno Retire los dos tornillos que hay en la parte posterior de la base del horno Levante la parte posterior de la base de...

Page 43: ...ador de asar es adecuada Esta llama debe tener un cono interno largo de 1 2 13 mm de longitud de color verde azulado con un manto externo azul oscuro y debe ser nítida y suave No debe haber puntas amarillas explosiones ni elevaciones de la llama Si es necesario regular la llama 1 Presione el botón Cancel Cancelar Espere hasta que el horno se enfríe 2 Afloje el tornillo de sujeción en el obturador ...

Reviews: