background image

MICRO HI-FI COMPONENT SYSTEM

INSTRUCTION MANUAL

KENWOOD CORPORATION

B60-5270-08 00   C    (T/M) 

OC

  0204

HD-5MD

Summary of Contents for HD-5MD

Page 1: ...MICRO HI FI COMPONENT SYSTEM INSTRUCTION MANUAL KENWOOD CORPORATION B60 5270 08 00 C T M OC 0204 HD 5MD ...

Page 2: ...RISK OF ELECTRIC SHOCK DO NOT OPEN THE LIGHTNING FLASH WITH ARROWHEAD SYMBOL WITHIN AN EQUILATERAL TRIANGLE IS IN TENDED TO ALERT THE USER TO THE PRESENCE OF UNINSULATED DANGEROUS VOLTAGE WITHIN THE PRODUCT S ENCLOSURE THAT MAY BE OF SUFFICIENT MAGNITUDE TO CONSTITUTE A RISK OF ELECTRIC SHOCK TO PERSONS THE EXCLAMATION POINT WITHIN AN EQUILATERAL TRIANGLE IS INTENDED TO ALERT THE USER TO THE PRESE...

Page 3: ...bing function reduces dubbing time to about 1 4 the normal time Playback of CD R RW discs The CD player is capable of playing both CD R and CD RW music discs which have been recorded on a CD recorder Equipped with a sampling rate converter Equipped with an optical digital input terminal that can be hooked up to a BS CS tuner for digital recording A 3 disc CD changer and MD player in one slim unit ...

Page 4: ...y If the unit was shipped to you directly notify your shipper immediately Kenwood recommends that you retain the original carton and packing materials in case you need to move or ship the unit in the future Keep this manual handy for future reference FM indoor antenna 1 AM loop antenna 1 Remote control unit 1 Batteries R6 AA 2 Accessories Before applying power Speaker cords 2 provided in the speak...

Page 5: ...back features 36 Listening to the desired sequence program playback 36 Repeated playback 38 Listening in random order random mode 39 Playback only the first track of selected CDs BEST HITS program playback 40 Convenient recording methods 41 Recording of all tracks or a single track of a CD by one touch recording O T E 42 Recording only the first track of selected CDs BEST HITS program recording 45...

Page 6: ... and operating instructions should be retained for future reference 1 Power sources The appliance should be connected to a power supply only of the type described in the instruction manual or as marked on the appliance If you are not sure of the type of power supply to your home consult your appliance dealer or local power company For appliances intended to operate from battery power or other sour...

Page 7: ...rounding conductors location of antenna discharge unit connection to grounding electrodes and requirements for the grounding electrode See Figure 18 Power lines An outside antenna system should not be located in the vicinity of overhead power lines or other electric light or power circuits or where it can fall into such power lines orcircuits Wheninstallinganoutsideantennasystem extreme care shoul...

Page 8: ...CAUTION Malfunction of microcomputer If operation is not possible or erroneous display appears even though all connections have been made properly reset the microcomputer by referring to In case of difficulty f 1 2 3 AM loop antenna The supplied antenna is for indoor use Place it as far as possible from the main system TV set speaker cords and power cord and set it to a di rection which provides t...

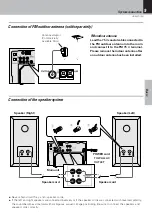
Page 9: ...outdoor antenna has been installed Antenna adaptor Commercially Available Parts Speaker Right Speaker Left Main unit Speaker cord POWER cord TO WALL AC OUTLET Never short circuit the and speaker cords If the left and right speakers are connected inversely or if the speaker cords are connected with reversed polarity the sound becomes unnatural with ambiguous acoustic image positioning Be sure to co...

Page 10: ...NWOOD Connectionofacassettedeck soldseparately Connect a separately sold cassette deck with the accessory audio cord to the terminals TAPE PLAY IN and REC OUT at the rear of this unit Please refer also to the operation instructions supplied with the cassette deck 1 0 2 7 3 8 Audio code Audio code To RECORD IN To PLAY OUT cassette deck System connection Subwoofer ...

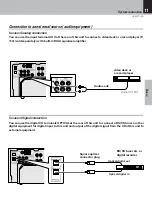
Page 11: ...this unit and output of the digital signal from the CD of this unit to external equipment Square optical connector plug BS CS tuner etc or digital recorder System connection Connectiontoanexternalsource audioequipment In case of analog connection You can use the input terminal AUX at the rear of this unit to connect a video deck or a record player P 110 sold separately with built in RIAA equalizer...

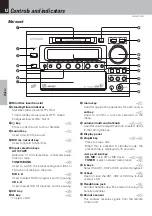
Page 12: ...playback and for pausing 7 CD tray 8 0 key To eject a MD 9 menu key Used for application operations for each source set key Used to confirm a function selected in the menu 0 volume multi control knob Used for volume adjustment and to select items in the setting menus Display panel stop 7 key Press to stop a disc When this is pressed in standby mode the present time is displayed for 5 seconds 4 p c...

Page 13: ...dication MD indication When an MD is set the indication on the in side appears MD recording indication 8 MD recording pause indication O T E one touch edit indication LP2 indication Indication with stereo 2x recording playback LP4 indication Indication with stereo 4x recording playback HIGH indication Indication at the time of CD high speed dub bing DIGITAL indication Indication at the time of dig...

Page 14: ...ncellation of the vari ous timers 8 O T E key w When this key is pressed during CD playback only the track being played will be copied to MD while the entire CD will be copied when it is pressed while the CD is stopped 9 POWER key Press to set the unit to On or Standby 0 TITLE INPUT key P Used for disc track title input TRACK EDIT key i Used for MD editing SET key i When the source is CD or MD Use...

Page 15: ...batteries with new ones If direct sunlight or the light of a high frequency fluorescent lamp inverter type etc is incident to the remote sensor malfunction may occur In such a case change the installation position to avoid malfunction Operationofremotecontrolunit Controls and indicators PREV GROUP NEXT key Q Used for MD group editing RANDOM PTY key For Europe and U K CD MD Press for setting playba...

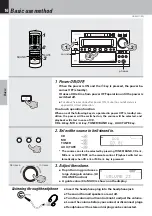
Page 16: ...lowing keys is operated in power OFF standby con dition the power will be switched on the source will be selected and playback will start in case of CD CD6 key MD 6 key TUNER BAND key AUX TAPE key 2 Selectthesourcetobelistenedto CD MD TUNER AUX TAPE º L R 30 10 5 3 1 0 dB DIGITAL The source can also be selected by pressing TUNER BAND CD 6 MD 6 or AUX TAPE on the remote control Playback will start ...

Page 17: ... set key Remote control unit only Main unit only Listening to the original sound of the source sourcedirect The sound from CD MD or another source can be heard as faithful as possible to the original sound by not passing it though the sound adjustment circuits of this unit 1 Press the sound key repeatedly to select S DIRECT Each press switches the modes as follows N B 1 N B 2 TONE 1 TONE 2 TONE 3 ...

Page 18: ...dB DIGITAL When the setting has been completed re turn to the original display is made after dis play of COMPLETE ListeningwithuseofTONECONTROL Select and set the desired tone control setting set in advance 1 Press the sound key repeatedly to select TONE 1 TONE 2 or TONE 3 Each press switches the modes as follows N B 1 N B 2 TONE 1 TONE 2 TONE 3 SOURCE DIRECT SOUND MODE OFF TONE 1 2 3 is not displ...

Page 19: ...HD 5MD EN 19 Basic Basic use method ...

Page 20: ... will result in malfunction Label side Recess for single CD 8 cm 2 Startplayback After a few seconds play starts from track No 1 When more than one disc has been set in this unit the next disc will be played automati cally when playback of one disc ends Playback will stop when all discs have been played Relay playback Track No being played Elapsed time of track being played L R 30 10 5 3 1 0 dB DI...

Page 21: ...4 Total remaining time of the disc REMAIN TOTAL display 36 50 Only 1 and 2 are displayed during random playback and single track repeat At the time of program playback 4 be comes the display of the total time for the programmed tracks Inregardtotitledisplay When a disc conforming to CD TEXT is played and the DISPLAY CHARAC key is pressed during CD playback or during stop the char acter information...

Page 22: ...6ハMNO 7マPQRS 8ヤTUV 9ラWXYZ 100 0ワヲン 10 3サDEF TITLE INPUT TRACK EDIT SET ENTER DISPLAY CHARAC TIME SPACE CLEAR DELETE TUNER BAND MD 6 AUX TAPE CD 6 1 4 7 P CALL DISC SKIP TUNING DOWN SLEEP REPEAT RANDOM P MODE BEST HITS TIMER SOUND MUTE PERV GROUP NEXT UP STOP AUTO MONO O T E 1 1 2 2 2 7STOP 7STOP SET MD6 MD6 SET 1 4 P CALL 4 P CALL DISPLAY CHARAC TUNING L R 30 10 5 3 1 0 dB MD DIGITAL L R 30 10 5 3...

Page 23: ...c REMAIN TOTAL display 36 50 Only 1 and 2 are displayed during random playback and single track repeat At the time of program playback 4 be comes the display of the total time for the programmed tracks Inregardtotitledisplay When the display key is pressed during MD playback or during stop the character infor mation recorded on the minidisc can be dis played on the display Remote control unit only...

Page 24: ...ons will be skipped at an inter val of about 0 5 second To select a preset station from the remote use the 4 P CALL key or numeric keys One by one presetting Manual preset A station can also be tuned even when it is not preset For details read Tuning to a non preset radio station Auto tuning Manual tuning Once the stations are stored by auto presetting you are not required to repeat this procedure...

Page 25: ... in the area where the system is to be used for instance when you move from area 1 or area 2 shown in the following table or vice versa proper recep tion of AM FM broadcasts cannot be expected In this case change the channel space setting in accordance with your area by referring to the following table Channelspacesetting 1 Select the tuner input 2 Press the stop 7 key for more than 2sec onds AtFM...

Page 26: ...its frequency is displayed 1 Perform the procedure in Tuning to a non preset radio station Auto tuning Manual tuning to receive the station to be preset 2 Press the ENTER key during reception 3 Select one of the preset numbers from 1 to 40 4 Press the ENTER key again A maximum of 40 stations of the band presently being received will be preset Repeat steps 1 2 3 and 4 to preset other stations If se...

Page 27: ...h The tuner automatically searches for a station which is currently broadcasting a specified program type genre PS Program Service Name Display When an RDS broadcast is received the station name is automatically displayed Some functions may not be provided or be given different names depending on countries or areas RDS RadioDataSystem ForU K andEurope BeforeusingRDS For reception of RDS stations t...

Page 28: ... The desired program type can be selected with the 4 or key from 29 types Press the key and release it when the desired type is displayed Searchingforadesiredprogramtype PTYsearch 4 keys 4 DOWN UP Program type table Pop Music Rock Music Easy Listening Music Light Classical Serious Classical Other Music News Current Affairs Information Sport Education Drama Culture Science Varied Weather Finance Ch...

Page 29: ...ram type name display changes to the station name display When searching for a Rock Music broadcast Display while the tuner is searching When a station is received Goes off Program type name display Station name display RANDOM PTY Lit FM TUNED MHz STEREO PTY L R 30 10 5 3 1 0 dB MD R D S RDS Radio Data System For U K and Europe UsingtheRDSdisplayfunction Press the P MODE RDS DISP key Remote contro...

Page 30: ...s 1 AUX Playback of the equipment connected to the AUX terminal at the rear 2 TAPE Playback of the equipment connected to the TAPE terminal at the rear 3 DIGITAL IN Playback of the equipment connected to the DIGITAL IN terminal at the rear 3 Startplaybackoftheexternalsource 4 Adjustthevolume AdjustmentoftheinputlevelatthetimeofAUXselection WhentheoutputlevelofthesourceequipmentconnectedtotheAUXter...

Page 31: ...nit It is displayed only at the time of title editing LP is displayed as the title only in case of playback on equipment not compatible with MDLP when tracks recorded by stereo long play recording are being played With this unit the stamp function STAMP can be switched ON LP is added or OFF LP is not added Types of record mode Stereo recording STEREO The possible recording time is the time shown o...

Page 32: ...c key explained here is convenient mainly for recording from the tuner or from an external source Convenient recording methods is recommended for recording from CD q Minidiscs cannot be inserted or ejected when the power is OFF standby Always switch on the power and then insert a minidisc Forced insertion of a disc in standby condition can cause defects Recording of radio broadcasts analog recordi...

Page 33: ... the time shown on the MD cartridge MONO Monaural recording Monaural recording is possible for approximately double the time shown on the MD cartridge 2 Press the set key 3 When LP2 or LP4 has been selected in step 2 turn the volume multi control knob select ON or OFF for LP STAMP and press the set key LP STAMP ON LP is inserted in front of the track title LP STAMP OFF LP is not inserted in front ...

Page 34: ... open Close the slider k PLAY ONLY Thisisaminidisconlyforplay back Insertarecordableminidisc k In regard to the track number at the time of re cording When recording from a CD the track number is increased when the track changes When recording from external equipment the track number automatically is increased by 1 when the input level again exceeds a specific level after having dropped for at lea...

Page 35: ... status the recording level can be adjusted while looking at the level indication 3 Select REC LEVEL as follows 1 Press the menu key 2 Select REC LEVEL with the volume multi control knob Return to the original status is made when no operation is per formed within 20 seconds 2 Press the set key 2 Turn the volume multi control knob to ad just the recording level and press the set key Analog or digit...

Page 36: ...a disc can not be selected Return to the original status is made when no opera tion is performed within 20 seconds When no operation is performed for some time after confirmation program stop status will be reached To continue programming follow the procedure for To add a track to an existing program Up to 32 tracks can be programed When PGM FULL is displayed no more tracks can be pro gramed If yo...

Page 37: ...ode CLEAR DELETE Each time the key is pressed the last track in the program is cleared Tocleartheentireprogram Remote control unit only Press in stop mode Changing to the next track during play backofatrack 4 P CALL Remote control Main unit When the key is pressed during play back play will skip to the next track in the program When the 4 key is pressed once during playback the track being played ...

Page 38: ...One track repeat 3 1 DISC One disc repeat 4 ALL DISC All disc repeat 1 Repeat mode indication To cancel repeat mode press the REPEAT key re peat key repeatedly to make the repeat indication disappear Changing to the next track during play backofatrack 4 P CALL Remote control Main unit When the key is pressed during play back play will skip to the next track When the 4 key is pressed once during pl...

Page 39: ...witches the mode MD 1 RANDOM off Normal playback 2 RANDOM lid Random playback CD 1 RANDOM off Normal playback 2 1 DISC RANDOM lid Random playback 3 ALL DISC RANDOM lid Random playback Random mode indication To cancel random mode press the random key RANDOM key to make the RANDOM indication disappear Changing to the next track during play backofatrack Remote control Main unit When the key is presse...

Page 40: ...t only 1 Set a disc into the CD tray 2 Enter CD stop status 3 Press the BEST HITS key 1 Press the CD 6 key BEST HITS CD 6 The first track of the selected disc will be played andthentheunitwillswitchtothefirsttrackofthe next disc BEST HITS program playback in combination with repeat playback is not possible BEST HITS Lit StoptheBESTHITS program playback 7 STOP AUTO MONO CanceltheBESTHITS program pl...

Page 41: ...he desired CD tracks in the desired order Convenientrecordingmethods Records all tracks in a CD onto a tape All track recording O T E Single track recording O T E Program recording When REC SPEED is set to HIGH recording to MD can be done with 4 times of the normal speed w To record only the first track of selected CDs Best hits program recording BEST HITS t The tracks played by the BEST HITS prog...

Page 42: ...unit 8 After completion of recording press the 0 key to eject the minidisc O T E Main unit When the volume multi control knob is turned switching is done as follows MD REC MODE GROUP MAKE REC SPEED DIMMER Return to the original status is made when no opera tion is performed within 20 seconds When the volume multi control knob is turned switching is done as follows CD MD NORM Recording with normal ...

Page 43: ...tarted just by pressing the O T E key during playback Recording will be done with the recording mode and the recording speed set in advance Perform the operation of step 3 on page 33 to change the recording speed At the end of the recording the CD will enter pause status In the same way other desired tracks can be re corded When the possible recording time or the possible number of tracks on the M...

Page 44: ... Listening to the de sired sequence program playback on page 36 to program the tracks Recording will be done with the recording mode and the recording speed set in advance Perform the operation of step 3 on page 33 to change the recording speed Recording of the programmed CDs starts When either the CD playback or the MD recording stops the other operation also will stop When this unit changes the ...

Page 45: ...t in advance Perform the operation of step 3 on page 33 to change the recording speed Recording of only the first track of the CDs will start The first track of the selected disc will be re corded and then the unit will switch to the first track of the next disc BEST HITS program re cording When this unit changes the CD automatically ac cording to the BEST HITS program the recording also is paused...

Page 46: ...n where recording is possible s Dividing and combining tracks Dividing tracks DIVIDE R Combining tracks COMBINE Y Moving tracks Moving individual tracks MOVE W Erasing tracks Erasingindividualtracks ERASE I Erasing all tracks on an MD ALL ERASE I Assigning a name to a minidisc or a track only remote control P Copying or memorizing a title and assigning it to a different minidisc or track TITLE MEM...

Page 47: ...ob 2 Press the set key 3 Perform the operation for All tracks of a CD can be recorded by one touch record ing normal speed 4x speed all tracks O T E and start recording w When the volume multi control knob is turned switching is done as follows Return to the original status is made when no operation is performed within 20 seconds MD REC MODE GROUP MAKE REC SPEED REC LEVEL DIMMER The group recordin...

Page 48: ...the group 7 After editing has been com pleted press the 0 key to eject the minidisc When the editing is to be abandoned press the TRACK EDIT key to stop the editing and to return to the original condition When an item which cannot be edited is se lected an will be shown at the beginning of the display MD edit mode is reached Return to the original status is made when no opera tion is performed wit...

Page 49: ...1 Press the TRACK EDIT key 2 Press the 4P CALL keys re peatedly to select EDIT GROUP and press the SET key 3 Press the 4P CALL keys re peatedly to select GROUP CAN CEL and press the SET key 4 Press the 4 P CALL keys to select the group to be de leted and press the SET key 6 Press the ENTER key 7 After editing has been com pleted press the 0 key to eject the minidisc Return to the original status i...

Page 50: ...p title numbers will be displayed When the track number is not to be changed press the SET key in this condition Tracks registered to a different group can not be selected 6 Press the 4P CALL keys re peatedly to select the last track number of the group and press the SET key When the track number is not to be changed press the SET key in this condition Tracks registered to a different group can no...

Page 51: ...e characters will scroll When an MD with group recordings is played on equipment not compatible with the group function numbers or symbols may be dis played in the disk name and correct display may not be possible In such a case it should be noted that the group information will be lost when the disk name is edited on such equip ment not compatible with the group function When an MD recorded on di...

Page 52: ...p the moved track also will not belong to any group Image for individual moving of tracks Select a track to be move Perform the operation after the display of GROUP and PGM has been extinguished Remote control unit only 1 Press the TRACK EDIT key 2 Confirm that EDIT TRACK is being displayed and press the SET key 3 Press the 4P CALL keys re peatedly to select MOVE 4 Press the ENTER key to deter min...

Page 53: ...ting has been com pleted press the 0 key to eject the minidisc Main unit The movement destination is shown by the directly preceding and the directly following track number and it moves forward or back each time the key is pressed While MDWRITING isdisplayed information is being written to the minidisc and the unit shouldnotbesubjectedtovibrationsorshocks Remove the minidisc after the editing info...

Page 54: ...d Fine adjustment range Perform the operation after the display of GROUP and PGM has been extinguished Remote control unit only 1 Press the TRACK EDIT key during playback at the desired division location 2 Confirm that DIVIDE is dis played and press the SET key When the editing is to be abandoned press the TRACK EDIT key to stop the editing and to return to the original condition When an item whic...

Page 55: ...tmentofthedivisionpointwith previewplaybackisnotdone presstheSETkey after step 2 to determine the division point Step 5 The approximately 3 seconds following the pause point will be played back repeatedly Each time a key is pressed the division point is moved one step 6 100 sec forward or back Fine adjustment is possible in the range from 31 to 31 steps The editing may be aborted when the MD is re...

Page 56: ...g tracks Combining the fourth and the first track The track number and the title of the first half remain The track numbers are adjusted The track number and the name of the last half are lost Perform the operation after the display of GROUP and PGM has been extinguished Remote control unit only 1 Press the TRACK EDIT key while playing the track to be at the beginning after combining 2 Press the 4...

Page 57: ... minidisc Main unit The editing may be aborted when the MD is removed or the power is switched off while EDIT NOW is being dis played The unit will pause at the start of the new combined track While MDWRITING isdisplayed information is being written to the minidisc and the unit shouldnotbesubjectedtovibrationsorshocks Remove the minidisc after the editing information has been written to the minidi...

Page 58: ...Image for eraseing a track Perform the operation after the display of GROUP and PGM has been extinguished Remote control unit only 1 Press the TRACK EDIT key 2 Press the SET key 3 Press the 4P CALL keys re peatedly to select ERASE 4 Press the SET key When the editing is to be abandoned press the TRACK EDIT key to stop the editing and to return to the original condition When an item which cannot be...

Page 59: ...ved or the power is switched off while EDIT NOW is being dis played While MDWRITING isdisplayed information is being written to the minidisc and the unit shouldnotbesubjectedtovibrationsorshocks Remove the minidisc after the editing information has been written to the minidisc with display of MD WRITING Even after minidisc editing has been completed it is possible to delete the editing up to that ...

Page 60: ... group playback mode 1 Press the P MODE key and light the GROUP indication 2 Press the PREV or the NEXT key to select the group which is to be given a group title or a track title Assigning a track title In normal stop mode titles can be given to all tracks When the unit is stopped in group playback mode titles can be given to the tracks in the group Input of a title memo Title memo can be selecte...

Page 61: ...QRS 8TUV 9WXYZ 100 0 10 3DEF SET DISPLAY CHARAC L R 30 10 5 3 1 0 dB MD DIGITAL L R 30 10 5 3 1 0 dB MD DIGITAL SET L R 30 10 5 3 1 0 dB MD DIGITAL ENTER 3 Press the SET key to deter mine the track or disc title memo number to be given a title 4 Enter the title 1 Press the DISPLAY CHARAC key repeatedly to select the character group 2 Press the character input keys 10keys to select the character 3 ...

Page 62: ...ss the CLEAR DELETE key to delete the character When a character is to be inserted without deleting a character step 2 set the cursor to the character directly following the desired insertion location When all characters are to be deleted this can be done by pressing the CLEAR DELETE key repeatedly Inregardtothenumberofcharacterswhichcan be entered A maximum of 1792 characters max 80 per track can...

Page 63: ...Inputofanamememo 1 Select title memo 1 2 or 3 during the title editing procedure Steps 2 and 3 on page 60 2 Enter the characters Steps 4 and 5 on page 61 Useofatitlememo 1 Select the character group Aa with title in put operation 2 Press the character key numeric key 1 and select 1 3 or 3 3 Press the SET key 1 title memo 1 2 title memo 2 3 title memo 3 Nameeditingcharactertable The following types...

Page 64: ...ey 2 Press the 4 P CALL keys repeatedly to select EDIT CANCEL 3 Press the SET key 4 Press the ENTER key to cancel the editing 5 After editing has been com pleted press the 0 key to eject the minidisc MD edit mode is reached Return to the original status is made when no opera tion is performed within 20 seconds Main unit When X is displayed in front of the indication the editing up to that time can...

Page 65: ...esafterthefollowing events When the input is CD During stop Whentheinputistuner tape orexternalinput Whenthevolume multicontrollevel is the minimum level or mute Adjusting the brightness of the displaypart DIMMER Whenthedisplayisfelttobetoobrightortoodim at night etc the brightness can be adjusted 1 Select DIMMER as follows 1 Press the menu key 2 Select DIMMER with the volume multi control knob Wh...

Page 66: ...e original status is made when no operation is per formed within 20 seconds Main unit only 2 Turn the volume multi control knob to select 12H 12 hour display or 24H 24 hour display and press the set key 3 Turn the volume multi control knob to adjust the hour setting When hour has set press the set key 4 Turn the volume multi control knob to adjust the minute setting When minute has set press the s...

Page 67: ...tuner reception etc Remote control unit only SLEEP AM L R 30 10 5 3 1 0 dB MD DIGITAL Each press increases the timer period by 10 minutes The sleep timer can be set up to 90 minutes 10 20 30 70 80 90 Cancel The unit is turned OFF automatically af ter the set time has elapsed To cancel Turn the unit OFF or press the SLEEP key until the sleep timer is canceled The system has been set up so that the ...

Page 68: ... the set key to confirm 3 Turn the volume multi control knob and select PROG 1 SET or 2 Press the set key to confirm 3 Select EVERYDAY or ONETIME ex ecution of the programed timer 1 Turn the volume multi control knob and select EVERYDAY or ONE TIME Press the set key to confirm 4 SettheONtime 1 Turn the volume multi control knob to adjust the hour setting When hour has set press the set key 2 Turn ...

Page 69: ...ource Timer setting will be completed and COMPLETE will be displayed 1 L R 30 10 5 3 1 0 dB MD DIGITAL 1 PLAY Timer play 2 AI PLAY Timer play with gradually in creasing volume Continuedonnextpage Timer operation 1 Turn the volume multi control knob to select the volume at the time of timer ON then press the set key to confirm 2 Turn the volume multi control knob to select the source to be record P...

Page 70: ...1 2 or 2 1 TIMER Remote control unit only When timer operation is not desired While the power is on press the TIMER key on the remote control to extinguish TIMER Remote control unit only The PROG contents set last will be executed Make the preparations for CD The PROG contents will be kept as long as no resetting is done When the power fails or the plug of the power cable is disconnected from the ...

Page 71: ...r the condensation has dried up Be specially cautious against condensation in a follow ing circumstances When this unit is carried from one place to another across a large difference in temperature when the hu midity in the room where this unit is installed in creases etc Caution on condensation Memory backup function Stored contents which are cleared immediately when power plug is unplugged from ...

Page 72: ...o not touch the disc directly Do not touch the disc by opening the shutter with your hand The cartridge will be damaged if it is forced open Storage position Do not leave MDs in places where the temperature and or humidity are extremely high for example in places subjected to direct sunlight Dust countermeasure The shutter of the disc cartridge is permanently open while the disc is loaded in the s...

Page 73: ...by digital input Digital copying cannot be re peated Inregardtothesamplingfrequency Normally there are the three following types of digital signals and they are called sampling frequen cies The sampling frequencies are divided as follows according to the type of the digital equipment 48 kHz Standard mode for DAT B mode transmission of BS tuners etc 44 1 kHz Standard mode for DAT CD MD etc 32 kHz S...

Page 74: ...lume to an appropriate Switch MUTE OFF Unplug the headphone plug Turn power off and re connect the speaker cord Adjust the present time again Adjust the present time again Insert correctly Connect properly referring to System con nection Adjust the left right volume balance Cancel the A P S function Adjust the present time referring to Clock adjustment Adjust the present time referring to Clock ad...

Page 75: ...ol operation is not pos sible Batteries are exhausted The remote control is too far away from the system the controlling angle is deviated or there is an obstacle in between There is no CD or MD set in the component to be played Replace with new batteries Operate the unit inside the remote control lable range Set a CD or MD in the component to be played Remedy Cause Symptom CD player Place the dis...

Page 76: ...recording modes cannot be combined As recording is done with 4 sec MONO LP2 or 8 sec LP4 as the min unit the indicated time may not coincide When a new minidisc for recording completely unrecorded is inserted READING will be displayed longer than normal When a minidisc is inserted which has been edited frequently or which has very many tracks READING will be displayed longer than normal Interrupte...

Page 77: ...n the MD 6 key is pressed Recording is not possible The sound is distorted There is much noise A recorded MD cannot be played on other equipment equipment not com patible with ATRAC3 4LP recordings have much noise No minidisc inserted An unrecorded minidisc has been inserted The minidisc is write protected Digital recording of a source with digital copy prohibition by SCMS has been tried The recor...

Page 78: ...external source with a sampling fre quency other than 38 kHz 44 1 kHz is 48 kHz is connected There is no recordable area Recording of the 256th title has been tried Title input in excess of the max character number has been tried This is a blank minidisc with nothing re corded on it TOC 1 UTOC 2 information is being read Various information is being written at the tome of editing or recording The ...

Page 79: ...m 21dBm Tuner section FM tuner section Tuning frequency range 87 5 MHz 108 MHz AM tuner section For U K and Europe Tuning frequency range 531 kHz 1 602 kHz For other countries Tuning frequency range 9 kHz step 531 kHz 1 602 kHz 10 kHz step 530 kHz 1 610 kHz Main unit Enclosure Bass reflex type Magnetically shielded Speaker configuration Woofer 120 mm cone type Tweeter 25 mm dome type Impedance 6 Ω...

Page 80: ...found on the back of the unit in the spaces designated on the warranty card and in the space provided below Refer to the model and serial numbers whenever you call upon your dealer for informa tion or service on this product Model Serial Number ...

Reviews: