background image

LCD Remote Control

wit

h PointLe

ss

R

F

Te

c

h

n

o

lo

g

y

Summary of Contents for RC-R0913

Page 1: ...LCD Remote Control with PointLess R F T e c h n o l o g y ...

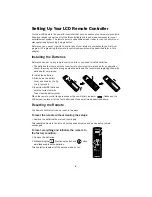
Page 2: ...lkaline batteries We recommend replacing them with batteries for normal use To install the batteries 1 Slide down the battery cover as shown by the fig ure to remove it 2 Insert four AA R6 batteries with the correct polarity Then close the battery cover When the remote control range reduces or the Low Battery indicator flashes on the LCD screen replace all of the four batteries at the same time as...

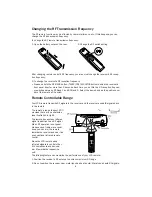
Page 3: ...Remote Controllable Range Your LCD remote transmits RF signals to the receiver and the receiver sends IR signals back to the remote The remote s range is about 20 ft provided there are no obstacles see illustration to right The remote transmits an infrared signal in addition to an RF signal When RF operation is not possi ble because of radio wave condi tions you can aim the remote towards the rece...

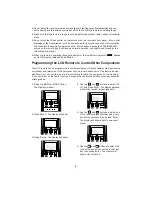
Page 4: ...s Programming the LCD Remote to Control Other Components Your LCD remote can be programmed to control almost any IR controllable audio video source component and television If the component s code is not already part of the remote s exten sive library you can use the remote s Learn feature to teach the component s commands to it You can also use the Learn function to expand the control capabilitie...

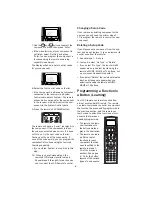
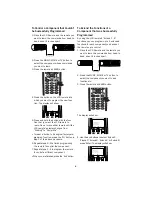
Page 5: ...tup Code If you replace an existing component with a new one you will need to perform steps 1 10 to program the remote to control the new component Deleting a Setup Code If you disconnect a component from the sys tem and do not replace it you can remove its control code from the remote 1 Repeat steps 1 6 above 2 In step 6 select No Type or Delete If you select No Type the input will still appear w...

Page 6: ... function press the Clr button in step 3 of the above procedure 6 Repeat steps 3 4 to finish programming the remote to control the component 7 Repeat steps 1 4 to program the remote to control a different component When you are finished press the Exit button To Extend the Functions of a Component that was Successfully Programmed By using the LCD remote s Extend 1 5 functions you can program up to ...

Page 7: ... not move either remote until the LCD remote s display changes from Waiting to Complete To reset a button to its original factory programmed function press the Clr button in step 3 of the above procedure 7 Repeat steps 1 6 to program more extended functions for that component or to program extended functions for another component When you are finished press the Exit button ...

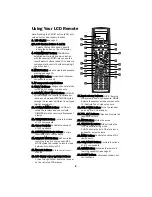
Page 8: ...SUB W W b button THX activates the THX Cinema listening mode SUB W allows control of the receiver s subwoofer output volume 22 M MENU b button Controls functions of A V components 23 O OSD PAGE 5 5 b button Controls functions of A V components 24 L LEARN b button Activates the remote s learning capability see page 5 25 F F SHIFT b button Activates secondary but ton functions Note Pressing the F SH...

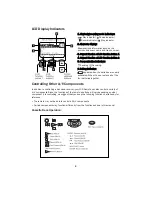
Page 9: ...ttery i indicator appears when the batteries are nearly exhausted When it does replace all of the four batteries together Controlling Other A V Components In addition to controlling a Kenwood receiver your LCD Remote can also control a variety of A V components Since the functions of the remote s buttons will vary depending on what component it is controlling we suggest that you keep the following...

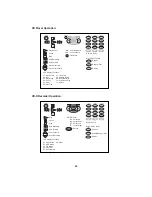
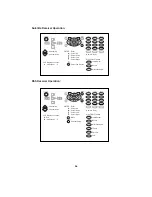
Page 10: ... Select 02 Set 03 Play Mode 04 Check 05 Clear 06 Disc Title 07 Track Title 08 All Data Read 09 Subout Monitor 10 Continuous Play 11 All Info LCD Display Functions AV POWER TUNING BAND ENTER AUTO MONO REPEAT RANDOM INPUT SEL TV SELECT DISPLAY SELECT THEME FAVORITE EXIT LAST CHANNEL AUDIO INFO STATUS MULTI ZONE ZONE A B Scan Forward Scan Backward Pause Play Stop Skip Backward Skip Forward ENTER Ente...

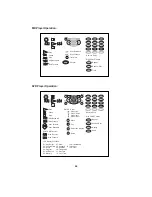
Page 11: ...T CHANNEL AUDIO INFO STATUS MULTI ZONE ZONE A B Numeric Entry Title TITLE GUIDE Scan Forward Scan Backward Pause Play Stop Skip Backward Skip Forward TITLE GUIDE MENU MENU TUNING BAND ENTER AUTO MONO RETURN PAGE OSD PAGE ENTER Enter Cursor Up Cursor Down Cursor Left Cursor Right MENU Menu OSD PAGE RETURN PAGE On Screen Display Return 01 Disc Select 02 Chapter Time 03 Angle 04 Program 05 DVD Setup ...

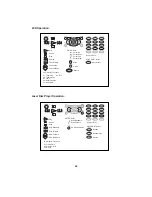
Page 12: ...put Select Numeric Entry INPUT SEL TITLE GUIDE MENU MENU TUNING BAND ENTER AUTO MONO RETURN PAGE OSD PAGE TITLE GUIDE MENU MENU Menu Guide AV POWER REPEAT RANDOM INPUT SEL TV SELECT DISPLAY SELECT THEME FAVORITE EXIT LAST CHANNEL AUDIO INFO STATUS MULTI ZONE ZONE A B Numeric Entry Slow Forward Slow Backward Pause Play Stop Skip Backward Skip Forward TITLE GUIDE MENU MENU TUNING BAND ENTER AUTO MON...

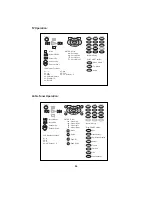
Page 13: ...ton AUDIO Audio INPUT SEL TV SELECT Video Select TV Select AV POWER REPEAT RANDOM INPUT SEL TV SELECT DISPLAY SELECT THEME FAVORITE FAVORITE EXIT LAST CHANNEL AUDIO INFO STATUS MULTI ZONE ZONE A B Numeric Entry Guide TITLE GUIDE Channel Up Channel Down Volume Down Volume Up TITLE GUIDE MENU MENU TUNING BAND ENTER AUTO MONO RETURN PAGE OSD PAGE ENTER Enter Cursor Up Cursor Down Cursor Left Cursor R...

Page 14: ...CD Display Functions With F SHIFT button Input Select Select Alternate Audio INPUT SEL SELECT AUDIO AV POWER REPEAT RANDOM INPUT SEL TV SELECT DISPLAY SELECT THEME FAVORITE FAVORITE EXIT LAST CHANNEL AUDIO INFO STATUS MULTI ZONE ZONE A B Numeric Entry Channel Guide TITLE GUIDE Channel Up Channel Down TITLE GUIDE MENU MENU TUNING BAND ENTER AUTO MONO RETURN PAGE OSD PAGE ENTER Enter Cursor Up Curso...

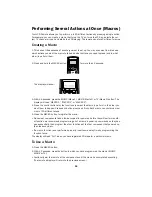
Page 15: ...or the functions you want the macro to perform in the order you want them to happen Press each button slowly and firmly Each macro can contain a maxi mum of 20 different steps 5 Press the MACRO button to register the macro Since most components take a few seconds after power up before they will perform anoth er function we recommend programming all of a macro s power up commands so they hap pen se...

Page 16: ...oodusa com e m mail inquiry kenwoodusa com 1 800 KENWOOD Main O Office P O Box 22745 Long Beach CA 90801 5745 Canada O Office 6070 Kestrel Rd Mississauga Ontario L5T 1S8 2002 Kenwood USA Corporation All Rights Reserved ...

Reviews: