background image

XGS12 Chassis Platform

Assembly Guide

Release 9.05 

Summary of Contents for Ixia XGS12

Page 1: ...XGS12 Chassis Platform Assembly Guide Release 9 05...

Page 2: ...standard commercial license which is embodied in its End User License Agreement EULA a copy of which can be found at http www keysight com find sweula or https support ixiacom com support services wa...

Page 3: ...0 4939 6410 support ixiacom com Australia 61 742434942 support ixiacom com EMEA Support 40 21 301 5699 support emea ixiacom com Greater China Region 400 898 0598 support china ixiacom com Hong Kong 85...

Page 4: ...e and Insert Processor Module 8 Remove and Insert Power Supply Module 9 Remove and Insert Fan Module 11 Chapter 4 Log on to XGS12 Chassis 13 Chapter 5 XGS12 SD Configuration 15 Connecting the XGS12 SD...

Page 5: ...Chapter 8 Troubleshooting 25 LED Indicators 26 IP Addressing Issues 28 Troubleshooting Licensing Issues 29 v...

Page 6: ...ant points in the main text Important Indicates information that is essential to the completion of a task Tip Provides supplemental suggestions for applying techniques and procedures to accomplish a t...

Page 7: ...d as separate paragraphs and user defined program elements within text l Text file content or examples such as lines of text from an ini file Textual conventions The following table describes the typo...

Page 8: ...he Xcellon load modules It is a 12 slot chassis with high speed backplane 160 Gbps between each adjacent two cards designed for aggregation across load modules XGS12 supports both IxLoad and BreakingP...

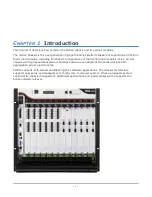
Page 9: ...Chapter 1 Introduction 2...

Page 10: ...hassis Power Supply Module l Chassis Processor Module The Processor Module is plugged into the front of the chassis in slot 0 The power supplies and fans are accessible from the rear of the chassis Ea...

Page 11: ...This page intentionally left blank 4...

Page 12: ...he chassis to rack face with all six bolts Fully depress power supply clamps when installing power supply module l Secure the power supply module thumb bolt when installing power supply module l Insta...

Page 13: ...ntervention may be required to power cycle the XGS12 chassis or restart a software program in the event the XGS12 chassis operation is upset or stopped by electrostatic discharge Chapter 3 Install XGS...

Page 14: ...d keep it aside 5 Remove the plastic wrapping 6 Insert the lowermost screws on the rack 7 Slide the chassis into the rack so that the lower screw notches of the chassis rests on the screws on the rack...

Page 15: ...not displayed So the credentials are required to log on l The chassis is CE marked and ULTM certified when using the 200 240 VAC power cords supplied with the chassis However these certifications for...

Page 16: ...h on the clips and push them in 3 Fasten the screws Inserting processor module Remove and Insert Power Supply Module The power supply module is accessible after removing the rear cover For details see...

Page 17: ...the power supply 2 Pull the clip inwards and then pull the handle out Individual Power Supply Removal To insert the individual power supplies slide the power supply in until you hear the clicking sou...

Page 18: ...with the screws Remove and Insert Fan Module The fan module is located on the rear side of the chassis For details see the XGS12 Chassis Back View image To remove the fan module 1 Unfasten the four s...

Page 19: ...To install the fan module 1 Push the rubber grommets over the metal standoff on the chassis 2 Fasten the four screws tightly Chapter 3 Install XGS12 Chassis 12...

Page 20: ...Windows 7 and Windows 10 remote desktop session is ixia and the password is the CPU module serial number found on the sticker located in front of the CPU module Note The chassis windows wallpaper is...

Page 21: ...This page intentionally left blank 14...

Page 22: ...APTER 5 XGS12 SD Configuration This section describes the tasks needed to configure the XGS12 SD chassis In this section Connecting the XGS12 SD Processor module 16 Initial Configuration XGS12 SD 17 1...

Page 23: ...nect the module you need to do the following 1 Insert and remove the Processor Module 2 Connect the RJ45 management port 4 as the designated management port to your lab management switch 3 Connect the...

Page 24: ...e you log on to the chassis change the IP address Note 10 0 x x 16 is the default internal port address This can be changed from IxExplorer Chassis Properties Change IP Address To change the IP addres...

Page 25: ...ties Select Internet Protocol Version 4 TCP IPv4 5 Select Properties and then select the Use the following IP address option 6 Enter the IP address subnet mask and default gateway Chapter 5 XGS12 SD C...

Page 26: ...HAPTER 6 Ixia Test Applications Support This section provides the details of the Ixia Test Applications supported by XGS12 chassis platform In this section Ixia Applications support for XGS12 SD 20 19...

Page 27: ...To start IxNetwork and assign ports from an XGS12 SD chassis do the following 1 Log on to an application server or workstation that has the IxNetwork application installed 2 Start IxNetwork 3 Select X...

Page 28: ...xia compatibility matrix https support ixiacom com support overview product support product compatibility matrix to determine the correct Ixia software application versions that are validated for inte...

Page 29: ...This page intentionally left blank 22...

Page 30: ...ommon Administrative Tasks This topic describes for reference some of the common tasks that system administrators will perform on the XGS12 system In this section Start a Windows Remote Desktop Connec...

Page 31: ...he management workstation start a Remote Desktop Connection session with the chassis using the IP address that was returned by the ping command In the Windows Security window provide the following cre...

Page 32: ...al status of your XGS12 unit and troubleshooting issues that may arise If you need assistance contact Ixia Technical Support using the contact information provided in Contact Us on page iii In this se...

Page 33: ...The Active LED is illuminated when you have taken ownership of the load module If you run traffic from IxExplorer without taking port ownership the In Use light is not illuminated CPU Slot LED Definit...

Page 34: ...ription Processor module Ethernet LEDs for each port Link LED Green Port has link Note Link and Activity LEDs are included for all Ethernet ports Act LED Flashes when port has activity Chapter 8 Troub...

Page 35: ...gning static IP addresses you must observe the following requirements l The two management IP addresses must be in the same subnet l The two IP addresses needed for management cannot be on the followi...

Page 36: ...IxOS license is required to run both BreakingPoint and IxLoad l License invalidation Time discrepancies between the network and theXGS12 system will invalidate the installed licenses To avoid this co...

Page 37: ...This page intentionally left blank 30...

Page 38: ...Ixia a Keysight Business 26601 West Agoura Road Calabasas California 91302 Keysight Technologies 2020...

Reviews: