background image


Contents 

Contents ................................................................................................................................................................... 1 

Chapter 1 Product Acceptance & Model Description ............................................................................................... 4 

1.1 Product Acceptance ............................................................................................................................. 4 

1.1.1 Items for Acceptance (Wires Included) .............................................................................. 4 

1.1.2 Nameplate of Servo Driver ................................................................................................. 4 

1.1.3 Nameplate of Servo Motor ................................................................................................. 5 

1.2 Component Names .............................................................................................................................. 5 

1.2.1 Component Names of CD2S Servo Driver ........................................................................ 5 

1.2.2 Component Names of Servo Motor ................................................................................... 6 

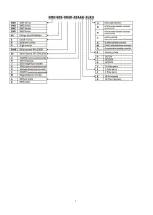
1.3 Model Description of Servo Motors and Drivers .................................................................................. 6 

1.3.1 Servo Drivers ...................................................................................................................... 6 

1.3.3 Power,Brake and Encoder cable of Motors ....................................................................... 8 

Chapter 2 Precautions and Installation Requirements ............................................................................................. 9 

2.1 Precautions .......................................................................................................................................... 9 

2.2 Environmental Conditions .................................................................................................................... 9 

2.3 Mounting Direction & Spacing.............................................................................................................. 9 

2.3.1 Precautions ........................................................................................................................ 9 

2.3.2 Servo Driver Installation ................................................................................................... 10 

Chapter 3 Interfaces and Wiring of CD2S Driver ................................................................................................... 13 

3.1 Interfaces of CD2S Driver .................................................................................................................. 13 

3.1.1 Interfaces .......................................................................................................................... 13 

3.1.2 Wiring Diagram ............................................................................................................................... 15 

3.1.3 X1 interface of CD2S Driver ........................................................................................................... 16 

3.1.4    Power Interface X3 of CD2S Driver

CD432S/CD622S X3 and X7

 ....................................... 17 

3.1.5 X5 and X6 Interfaces of CD2S Driver ............................................................................................. 18 

3.1.5.1    X5 Interface ............................................................................................................................... 18 

3.1.5.2    X6 Interface ................................................................................................................ 18 

Chapter 4 Digital Operation Panel .......................................................................................................................... 19 

4.1 Introduction ........................................................................................................................................ 19 

4.2 Operation on Digital Operation Panel ................................................................................................ 21 

Example  4-1:  Set  the  denominator  of  electronic  gear  ratio  to  10000  with  number  system 

switching .................................................................................................................................... 21 

Example 4-2: Set the speed to 1000 RPM/-1000 RPM with separate regulation of bits .......... 22 

Chapter 5 Motor Selection,Trial Operation and Parameter List ............................................................................. 24 

5.1 Driver and motor configuration .......................................................................................................... 24 

5.2 Trial Operation ................................................................................................................................... 27 

5.2.1 Objective........................................................................................................................... 27 

5.2.2 Precautions ...................................................................................................................... 27 

5.2.3 Operating Steps ................................................................................................................ 28 

5.2.4 Diagram of Trial Operation ............................................................................................... 28 

5.3 EASY USE ......................................................................................................................................... 28 

5.4 Description of Parameters ................................................................................................................. 34 

Chapter 6 Operation on Input/Output Ports ........................................................................................................... 46 

Summary of Contents for CD2S Series

Page 1: ...3 1 Interfaces of CD2S Driver 13 3 1 1 Interfaces 13 3 1 2 Wiring Diagram 15 3 1 3 X1 interface of CD2S Driver 16 3 1 4 Power Interface X3 of CD2S Driver CD432S CD622S X3 and X7 17 3 1 5 X5 and X6 Int...

Page 2: ...rt 55 Chapter 7 Mode Operation 58 7 1 Pulse Control Mode 4 Mode 58 7 1 1 Wiring in Pulse Control Mode 58 7 1 2 Parameters for Pulse Control Mode 59 7 1 3 Examples of Pulse Control Mode 62 Example 7 1...

Page 3: ...nsport Protocol 103 9 2 Data Protocol 104 9 2 1 Download from Host to Slave 104 9 2 2 Upload From Slave to Host 105 Chapter 10 Troubleshooting 108 10 1 Alarm Messages 108 Table 10 1 Fault codes 108 10...

Page 4: ...of a servo motor and that of a servo driver Whether the accessories included in the packing list are complete Check the packing list Whether any breakage occurs Check the external appearance complete...

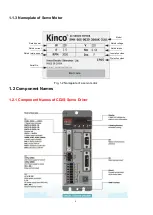
Page 5: ...Rated power Rated current Rated rotation speed Serial No Model Rated voltage Rated torque Insulation class Protection class Bar code Fig 1 2 Nameplate of a servo motor 1 2 Component Names 1 2 1 Compo...

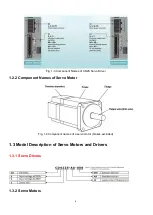
Page 6: ...nent Names of CD2S Servo Driver 1 2 2 Component Names of Servo Motor Fig 1 4 Component names of a servo motor brakes excluded 1 3 Model Description of Servo Motors and Drivers 1 3 1 Servo Drivers 1 3...

Page 7: ...7...

Page 8: ...8 1 3 3 Power Brake and Encoder cable of Motors...

Page 9: ...d servo motor from dropping or striking because they are precision equipment 7 For safety do not use any damaged servo driver or any driver with damaged parts 2 2 Environmental Conditions Table 2 1 En...

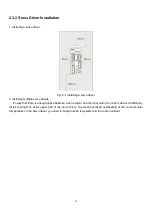
Page 10: ...drivers Ensure that there is enough space between a servo driver and the inner wall of a control cabinet Additionally install cooling fans at the upper part of the servo driver To prevent localized o...

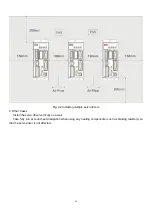
Page 11: ...ultiple servo drivers 3 Other Cases Install the servo driver vertically on a wall Take fully into account heat dissipation when using any heating components such as braking resistors so that the servo...

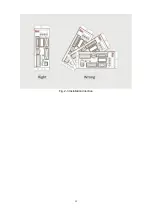
Page 12: ...12 Fig 2 3 Installation direction...

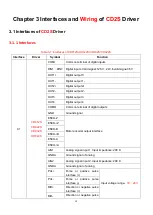
Page 13: ...ut 1 OUT2 Digital output 2 OUT2 Digital output 2 OUT3 Digital output 3 OUT4 Digital output 4 COMO Common terminal of digital outputs GND Ground signal ENCO Z Motor encoder output interface ENCO Z ENCO...

Page 14: ...cable interface L N Main power supply Single phase AC220V RB RB Braking resistor interface X5 CD412S CD422S CD432S CD622S RS232 RS232 interface X6 ENCODER IN Encoder cable interface X7 CD432S CD622S...

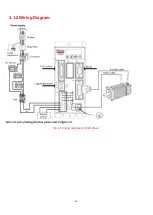
Page 15: ...15 3 1 2 Wiring Diagram Fig 3 1 Wiring diagram of CD2S driver...

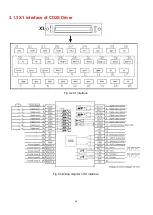
Page 16: ...16 3 1 3 X1 interface of CD2S Driver Fig 3 2 X1 interface Fig 3 3 Wiring diagram of X1 interface...

Page 17: ...17 3 1 4 Power Interface X3 of CD2S Driver CD432S CD622S X3 and X7 Fig 3 4 Power interface of CD2S driver CD412S 422S AC220V CD432S AC220V CD622S AC380V...

Page 18: ...round of signal 6 NC N A 7 NC N A 8 NC N A 9 NC N A Interface Pin No Signal Description Function X6 15 pin female connector 1 5V To output 5 V voltage Input interface of encoder in motor 9 GND 0 V 8 P...

Page 19: ...on panel Table 4 1 Display contents and functions of a digital operation panel Number Point Key Function Indicates whether data is positive or negative If it is on it indicates negative otherwise it i...

Page 20: ...ion positive negative limit signals Overall Flicking Indicates that an error occurs on the driver and is in the alarm state If the parameter adjusting display mode is featured by the decimal system Wh...

Page 21: ...ings I O parameters Mode operation parameters Set motor parameters Set driver parameters Trial operation Check wrong history records Loop Fig 4 1 Operation on a digital operation panel Note If a non r...

Page 22: ...dified to 10000 Fig 4 2 Number system conversion Example 4 2 Set the speed to 1000 RPM 1000 RPM with separate regulation of bits 1 Press MODE The main menu is displayed Choose F000 2 Press ENTER The i...

Page 23: ...23 Fig 4 3 Separate regulation of bits...

Page 24: ...river Please refer to the selection table when setting the motor model 1 Customers have the data file No need to configure motor Use the CD PC software to download data file to servo driver then drive...

Page 25: ...gure motor model in servo Customers can configure the motor s model according to servo motor configuration table mentioned above then set the parameters according to the application If the motor s mod...

Page 26: ...ware Operation Connect the servo to PC open the CD PC then Menu Driver Control Panel F004 in the F004 in the F004 set the 19th operation Motor Num Please refer to the servo and motor configuration tab...

Page 27: ...s or when the motor is running pulse signals digital input signals and analog signals of the external controller are temporarily unavailable so safety must be ensured 4 During the trial operation the...

Page 28: ...ctivate trial operation In this case the numeric display is adc d and the motor shaft releases When long pressing or the motor automatically locks and runs according to SpeedDemand_RPM or SpeedDemand_...

Page 29: ...im of EASY and TunE is to solve the problem of panel operation If users use software to init parameters or change motor type only EA00 EA01 and Tn00 can displayed on the menu of EASY and TunE Users mu...

Page 30: ...r Used when EA02 is set to 6 or 7 The relationship between analog input voltage and motor velocity the unit of measure is rpm V For controller use with standard KINCO AS motors the maximum value is 37...

Page 31: ...1 98 35 24 17 2223 800 568 2 139 50 35 18 2500 900 568 3 195 70 49 19 2778 1000 733 4 264 95 66 20 3334 1200 733 5 334 120 83 21 3889 1400 1032 6 389 140 100 22 4723 1700 1032 7 473 170 118 23 5556 20...

Page 32: ...chart of EASY Jog the machine evaluate the performance Measure the Inertia Ratio by Tn03 Adjust the Stiffness by Tn01 Jog the Machine evaluate the performance END Adjust Gain by PC Not good Good Not...

Page 33: ...33 EASY flowchart Note The menu is exited automatically if there is no operation in 60s and users have to start again Entered data is valid immediately but must be saved via EA00...

Page 34: ...at once but must be saved via Tn00 Considering about safety it is unnecessary to press SET to verify when users need to modify stiffness or inertia ratio Data are also valid but are only adjusted step...

Page 35: ...3 28 is set to 0 without external analog control 0 N A d0 03 60710010 CMD_q Sets input torque instructions current instructions when the driver works in the 4 mode and the address d3 30 is set to 0 wi...

Page 36: ...tor d1 07 60F70D10 Chop_Power_Real Actual power of a braking resistor d1 08 60F70B10 Temp_Device Temperature of a driver C d1 09 60790010 Real_DCBUS Actual DC bus voltage d1 10 60F70C10 Ripple_DCBUS F...

Page 37: ...speed of velocity loop N A 0 32767 d2 02 60F90210 Kvi Time used to adjust speed control to compensate minor errors N A 0 16384 d2 03 60F90308 Notch_N Notch filtering frequency setting for a velocity l...

Page 38: ...tual torque Set torque Actual torque Set torque Actual speed Maximum speed Actual speed Actual speed Maximum speed Maximum speed V the maximum speed complies with d2 24 Max_Speed_RPM parameter setting...

Page 39: ...rol 2 800 4 Multi Din 0 800 8 Multi Din 1 801 0 Multi Din 2 802 0 Gain switch 0 804 0 Gain switch 1 100 0 Quick stop 200 0 Start homing 400 0 Activate command 000 1 N A d3 02 20100410 Din2_Function 00...

Page 40: ...l 2 rpm 0 N A d3 21 20200C10 Din_Speed3_RPM Multi speed control 3 rpm 0 N A d3 22 25020110 Analog1_Filter Used to smooth the input analog signals F Filter Frequency 4000 2 Analog1_Filter Time Constant...

Page 41: ...s 4 1000 32767 32767 d3 35 25080210 Gear_Divider Indicates the denominator to set electronic gears when the operation mode is 4 1000 1 32767 d3 36 25080308 PD_CW 0 Double pulse CW CCW mode 1 Pulse Dir...

Page 42: ...02 64100208 Feedback_Type Type of encoders 001 1 Differential ABZ and differential UVW signals 001 0 Differential ABZ and UVW signals of TTL 000 1 ABZ of TTL and differential UVW signals 000 0 ABZ of...

Page 43: ...30 K2 324 B SMH80S 0075 30 K3 334 B SMH80S 0100 30 K4 344 B SMH110D 0105 20 K5 354 B SMH110D 0125 30 K6 364 B SMH110D 0126 20 K7 374 B SMH110D 0126 30 K8 384 B SMH110D 0157 30 K9 394 B SMH110D 0188 3...

Page 44: ...to save and restart when users change this parameter d5 03 2FE1001 0 U2BRG Sets the baud rate of the serial port 540 19200 270 38400 90 115200 You need not restart driver 270 Unnecessar y to restart...

Page 45: ...Note Factory parameters 150 d5 14 2FF0040 8 Key_Address_F00 1 Sets numeric display data N A d5 15 65100B1 0 RS232_Loop_Ena ble 0 1 to 1 1 1 to N 0 d5 16 2FFD001 0 User_Secret User password 16bits 0 65...

Page 46: ...l functions on digital input output ports according to application requirements 6 1 Digital Input Signals 6 1 1 Polarity Control on Digital Input Signals Table 6 1 Simplified IO polarity setting varia...

Page 47: ...6 1 2 Simulation of Digital Input Signals Table 6 4 IO simulation variable Numeric Display Variable Name Meaning Default Value Rang e d3 09 Dio_Simulate Simulates input signals and enforces output si...

Page 48: ...default functions of digital input signals Numeric Display Variable Name Meaning Default Value d3 01 Din1_Function 000 1 Driver enable 000 2 Driver fault reset 000 4 Operation mode control 000 8 P co...

Page 49: ...limit Indicates the limit of forward running of motors normally closed contact by default By default the driver regards position positive limits as valid and polarity can be modified to adjust to norm...

Page 50: ...tor 2 25090410 0 1 1 The 3rd electronic ratio Molecular 3 25090510 Denominator 3 25090610 1 0 0 The 4th electronic ratio Molecular 4 25090710 Denominator 4 25090810 1 0 1 The 5th electronic ratio Mole...

Page 51: ...n of automatically powering on the driver by setting internal parameters in drivers instead of external digital input ports Table 6 11 describes the setup method Table 6 11 Enabling the function of au...

Page 52: ...bes the setup method Table 6 13 Settings on operation mode control on drivers Numeric Display Variable Name Parameter Settings d3 03 Din3_Function Set to 000 4 d3 16 Din_Mode0 Set to 0 004 4 d3 17 Din...

Page 53: ...es for setting simplified IO polarity Numeric Display Variable Name Meaning Default Value Range d3 08 Dio_Polarity Sets IO polarity 0 N A Dio_Polarity simplified IO polarity settings is used to set th...

Page 54: ...000 4 Position reached 000 8 Zero velocity 001 0 Motor brake 002 0 Velocity reached 004 0 Index 008 0 The maximum speed obtained in the torque mode 010 0 PWM ON 020 0 Position limiting 040 0 Referenc...

Page 55: ...velocity limit In the 4 analog torque mode signals are output after the max restricted speed is reached PWM ON The driver enables the motor Motor limiting Motor is in the status of position limiting...

Page 56: ...st be connected To apply the BR BR port both the 24VO and COMO ports must connect to the external input power 2 NPN wiring to controllers that support valid low level input Fig 6 5 NPN wiring diagram...

Page 57: ...gital output port do remember to connect a diode in inverse parallel as shown in Fig 6 7 Fig 6 7 Connect a relay to the digital output port Reverse parallel connect diode Note When OUT3 and OUT4 are u...

Page 58: ...trol Mode 1 Wiring diagram of CD2S driver in pulse control mode Fig 7 1 Wiring diagram of CD2S driver in pulse control mode 2 Common anode connection to controllers that support valid low level output...

Page 59: ...c gear 0 in mode 4 1000 1 32767 Parameters for electronic gear ratio are used to set the numerator and denominator of electronic gears when the driver operates in mode 4 Command pulse input Command pu...

Page 60: ...t with d3 00 and restarts it later 1 0 2 Note CD series doesn t support AB phase signal Double pulse CW CCW mode d3 36 0 Pulse direction P D mode d3 36 1 Incremental encoder mode d3 36 2 3 Parameters...

Page 61: ...loading conditions During adjustment of the control loop ensure that the bandwidth of the velocity loop is at least twice of that of the position loop otherwise oscillation may occur Table 7 5 Parame...

Page 62: ...eter should be set to 20 7 0 45 Proportional gain of velocity loop Kvp If the proportional gain of the velocity loop increases the responsive bandwidth of the velocity loop also increases The bandwidt...

Page 63: ...me Meaning Parameter Settings d3 01 Din1_Function Defines the functions of digital input port 1 000 1 Driver enable d3 02 Din2_Function Defines the functions of digital input port 2 000 2 Fault reset...

Page 64: ...digital input port d3 02 Din2_Function Defines the functions of digital input port 2 000 2 Error resetting d3 03 Din3_Function Defines the functions of digital input port 3 000 4 Control on operation...

Page 65: ...l speed reaches the target speed instantly As a contrast in the speed mode with acceleration deceleration 3 mode the actual speed gradually increases until it reaches the target speed Both the acceler...

Page 66: ...00 2 Analog1_Filter Time Constant T Analog1_Filter 4000 S 5 1 127 d3 23 Analog1_Dead Sets dead zone data for external analog signal 1 0 0 10V d3 24 Analog1_Offset Sets offset data for external analog...

Page 67: ...ent of dead zone signals For offset processing see the left part in Fig 7 6 for dead zone processing see the right part in Fig 7 6 7 2 4 Examples of Analog Speed Mode In the analog speed mode follow t...

Page 68: ...he driver is required to operate in the speed mode after being powered on set d3 16 to 3 or 3 Step 4 After configuring functions on digital input ports select the analog speed channel and set paramete...

Page 69: ...hannel 2 AIN2 Valid mode 4 0 0 2 d3 31 Analog_Torque _Factor Sets the proportion between analog signals and output torque current 0 d2 15 Speed_Limit_F actor The factor that limits the maximum speed i...

Page 70: ...r settings If the driver does not require enabling through external digital input ports you can disable the enabling function of external digital input ports by referring to Table 6 13 of Example 7 3...

Page 71: ...t signals are valid Set to 0 003 3 mode speed mode with acceleration deceleration d3 25 Analog2_Filter Used to smooth the input analog signals Filter frequency f 4000 2 Analog1_Filter Time Constant T...

Page 72: ...es used to select a target position between Position 0 7 Table 7 20 Internal Multi position Control Mode Parameter Table Note In this control mode position section X can be positive or negative it can...

Page 73: ...0 DIN5 Internal position 1 DIN6 Internal position 2 DIN6 DIN5 DIN4 0 0 0 Select position and speed in section 0 DIN6 DIN5 DIN4 0 0 1 Select position and speed in section 1 DIN6 DIN5 DIN4 0 1 0 Select...

Page 74: ...eed of position section 1 Set to 150 set the speed of section 1 to 150 d3 41 Set position M M 10000 Set to 2 d3 42 Set position N Set to 28500 set the position of section 2 t0 28500 d3 20 Set the spee...

Page 75: ...ons require immediate updating set it to 2F if you choose relative positioning method set it to 4F To change these parameters successfully you have to save the value of d3 00 and then restart 7 5 Inte...

Page 76: ...0 20 Valid at operation mode 1 3 or 3 If d3 28 is set to 10 17 Ain1 is valid which corresponds to multi speed control 0 7 If d3 28 is set to 20 27 Ain2 is valid which corresponds to multi speed contro...

Page 77: ...1 Din_Speed3_RPM Set to 400 rpm d3 00 Store_Loop_Data Set to 1 7 7 Homing Mode 6 Mode 1 Summary To make a system execute positioning in accordance with its absolute positioning the first step is to de...

Page 78: ...movement is rightward if the positive limit switch is inactive here shown as low The position of home is at the first index pulse to the left of the position where the positive limit switch becomes in...

Page 79: ...the point at which the reversal takes place is anywhere after a change of state of the home switch Methods 5 and 6 Homing on the negative home switch and index pulse Using methods 5 or 6 the initial d...

Page 80: ...ht and using methods 11 to 14 the initial direction of movement is to the left except if the home switch is active at the start of motion In this case the initial direction of motion is dependent on t...

Page 81: ...30 Homing without an index pulse These methods are similar to methods 1 to 14 except that the home position is not dependent on the index pulse it is dependent only on the relevant home or limit swit...

Page 82: ...82...

Page 83: ...d for future expansion of the homing mode Methods 33 and 34 Homing on the index Method 35 Homing on the current position In this method the current position is taken to be the home position Methods 17...

Page 84: ...trol d3 04 Din4_Function 200 0 Start homing d3 05 Din5_Function 001 0 Positive limit d3 06 Din6_Function 002 0 Negative limit d3 07 Din7_Function 004 0 Home signal d3 14 Dout4_Function 004 0 Index sig...

Page 85: ...negative limits are default to normally closed point Otherwise the Panel will alarm and display P L positive limit and N L No limit Only when the alarm is eliminated the origin control mode can be no...

Page 86: ...to 1 at the same time the definition Start finding the origin is eliminated 3 Start homing 1 Enable motor which means the digital input point 1 is set to high level The computer motoring picture is s...

Page 87: ...ing the origin signal is a pulse signal requires only a rise not need to always be on If you want to start next time a rise pulse is enough 4 After the external find the origin computer monitoring pic...

Page 88: ...s the Z phase signal in mode 7 and ultimately find the origin Computer monitoring picture is shown as follows In mode 7 it is default to detect z phase signal after searching the origin decline along...

Page 89: ...hown as follows At this point you have completed the origin search function then the drive position is automatically set to zero and the current position is default to origin Computer monitoring pictu...

Page 90: ...equired Parameters for velocity loops and position loops should be adjusted properly according to loading conditions During adjustment of the control loop ensure that the bandwidth of the velocity loo...

Page 91: ...and the time for steady state adjustment is reduced however if the integral gain is too great system oscillation may occur Adjustment steps Step 1 Adjust the gain of velocity loop to calculate the ba...

Page 92: ...oop During gain adjustment of a velocity loop if the motor noise is too great you can properly reduce the parameter Speed_Fb_N for feedback filter of the velocity loop however the bandwidth F of the f...

Page 93: ...he position loop K_Velocity_FF the velocity feedforward of a position loop can be increased to reduce position following errors When position signals are not smooth if the velocity feedforward of a po...

Page 94: ...to 1 to enable the notch filter If you do not know exactly the resonance frequency you can firstly set the max value of d2 14 current instruction to a low one so that the oscillation amplitude is with...

Page 95: ...o chapter 7 2 Set speed mode control according to 7 2 3 Click the menu Driver Operation mode Auto Reverse and set the parameter for auto reverse Set Auto_Reverse as 0 for no control Set Auto_Reverse a...

Page 96: ...96 8 4 Debugging example 8 4 1 Oscilloscope 1 Enter oscilloscope 2 Parameters for Oscilloscope...

Page 97: ...vp and observe the speed curve Following figures show the different curve in different Kvp According to the curve it shows that the bigger value of Kvp the faster response of speed 2 Adjust Kvi accord...

Page 98: ...98 In Auto Reverse mode Kvp 110...

Page 99: ...ce overshoot 3 Use oscilloscope to observe curve Set motor running at Auto Reverse mode by time Operation mode 3 set parameters of oscilloscope as following figure In Fig 1 and Fig 2 Vff is 100 When K...

Page 100: ...100 The oscilloscope is as following max following error is 69 inc Fig 2 Kpp 30 Vff 100...

Page 101: ...101 The oscilloscope is as following max following error is 53 inc Fig 3 Kpp 30 Vff 50...

Page 102: ...102 The oscilloscope is as following max following error is 230 inc...

Page 103: ...host computer can send any data to CD2S driver The driver configured with ID No will calculate such data and return a reply Default communication settings for the CD2S servo driver are as follows Baud...

Page 104: ...UB INDEX DATA CMD Specifies the direction of data transfer and the volume of data 23 0x16 Sends 4 byte data bytes 4 7 contain 32 bits 2b 0x16 Sends 2 byte data bytes 4 5 contain 16 bits 2f 0x16 Sends...

Page 105: ...s that sent by the master If the data contains no error byte 4 byte 7 save the object value read from the slave with the lower order bits arranged before the higher order bits Correct value byte7 byte...

Page 106: ...01 2F 60 60 00 01 00 00 00 0F 607A0020 Target_Position 50000inc 01 23 7A 60 00 50 C3 00 00 EF 60810020 Profile_Speed 200RPM 01 23 81 60 00 55 55 08 00 49 60830020 Profile_Acc 610 352rps s Default DEC...

Page 107: ...60840020 Profile_Dex 610 352 rps s Default oder Resolution 1875 Default unit of Profile acc dec DEC DEC RPS S 65536 Encoder Resolution 1000 4000 Note Under communication mode data are transmitted in...

Page 108: ...ils enter the menu of Group F007 Press Enter The interface of faulty codes is displayed The errors that you first discovered are those that have occurred most recently Press or to browse the messages...

Page 109: ...the driver bus is below the allowable range Check the input power Power on AC first then power DC Reduce deceleration 008 0 Over Current The power tube in the driver is faulty or short circuit occurs...

Page 110: ...oblem Driver internal problem Check 24VDC power supply Contact manufacturer Chapter11 Appendix Appendix 1 Selection Table for Brake Resistor Driver Model Driver Power W Brake Resistor Brake Resistor M...

Page 111: ...g to real application Appendix 2 Selection Table for Fuse Driver Model Driver Power W Specification CD420 AA 000 CD422 AA 000 200W 3 5A 250VAC 400W 7A 250VAC 750W 15A 250VAC CD430 AA 000 CD432 AA 000...

Reviews: