background image

-1-

BEFORE YOU BEGIN

BEFORE YOU BEGIN

ESCALE

INSTALLATION INSTRUCTIONS

FLOOR STANDING TOILET

K-25089T-S/K-25090T-S/K-25091T-S/K-24932T-GS

K-23076T-CPS/K-23076T-BNS/K-23077T-CPS/K-23077T-BNS

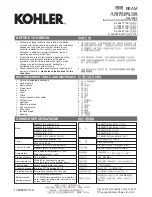
ORDERING INFORMATION

ESCALE WF Toilet(HT200 PNE IWT) ..................K-25089T-S

Includes Bowl ........................................................K-4097T
Includes HYDRO-TOWER 200 PNE

In-Wall Tank W/O Frame .............K-78074T-ESS

Includes ESCALE Quick-Release QC Seat ....K-4417T-2P

ESCALE WF Toilet(HT300 PNE IWT) ..................K-25090T-S

Includes Bowl ........................................................K-4097T
Includes HYDRO-TOWER 300 PNE

In-Wall Tank W/O Frame .............K-78077T-ESS

Includes ESCALE Quick-Release QC Seat ....K-4417T-2P

ESCALE WF Toilet(HT300 MEC IWT)..................K-25091T-S

Includes Bowl ........................................................K-4097T
Includes HYDRO-TOWER 300

In-Wall Tank W/O Frame .............K-10611T-ESS

Includes ESCALE Quick-Release QC Seat ....K-4417T-2P

ESCALE WF Toilet (BEAM M FV)......................K-24932T-GS

Includes Bowl ...............................................K-21856T-GS
Includes BEAM Manual Toilet/Squat

Flush Valve.......................................K-77681K-G

Includes ESCALE Quick-Release QC Seat ...K-4417T-2P

(

200

).........K-25089T-S

..................................................................K-4097T

200

....................K-78074T-ESS

................................K-4417T-2P

(

300

).........K-25090T-S

..................................................................K-4097T

300

....................K-78077T-ESS

................................K-4417T-2P

(

300

).........K-25091T-S

..................................................................K-4097T

300

...........................K-10611T-ESS

................................K-4417T-2P

(

)............K-24932T-GS

..........................................................K-21856T-GS

.........................................................K-77681K-G

................................K-4417T-2P

·

·

·

·

·

Fixture dimensions are nominal and conform to tolerances
established by ASME Standards (A112.19.2-2018).
This product complies with Q/KCI-006-2018 and GB
25502-2017.
Water Efficiency Grade 1 for K-25089T-S/K-25090T-S/K-
25091T-S/K-23076T-CPS/K-23076T-BNS/K-23077T-
CPS/K-23077T-BNS.
Water Efficiency Grade 2 for K-24932T-GS.

Please read these instructions carefully to familiarize
yourself with the required tools, materials, and installation
sequences. Follow the sections that pertain to your
particular installation. This will help you avoid costly
mistakes. In addition to proper installation, read all
operating and safety instructions.
All information in these instructions is based upon the
latest product information available at the time of
publication. Kohler China reserves the right to make
changes in product characteristics, packaging, or
availability at any time without notice.
These instructions contain important care, cleaning, and
warranty information -

.

please leave instructions for the

consumer

·

·

·

·

·

-

ASME

(A112.19.2-

2018)

Q/KCI-006-2018

GB 25502-2017

K-25089T-S/K-25090T-S/K-25091T-S/K-23076T-CPS/K-
23076T-BNS/K-23077T-CPS/K-23077T-BNS

1

K-24932T-GS

2

©

©

Copyright Kohler China Investment Co., Ltd. 2018

2018

No.2 KOHLER ROAD, SANSHUI CENTRAL INDUSTRIAL PARK, LEPING TOWN, SANSHUI DIST., FOSHAN, GUANGDONG, PRC

POST CODE 528137

2

528137

8# MENGSHAN RD, ECONOMIC DEVELOPMENT ZONE OF HUANTAI, ZIBO, SHANDONG, CHINA

POST CODE: 256410

8

256410

:

1269084-T01-D

Summary of Contents for Escale K-23076T-CPS

Page 1: ...established by ASME Standards A112 19 2 2018 This product complies with Q KCI 006 2018 and GB 25502 2017 Water Efficiency Grade 1 for K 25089T S K 25090T S K 25091T S K 23076T CPS K 23076T BNS K 23077T CPS K 23077T BNS Water Efficiency Grade 2 for K 24932T GS Please read these instructions carefully to familiarize yourself with the required tools materials and installation sequences Follow the sec...

Page 2: ...g toilet does not have a supply shut off valve below the tank install one before installing the new toilet 12504A NA NOTICE 254mm 305mm S 12504A NA ESCALE WF Toilet BEAM SR D CP K 23076T CPS Includes Bowl K 23078T DPS Includes BEAM Toilet Sensor DC K 30947T CP Includes ESCALE Quick Release QC Seat K 4417T 2P ESCALE WF Toilet BEAM SR D BN K 23076T BNS Includes Bowl K 23078T DNS Includes BEAM Toilet...

Page 3: ...shed Wall Finished Wall Install Flushing Mechanism 1 Install The Tank 1 Turn the water supply off before installing the new toilet 2 Install the concealed tank system in wall before decorating the wall 3 Install the tank system per tank s installation instructions 4 Refer to installation instructions of in wall tank for SKU of faceplate 2 Install Manual Valve Or Sensor Refer to installation instru...

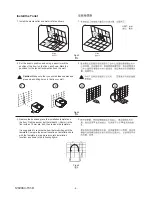
Page 4: ...all Caution 2 1 1 2 Fig 3 3 UNIT mm Water Supply 345 O utlet 110 130 180 S trap 345 Outlet 185 Water Supply P trap 4 3 3 15 38 3 Remove the bowl and place the installation template on the floor Drill the anchor bolt hole depth 38mm in the floor with an 15mm dia drill then remove the template It is suggested to reverse the bowl before drilling with the template Compare the actual loacation of insta...

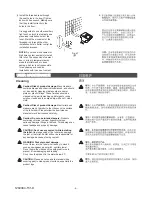
Page 5: ...into the reserved drainage pipe Fig 7 Push the bowl to insert the drainage hole into the S trap and also insert the water pipe into the outlet of the in wall tank 4 PVC 7 UNIT mm Fig 6 6 Fig 7 7 185 185 110 130 With 12504A S trap For Separate Purchase 12504A NA NA 50mm From Floor 50mm 50 185 5 Move the toilet to the field and make sure the bottom profile matches marked line on the ground 5 1269084...

Page 6: ...ause of using cement Do not throw into the toilet what is easy to block it such as newspaper paper pilch sanitary towel Do not bump the vitreous china with great force to prevent it from damaging and leaking Do not use the product in the water below 0 C o Please do not use hard materials like scouring pad to clean product surface especially the product logo CAUTION 0 C o USER MAINTENANCE USER MAIN...

Page 7: ...护理 清洁及保养等重要资料 请交 消费者留存 安装之前 RECOMMENDED TOOLS AND MATERIALS 所需工具及材料 开口 活动扳手 卷尺 梅花扳手 管扳手 直角尺 水平尺 老虎钳 管钳 十字螺丝刀 生料带 专用扳手 连接线 剥线器 绝缘胶布 电工套管 柏明 感应器规格 1350669 T01 A 型 号 Power 电 源 Liter per flushing 冲洗水量 Temperature 1 55 水温 1 45 以内 沿发射角度方向 Recommended working pressure 推荐工作压力 K 30947T 3 4 5L K 30948T 3 6L K 30951T 6 8L K 30952T 6 8L K 30947T 3 4 5L 3 6L 直流型 K 30948T 3 4 5L 3 6L 交流型 K 30951T 6 8L 直流型 K 309...

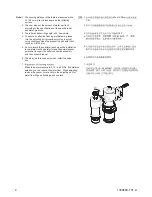
Page 8: ...lpful for qualified maintenance personnel to repair the outlet connection assembly and the vacuum breaker 6 The slurry mold is used only when install the valve box 30cm X 30cm 20 K 8750 注意 1 2 3 4 5 6 2 The user may set the amount of water per flush according to the specifications of the specific toilet and water pressure When the water pressure is 0 10 0 55 MPa If sometimes splashs you can reduce...

Page 9: ...2 管接头 排污管中心线 Table of installation positions for toilets Used with K 4350 K 4368 K 4349 K 4367 座便器安装位置 配K 4350 K 4368 K 4349 K 4367 158 158 H L CL OF OUTLET G1 1 2 SPUD G1 1 2 G1 1 2 管接头 排污管中心线 158 158 L 105 0 30 105 0 30 H L K 4330 K 8750 L H 570 L 540 600 H 570 630 600 H 670 H 630 700 670 H 740 700 H 600 L 570 630 600 L 660 630 L 700 660 L H G1 1 2 CL OF OUTLET G1 1 2 SPUD G1 1 2 G1 1 2 管接头 排污管中...

Page 10: ...e use 2429T SA NA as rear inlet d To comply with above tables you may cut either end of the connecting pipe Table of installation positions for squats L H 700 L 730 640 H 670 4 1350669 T01 A 730 L 760 670 H 700 760 L 790 700 H 730 790 L 820 730 H 760 820 L 850 760 H 790 蹲便器安装位置 注意 为保证感应效果 L H安装对应尺寸需严格 遵守 若L H值超过表格范围 不推荐使用 当座便器安装长度540 L 850时 上进水配管 请选配2430T NA 后进水配管请选配 2429T NA 蹲便器后进水配管请选配 2429T SA ...

Page 11: ...nd some other polished plates d No strong ultraviolet radiation or electromagnetic field nearby 1 a b c d 1350669 T01 A 5 2 Remove the dust proof cover from the inlet connection of the flushing valve Then place the flushing valve into the slot adjust its level and square with battens and connect the inlet tubes Screw down the nut at the outlet position Refer to the specific rough in of different t...

Page 12: ...ower supply while installing Connection line is not supplied AC connection wire with insulating sleeving is recommended Wire of which the nominal section area of conductor is not less than 0 5mm is also recommended DC connection line use wire of which the nominal section area is not less than 0 3mm It is cut according to acted installation requirements The length of cut wire is recommended less th...

Page 13: ...kage during the application of water supply b Please avoid breaking the manual lever line during this procedure c Avoid the plug ins from wetting or this will result in false operations of the sensor Valve Box Tiles Slurry Mold Manually Operation button 手动按钮 3 a b 105 30 0 用手动按钮组件驱动冲洗器 试通水 确认各管道连接处无 渗漏后 将手动拉线组件放回原位 将灰浆模装于阀盒上 阀盒周围空隙用灰浆抹平 试水过程中确认出水口连接完成或封堵无误 防止接插件受潮 否则将引起误动作 注意 暗盒 瓷砖 灰浆模 When the sl...

Page 14: ...ver rotate counterclockwise to remove the sensor cover a b c Prevent damage or drop of the cover or break the cord during this procedure d Please observe the indicator from the bottom of the sensor cover upwards connector Ensure the tightness of the to avoid them from wetting Wear clean gloves when installing the sensor cover to avoid surface injury by cement or sand Indicator 5 a b c a b c d c 90...

Page 15: ...nt The central position and correctness of the sensor will affect the proper operation of the sensor 6 INSTALLATION IN OTHER METHODS a Installation On Prefabricated Board b Installation On Decorating Panel 105 0 30 Prefabricated Board 预制板 105 0 30 35 35 Decorating Panel 装饰板 9 1350669 T01 A Notice For these two installation forms the sensor must be installed according to rough in 安装面板后 观察面板是否端正及其中心...

Page 16: ...951T DC take out the battery box from the back of the cover and put batteries into the box Connect battery box assy to control box While installing K 30948T K 30952T AC connect AC power unit to control box and then power on 1 a b 2 a b c 1350669 T01 A 10 the product is in the status of automatically adjusting its 使用说明 自动调节感应范围 本节操作步骤准确与否将影响感应效果 本产品出厂时 感应距离设定为距感应窗口沿发射角度方向 85cm以内 以30cm 30cm白纸为反射平面 红...

Page 17: ...hen the sensor cannot perform correctly or the toilet is being repaired It is not recommended to use when the sensor is normally functional b When the sensor cannot function properly please refer to the list of troubleshooting on Page 15 c Do not exert too much force to avoid the manual unit from damaged Notice a b c 手控冲洗 本系统能对大部分衣物感应良好 但可能对极少数衣物出现感 应不良现象 如有感应不良现象时可用手控冲洗 按钮为备用机构 为感应器不能正常工作或维 修便器时使...

Page 18: ... new batteries the flash direction of the indicator is downward so you need to observe along the direction Note Screws 螺钉 Battery Box Cover 电池盒盖 Batteries 电池 Battery Box 电池盒 6 电池的更换 仅适用于安装K 30947T K 30951T使用直流 电源的情况 电池耗尽时 指示灯 每6秒闪烁1次 感应器将继续工作大 约一周时间 指示灯 每6秒闪烁2次 感应器将停止工作 直至更换电池 更换电池时取下电池盒盖 换上新电池即可 指示灯发光方向为斜向下 因此需顺着发光方向 观察 注意 7 Protective Flushing When the toilet has not been used for a long time th...

Page 19: ...ter when cleaning to avoid foreign materials entering the inside of the valve body Notice Care Clean Keep the sensing window clean Wipe with soft cloth and mild cleaner a Do not use dust removing powder abrasive powder or cleaner containing oil acidor alkaline ingredient b Do not spray air refresher disinfector or other deodorizing cleaning solvent directly into the sensing window c Keep wire away...

Page 20: ...ns are taken please contact with us via distributor 1350669 T01 A 14 1 2 3 1 2 1 2 3 1 2 TROUBLESHOOTING 简单故障排除 请在委托修理前做以下检查 现象 可能原因 处理方法 不出水 感应指示灯不亮 感应指示灯闪烁 而无水流出或出水较差 不停水 感应灯也不闪烁 电池指示灯连续 闪烁而不出水 调节栓未完全打开 水压太低 过滤装置脏堵 阀体部件内有脏物 手动装置损坏 电池耗尽 仅适用于安装K 30947T CP BN K 30951T CP BN的情况 打开调节栓 改善供水情况 清洗过滤装置 清洗过滤装置后 使感应器连续感应动作 数次 检查手动装置 更换新电池 仅适用于安装K 744T M的情况 如按以上操作仍未解除故障 请通过销售商与本公司联系 1 检查电源连接 2 清理物体 3 清洁窗口 4...

Page 21: ...220V AC power supply corresponding protective measures should be taken 9 Please confirm no water penetration at the connection area of AC wire and the connection area is not easy to be affected by damp 10 Don t connect power unit to AC power supply until the sensor installation is finished 11 The head AC power supply must be protected with appropriate fuse 12 Please confirm the AC power supply and...

Page 22: ...常情况下使用本产品时 环保使用期限 才有效 10 产品中有害物质含量的说明 有害物质统计表 注 本表格提供的信息是基于供应商提供的数据及科勒公司的检测结果 本产品应用环保设计理念 在当 前技术水平下 所有有害物质或元素的使用已经控制到了最低程度 科勒公司会继续努力通过改善现有技 术来减少这些物质的使用 有害物质名称 部件名称 铅 Pb 汞 Hg 外壳组件 阀体组件 控制盒组件 电池盒组件 电池 交流电源盒 进水组件 附件类 多溴联苯 PBB 多溴二苯醚 PBDE 镉 Cd Cr VI 六价铬 表示该有害物质在该部件所有均质材料中的含量均在GB T 26572现行有效版本规定的限量要求以下 表示有害物质至少在该部件的某一均质材料中的含量超出GB T 26572现行有效版本规定的限量要求 表示部分机型含有该部件 ...

Page 23: ...o reduce the use of these hazardous materials used in this product The product service life for environment protection is 10 years Kohler Company will specify product service life based on product characteristics The product service life for environment protection is only effective when the product is used as described in the product specification Toxic or Hazardous Substance or Elements Part name...

Reviews: