
-1-
BEFORE YOU BEGIN
BEFORE YOU BEGIN
ESCALE
INSTALLATION INSTRUCTIONS
FLOOR STANDING TOILET
K-95027T-S
ORDERING INFORMATION
E
scale
F
loor
S
tanding
T
oilet .....................................
K-95027T
I
ncl
u
des
B
o
w
l .......................................................
K-4097T
I
ncl
u
des
ESCALE Qu
ic
k-R
elease
QC S
eat .
K-4417T-2PM
....................................
K-95027T
..................................................................
K-4097T
.............................
K-4417T-2PM
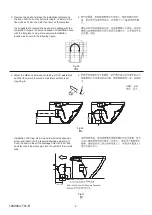
SAFETY: WARNINGS
K
o
h
ler
p
rod
u
cts are
p
recision
-
engineered and s
h
o
u
ld gi
v
e
contin
u
ed s
up
erior and sa
f
e
p
er
f
or
m
ance
, p
ro
v
ided
:
1
.
Th
e
y
are installed
,
co
mm
issioned
,
o
p
erated and
m
aintained in accordance
w
it
h
t
h
e reco
mm
endations gi
v
en
in t
h
is
M
an
u
al.
2
.
P
eriodic attention is gi
v
en
,
as necessar
y,
to
m
aintain t
h
e
p
rod
u
ct in good
fu
nctional order.
R
eco
mm
ended
g
u
idelines are gi
v
en in t
h
e
section.
C
are
fu
ll
y
ins
p
ect t
h
e ne
w f
i
x
t
u
re
f
or an
y
signs o
f
da
m
age.
Wh
en installing
K
o
h
ler
P
rod
u
cts
, m
an
uf
act
u
rers g
u
idelines
f
or
p
o
w
er tool sa
f
et
y
s
h
o
u
ld
b
e
f
ollo
w
ed.
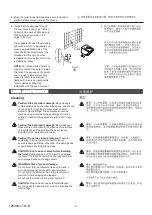
MAINTENANCE
1
.
2
.
·
·
·
·
·
F
i
x
t
u
re di
m
ensions are no
m
inal and con
f
or
m
to tolerances
esta
b
lis
h
ed
by ASME S
tandards
(A112
.
19
.
2-2013)
.
Th
e
p
rod
u
ct co
mp
lies
w
it
h GB 6952-2015
.
P
lease read t
h
ese instr
u
ctions care
fu
ll
y
to
f
a
m
iliari
z
e
y
o
u
rsel
f w
it
h
t
h
e re
qu
ired tools
, m
aterials
,
and installation
se
qu
ences.
F
ollo
w
t
h
e sections t
h
at
p
ertain to
y
o
u
r
p
artic
u
lar installation.
Th
is
w
ill
h
el
p y
o
u
a
v
oid costl
y
m
ista
k
es.
I
n addition to
p
ro
p
er installation
,
read all
o
p
erating and sa
f
et
y
instr
u
ctions.
A
ll in
f
or
m
ation in t
h
ese instr
u
ctions is
b
ased
up
on t
h
e
latest
p
rod
u
ct in
f
or
m
ation a
v
aila
b
le at t
h
e ti
m
e o
f
pub
lication.
K
o
h
ler
Ch
ina reser
v
es t
h
e rig
h
t to
m
a
k
e
c
h
anges in
p
rod
u
ct c
h
aracteristics
, p
ac
k
aging
,
or
a
v
aila
b
ilit
y
at an
y
ti
m
e
w
it
h
o
u
t notice.
Th
ese instr
u
ctions contain i
mp
ortant care
,
cleaning
,
and
w
arrant
y
in
f
or
m
ation
-
.
please leave instructions for the
consumer
·
·
·
·
·
-
ASME
(A112
.
19
.
2-
2013)
GB 6952-2015
N
o.
2 KOHLER ROAD, SANSHUI CENTRAL INDUSTRIAL PARK, LEPING TOWN, SANSHUI DIST
.
, FOSHAN, GUANGDONG, PRC
POST CODE 528137
2
528137
8# MENGSHAN RD, ECONOMIC DEVELOPMENT ZONE OF HUANTAI, ZIBO, SHANDONG, CHINA POST CODE: 256410
8
256410
©
©
C
o
py
rig
h
t
K
o
h
ler
Ch
ina
I
n
v
est
m
ent
C
o.
, L
td.
2016
2016
1269084-T01-B