
©2021 Kohler Co.
Installation and Care Guide
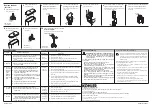
CAUTION:
Turn on the water and allow
water to
fl
ow through the supply pipe to
flush the system of any debris before
connecting fi ll valve.
IMPORTANT NOTICE TO INSTALLERS!:
Please leave these instructions for the consumer.
Please retain for future reference.
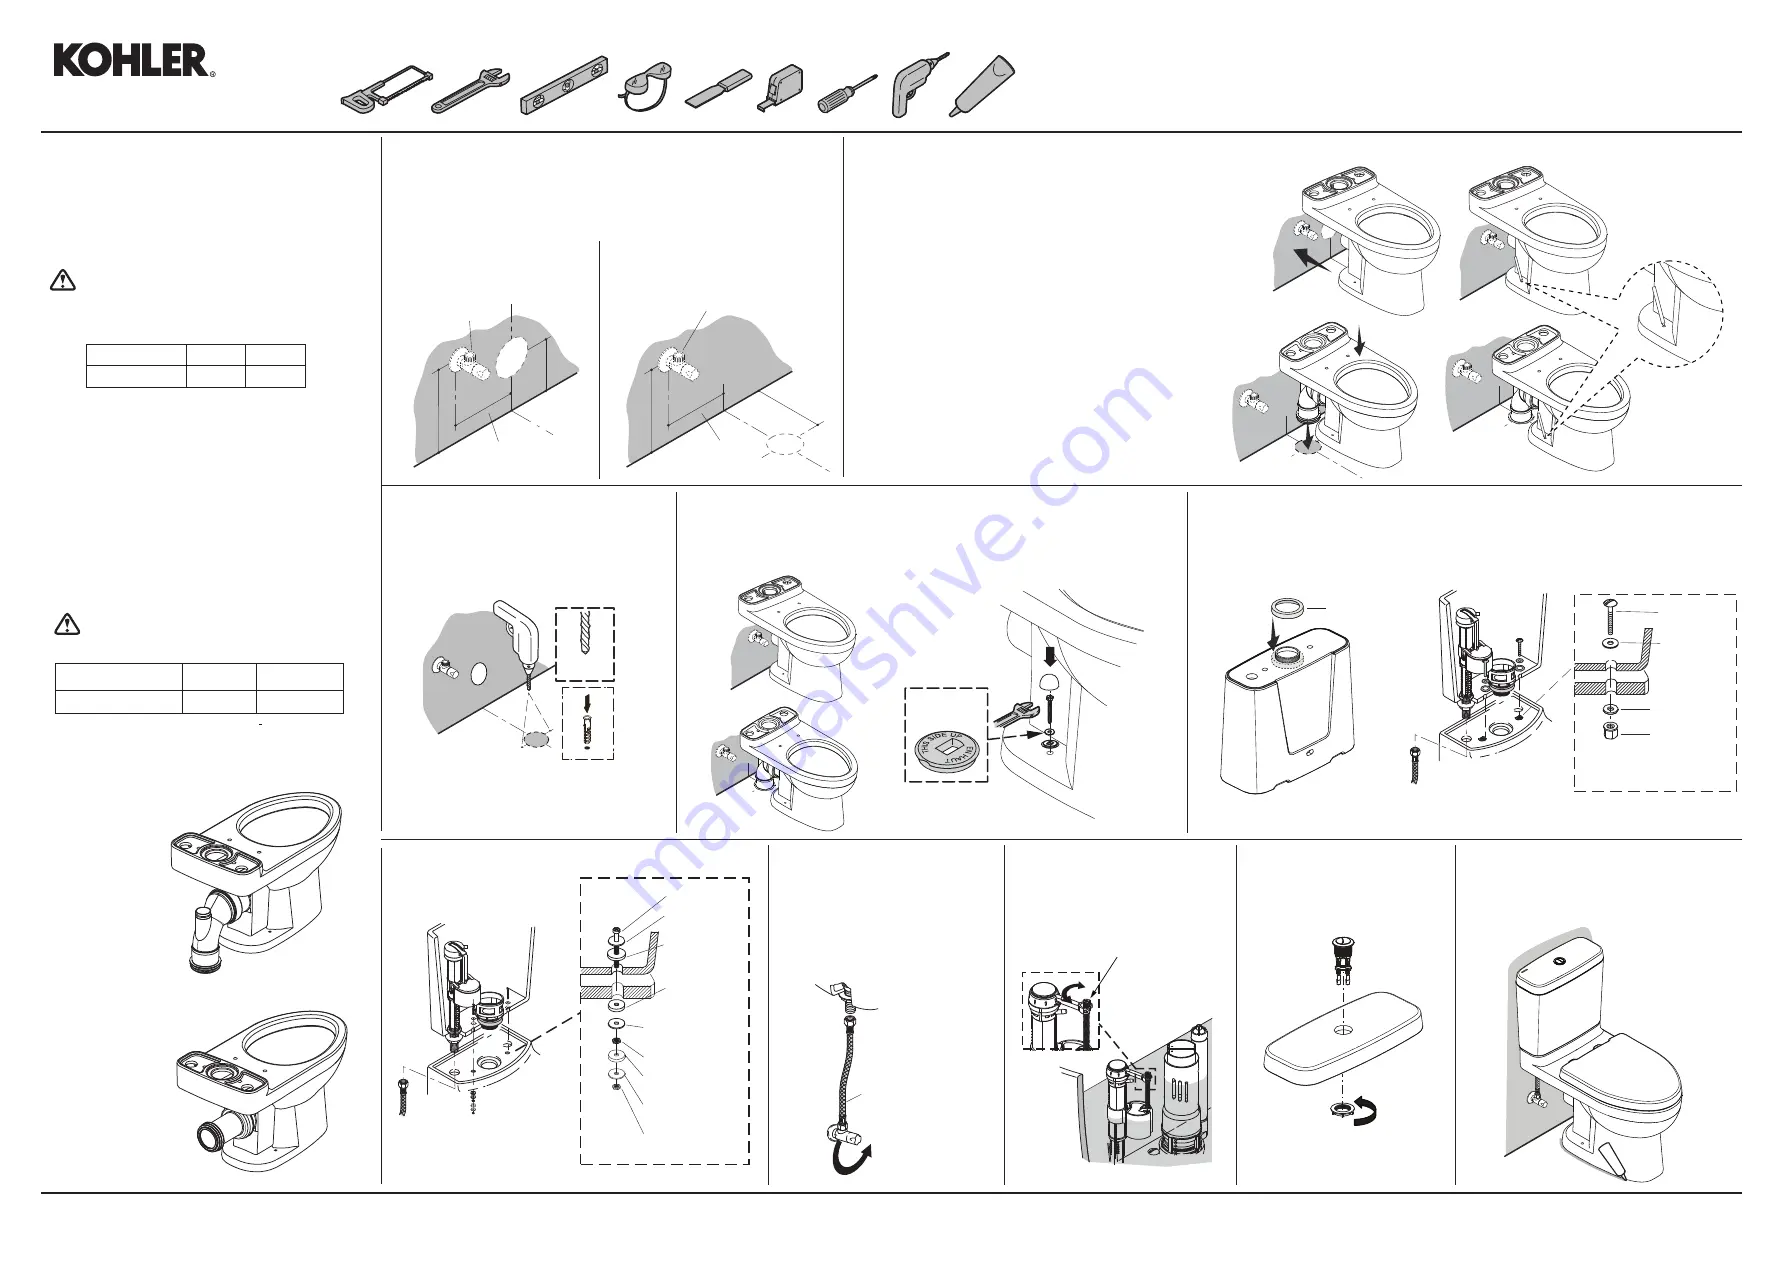
NOTE:
Some installation parts might not be
provided.
NOTE:
The toilet pictured in the installation
steps may differ from the model being installed.
Type of Trap
65 mm
185 mm
Plastic Trap
P-Trap
S-Trap
Plastic Connector
Roughing-in
(Dimensions are approximate)
Unit: mm
S-Trap
P-Trap
1/2"
200
185
260
1/2"
200
65
260
1
2
4
1491091-X2-A
ข้อควรระวัง
:
เปิดนําเพือทําความสะอาดและขจัดเศษ
ต่างๆ
ออกจากท่อนําดีก่อนประกอบกับวาล์วนําเข้า
ข้อสําคัญถึงผู้ติดตัง
!
คู่มือนีมีข้อมูลสําคัญโปรดมอบ
เอกสารให้กับเจ้าของสุขภัณฑ์
ข้อสังเกต
:
อุปกรณ์สําหรับการติดตังบางชินอาจไม่รวม
อยู่ในชุดสุขภัณฑ์
ข้อสังเกต
:
รูปภาพของสุขภัณฑ์ทีแสดงอยู่ในขันตอน
การ
ติดตังสุขภัณฑ์อาจจะแตกต่างไปจากรุ่นสุขภัณฑ์ทีท่านกํา
ลังดําเนินการติดตัง
ชนิดท่อน้ำทิ้ง
ท่อน้ำทิ้งแบบพลาสติก
65
มม
185
มม
แบบลงพื้น
แบบออกผนัง
ท่อน้ำทิ้งแบบพลาสติก
S-Trap
ท่อน้ำทิ้งแบบลงพื้น
P-Trap
ท่อน้ำทิ้งแบบออกผนัง
ระยะการติดตัง
(
ขนาดระยะแสดงค่าโดยประมาณ
)
หน่วย
:
มม
.
ท่อน้ำทิ้งแบบออกผนัง
ท่อน้ำทิ้งแบบลงพื้น
เจาะรูตําแหนงทีทําเครืองหมายไว้ทีพืน
จากนันสวม
พุกลงรูทีเจาะ
Washer
Washer
Nut
Rubber
Washer
Washer
Nut
Rubber Washer
(For HK market only)
แหวนรอง
แหวนรอง
แหวนรอง
ยางรอง
ยางรอง
ยางรอง
/
นอต
/
นอต
/
สกรู
สำหรับตลาดฮ่องกง
Rubber
Washer
ข้อแนะนําการติดตั้งและการดูแลรักษา
REACH CONCEALED TOILET
K-28413H, K-28414H
K-28416K, K-28417X
Determine the position of the toilet bowl mounting hole.
กําหนดตําแหน่งรูยึดโถสุขภัณฑ์
Connect to wall /
ติดตังเข้ากับผนัง
Connect the connector on the bowl, then push bowl to
backward until connector and waste pipe touch. Mark the
anchore holes.
ประกอบข้อต่อนําทิงเข้ากับโถสุขภัณฑ์
จากนันค่อยๆดัน
กระทังข้อต่อนําทิงสวมเข้ากับท่อนําเสีย
Connect to Floor /
ติดตังกับพืน
Connect the connector on the bowl, then carefully put
down the bowl until connector and waste pipe touch.
Mark the anchore holes.
ประกอบข้อต่อนําทิงเข้ากับโถสุขภัณฑ์
จากนันค่อยๆวางลงกระทัง
ข้อต่อนําทิงสวมเข้ากับท่อนําเสีย
Mark the
anchore holes.
กําหนดรูพุก
Turn the tank upside down and place the gasket to the shank of flush valve. Install
the tank to the bowl.
Drill the marked location holes on the floor.
Insert the anchors into the holes.
3
วางโถสุขภัณฑ์ในตําแหน่งทีกําหนด
ติดตังอุปกรณ์ยึดโถสุขภัณฑ์กับพืน
อย่าขันแน่นจนเกินไป
!
ควําถังพักนําและสวมประเก็นเข้ากับถังพักนํา
จากนันติดตังถังพักนําเข้ากัโถสุขภัณฑ์
5
Connect supply hose and turn
on the water. Flush several
times and check for leaks.
ประกอบสายนําดีและวาล์ว
เปิด
-
ปิดนํา
กดชักโครกหลายๆ
ครัง
เพือตรวจสอบการรัวซึม
6
Adjust the water level. If needed.
ปรับระดับนํา
ถ้าจําเป็น
7
Install push button to the tank
cover.
ประกอบปุ่มกดเข้ากับฝาถังพักนํา
8
Install the tank cover and the seat. Apply
silicone around base.
ประกอบฝาปิดถังพักนําและฝารองนังสุขภัณฑ์
ยา
แนวซิลิโคนรอบขอบฐานสุขภัณฑ์
Place the toilet bowl at the designated position. Install the toilet bowl attach-
ment to the floor.
Do not overtighten!
3/8"
(For Asia market)
Screw
Washer
Nut
แหวนรอง
Washer
แหวนรอง
นอต
สกรู
สำหรับตลาดเอเชีย
This side up.
วางด้านนีขึน
Do not overtighten!
อย่าขันแน่นจนเกินไป
!
1/2”
Supply Hose
สายนําดี
+
-
Turn here to adjust water level.
หมุนทีนีเพือปรับระดับนํา
Gasket
ประเก็น


