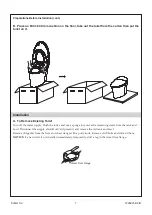
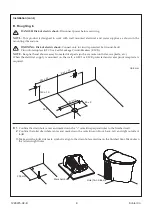
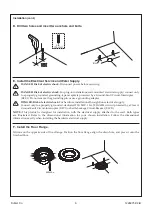
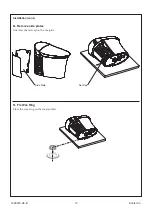
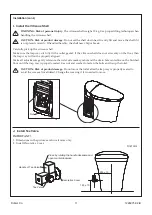
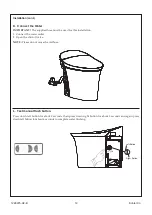
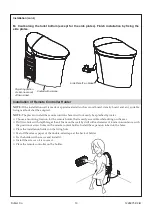
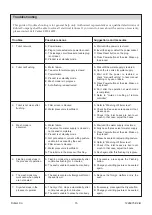
background image

Installation Guide

Integrated Toilet

คู่มือแนะนำ�ก�รติดตั้ง

สุขภัณฑ์ชิ้นเดียวพร้อมระบบชำ�ระล้�งแบบอัตโนมัติ

1226975-X2-B

English page 1-16

ภาษาไทย หน้า 17-31

©2015 Kohler Co.

 K-5401X

Summary of Contents for K-5401X

Page 1: ...Installation Guide Integrated Toilet คู มือแนะนำ การติดตั ง สุขภัณฑ ชิ นเดียวพร อมระบบชำ ระล างแบบอัตโนมัติ 1226975 X2 B English page 1 16 ภาษาไทย หน า 17 31 2015 Kohler Co K 5401X ...

Page 2: ...NOTE Flush the water supply pipes thoroughly to remove debris Product is designed for tap water or potable water Thank You for Choosing Kohler Company Thank you for choosing Kohler Kohler craftsmanship offers you a rare combination of proven performance and graceful sophistication that will satisfy you for years to come The dependability and beauty of your Kohler product will surpass your highest ...

Page 3: ...ks again for choosing Kohler Company Pre arrange enough space for toilet installation Make sure it will not affect the opening and closing of the door Confirm the rough in 305 mm it need reach to 292 350 mm otherwise it may affect installation Confirm the distance the water outlet connector away from the finished wall upper the surface of finished wall by 3 mm and lower the surface of finished wal...

Page 4: ...of hazardous gases If a new toilet is not installed immediately temporarily place a rag in the floor flange opening WARNING Risk of electric shock for hardwire installations through floor electrical supply Connect only to properly grounded dedicated 220 240 V 10A 50 60 Hz circuit protected by a Class A Ground Fault Circuit Interrupter GFCI or Earth Leakage Circuit Breaker ELCB WARNING Risk of elec...

Page 5: ...mum Distance from Hole to Wall 305mm Lowest Supply Condition Recommend 1 Bar kgf cm2 0 1Mpa Dynamic Pressure Highest Supply Condition 7 4 Bar kgf cm2 0 74Mpa Static Pressure Electrical Power 220 240V 50 60 Hz 1000 W Power Cord Length About 1 3 m Outline Dimension of Product 670 x 438 x 533 mm Product Weight About 46 kg Operation Environment 1 40 C NOTE Homeowner s Guide for detailed specifications...

Page 6: ...d button to start the warm wind function Press it again to turn it off Press the button to turn off the power long tone hint Press the button to turn off the night light function long tone hint Press it again to turn on short tone hint Press the button to enter front Wash mode Press it again to turn it off Press the button for flushing Toilet WARNING Risk of of personal injury and product damage Pl...

Page 7: ...and use a sponge to remove the remaining water from the tank and bowl Disconnect the supply shut off valve if present and remove the old tank and bowl Remove old gasket from the floor and closet flange with a putty knife Remove old T bolts and discard them NOTICE if a new toilet is not installed immediately temporarily stuff a rag in the closet floor flange Closet Floor Flange Preparations Before ...

Page 8: ...lectric shock Disconnect power before servicing WARNING Risk of electric shock Connect only to circuits protected by Ground Fault Circuit Interrupters GFCI or Earth Leakage Circuit Breakers ELCB NOTE Keep bath and shower away from electrical parts such as remote controller receptacle etc When the electrical supply is mounted on the wall a GFCI or ELCB protected and water proof receptacle is requir...

Page 9: ...type receptacle protected by a Ground Fault Circuit Interrupter GFCI Do not remove the grounding pin or use a grounding adapter DENGER Risk of electric shock For hardwire installations through floor electrical supply Connect only to a properly grounded dedicated 220 240V 10A 50Hz 60Hz circuit protected by a Class A Ground Fault Circuit Interrupter GFCI or Earth Leakage Circuit Breaker ELCB NOTE Th...

Page 10: ...1226975 X2 B 10 Kohler Co G Remove side plates Unscrew the nut cap on the tee joint H Fix Wax Ring Place the wax ring on the waste outlet Side Plate Nut Cap Installation cont ...

Page 11: ... The vitreous shell weighs 35 kg Use proper lifting technique when handling the vitreous shell CAUTION Risk of product damage Do not set the shell down hard Gently lift and move the shell if it is not placed correctly If handled harshly the shell may chip or break CAUTION Risk of product damage Do not move the toilet after the trap way is properly seated to avoid the wax seal invalidated Change th...

Page 12: ...he water outlet 2 Open the shut off valve NOTE Please do not reuse the old hose L Test manual flush button Press down left button for about 2 seconds then press down right button for about 3 seconds and again press down left button for about 6 seconds to complete water flushing Left Button Right Button Installation cont ...

Page 13: ... the remote control where it will not easily be splashed by water Choose a mounting location for the remote holder that is easily accessible while sitting on the seat Drill two holes with depth larger than 45 mm on the wall by drill with a diameter of 6 mm in accordance with the position of screw holes on the remote control holder Install the expansion tube into the holes Place the installation ho...

Page 14: ...s When it is used for the first time product will be in default stage Front Wash Rear Wash Seat Temperature mid Water Temperature mid Water Temperature mid Wind Temperature mid Pressure mid Pressure mid Night Light On Position Level 3 Position Level 3 Energy Saving Mode 6H Function of Auto Lid Turning On Function of Auto Flushing On Installation of Remote Controller Holder cont Public Anti theft I...

Page 15: ...t A Refer to Washing of filter screen B Check if all tee valves are opened If not please open C Check if the inlet hoses are bent over much In that case adjust the hoses 4 Wash mode is abnormal A Water failure B Tee valve for water supply is closed or not opened completely C Product is at standby mode D Not yet seated or current sitting posture unable to be sensed by the seat E Filter screen is bl...

Page 16: ...ight function is turned off B The indoor light is too bright A Check the section of night light at auxiliary keyboard function to activate the night function B The night function is turned off 12 UV sterilization function does not work A Human body is sensed by seat B The seat is covered by foreign matters or the seat is wet A Please activate the function of UV sterilization again after leaving B ...

Page 17: ...มีส วนประกอบของคลอรีน แคลเซียมไฮโปคลอไรท ข อควรระวัง ความเสี ยงซึ งอาจท ำให เกิดความเสียหายต อผลิตภัณฑ และทรัพย สิน อย าใช ซีเมนต ในการติดตั งโถสุขภัณฑ การขยายตัวเนื องจากความร อนของโถสุขภัณฑ อาจท ำให เกิดความเสียหายบริเวณฐานของโถสุขภัณฑ ทางโคห เลอร จะไม รับผิด ชอบต อความเสียหายใดๆที มาจากการใช ซีเมนต ในการติดตั ง ค ำเตือน ความเสี ยงซึ งอาจท ำให ผลิตภัณฑ ช ำรุด อย าทิ งสิ งของ เช น กระดาษหนังสือพิ...

Page 18: ...ารติดตั ง หากพบปัญหาในการติด ตั ง กรุณาติดต อบริษัทโคห เลอร ขอขอบพระคุณที เลือกใช ผลิตภัณฑ โคห เลอร ตรวจสอบพื นที ก อนการติดตั งให เหมาะสม เพื อไม ให กระทบโถสุขภัณฑ ในการเปิดและปิดประตูห องน ำ ตรวจสอบระยะการติดตั งให กึ งกลางท อระบายน ำทิ งห างจากผนังประมาณ 305 มม เพื อไม ให เกิดผลกระทบ ในการติดตั ง พื นที ติด ตั งควรมีระยะประมาณ 292 350 มม ตรวจสอบระยะของท อต อทางน ำกับผนัง ให ท อยื นจากผนัง 3 มม ...

Page 19: ...อุปกรณ ทดสอบสามครั ง แรงดัน ไดนามิกของอุปกรณ ทดสอบต องไม ต ำกว า 0 46 บาร 0 046 เมกะปาสคาล 6 7 ปอนด ต อตารางนิ ว ก อนเริ มการติดตั ง ต อ มาตรวัด ความดัน วาล วปิด เปิด สายยาง สายนํ าดี วาล วนํ าสามทาง วิธีการวัดปริมาณน ำอย างง าย เตรียมถังใส น ำ เปิดข อต อสามทางเต มก ำลัง ทดสอบโดยปล อยน ำไหลลงถังเป นเวลา 10 วินาทีสามครั ง ปริมาณน ำน อยที สุด ควรมากกว า 5 7 ลิตร ...

Page 20: ...ุปกรณ ป องกันกระแสไฟฟ า ลัดวงจร GFCI หรือเบรกเกอร ELCB ค ำเตือน ความเสี ยงซึ งอาจท ำให เกิดกระแสไฟฟ าลัดวงจร ต องใช เต าเสียบปลั กไฟขนาด 10 แอมแปร ค ำเตือน ความเสี ยงซึ งอาจท ำให เกิดกระแสไฟฟ าลัดวงจรในการติดตั งสายไฟผ านแหล งจ ายไฟภาคพื นโปรดติดตั งสายดิน โดยใช อุปกรณ ป องกันกระแสไฟฟ าลัดวงจร GFCI หรือเบรกเกอร ELCB ขนาด 220 240 โวลต 10 แอมแปร 50 60 เฮิรตซ ข อควรระวัง ความเสี ยงจากก าซพิษ หากยังไม...

Page 21: ...ผลิตภัณฑ ประมาณ 46 กก สภาพการท ำงาน 1 40 องศาเซลเซียส ข อสังเกต กรุณาดูรายละเอียดเพิ มเติมของที นั งโถสุขภัณฑ จาก คู มือการดูแลรักษาผลิตภัณฑ แผ นกันกระแทก 4 ชิ น ที รองนั ง ป องกันเชื อโรค ฝารองนั ง ป องกันเชื อโรค ก านฉีดชําระ บริเวณตรวจจับเซ นเซอร ที รองนั ง กดเพื อใช งานโหมดชําระส วนหลัง กดอีกครั งเพื อปิด พื นที การตรวจจับแสง กดเพื อใช งานโหมดเป าแห ง กดอีกครั งเพื อปิด กดเพื อปิดการทํางานของผ...

Page 22: ...ัณฑ วิเทรียสเพื อน ำผลิตภัณฑ ออกจากบรรจุภัณฑ ข น ำโถสุขภัณฑ ออกจากบรรจุภัณฑ มาวางบนฐานรองขนาด 800 x 800 มม โถสุขภัณฑ ค ำเตือน ความเสี ยงซึ งอาจท ำให ได รับบาดเจ บหรือผลิตภัณฑ ช ำรุด กรุณาอย ายกผลิตภัณฑ โดยการจับที รองนั งของ โถสุขภัณฑ เนื องจากผลิตภัณฑ มีน ำหนักมาก ...

Page 23: ...ันตราย ความเสี ยงซึ งอาจท ำให เกิดกระแสไฟฟ าลัดวงจร ถอดปลั กไฟทุกครั งก อนการติดตั งหรือการซ อมบ ำรุง ข อสังเกต ผลิตภัณฑ นี ออกแบบมาเพื อใช งานกับระบบน ำและแหล งจ ายไฟฟ าแบบติดผนัง ค ำเตือน ความเสี ยงซึ งอาจท ำให เกิดกระแสไฟฟ าลัดวงจรโปรดติดตั งสายดินโดยใช อุปกรณ ป องกันกระแสไฟฟ าลัดวงจร GFCI หรือเบรกเกอร ELCB ข อสังเกต ระวังไม ให อุปกรณ ไฟฟ าอยู ใกล อ างอาบน ำและฝักบัว เช น รีโมทคอนโทรล เต าเสียบ...

Page 24: ...ั กไฟทุกครั งก อนการติดตั งหรือการซ อมบ ำรุง ค ำเตือน ความเสี ยงซึ งอาจท ำให เกิดกระแสไฟฟ าลัดวงจร ในการเชื อมต อปลั กติดผนังต องติดตั งสายดินโดยใช อุปกรณ ป องกันกระแสไฟฟ าลัดวงจร GFCI หรือเบรกเกอร ELCB ห ามถอดหรือดัดแปลงเต าเสียบปลั กไฟสายดิน ค ำเตือน ความเสี ยงซึ งอาจท ำให เกิดกระแสไฟฟ าลัดวงจรโปรดติดตั งสายดินโดยใช อุปกรณ ป องกันกระแสไฟฟ าลัดวงจร GFCI หรือเบรกเกอร ELCB ขนาด 220 240 โวลต 10 แอมแ...

Page 25: ... ด านหลังของหน าแปลนท อน ำทิ งจัดวางหน าแปลนท อน ำทิ งให ตรงกับรูท อน ำทิ ง แล วกดลงให เสมอกับพื น ซิลิโคน ช การถอดฝาครอบด านข าง ขันที ครอบนอตที เชื อมต อกับข อต อสามทางออก ซ การวางขี ผึ งกันกลิ น วางขี ผึ งกันกลิ นลงบนช องระบายน ำทิ ง แผงปิดด านข าง ฝาปิด การติดตั ง ต อ ...

Page 26: ...เคลื อนย าย โถสุขภัณฑ อย างระมัดระวัง อย ากระแทกโถสุขภัณฑ วิเทรียส เพราะการกระแทกอาจท ำให ผลิตภัณฑ บิ นหรือแตก ข อควรระวัง ความเสี ยงซึ งอาจท ำให ผลิตภัณฑ ช ำรุด ห ามเคลื อนย ายโถสุขภัณฑ หากติดตั งข อต อน ำทิ งบนทางน ำทิ ง เรียบร อยแล ว เพื อไม ให ขี ผึ งกันกลิ นเสียหาย หากจ ำเป นต องเคลื อนย ายให เปลี ยนขี ผึ งกันกลิ นด วย ยกแผงปิดด านข างอย างระมัดระวัง ตรวจสอบว าข อต อน ำทิ งวางบนประเก นท อน ำท...

Page 27: ... อกับท อน ำเข า 2 เปิดวาล วเปิด ปิดน ำ ข อสังเกต อย าน ำสายน ำดีเก ากลับมาใช ใหม ฏ ทดสอบปุ มช ำระล างแบบแมนนวล กดปุ มด านซ ายประมาณ 2 วินาที จากนั นกดปุ มด านขวาประมาณ 3 วินาที แล วจึงกดปุ มซ ายอีกครั งประมาณ 6 วินาที จึงเสร จสิ นกระบวนการช ำระล าง การติดตั ง ต อ ปุ มด านซ าย ปุ มด านขวา ...

Page 28: ...ดยใช ดอกสว านขนาดเส นผ าศูนย กลาง 6 มม เจาะให มีความลึก มากกว า 45 มม ตามระยะห าง รูสกรูของที ยึดแท นวางรีโมทคอนโทรล เพื อใส พุก ใช แผ นพลาสติกที มีกาวสองหน าติดแทนที ยึดโลหะ ลอกเทปกาวสองหน าที แผ นพลาสติกด านหลังแท นวางรีโมทคอนโทรลออก น ำไปแปะบนผนังในต ำแหน งที ต องการวางรีโมทคอนโทรล ไว บนแท นวาง วิธีที สอง ใช นอตสี ตัวยึดแผ นล อคโลหะเข ากับด านหลังแท นวางรีโมทคอนโทรล เสียบแท นวางรีโมทคอนโทรลเข า...

Page 29: ...กลางคืนจะ กะพริบ ผลิตภัณฑ จะอยู ในการตั งค าจากโรงงาน เมื อมีการเริ มใช ครั งแรก การช ำระล างส วนหน า การช ำระล างส วนหลัง อุณหภูมิที รองนั ง ปานกลาง ระดับอุณหภูมิน ำ ปานกลาง ระดับอุณหภูมิน ำ ปานกลาง อุณหภูมิลมเป าแห ง ปานกลาง แรงดัน ปานกลาง แรงดัน ปานกลาง แสงไฟกลางคืน เปิด ต ำแหน ง ระดับ 3 ต ำแหน ง ระดับ 3 โหมดประหยัดพลังงาน 6 ชั วโมง ฟังก ชั นเปิด ปิดฝารองนั งและที รองนั งโถสุขภัณฑ อัตโนมัติ เปิ...

Page 30: ...มท ำงาน จ เริ มการช ำระล างหลังจากโหมดช ำระล างท ำงาน แล วเสร จ ฉ อ างอิง คู มือแนะน ำการตั งค ารีโมทคอนโทรล 3 สุขภัณฑ ไม สะอาด หลังการช ำระล าง ก ตัวกรองอุดตัน ข แรงดันน ำไม เพียงพอ ก ดูอ างอิง การท ำความสะอาดตัวกรอง ข ตรวจสอบว าเปิดวาล วข อต อสามทางอยู หาก ยังไม ได เปิดให เปิดวาล วก อน ค ตรวจสอบการหักงอของสายน ำดี ปรับสายน ำ ดีให น ำไหลสะดวก 4 โหมดช ำระล างท ำงาน ไม ปกติ ก ระบบน ำขัดข อง ข ข อต ...

Page 31: ...ตั งค ารีโมทคอนโทรล ค รอให การช ำระล างเสร จสิ น 11 แสงไฟกลางคืน ไม ท ำงาน ก ฟังก ชั นแสงไฟกลางคืนปิดอยู ข แสงไฟภายในห องสว างเกินไป ก ดูหัวข อของแสงไฟกลางคืน ฟังก ชั นคีย บอร ด เสริม เพื อกระตุ นการท ำงานแสงไฟกลางคืน ข ไม ได เปิดฟังก ชั นแสงไฟกลางคืน 12 ระบบฆ าเชื อด วยแสง UV ไม ท ำงาน ก ที รองนั งตรวจจับร างกายมนุษย ได ข มีวัตถุแปลกปลอมคลุมที รองนั งหรือที รองนั ง เปียก ก โปรดกดค ำสั งการท ำงานร...

Page 32: ...องเตยเหนือ เขตวัฒนา กรุงเทพฯ 10110 ลูกค าสัมพันธ โทร 022046222 โทรสาร 022046224 E mail callcenterthailand kohler com KOHLER THAILAND PUBLIC COMPANY LIMITED 16th FL JasmineCityBldg 2 Soi Sukhumvit23 Sukhumvit Road Wattana Bangkok10110Thailand Call Center Tel 66 2204 6222 Fax 66 22046224 1226975 X2 B ...

Reviews: