background image

English page  

2-19


中 文 页 码

 20-37

科勒(中国)投资有限公司

静安

制造商:

中国上海市宝山区丰翔路1955号  邮编: 200444

Installation Guide

安装说明

 KARING 2.0 INTELLIGENT TOILET

新悦


2.0


智能座便器

K-77780T-0

K-77780T-XP-0

 KARING 2.0 INTELLIGENT TOILET

IOT

新悦


2.0


智能座便器

云智能版

1303729-T01-G

Summary of Contents for K-77780T-0

Page 1: ...19 中 文 页 码 20 37 科勒 中国 投资有限公司 静安 制造商 中国上海市宝山区丰翔路1955号 邮编 200444 Installation Guide 安装说明 KARING 2 0 INTELLIGENT TOILET 新悦2 0智能座便器 K 77780T 0 K 77780T XP 0 KARING 2 0 INTELLIGENT TOILET IOT 新悦2 0智能座便器 云智能版 1303729 T01 G ...

Page 2: ...ustomer Confirm discharge pit dimension distance is 305mm pit dimension distance must be 292 350mm or the installation will be compromised Confirm water supply stop must extend no more than 3mm beyond the finished wall or sink no more than 5mm below finished wall or the installation will be compromised DN15mm or larger main water pipe is recommended to ensure following water supply requirements NO...

Page 3: ...chor Screw T Bolts Flange Expansion Bolt Kits NOTE Plastic Anchor Recommend use outside dia 10mm Screw Recommend using M6 screw to match the plastic anchor Reference Value Unit mm ROUGHING IN Finished Wall of Outlet Finished Floor Bottom View Kohler reserves the right to change marked dimensions without prior notice Front of Bowl Kohler Co 3 1303729 T01 G ...

Page 4: ... mildew and other incidental effects The antibacterial rate is more than 90 Perform test in accordance with GB21551 2 2010 requirements Testing lab China household electrical appliances testing institute electromechanical products testing technology center of Shanghai Entry Exit inspection and quarantine bureau 1 Standby mode Hold button over 2s to enter standby mode Details refer to Standby mode ...

Page 5: ... from the carton box please pay special attention to the bottom of the toilet to avoid the tank assembly to drop out WARNING Risk of personal injury and product damage Please do not hold the rim of the bidet seat when lifting the toilet As the toilet is heavy please seek for help if necessary Toilet Tank Assy Kohler Co 5 1303729 T01 G ...

Page 6: ...ilet on it NOTICE Operate with care to avoid scratching the surface of the vitreous shell b Take out the tank assembly from the vitreous shell and put it on the floor D Place every part on the floor and ready for installation Remove the EPE foam from the tank Remove the gasket and the collar Fig 6 Actuation Switch 1303729 T01 G 6 Kohler Co ...

Page 7: ...s ELCB s Keep bath and shower away from electrical parts such as remote controller receptacle audio input appara tus and so on If the socket is wall mounted a GFCI or ELCB protected and water proof receptacle is required Follow the dimensional information exactly when installing a hardwire electrical supply DANGER Risk of electric shock Disconnect power before servicing NOTE This product is design...

Page 8: ...e content cements to install this toilet The expansion of cement due to a rise in temperature may make the toilet crack or cause damage Kohler is not responsible for any damage caused by installation with the use of cement DANGER Risk of electrical shock For hardwire installations through floor electrical supply Connect only to a properly grounded dedicated 220V 10A 50Hz circuit protected by a Cla...

Page 9: ... align the tank on the centerline Position the tank on the T bolts CAUTION Risk of product damage Do not push down on any part of the tank assembly other than the cylinder Damage may occur CAUTION Risk of product damage Do not rock or lift the tank after placement The seal created by the wax ring may be broken resulting in leaking Position the loose end of the refill tube out the outlet ring Outle...

Page 10: ...tment rod counterclockwise to lower and clockwise to raise the waterline setting Return the manual switch into the locked position by using a flathead screwdriver to turn it clockwise Stop the shut off value Note The waterline is a notch in the inside of the tank marked with a label IMPORTANT Please use the water supply hose accompanying with new machine The old hose assembly shall not be used aga...

Page 11: ...hey will not be pinched or damaged Install the collar onto the tank Clip the spray shield into place over the fill valve Fix the gasket to the tank and press tight Fig 15 Fig 16 Wiring Harness Plug Connected to Bidet Seat Tank Refill Tube Gasket Collar Spray Shield Tank Tape Discharge pipe red Water replenishment pipe blue Level Switch Wire Wiring Harness Plug Connected to Pump Electrical Plug Koh...

Page 12: ...in Carefully pick up the vitreous shell and place it over the tank Make sure the trapway seats fully in the outlet gasket If the vitreous shell does not sit evenly on the floor the trapway is not properly seated Make all adjustments gently until the trapway is properly seated If plug in connection is desired plug the pump in Connect replenish water hose and discharge pipe Connect the wiring harnes...

Page 13: ...ete installation 1 Open toilet cover Open toilet cover by tool provided 2 Unscrew air filter cartridge as shown direction 3 Slightly press down and unscrew as shown direction tighten new filter cartridge Please exchange filter cartridge immediately when customer found red light ON all the time as following remove cover from the top 2 1 Fig 20 2 1 Kohler Co 13 1303729 T01 G ...

Page 14: ...proper operation Refer to Homeowner s Guide to check whether the bidet seat functions well Refer to the troubleshooting chart if the toilet does not func tion properly Insert a screw through both grommets Insert a screw in both of the provided holes and tighten Do not overtighten Place a cap over each screw The caps should be flush with the exterior of the shell Cut a recess in the access cover us...

Page 15: ...older that is easily accessible while sitting on the seat Drilling two holes with depth larger than 45mm on the wall by drill with a diameter of 6mm in accordance with the position of screw holes on the remote control holder Installing the expansion tube into the holes Placing the installation holder on the fixing hole Peeling off the release paper of double sided tape at the back of holder Fixing...

Page 16: ...blinking self inspection completed When it is used for the first time it is in the state of default value Front Wash Water Temperature mid Pressure mid Position mid Rear Wash Water Temperature mid Pressure mid Position mid Seat Temperature mid Night light ON Energy saving OFF Function of Auto Lid Turning On Function of Auto Flushing On Auto UV function ON Auto sterilization function ON Standby mod...

Page 17: ...filter cartridge installation refer to Page 13 5 Flushing mode stops in the operation process A Flushing mode stops automatically after continuous flushing for 5 minutes B The seat is unable to detect customer A If necessary press the flushing button again B Adjust your sitting position or sit on the toilet again 6 The wash mode run even when no one is sitting on the toilet A The seat is covered b...

Page 18: ...ose to the toilet C Power on the toilet D Press button on side panel E Check the section of Communication between remote control and toilet connect the toilet and the remote control 15 The ring is not warm A Remote ring temp setting is too low B Toilet is on Standby mode A Set ring temp to proper dial B Press button on side panel 16 The IoT function not work for K 77780T XP 0 A Power failure B Plu...

Page 19: ...mage to these fittings caused by the use of cleaners containing chlorine calcium hypochlorite CAUTION Do not use any hard setting material cement mortar while installing the toilet Thermal expansion of hard setting material cement mortar will damage or crash the feet of toilet Kohler will not be responsible for any damage because of using hard setting material cement mortar for toilet installation...

Page 20: ...况下 无需借助工具即可切断本产 品的进水水路 否则本产品的意外故障可能会导致用户损失 305mm 坑距需满足292 350mm 如未满足 可能会影响安装 确认出水接头距离完工墙面凸出不超过3mm 沉入完工墙壁不超过5mm 如未满足 可能会影响安装 推荐使用内径DN15mm以上的主水管 以确保下述供水条件要求 INSTALLATION INSTRUCTIONS KARING 2 0 INTELLIGENT TOILET 新悦2 0智能座便器 K 77780T 0 KARING 2 0 INTELLIGENT TOILET IOT 新悦2 0智能座便器 云智能版 K 77780T XP 0 1303729 T01 G 20 Kohler Co ...

Page 21: ... 2 T 1 10mm M6 O 755 705 390 526 451 305 364 402 206 Kohler Co 21 1303729 T01 G ...

Page 22: ...表面的细菌生长 这一加工处理不代表防霉等附带效果 抗菌率大于90 依据GB21551 2 2010进行试验 测试机构 中国家用 电器检测所 上海出入境检验检疫局机电产品检测技术中心 1 待机模式 长按 按住2秒以上 键 进入待机模 式 详见用户手册第38页的 待机模式 项 2 停止功能 按一下 键 停止正在进行的冲洗功 能 暖风功能 空气净化功能 一键除菌功能 手动喷嘴清洁功能和UV功能 4 0L 3级 305mm 最小进水压力0 07MPa 动压 最大进水压力0 74MPa 220V 50Hz 1100W 约1600W 约1 1m 约705mm x 451mm x 526mm 约46kg 智能座便器加施的水效标识的说明 水效标识表示智能座便器水效等级等性能的一种符合性标志 1303729 T01 G 22 Kohler Co ...

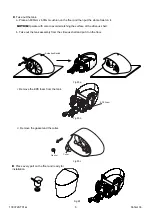
Page 23: ...3 A B 4 Kohler Co 23 1303729 T01 G ...

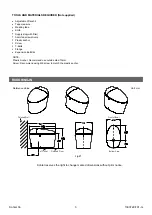
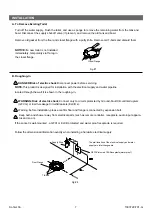
Page 24: ...b C a 800mm x 600mm 5a c 5b d 5c D 6 1303729 T01 G 24 Kohler Co ...

Page 25: ...T A 7 70mm 70mm 150mm 305mm GFCI 警告 安装马桶前 确认法兰与地面采用膨胀螺栓连接 ELCB B 墙面插座 墙面插座 GFCI ELCB 墙面插座 10A T 8 Kohler Co 25 1303729 T01 G ...

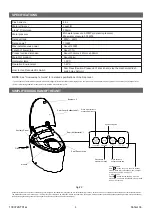
Page 26: ...D T 8mm 5 16 T 70mm C GFCI T 9 墙面插座 墙面插座 220V 10A 50Hz 1303729 T01 G 26 Kohler Co ...

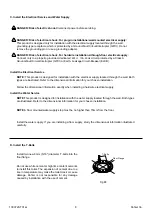
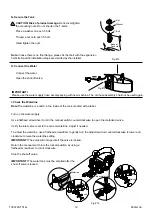
Page 27: ...F T T 11 T 10 E Kohler Co 27 1303729 T01 G ...

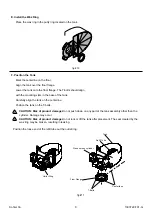
Page 28: ...14 G T T T 12 T H 13 重要提示 必须使用随器具附带的新软管组件 旧软管组件不能重复使用 I 1303729 T01 G 28 Kohler Co ...

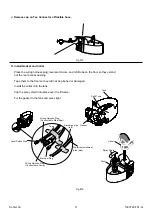
Page 29: ...J 15 K 16 排水管 红色 蓝色 进 Kohler Co 29 1303729 T01 G ...

Page 30: ...M 连接补水管和排水管 18 L 35 17 排水管 18 T 红色 蓝色 在完成线束 泵 线束 电子盖板 安装后 请务必用线束接头旁的塑料抱箍卡住接插件 并用附带的螺丝锁紧 1303729 T01 G 30 Kohler Co ...

Page 31: ...N 安装净化水滤芯 4 重新合上整机外壳 直接用手将整机外壳向下按下 两 侧及后方的卡扣到位后 没有松动 即完成安装 22 轻轻向外打开整机外壳后向上取下外壳 1 打开整机外壳 借助工具 提供 2 按图示方向旋出旧滤芯 3 按图示方向略向下施加压力 旋紧新的滤芯 19 2 1 20 2 1 21 Kohler Co 31 1303729 T01 G ...

Page 32: ...P 24 用硅胶 25 O 23 1303729 T01 G 32 Kohler Co ...

Page 33: ...图26 6mm 45mm 图27 公共场所防遗失安装方式 取下硅胶塞 取下硅胶塞 遥控器 充电座 Kohler Co 33 1303729 T01 G ...

Page 34: ...28 自检进行中 停止闪烁 自检结束 女性冲洗 水温 中档 水流强度 中档 冲洗位置 中档 臀部冲洗 圈温 中档 夜灯 开 节能模式 关 自动翻盖功能 开 自动冲水功能 开 自动UV功能 开 自动除菌功能 开 待机模式 关 长时如厕提醒功能 关 水温 中档 水流强度 中档 冲洗位置 中档 确认进水阀是否已打开 1303729 T01 G 34 Kohler Co ...

Page 35: ...31 Kohler Co 35 1303729 T01 G ...

Page 36: ...源线插头上漏电保护开关未复位 D 产品处于待机状态 A 等到电力恢复 B 插上插头或者检测电源插座 C 按下插头上的复位按钮 D 按一下侧面 按键 针对K 77780T XP 0 机型 17 7 座便器使用时有 A 除臭装置落座后自动开启 嗡嗡 声 A 这是除臭功能运行的正常声音 可以通过按 停止 键 临时关闭除臭功能 或长按遥控器上的 空气净化 键2秒以上 禁止 开 启此功能 参见用户手册第31页的 L 条款说明 1303729 T01 G 36 Kohler Co ...

Page 37: ... o 0 C 在安装本座便器时切勿使用任何凝胶材料 水泥砂浆 因为凝胶材料 水泥砂浆 的热膨胀可能使 座便器的脚部挤破或损坏 科勒对所有因为凝胶材料 水泥砂浆 安装而引起的座便器破裂恕不负责 Kohler Co 37 1303729 T01 G ...

Reviews: