background image

1500353-KR2-A

K-8297KR-HC-0

2-7

8-13

Kohler China Investment Co., Ltd.

No.158, Jiangchangsan Road, Jing'An District, Shanghai, PRC Post Code : 200436

Manufacturer: Shanghai Kohler Electronics., Ltd.

No. 1955, Fengxiang Road, Baoshan Area, Shanghai, PRC Post Code : 200444

Summary of Contents for K-8297KR-HC-0

Page 1: ... 0 2 7 8 13 Kohler China Investment Co Ltd No 158 Jiangchangsan Road Jing An District Shanghai PRC Post Code 200436 Manufacturer Shanghai Kohler Electronics Ltd No 1955 Fengxiang Road Baoshan Area Shanghai PRC Post Code 200444 ...

Page 2: ...his seat in a location exposed to excessive moisture where condensation might form on the product surface Provide adequate ventilation to avoid damage to the electronic components due to high humidity levels IMPORTANT Risk of product or property damage Pushing or pulling on the water connection may cause water leakage IMPORTANT Risk of product damage Do not apply excessive force to the spray wands...

Page 3: ...mension 20mm 3 Mounting hole to toilet ring distance 70mm 4 Mounting hole to toilet top distance 460 490mm 5 Toilet ID dimension 370 390mm 6 The electrical outlet should be located within 1 m of the toilet to accommodate the length of the power cord 1500353 KR2 A 3 ...

Page 4: ...groove Pay attention to the washer direction bent side upwards for washer close to hole Tighten bolts slightly towards threads direction Loosely thread a nut onto each of the bolts for future adjustment For all other toilets installation Position the mounting plate over the mounting holes on the bowl Place each screw into washer pay attention to the washer direction with bent side upwards for wash...

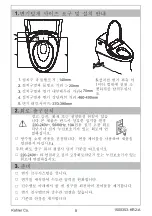
Page 5: ...Mounting Plate Release Button 1500353 KR2 A 5 ...

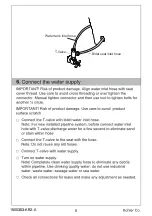
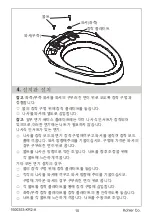
Page 6: ...Water tank inlet hose Bidet seat inlet hose T Valve 1500353 KR2 A 6 ...

Page 7: ...t light blink until initialization completion Attach the clips along the hose and power cord The seat is activated by skin to seat contact To activate the seat controls for testing purpose when facing the toilet place your hand or a damp wash cloth on the right side of the seat approximately 1 3 from the front of the seat as illustrated Continue reference Operation section within user s manual to ...

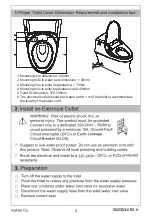
Page 8: ...1500353 KR2 A 8 ...

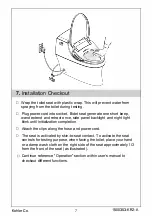
Page 9: ...140mm 20mm 70mm 1500353 KR2 A 9 ...

Page 10: ...않습니다 나사식 인서트가 있는 변기 나사를 장착 보드와 변기 장착 구멍에끼우고 와셔를 움직여 장착 보드 홈에 끼웁니다 와셔 방향에주의를 기울이십시오 구멍에 가까운 와셔의 경우 구부러진 면이 위로 옵니다 볼트를 나사산 방향으로 약간 조입니다 너트를 향후 조정을 위해 각 볼트에 느슨하게 끼웁니다 기타 모든 변기 설치의 경우 볼의 장착 구멍 위에 장착 플레이트를 놓습니다 각각의 나사를 와셔에 끼우고 와셔 방향에 주의를 기울이십시오 구멍에 가까운 와셔의 경우 구부러진 면이 위로 옵니다 각 볼트를 장착 플레이트를 통해 장착 구멍에 삽입합니다 좌측 우측 장착 플레이트를 장착 플레이트의 홈 안착하도록 놓습니다 너트를 각 볼트에 느슨하게 끼웁니다 너트를 수동으로 조입니다 10 ...

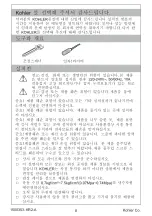
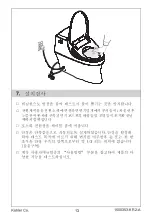
Page 11: ...장착 플레이트 릴리스 버튼 11 ...

Page 12: ...물탱크 주입 호스 비데 시트 주입 호스 T 밸브 12 ...

Page 13: ...전원케이블을 전원 소켓에 연결하면 변기덮개에서 부저음이 1차 울린 후 노즐관이 한차례 신축되면 키보드위의 배광등 및 조명등이 초기화 끝날 때까지 깜빡입니다 1500353 KR2 A 13 ...

Reviews: