


OVE
INSTALLATION INSTRUCTIONS
TWO-PIECE TOILET
K-17737T-S2/K-17737T-2/K-17737T-RN/K-17737T-RNS
-1-
1079129-T01-U
·
·
·
Please read these instructions carefully to familiarize
yourself with the required tools, materials, and installation
sequences. Follow the sections that pertain to your
particular installation. This will help you avoid costly
mistakes. In addition to proper installation, read all
operating and safety instructions.
All information in these instructions is based upon the
latest product information available at the time of
publication. Kohler China reserves the right to make
changes in product characteristics, packaging, or
availability at any time without notice.
These instructions contain important care, cleaning, and
warranty information -
.
please leave instructions for the
consumer
·
·
·
-
·
ORDERING INFORMATION
OVE Elongated 2-PC Toilet .................................K-17737T-S2
Includes Tank.................................................K-19990T-2
Includes Bowl.................................................K-17736T-2
Includes Seat ................................................K-17660T-M
OVE Elongated 2-PC Toilet ...................................K-17737T-2
Includes Tank............................................K-19990T-TN3
Includes Bowl ................................................K-17736T-2
Includes Seat................................................K-17669T-M
OVE Elongated 2-PC Toilet ................................K-17737T-RN
Includes Tank .............................................K-19990T-RN
Includes Bowl .............................................K-17736T-RN
Includes Seat ................................................K-17669T-M
OVE Elongated 2-PC Toilet..............................K-17737T-RNS
Includes Tank...........................................K-19990T-RNS
Includes Bowl .............................................K-17736T-RN
Includes Seat ................................................K-17660T-M
.........................................K-17737T-S2
..............................................................K-19990T-2
..............................................................K-17736T-2
.............................................................K-17660T-M
.........................................................K-19990T-TN3
.............................................................K-17669T-M
........................................K-17737T-RN
..........................................................K-19990T-RN
..........................................................K-17736T-RN
.............................................................K-17669T-M
......................................K-17737T-RNS
........................................................K-19990T-RNS
..........................................................K-17736T-RN
.............................................................K-17660T-M
...........................................K-17737T-2
..............................................................K-17736T-2
©
©
Copyright Kohler China Investment Co., Ltd. 2021
2021
No.2 KOHLER ROAD, SANSHUI CENTRAL INDUSTRIAL PARK, LEPING TOWN, SANSHUI DIST., FOSHAN, GUANGDONG, PRC
POST CODE 528137
2
528137
8# MENGSHAN RD, ECONOMIC DEVELOPMENT ZONE OF HUANTAI, ZIBO, SHANDONG, CHINA
256410
8
256410
NO.1 KOHLER STREET, ECONOMIC DEVELOPMENT ZONE OF FAKU COUNTY, SHENYANG LIAONING PROVINCE, PRC
110400
1
110400
:
POST CODE:
POST CODE:
NOTES
·
·
·
·
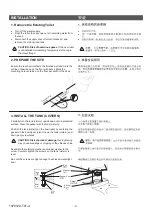
Observe all local plumbing and building codes.
Shut off the water supply.
Ensure that the new drain has the correct roughing-in
dimension.
Carefully inspect the new fixture for any sign of damage.
·
·
·
·
·
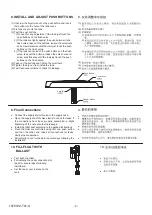
Fixture dimensions are nominal and conform to tolerances
established by ASME Standards (A112.19.2-2018).
This product complies with Q/KCI-006-2018 and GB
25502-2017. Water Efficiency Grade 2.
·
·
·
ASME
(A112.19.2-
2018)
Q/KCI-006-2018
GB 25502-2017
2


