
REACH
INSTALLATION INSTRUCTIONS
VITREOUS CHINA ONE-PIECE TOILET
K-3856T-S/K-3856T-B
, 2011
Copyright Kohler China Ltd., 2011
528137
·
·
·
Please read these instructions carefully to familiarize
yourself with the required tools, materials, and installation
sequences. Follow the sections that pertain to your
particular installation. This will help you avoid costly
mistakes. In addition to proper installation, read all
operating and safety instructions.
All information in these instructions is based upon the
latest product information available at the time of
publication. Kohler China reserves the right to make
changes in product characteristics, packaging, or
availability at any time without notice.
These instructions contain important care, cleaning, and
warranty information -
.
please leave instructions for the
consumer
·
·
·
-
ORDERING INFORMATION
.........................................K-3856T-S
Includes
..................................K-4087T
.........................................K-3856T-B
Includes
..................................K-4088T
REACH One-piece Toilet
REACH One-piece Toilet
REACH Quiet-Close
REACH
Toilet Seat
(Hidden Hinge Base)
Toilet Seat
(Hidden Hinge Base)
.......................................................K-3856T-S
.............................................................K-4087T
........................................................K-3856T-B
.............................................................K-4088T
(
)
(
)
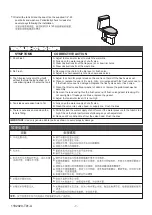
NOTES
·
·
·
·
·
·
·
·
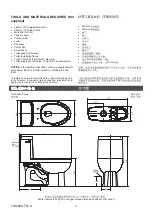
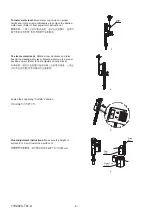
Observe all local plumbing and building codes.
Shut off the water supply.
Seat post holes are on 140mm (5-1/2") centers.
Ensure that the new drain has the correct roughing-in
dimension. This toilet has a 305mm (12") roughing-in
dimension.
.
Closet flange must be 305mm (12") on-center from wall.
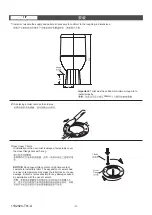
Carefully inspect the new fixture for any sign of damage.
For new construction, refer to the dimensions in
for locating the shut-off valve.
Fixture dimensions are nominal and conform to tolerances
established by ASME Standards (A112.19.2-2008).
See Roughing-in
installation step
·
·
·
·
·
·
·
·
140mm
305mm(
)
305mm
ASME
(A112.19.2-
2008)
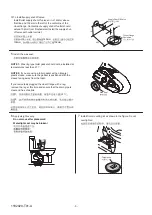
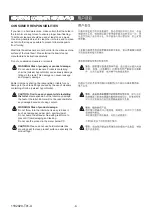
WARNING: Risk of personal injury or product
damage
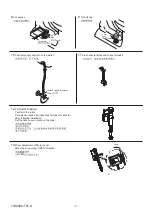
WARNING: Risk of external leakage
: Handle vitreous china products very carefully.
Vitreous china can break and chip if you overtighten
bolts and nuts.
. The fill valve
nut has been factory-tightened to design specifications.
If re-tightening is required, wrench tighten one turn
past finger tight .
-1-
1182020-T01-A


