background image

VEIL

INSTALLATION INSTRUCTIONS

3/4.5L CLASS FIVE 1PC TOILET

3/4.5L

S-TRAP 305mm K-1381T-S/K-1381T-SL
S-TRAP 400mm K-1382T-S/K-1382T-SL

-1-

·

·

·

Please read these instructions carefully to familiarize
yourself with the required tools, materials, and installation
sequences. Follow the sections that pertain to your
particular installation. This will help you avoid costly
mistakes. In addition to proper installation, read all
operating and safety instructions.
All information in these instructions is based upon the
latest product information available at the time of
publication. Kohler China reserves the right to make
changes in product characteristics, packaging, or
availability at any time without notice.
These instructions contain important care, cleaning, and
warranty information -

.

please leave instructions for the

consumer

·

·

·

-

NOTES

·

·

·

·

·

·

·

·

Observe all local plumbing and building codes.
Shut off the water supply.
Seat post holes are on 140mm (5-1/2") centers.
Ensure that the new drain has the correct roughing-in
dimension. This toilet has a 305mm /400mm roughing-in
dimension.

.

Closet flange must be 305mm/400mm on-center from wall.
Carefully inspect the new fixture for any sign of damage.
For new construction, refer to the dimensions in

for locating the shut-off valve.

Fixture dimensions are nominal and conform to tolerances
established by ASME Standards (A112.19.2-2013).

See Fig. #1

Fig. #1

and Fig. #3

·

The product complies with GB 6952-2015.

·

·

·
·

·
·

·

·

140mm

305mm/400mm(

1)

305mm/400mm

1

3

ASME

A112.19.2-

2013.

·

GB 6952-2015

3/4.5L

305mm ........K-1381T-S

3/4.5L

305mm ......K-1381T-SL

...........................................K-77070T

3/4.5L

400mm ........K-1382T-S

L

..............................K-4141T

...............................K-4141T

3/4.5

400mm ......K-1382T-SL

...........................................K-77070T

ORDERING INFORMATION

Includes Quiet-close Toilet Seat ..............................K-4141T

Includes

Includes Quiet-close Toilet Seat .............................K-4141T

VEIL 3/4.5L Class Five 1PC Toilet 400mm ...........K-1382T-SL

Includes Elongated Slim Seat ................................K-77070T

VEIL 3/4.5L Class Five 1PC Toilet 305mm ............K-1381T-S

VEIL 3/4.5L Class Five 1PC Toilet 305mm...........K-1381T-SL

Elongated Slim Seat ...............................K-77070T

VEIL 3/4.5L Class Five 1PC Toilet 400mm.............K-1382T-S

No.2 KOHLER ROAD, SANSHUI CENTRAL INDUSTRIAL PARK, LEPING TOWN, SANSHUI DIST., FOSHAN, GUANGDONG, PRC

POST CODE 528137

2

528137

8# MENGSHAN RD, ECONOMIC DEVELOPMENT ZONE OF HUANTAI, ZIBO, SHANDONG, CHINA POST CODE: 256410

8

256410

©

©

Copyright Kohler China Investment Co., Ltd. 2018

2018

1262233-T01-B

Summary of Contents for VEIL K-1381T-S

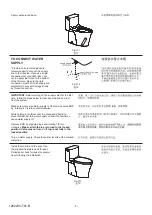
Page 1: ...ing in dimension Closet flange must be 305mm 400mm on center from wall Carefully inspect the new fixture for any sign of damage For new construction refer to the dimensions in for locating the shut off valve Fixture dimensions are nominal and conform to tolerances established by ASME Standards A112 19 2 2013 See Fig 1 Fig 1 and Fig 3 The product complies with GB 6952 2015 140mm 305mm 400mm 1 305mm...

Page 2: ...254mm 10 adjustable wrench 305mm 12 pipe wrench Metal file file cut Tape measure Tubing cutter Level Hacksaw Putty knife Screwdriver Toilet gasket wax seal Toilet T bolts 2 8mm 5 16 diameter Toilet supply shut off valve 10mm 3 8 recommended If the existing toilet does not have a supply shut off valve below the tank install one before installing the new toilet NOTICE 254mm 305mm 8mm T 2 10mm Fig 1 ...

Page 3: ...ove the finished floor line and 190mm to the left of the closet flange centerline The centerline of the supply shut off valve outlet should extend 67mm from the finished wall Install the supply shut off valve with the outlet vertical Supply Shut Off Valve Closet Flange Centerline 190 305 200 10mm 5 TO INSTALL BOWL Position the template and align with drain hole Mark down the position of foot and 5...

Page 4: ...the toilet NOTE 1 NOTE 2 o Install plastic to ground and mounted with 3 set of bolts firmly Carefully align and lower the bowl Apply weight to the bowl rim to let the outlet insert into plastic trap Carefully thread the screws into the brackets until toilet is secure Alternately tighten left and right sides to prevent pulling the toilet off center Install cap to cover screw Do not overtighten 1 21...

Page 5: ...er supply off Replace END by engaging lugs and rotating 1 8 turn clockwise Turn on water supply Check that water level is at the marked water line 1 8 1 8 TO CONNECT WATER SUPPLY Flexible hose not provided are recommended to connect the supply line to the fill valve If you use a rigid connection not provided take care not to apply side forces to the bottom of the fill valve Be sure the rigid conne...

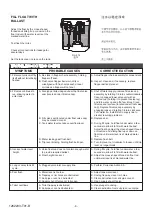
Page 6: ...e continues to run allowing water to enter tank 3 Incorrect water level height FILL FLOAT WITH BALLAST Adjust the float by the cross shaped thread and sliding it up or down on the float rod until the water level is at the marked water line Test flush the toilet Check all connections for leakage for several days Set the tank cover in place on the tank Fig 14 14 A Foreign particles lodged under the ...

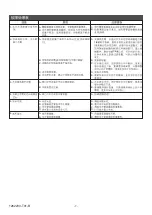
Page 7: ...1 A B A B A B C D E A 1 8 1 8 B C D E 2 3 A B A B 4 A 2A A 5 A B C D A B C D 6 A B A B 7 1262233 T01 B ...

Page 8: ... cleaners or solvents Do not use in tank cleaners Products containing chlorine calcium hypochlorite can seriously damage fittings in the tank This damage can cause leakage and property damage Kohler Company shall not be responsible or liable for any damage to these tank fittings caused by the use of cleaners containing chlorine calcium hypochlorite WARNING Risk of property or product damage 0 C o ...

Reviews: