background image

The essentials of imaging

www.minoltaeurope.com

User Manual

Minoltafax 1400

Summary of Contents for Minoltafax 1400

Page 1: ...The essentials of imaging www minoltaeurope com User Manual Minoltafax 1400 ...

Page 2: ...talling the fax machine 2 6 Ambient requirements 2 6 Location 2 6 Space requirement 2 7 Storage of consumables 2 7 2 3 Setting up the fax machine 2 8 Connecting the fax machine 2 8 Installing the ink cartridge 2 9 Inserting paper 2 11 Re aligning the printer 2 13 Setting the ringer volume 2 14 Setting the monitoring volume 2 14 3 Individual fax machine settings 3 1 Please observe 3 1 List of lette...

Page 3: ...out of activity report 3 21 4 Sending documents 4 1 Please observe the following 4 1 Characteristics of documents to be transmitted 4 1 Interrupting a procedure 4 2 4 2 Inserting a document 4 3 4 3 Setting the resolution and contrast 4 4 Setting the resolution for present transmission 4 4 Permanently setting the transmission resolution 4 5 Setting the contrast 4 6 4 4 Sending a document 4 7 Dialli...

Page 4: ...eceiving faxes manually 5 2 5 3 Combination with an answering machine 5 3 5 4 Receiving selected faxes 5 4 5 5 Receiving and forwarding fax transmissions 5 5 Setting of automatic fax forwarding 5 5 Setting of manual fax forwarding 5 6 Release of manual fax forwarding 5 7 5 6 Memory reception during printer problem 5 8 Print received fax message from memory 5 8 Power cut while data is stored 5 8 Da...

Page 5: ...Change print settings 7 7 Printing of print file 7 8 7 5 Printing from a pure DOS application 7 9 Creation of print file 7 9 Printing of print file 7 10 Change print settings 7 11 7 6 Re set printer after a malfunction 7 12 8 Using the telephone 8 1 Making a phone call 8 1 8 2 Receiving a telephone call 8 2 8 3 Dialling a number 8 3 Dialling a number via the numerical keys 8 3 Dialling a number vi...

Page 6: ...0 3 10 7 Problems with print out quality 10 4 10 8 Rectifying problems 10 5 Removing a jammed document 10 5 Removing a paper jam 10 6 Renewing the ink cartridge 10 7 Re aligning the printer via Minoltafax 1400 10 9 Re aligning the printer via computer 10 10 Cleaning the printer head nozzles via Minoltafax 1400 10 11 Cleaning the printer head nozzles via computer 10 12 10 9 Error codes in the print...

Page 7: ...MF 1400 Rev 1 1 1 22 10 99 ...

Page 8: ...ur fax machine G Setting up your fax machine G Use of fax machine as PC printer G Sending and receiving faxes G Copying documents G Trouble shooting Please read this manual thoroughly before starting up your fax machine and always keep it readily available More detailed information can be obtained from G Your technical support partner G Our Internet website http www minolta com This website contai...

Page 9: ... 1 22 10 99 This documentation must not be reproduced transferred copytyped stored in an archive or translated without the explicit prior permission in writing by Minolta Co Ltd The manufacturer reserves the right to modify this manual ...

Page 10: ... the fax machine Setting up the fax machine 3 Individual fax machine setup This is where you will learn how to Program letters and figures Set your station identification Set the the date and time Program the one touch keys 4 Sending a fax This is where you will learn various methods of sending a fax 5 Receiving a fax This is where you will learn various methods of receiving a fax 6 Copying a docu...

Page 11: ...njury or damage to the machine due to incorrect operation The arrow indicates certain behaviour to prevent a dangerous situation SET Key on keypad with the designation Set ERROR Message in display showing the text Error Single operation step further steps not necessary 1 Step 1 of a procedure 2 Step 2 of a procedure etc This is where you receive help Carrying out the described operation will achie...

Page 12: ... easily visible and accessible Do not pull on the electrical cable to disconnect the plug from the mains socket Do not connect the machine to a telephone line during a thunderstorm Do not use the fax machine handset near explosive gases Do not pull the plug out of the mains socket if your hands are wet Risk of electrical shock Only move the machine after pulling the plug out the main socket Do not...

Page 13: ... the plug out of the mains socket immediately and inform your local service centre Never place drinking cups bottles or other vessels containing liquids on the machine If liquid should nevertheless enter the machine pull the plug out of the mains socket immediately and inform your local service centre If your machine becomes extremely warm generates smoke or an unusual odour or makes an unusual no...

Page 14: ...ional standards The noise level at the place of work is 75 dB A or less according to ISO 777 Machines with CE approval CTR 21 approval These machines fulfil the valid European requirements of the Council Decision 98 482 EC for individual connections to public telephone networks PSTN As there are certain differences in the networks of the individual member states problems can still occur with main ...

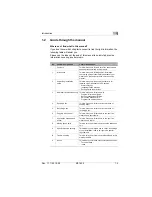
Page 15: ...1 Introduction 1 8 MF 1400 Rev 1 1 1 22 10 99 ...

Page 16: ... is hazardous for small children Please keep the packaging out of reach of small children 1 Remove the fax machine and its accessories from the carton 2 Remove the individual packaging 3 Remove the transport retainer bands Fax machine Telephone handset Telephone cable Ink cartridge Paper support Instruction manual Ferrite core Printer driver CD ROM ...

Page 17: ...setup 2 2 MF 1400 Rev 1 1 1 22 10 99 Machine layout Paper support Document support Document guide Control panel Document output Paper output Monitoring volume Ringer volume Printer Interface parallel Telephone cable connection ...

Page 18: ...Unpacking installation setup 2 Rev 1 1 1 22 10 99 MF 1400 2 3 Document release lever Document transport roller 1 Document transport roller 2 Document sensor ...

Page 19: ...nus 4 MEMORY Will blink when data is stored in the page memory 5 DISPLAY Shows various information Standard display Date and time Specific input requirements Status message 6 PRINTER RESET To re align the printer 7 AUTO TAD MAN To switch between Automatic fax reception Answering machine Manual fax reception 8 RESOLUTION To select the transmission resolution Standard Fine Extra fine Half tone 9 ONE...

Page 20: ... number 12 START To start a function Transmit Receive 13 COPY To start A copy function A list print out 14 STOP To interrupt a function and eject a document 15 REDIAL P To re dial the number last dialled and to insert a pause between two digits of a number 16 HOLD To temporarily place a call on hold 17 R To call an outside line within a PBX system 18 MONITORING To acoustically monitor a call conne...

Page 21: ...asily inflammable objects such as curtains G Free of objects that could block the ventilation slots in the machine housing G Easily accessible mains socket G Away from explosive gases The machine must be protected from the following G Splashing liquids G Organic gases such as ammoniac G Direct sunlight G Excessive temperature fluctuations G Discharged air from heaters and air conditioning units CA...

Page 22: ...m Does the fax machine have enough space Ensure that there is sufficient space in front of the fax machine otherwise the ejected document or paper could become jammed Storage of consumables Store the consumables G In their closed original packaging G Protected from direct sunlight or heat G In a cool dry and dust free place G Our of the reach of small children A small box is located inside the Min...

Page 23: ...e Connecting the fax machine 1 Slide the plastic noses on the paper support in the available slots 2 Connect the handset to the available connection 3 Connect the fax machine to the telephone connection Use the telephone cable for this purpose 4 Insert plug into socket Connection for handset ...

Page 24: ...black 4968 050 colour 4968 060 Do not touch the printing head on the ink cartridge Do not place the ink cartridge on its printing head Do not shake or take apart the ink cartridge Store ink cartridge out of children s reach 1 Fold the control panel forwards The cartridge holder will move to central position 2 Open the printer unit cover The cartridge holder is under the cover If the cartridge hold...

Page 25: ...orwards The ink cartridge must engage with an audible click 6 Close the control panel cover The display will show NEW CARTRIDGE If NEW CARTRIDGE does not appear in the display Make sure that the cartridge engages properly in the cartridge holder 7 Confirm by pressing the SET key The standard display message will appear NEW CARTRIDGE 08 Sep 99 15 32 ...

Page 26: ...qualities Paper formats A4 210 297 mm Letter 216 279 mm Legal size 216 356 mm The default setting is A4 See page 9 1 for other settings Paper thickness less than 0 2 mm Paper weight 64 to 90 g m2 1 Fold the paper support forwards 2 Fan through the paper bundle before inserting it 3 Align the paper at the right edge of the paper feeder and slide it downwards until it rests on the stopper ...

Page 27: ...2 Unpacking installation setup 2 12 MF 1400 Rev 1 1 1 22 10 99 4 Slide the left paper guide against the paper 5 Close the paper support Paper guide ...

Page 28: ...he code of this line segment via the numerical keys Confirm your choice by pressing the SET key You will hear a beep The printer is now re aligned 5 Press the STOP key to return to the standard display Always after replacement of the ink cartridge Always re align printer after replacement of the ink cartridge in order to get an optimum printing result Also re alignable via PC When using your Minol...

Page 29: ...lector switch is at the left side of the machine Select one of the settings H Ringer loud M Ringer normal OFF Ringer silent Setting the monitoring volume Set the monitoring volume as required The volume selector switch is at the left side of the machine Select one of the settings H Monitoring loud M Monitoring normal L Monitoring quiet ...

Page 30: ...s accessible by the numerical keys are listed in three groups The table below shows how the characters are compiled The respective character will appear depending on how many times you press the numerical key Example Numerical key Capital letters Small letters Digits 1 1 2 A B C a b c 2 3 D E F d e f 3 4 G H I g h i 4 5 J K L j k l 5 6 M N O m n o 6 7 P Q R S p q r s 7 8 T U V t u v 8 9 W X Y Z w ...

Page 31: ...l panel key in order to enter the required character see page 3 1 3 Press the one touch key 5 CURSOR RIGHT to confirm your choice The cursor will then move to the next position 4 Enter the next character 5 Repeat steps 3 and 4 until you have entered all characters One touch keys 4 5 and 0 have double functions The one touch keys 4 5 and 0 have double functions For some procedures keys 4 and 5 are ...

Page 32: ...have double functions The one touch keys 4 5 and 0 have double functions For some procedures keys 4 and 5 are used move the cursor in the display while 0 is used to delete characters One touch key 4 Cursor to left One touch key 5 Cursor to right One touch key 0 Delete character Setting dialling pauses When storing numbers under a one touch key or in the directory you should include dialling pauses...

Page 33: ... entry G To eject an inserted document In order to carry out the above functions Press the STOP key repeatedly when necessary Setting the dialling method MFV IWV The default dialling method is MF tone signalling Due to European approval legislation a switch over to impulse signalling is not permissible at user operation level If it is necessary to change your machine to impulse dialling please con...

Page 34: ...ey Confirm your choice via the SET key 3 Enter your station name max 24 characters Confirm your choice via the SET key 4 Enter your fax number max 20 digits Confirm your choice via the SET key Press the HOLD key to enter a sign Press the function key 9 to enter a space 5 Select a PBX mode via the MENU key Confirm your choice via the SET key A beep will be heard when selecting OFF or FLASH The sett...

Page 35: ...y Printing of sender identification data inside or outside the document Set your sender identification data positioning inside or outside the document via software switch 20 The fax machine is delivered with the software switch 20 in the 01 position outside see page 9 1 When printing the sender identification data inside the document the top 10 mm are not reproduced This space is then required for...

Page 36: ...times Confirm your choice via the SET key 2 Press the SET key 3 Enter the date and time via the numerical keys Confirm your choice via the SET key A beep will be heard The date and time are now stored 4 Press the STOP key to return to the standard display The standard display will now show the entered date and time Entering 2 digit date and time In order to enter the date 8th June 1999 and the tim...

Page 37: ...e touch keys offer G One touch number dialling G Administration of up to 10 numbers newly specify change setting delete setting G Print out of one touch key allocation One touch keys 4 5 and 0 have double functions For some procedures keys 4 and 5 are used move the cursor in the display while 0 is used to delete characters One touch key 4 Cursor to left One touch key 5 Cursor to right One touch ke...

Page 38: ... characters Confirm your choice via the SET key 4 Enter the number max 32 digits Confirm your choice via the SET key A beep sound will be heard The number is now stored Is the fax machine connected to a PBX system Before entering the phone number press the R key to call an outside line 5 Repeat steps 2 to 4 in order to store another number under a different one touch key or press the STOP key to r...

Page 39: ...which you want to store a number Confirm your choice via the SET key 3 Press the SET key 4 Alter the designation of the number Confirm your choice via the SET key 5 Alter the number Confirm your choice via the SET key A beep will be heard The alteration of the one touch key is now stored 6 Repeat steps 2 to 4 in order to store another number under a different one touch key or press the STOP key to...

Page 40: ...he SET key 2 Press the one touch key 0 9 of the allocation you want to delete Confirm your choice via the SET key 3 Press the MENU key Confirm your choice by pressing the SET key 4 A beep will be heard The allocation of the one touch key has been deleted 5 Repeat steps 2 to 4 in order to delete the allocation of another one touch key or press the STOP key to return to the standard display 2 SET ON...

Page 41: ...llocated one touch keys Print out a list showing the detailed allocation of each one touch key 1 Press the MENÜ key twice 2 Press the COPY key A list of the one touch keys will be printed 3 Press the STOP key to return to the standard display 2 SET ONETOUCH ONETOUCH LIST 08 Sep 99 15 32 ...

Page 42: ...l dialled numbers Activity report either daily or after 20 activities G Possibility to trace the last time and how often a number stored in the directory was called If you have not occupied all 50 storage points the remaining vacant storage points will be automatically administered by the machine If a number is dialled that is not already stored in the directory this number will be automatically a...

Page 43: ...ice via the SET key Is your fax machine connected to a PBX system Before entering the number press the R key to call an outside line 4 Enter the designation of the number max 16 characters Confirm your choice via the SET key A beep will be heard The data is now stored 5 Repeat steps 1 to 4 in order to add another entry to the directory or press the STOP key to return to the standard display SEARCH...

Page 44: ...tion is stored 3 Press the one touch key 5 CURSOR RIGHT The respective directory number will appear in the display 4 Press the SET key 5 Alter the number Confirm the alteration via the SET key The respective designation of the directory number will be displayed 6 Press the SET key in order to confirm the entry in the directory Your input is confirmed by the sound of a beep The alterations to the d...

Page 45: ...he STOP key to return to the standard display Scrolling through the directory The entries stored in the directory are sorted according to their dialled frequency Frequently dialled numbers are stored at the beginning and less frequently dialled numbers are stored at the end of the directory Use the arrow keys DIRECTORY in order to have a look at the entries one after the other Does the display ind...

Page 46: ... to call additional directory information Designation of number Number Dialling frequency and date last dialled Directory entry search 1 Press the SEARCH key 2 Enter the first letter of the designation to be searched 3 Press the left DIRECTORY arrow key All stored entries beginning with the selected letter will be displayed in sequence MUSTER MUSTER 1234 123456 5 21 Sep 12 00 SEARCH n SEARCH M MUS...

Page 47: ...nvenient list of all entries stored in the directory can be printed 1 Select a DIRECTORY entry via the arrow keys 2 Press the COPY key while a directory entry is shown in the display The directory will be printed 3 Press the STOP key to return to the standard display MUSTER DIRECTORY LIST 08 Sep 99 15 32 ...

Page 48: ...ECTORY arrow keys 2 Press the MENU key 3 Press the one touch key 0 9 which should receive the transferred entry Confirm this choice via the SET key A beep will be heard The entry has now been deleted from the directory and is stored under the selected one touch key 4 Press the STOP key to return to the standard display Directory or one touch key When transferring an entry from the directory to a o...

Page 49: ...ly until ACT REPORT ON can be seen in the display Confirm your choice via the SET key 4 Enter the time of day when the activity report should be printed out Confirm your choice via the SET key or Do not enter any time of day Confirm your choice via the SET key The activity report will then be automatically printed out after every respective 20 transmissions A beep will be heard The activity report...

Page 50: ...key repeatedly until ACT REPORT OFF can be seen in the display Confirm your choice via the SET key 4 Press the STOP key to return to the standard menu Manually started print out of activity report You can also manually start a print out of the activity report The data in the report will not be deleted after printing Press and hold the SET and COPY keys simultaneously for approximately one second T...

Page 51: ...3 Individual fax machine settings 3 22 MF 1400 Rev 1 1 1 22 10 99 ...

Page 52: ... this as a jammed document and stop the transmission All paper clips and staples must be removed from a document before inserting it into the fax machine Ink adhesive and correction fluid must be completely dry before inserting a document into the fax machine Yellow green yellow and light blue text will not be transmitted Do not insert carbon paper or paper coated with wax or plastic Maximum docum...

Page 53: ...sing the STOP key will G Stop a started procedure fax transmission photocopy etc G Leave the menu and return to the standard display G Cancel wrongly entered data G Eject an inserted document If you wish to carry out the above functions Press the STOP key numerously when necessary ...

Page 54: ...ous documents 0 08 to 0 13 mm per document 1 Insert the document with its face downwards in the document feeder The document will be automatically recognised and then pulled into the machine 2 Adjust the right document guide according to the width of the document Do you want to transmit more than 20 document sheets Quite simple Just insert further document sheets into the document feeder during th...

Page 55: ... present transmission The transmission resolution grade can be set as follows 1 Insert the document into the document feeder and adjust the document guide accordingly 2 Select the required transmission quality via the RESOLUTION key Standard for standard text of good quality Fine for text and graphics with fine lines Super fine for text and graphics with extremely fine lines Gray scale for photos ...

Page 56: ...nter the code as required via the numerical keys 00 Std for standard text 01 Fine for text and graphics with fine lines 02 Super fine for text and graphics with extremely fine lines 03 Gray scale for photos and graphics with Gray scales 04 Save last setting 5 Press the SET key The setting is now stored 6 Press the STOP key twice to return to the standard display Saving the last setting When enteri...

Page 57: ...firm your choice via the SET key 3 Press the numerical keys 2 and 8 for software switch 28 Confirm your choice via the SET key 4 Enter the code as required via the numerical keys 00 for document with normal contrast 01 for very light document with very little contrast 5 Press the SET key The setting is now stored 6 Press the STOP key twice to return to the standard display 8 FAX SET UP 3 FEATURE S...

Page 58: ...lect the required transmission quality via the RESOLUTION key 3 Enter the number via the numerical keys Is your fax machine connected to a PBX system Before dialling the number press the R key to call an outside line 4 Press the START key The fax transmission will start as soon as the receiving fax machine sends a signal that it is ready to receive The number of the receiving fax machine will appe...

Page 59: ...and adjust the document guide accordingly 2 If required select the required transmission quality via the RESOLUTION key 3 Press the REDIAL P key The fax transmission will start as soon as the receiving fax machine sends a signal that it is ready to receive The number of the receiving fax machine will appear in the display STANDARD STANDARD TRANSMISSION 1234 123456 49 1234 123456 ...

Page 60: ...e RESOLUTION key 3 Press the respective one touch key under which the required number is stored The fax transmission will start as soon as the receiving fax machine sends a signal that it is ready to receive The number of the receiving fax machine will appear in the display More information about the one touch keys Please consult page 3 8 for detailed information how to store alter or delete numbe...

Page 61: ...a the RESOLUTION key 3 Select the required number via the DIRECTORY arrow keys 4 Press the START key The fax transmission will start as soon as the receiving fax machine sends a signal that it is ready to receive The number of the receiving fax machine will appear in the display More information about the electronic directory Please consultpage 3 13 for detailed information how to store alter or d...

Page 62: ... directory Via redial The fax transmission will start as soon as the receiving fax machine sends a signal that it is ready to receive The number of the receiving fax machine will appear in the display Was the call answered by a person The fax machine at the receiving end must be switched over to fax operation If fax machine signals can be heard coming from the receiving end start the fax transmiss...

Page 63: ... Press the MENU key four times Confirm your choice via the SET key 3 Enter the quantity of pages to be transmitted Confirm your choice via the SET key A beep will be heard 4 Start the fax transmission in the normal way Entered page quantity quantity of transmitted pages If the entered page quantity is not identical to the quantity of transmitted pages an error message will appear in the activity r...

Page 64: ...ed 1 Insert the document into the document feeder and adjust the document guide accordingly 2 Press the MENU key 3 Press the key A beep will be heard The fax transmission speed is now reduced 4 Start the fax transmission in the normal way Fax transmission speed permanently altered A change of transmission speed only applies to the present fax transmission By the way Interference caused by poor qua...

Page 65: ... key 4 Enter the required transmission start time via the numerical keys Confirm your choice via the SET key 5 Dial the receiving fax number Manually Via one touch key Via directory Via redial 6 Press the SET key A beep will be heard The timer function is now active The display will repeatedly switch over between the programmed transmission time and resolution grade Automatic print out of transmis...

Page 66: ...me via the numerical keys Confirm your choice via the SET key 4 If necessary press the STOP key to completely delete the old number and then dial the new number of the receiving fax machine Manually Via one touch key Via directory Via redial 5 Press the SET key A beep will be heard The altered timer function is now stored The display will repeatedly switch over between the programmed transmission ...

Page 67: ...n can be deleted 1 Press the MENU key three times Confirm your choice via the SET key 2 Press the SET key A beep will be heard The transmission delay time has now been deleted 3 Press the STOP key to return to the standard display The inserted document will be automatically ejected 3 TIMER Tx CANCEL CANCELLED 08 Jun 99 15 32 ...

Page 68: ... and 2 for software switch 32 Confirm your choice via the SET key 4 Enter the required code via the numerical keys 00 no printed report 01 print report after every delayed transmission 02 print report only after unsuccessful transmission 5 Press the SET key The setting is now programmed 6 Press the STOP key twice to return to the standard menu Software switches are very practical This fax machine ...

Page 69: ...rogram up to 20 receivers per broadcast order G program up to 10 different broadcast orders Broadcast orders are automatically deleted after the broadcasting process has been carried out successfully Make sure to print out a list of the broadcast receivers When setting up a broadcast make sure to print the list of the broadcast receivers enabling you to check at any point of time the job number of...

Page 70: ... key Has a broadcast been set up already If a broadcast has been set already themessageB OSET will be displayed Press the SET key in order to set up another broadcast 4 Press the numerical key 0 5 Dial the first receiving party s directory number manually via one touch key via directory 6 Press the SET key in order to enter another directory number or press the COPY key if you do not want to enter...

Page 71: ...ent will be fed in and stored The job number of the broadcast order and the amount of pages which can probably still be read in by the memory will be displayed upon which broadcasting will start immediately Automatic Print of Transmission Report The transmission report can be printed automatically after the transmission has been finished see page 4 14 PARTY JOB 0 LEFT 50 B O 0 17 00 ...

Page 72: ...nce with the fax document 3 Press the START key Has a broadcast order been set already If a broadcast order has been set already the message B O SET is displayed Press the SET key in order to set up another broadcast 4 Press the numerical key 1 5 Enter the start time of the broadcast via the numerical keys Confirm your input by pressing the SET key 6 Dial the first receiving party s directory numb...

Page 73: ...order to set up additional receivers of the broadcast message 9 Press the START key The documents to be sent will be fed in and stored The job number of the broadcast order and the amount of pages which can probably still be read in by the memory will be displayed Broadcasting will begin at the indicated start time Automatic Print of Transmission Report The transmission report can be printed autom...

Page 74: ...t order you want to cancel with the numerical keys Confirm your input by pressing the SET key The entry is confirmed by a beep The broadcast order is cancelled 4 Press the STOP key in order to return to the standard display Broadcast orders are automatically deleted A broadcast order is automatically deleted after the broadcasting job has been finished B O CANCEL JOB No n JOB No 0 08 Sep 99 15 32 ...

Page 75: ...ce Confirm your choice by pressing the SET key 3 Press the numerical keys 3 and 5 for software switch 35 ON Confirm your entry by pressing the SET key 4 Select via the following numerical keys as indicated below 00 OFF 01 ON 5 Press the SET key The setting is stored 6 Press the STOP key twice in order to return to the standard display Software switches are handy The fax machine can be individually...

Page 76: ...times 1 Press the MENU key 8 times Confirm your choice via the SET key 2 Press the MENU key twice Confirm your choice via the SET key 3 Enter the required code via the numerical keys 05 redial with programmed transmission delay 06 automatic redial with standard transmission 4 Press the SET key 5 Enter the required code via the numerical keys 00 no redial attempt 01 1 x redial attempt 02 2 x redial...

Page 77: ...4 Sending documents 4 26 MF 1400 Rev 1 1 1 22 10 99 Starting manual redial function A redial function can be manually started Press the REDIAL P key The redial function will now start ...

Page 78: ... than it would take if one page would have to be transmitted once more ECM permanently ON OFF How to select a permanent ECM setting 1 Press the MENU key eight times Confirm your choice by pressing the SET key 2 Press the MENU key twice Confirm your choice by pressing the SET key 3 Press the numerical keys 2 and 4 for software switch 24 ON Confirm your entry by pressing the SET key 4 Make your inpu...

Page 79: ...smission quality via the RESOLUTION key depending on the quality of the fax document 3 Press the MENU key six times Confirm your choice by pressing the SET key 4 Select the ON or OFF setting by pressing the MENU key Confirm your choice by pressing the SET key The input is confirmed by a beep 5 Carry out fax transmission as usual Change to permanent ECM setting If you wish to have the ECM permanent...

Page 80: ...t will allow the fax machine to ring a further seven times If the incoming call remains unanswered your machine will automatically switch over to auto fax mode Individual settings of the auto fax mode can be carried out via the software switches G Software switch 07 RINGER QUANTITY Quantity of rings before the machine switches itself into the telephone line G Software switch 09 F T SWITCH Quantity...

Page 81: ...RT key to receive the fax transmission The caller can start the fax transmission when the signal from your fax machine can be heard Is the incoming call an automatic fax transmission You will hear a fax machine signal The Minoltafax 1400 will recognise the incoming signal and automatically start receiving the fax transmission If software switch 54 has been set at 00 OFF your fax machine will not s...

Page 82: ... on fax reception with an answering machine connected Press the AUTO TAD MAN key repeatedly until E MODE ANSWER appears in the display Is the incoming call an automatic fax transmission You will hear a fax machine signal The Minoltafax 1400 will recognise the incoming signal and automatically start receiving the fax transmission Is the incoming call a voice call The connect answering machine will ...

Page 83: ...he calling machine is not a one touch number The incoming fax transmission will be automatically stopped as soon as RECEIVE appears in the display The incoming fax does not have a station identification The incoming call will be automatically stopped When the software switch 26 is set at 01 ON faxes can be received selectively The default setting is software switch 16 is 00 OFF Please consult page...

Page 84: ... number of the fax machine to which you want to forward your fax transmissions manually via one touch key via directory 4 Press the SET key The automatic fax forwarding setting is confirmed by the sound of a beep The standard display appears Busy or faulty transmission Should the fax machine to which the transmission is being forwarded emit a busy tone dialling is repeated in accordance with the c...

Page 85: ...oice by pressing the SET key 2 Press the MENU key until FORWARD MAN is displayed Confirm your choice by pressing the SET key 3 Enter a four figure password via the numerical keys 4 Press the SET key The manual fax forwarding setting is confirmed by the sound of a beep The standard display appears 7 SET FORWARD FORWARD MAN PASSWORD 1 2 3 n PASSWORD 08 Sep 99 15 32 ...

Page 86: ... fax signal of your fax machine 3 Enter the password selected for the manual fax forwarding 4 If the password is accepted by the Minoltafax 1400 the CNG signals are released If a wrong password is entered the ERROR signal 4 is to be heard followed by the PASSWORD INPUT signal 3 Should you enter a wrong password three times after another the connection will be interrupted If there is no fax transmi...

Page 87: ... The received pages can be printed out from the incoming data store 1 Rectify the cause of the respective fault 2 Press the PRINTER RESET key The stored data will be printed Power cut while data is stored In the event of a power cut all stored data will be lost The display will then show the message DATA LOSS Data overflow with half tone fax transmission The memory reception can store up to 34 pag...

Page 88: ...accordingly 1 Press the MENU key Confirm your choice via the SET key 2 Dial the number of the other fax machine Manually Via one touch key Via directory Via redial 3 Press the SET key The transmission will start as soon as your fax machine receives a signal from the other fax machine The number of the other machine will appear in the display 1 POLLING Rx 1234 123456 TRANSMISSION 49 1234 123456 ...

Page 89: ...duced in size so that they fit on one page of paper 1 Press the MENU key 8 times Confirm your choice via the SET key 2 Press the MENU key twice Confirm your choice via the SET key 3 Enter the digits 5 and 5 for software switch 55 Confirm your choice via the SET key 4 Enter the respective code 00 100 no reduction 01 90 02 84 03 70 5 Press the SET key The setting in now programmed 6 Press the STOP k...

Page 90: ...ase observe the following G You can only make use of this function if the reception mode is set at MAN or AUTO G Forwarding of incoming fax transmissions is not possible with every telephone model 1 Press the 3 key twice on your telephone 2 Place the telephone handset on the hook Your fax machine will now accept the transmission The respective code to transfer a fax transmission can be individuall...

Page 91: ...5 Receiving faxes 5 12 MF 1400 Rev 1 1 1 22 10 99 ...

Page 92: ...rt the document with its face downwards in the document feeder The display will show the present resolution setting 2 If necessary alter the resolution grade via the RESOLUTION key 3 Press the COPY key The copying function will start Stopping a copying function Press the STOP key frequently when necessary to stop a started copying function STANDARD STANDARD COPY ...

Page 93: ...t feeder The display will show the present resolution setting 2 If necessary alter the resolution grade via the RESOLUTION key in accordance with the fax document 3 Press the MENU key four times Confirm your choice by pressing the SET key 4 Enter the quantity of copies to be made from the original via the numerical keys 5 Press the COPY key The original document is automatically fed in The copies ...

Page 94: ...ia the SET key A beep will be heard The reduction factor is now programmed 3 Insert the document with its face downwards in the document feeder The display will show the present resolution setting 4 If necessary alter the resolution grade via the RESOLUTION key 5 Press the COPY key The copying function will start Setting is permanent This setting remains active until it is programmed to a differen...

Page 95: ...6 Copying a document 6 4 MF 1400 Rev 1 1 1 22 10 99 ...

Page 96: ...ck or for colour printing 7 1 Printer specifications Make sure to observe the following printer specifications Printer Printer type Ink jet printer Paper feed Automatic paper feed Paper type Standard paper 64 to 90 g sq m foils available Paper formats A4 Letter Legal size Capacity of paper holder 100 sheets max max thickness of paper stack 10 mm Print format Horizontal a 210 to 216 mm b 3 4 mm for...

Page 97: ...must be narrower than 17 mm G It is imperative that the supplied magnetic core be used if there is none provided on your cable Connect your Minoltafax 1400 to a computer to use it as a printer 1 Make sure that the Minoltafax 1400 and the computer are switched off 2 Insert the plug of the parallel cable in the parallel interface of the Minoltafax 1400 System Requirements Windows 95 98 Parallel port...

Page 98: ... the fax machine as PC printer 7 Rev 1 1 1 22 10 99 MF 1400 7 3 3 Secure the plug with both metal clips on the Minoltafax 1400 4 Connect the other cable end to the parallel interface of your computer 17 mm ...

Page 99: ...ur computer How is the printer driver installed in the computer Help regarding correct installation of the printer driver is to be found in the installation instructions attached to the printer driver CD ROM as well as in the user s guide of your computer Printer driver control programme A control programme for the Minoltafax 1400 as well as a de installation programme for the printer software are...

Page 100: ...control programme is installed with the printer driver The control programme is contained in the Minoltafax 1400 programme group Use the control programme for the following G Cleaning of print head G Ink cartridge alignment G Print jobs supervision G Supervision of ink cartridge filling level G Printing of test page G Change of DOS settings G Control programme supervision Application of de install...

Page 101: ...dows 3 1 or 3 11 Printing from a DOS application in Windows 1 Make sure you are working in Windows 2 Select the options tab in the Minoltafax 1400 control programme 3 Make sure that the function Deactivate Minoltafax 1400 printer from DOS is not cross marked 4 Start the MS DOS input prompt 5 Start the DOS application from which you want to print 6 Set the HP DeskJet 500C printer as the present pri...

Page 102: ...1 Select the DOS print tab in the Minoltafax 1400 control programme 2 Alter the print settings to your requirements What effects do the alterations cause Alterations made to the DOS print tab only have an effect on print orders from the DOS area Alterations made to any other tab have an effect on all print orders DOS application or printer driver Printer settings made in your DOS application overw...

Page 103: ...he respective information is given in the user s guide of your application 5 Transmit the print file to the printer with the following instruction copy file specification lptn b copy DOS instruction to execute a copying job file specification specification of print file lptn designation of printer port e g LPT1 b DOS instruction to transmit data in the binary form Delayed printing and data errors ...

Page 104: ... control programme 3 Make sure that the function Deactivate Minoltafax 1400 printer from DOS is not cross marked 4 Quit Windows 5 Start the DOS application from which you want to print 6 Set the HP DeskJet 500C printer as the present printer unit Two HP DeskJet 500C selectable There is a monochrome as well as a multi coloured version of the printer driver If you want to print in one colour only se...

Page 105: ...nt file to the printer with the following instruction copy file specification lptn b copy DOS instruction to execute a copying job file specification specification of print file lptn designation of printer port e g LPT1 b DOS instruction to transmit data in the binary form Delayed printing and data errors may occur When printing print files delays and data errors may occur Therefore other printing...

Page 106: ... 1 Select the DOS print tab in the Minoltafax 1400 control programme 2 Alter the print settings to your requirement What effects do the alterations cause Alterations made to the DOS print tab only have an effect on print orders from the DOS area Alterations made to any other tab have an effect on all print orders DOS application or printer driver Printer settings made in your DOS application overw...

Page 107: ...r 7 12 MF 1400 Rev 1 1 1 22 10 99 7 6 Re set printer after a malfunction The printer has to be re set after a malfunction as e g faulty paper feed 1 Remove the cause of the malfunction 2 Press the PRINTER READY key to re set the printer ...

Page 108: ...achine connected to a PBX system Before dialling the required number press the R key to call an outside line 3 When you hear a reply pick up the handset and start your conversation Method 2 1 Pick up the handset 2 Dial the required number Manually Via one touch key Via directory Via redial Is your fax machine connected to a PBX system Before dialling the required number press the R key to call an ...

Page 109: ...8 2 MF 1400 Rev 1 1 1 22 10 99 8 2 Receiving a telephone call Receive a phone call as follows 1 When the telephone rings pick up the handset 2 Answer the call 3 When the conversation is finished place the handset on its hook ...

Page 110: ...al function The last dialled number can be redialled by using the redial function Press the REDIAL P key The entered number will be dialled immediately Dialling a number via a one touch function A number can be dialled via a one touch key Press the respective one touch key under which the required number is programmed The programmed number will be dialled immediately More information about the one...

Page 111: ...t in the directory to find a stored number 1 Press the SEARCH key 2 Enter the first letter of the searched name or enter any letter so that the entries will appear in the display in alphabetical order 3 Press the left DIRECTORY key until the required entry appears in the display Press the START key to start the dialling function More information about the electronic directory Please consult page 3...

Page 112: ...rsation The call will be put on hold 2 Place the handset on the hook 3 Lift the handset off the hook The conversation can be continued Method 2 1 Press the HOLD key during the conversation The call will be put on hold 2 Press the HOLD key again The conversation can be continued Music music and more music You can determine via software switch 10 whether music will be heard at the other end while wa...

Page 113: ...ax 1 Lift the handset off the hook during the fax transmission After the fax transmission has ended a signal tone will sound for approximately 7 seconds 2 When the person at the other end picks up the handset a short signal will sound You can now start your conversation Making an operator call immediately after receiving a fax 1 Lift the handset off the hook during the fax transmission After the f...

Page 114: ...ENU key twice Confirm your choice via the SET key 3 Enter the software switch code e g 55 via the numerical keys Confirm your choice via the SET key 4 Enter the code of the required feature e g 01 90 5 Press the SET key The setting is now programmed 6 Press the STOP key twice to return to the standard display Cancelling a programming procedure Press the STOP key numerously when necessary to cancel...

Page 115: ...list of the present software settings 1 Press the MENU key 8 times Confirm your choice via the SET key 2 Press the MENU key twice 3 Press the COPY key A list of the software switches will be printed out 4 Press the STOP key twice to return to the standard display 8 FAX SET UP 3 FEATURE SW FEATURE SW LIST 08 Sep 99 15 32 ...

Page 116: ...3 11 short signal 1 x 2 x 3 x 11 x 03 08 Possibility of remote start via connected telephone apparatus during manual fax reception 00 10 99 OFF ON Code with 2 digits 33 09 Quantity of simulated call signals before the fax machine switches over from telephone call to fax reception 00 01 02 03 04 05 OFF 3 x 5 x 7 x 9 x 11 x 03 10 Music selection during hold function 00 01 No music Greensleeves 01 13...

Page 117: ...t print out after delayed timer transmission 00 01 02 OFF ON every transmission ON with errors only 00 36 Half tone quality relative to transmission speed 00 01 Fast transmission Slow transmission 01 48 Language selection 00 01 02 Danske English Deutsch 02 50 Reduction ratio during copy function vertical only 00 01 100 97 01 54 Automatic reception with manual sending and reception 00 01 OFF Press ...

Page 118: ...incoming call has not been received G The handset of your fax machine or a connected telephone was not lifted off the hook The display will show POWER SAVE If any of the above requirements is not fulfilled your fax machine will automatically switch over to normal standby mode The power save mode can be switched on or off via software switch 13 The default setting of software switch 13 is 01 ON For...

Page 119: ...9 Setting specific features 9 6 MF 1400 Rev 1 1 1 22 10 99 ...

Page 120: ...ll not feed in The document paper is too thin or too thick Page 4 1 A previous document is jammed in the document feeder Remove the jammed document Page 10 5 The display shows INK OUT The ink cartridge is empty Install a new ink cartridge Page 10 7 The paper will not feed in correctly Some paper sheets are stuck together Fan through the paper sheets before inserting them in the paper holder Page 2...

Page 121: ...e 2 6 It is not possible to receive a fax There is no paper in the paper holder Page 2 11 Selective reception has been activated Check setting of software switch 26 Page 5 4 The print out is very pale The ink cartridge is almost empty Install a new ink cartridge Page 10 7 The print out is blank The ink cartridge is totally empty Install a new ink cartridge Page 10 7 The ink cartridge is not correc...

Page 122: ...print job has been finished Hold the PRINTER READY key for approx 1 5 seconds Display shows PRINT STOPPED Problem description Possible cause solution See Dialling tone cannot be heard when picking up the handset The telephone cable is not correctly connected Page 2 7 The caller can only be heard very quietly through the loudspeaker The monitoring function is set at quiet Page 2 13 Problem descript...

Page 123: ...er head nozzles in the ink cartridge are blocked Clean the nozzles on the printer head Page 10 12 The ink cartridge is almost empty Install a new ink cartridge Page 10 7 Print out contains blank lines The printer head nozzles in the ink cartridge are blocked Clean the nozzles on the printer head Page 10 12 Print out has blank patches Print out has ink smudges Printed lines are not straight Printer...

Page 124: ...n the display shows DOCUMENT JAM 1 Fold the control panel forwards 2 Press and hold the green document release lever while pulling the jammed document slowly upwards out of the machine 3 Close the control panel The display will show OLD CARTRIDGE 4 Confirm this by pressing the SET key The standard display will appear OLD CARTRIDGE 08 Sep 99 15 32 ...

Page 125: ...achine when the display shows CHECK PAPER 1 Fold the paper cover forwards 2 Pull the jammed paper slowly upwards out of the machine 3 Close the paper cover 4 Press the PRINTER RESET key The standard display will appear All data stored in the memory will be automatically printed out CHECK PAPER 08 Sep 99 15 32 ...

Page 126: ...head on the ink cartridge Do not place the ink cartridge on it printer head Do not shake or take apart the ink cartridge Store ink cartridge out of children s reach 1 Fold the control panel forwards The cartridge holder will move to central position 2 Open the printer unit cover The cartridge holder containing the used ink cartridge is located under the cover If the cartridge holder is not under t...

Page 127: ...Gently press the ink cartridge forwards The ink cartridge must engage with an audible click 7 Close the control panel cover The display will show NEW CARTRIDGE If NO CARTRIDGE appears in the display Check if the ink cartridge has correctly engaged in the cartridge holder 8 Confirm by pressing the SET key The standard display will appear NEW CARTRIDGE 08 Sep 99 15 32 ...

Page 128: ...t page will be printed out 3 Determine which line segment on the test print is closest to being a straight line 4 Enter the code of this line segment via the numerical keys Confirm your choice by pressing the SET key You will hear a beep The printer is now re aligned Always after replacing the ink cartridge In order to ensure optimum printing results the printer should always be re aligned after i...

Page 129: ...st page is printed 4 Determine which line segment on the test print is closest to being a straight line 5 Enter the code of this line segment in the dialogue box Align Bidi 6 Click the OK button to confirm your input The printer is now re aligned Always after replacing the ink cartridge In order to ensure optimum printing results the printer should always be re aligned after installing a new ink c...

Page 130: ...the SET key A test page will be printed out 3 Compare the thin lines above and below the black strip Are the line continuous If yes the printer head nozzles are clean The cleaning procedure is complete Are the lines interrupted If yes the printer head nozzles are blocked Repeat the cleaning procedure 4 only if the test page is not properly printed after the third time Replace the ink cartridge and...

Page 131: ...ab 3 Click the button CLEAN NOZZLES A test page is printed 4 Compare the fine lines above and below the black strip Are the lines continuous The printer head nozzles are clean The cleaning procedure is finished Are the lines interrupted The printer head nozzles are blocked Repeat the cleaning procedure 5 only if the test page is not properly printed after the third time Replace the ink cartridge a...

Page 132: ...antity of transmitted pages is not identical to the entered quantity of pages with page count function 27 Timer delayed transmission or document broadcasting function was interrupted or the document feeder did not contain a document 30 onwards Poor quality print out due to poor telephone line connection If this error code appears frequently please contact your local Minolta service centre 40 onwar...

Page 133: ...10 Trouble shooting 10 14 MF 1400 Rev 1 1 1 22 10 99 ...

Page 134: ...400 bps transmission speed Error Correction Mode ECM coding Automatic document feed up to 20 pages Paper holder with automatic paper feed up to 50 pages Easily comprehensible 16 character display High resolution print out with 64 Gray scales Bubble jet printer head for normal paper with ink save feature Centronics printer interface Power save feature G Telephone functions Memory for 10 numbers und...

Page 135: ... 1 1 1 22 10 99 The Minoltafax 1400 is approved for connection to Telecom public telecommunication networks and to other fax machines of transmission compatibility group 3 Minoltafax 1400 For office personnel with high demands ...

Page 136: ...tergent CAUTION Damage to apparatus due to using wrong cleansing substance The housing can be damaged when cleaning with substances containing alcohol or benzine Only clean the housing with a neutral household detergent Cleaning document transport rollers 1 and 2 Clean the document transport rollers 1 and 2 regularly Dirty transport rollers can cause faulty document feeding 1 Fold the control pane...

Page 137: ...nel The display will show OLD CARTRIDGE 5 Confirm this via the SET key The standard display will appear Damp transport rollers will cause faulty document transport Before using your fax machine ensure that the transport rollers 1 and 2 are completely dry otherwise faulty document transport can occur Document Document transport roller 2 transport roller 1 OLD CARTRIDGE 08 Sep 99 15 32 ...

Page 138: ...e mode 1 7 W Stand by without power save mode 5 7 W Machine dimensions Height 264 mm Width 360 mm Depth 300 mm Weight Approx 3 9 kg without consumables Ambient temperature 5 C to 35 C Sending Transmission durationh Super fine resolution approx 45 sec ITU test page 1 Fine resolution approx 20 sec ITU test page 1 Standard resolution approx 15 sec ITU test page 1 Timer transmission Yes up to 24 hours...

Page 139: ...esolution 7 7 lines mm Standard resolution 3 85 lines mm Gray scales 64 Print out Printer types Bubble jet printer Printer resolution Max 600 dpi Printing width Max 203 mm Paper weight 64 to 90 g m2 Paper sizes A4 Letter Legal size Paper thickness Less than 0 2 mm Paper holder 50 pages Designation Ident No Ink cartridge black Type 4968 050 Print head 56 nozzles Number of prints approx 600 pages ca...

Page 140: ...plements 1 2 and 3 Safety of telecommunication devices including electronic components EMV EN55 022 Class B 1994 A2 1997 Limit values and measuring methods for suppressing telecommunication devices EN50082 1 1992 Electromagnetic compatibility Basic standard Section 1 Residential areas business and industry EN61000 3 2 Harmonic Current Emissions EN61000 3 3 1995 Voltage Fluctuations IEC 801 2 1991 ...

Page 141: ...ering machine 5 3 Approval symbol 1 7 Automatic print out of delayed transmission report 4 17 Automatic reception Receiving faxes automatic 5 1 B Broadcast 4 23 Broadcasting of Fax Documents 4 18 4 21 C Call operator 8 6 Calling a fax transmission Polling 5 9 Calling statistics of directory number 3 17 Cancelling a procedure 3 4 Cancelling Broadcast Order 4 23 Caring for the machine 11 3 Cartridge...

Page 142: ...ng the allocation of a one touch key 3 11 Deleting transmission delay time 4 16 Dialling a number 8 3 directory 8 4 one touch 8 3 redail 8 3 Dialling a number via a one touch key 4 9 Dialling a number via redial 4 8 Dialling a number via the directory 4 10 Dialling and number and monitoring a call 4 11 Dialling the number via the numerical keys 4 7 Digits 3 1 Digits and letters correcting 3 3 ente...

Page 143: ...Documents to be transmitted characteristics 4 1 E ECM for one single fax transmission ON OFF 4 28 ECM ON OFF 4 27 ECM permanently ON OFF 4 27 Entering numbers into the directory 3 14 Error codes in the printed reports 10 13 External telephone 5 11 F Faxes answering machine 5 3 automatic reception 5 1 manual reception 5 2 selected 5 4 Faxes receiving 5 1 Features 11 1 H Half tone fax transmission 5...

Page 144: ...nd digits correcting 3 3 entering 3 2 Location 2 6 Loudspeaker volume 2 14 M Machine overview 2 2 Manual reception Receiving faxes manual 5 2 Manually started print out of activity report 3 21 Memory reception during printer problem 5 8 O One touch keys altering 3 10 deleting 3 11 printing a list 3 12 setting 3 8 storing 3 9 Operation panel of Minoltafax 1400 2 4 Operator call 8 6 Optional accesso...

Page 145: ... using the software 7 5 Printer problem memory reception 5 8 Printing a list of allocated one touch keys 3 12 Printing from a DOS application in Windows 7 6 Printing from a pure DOS application 7 9 Printing list of directory entry 3 18 Printing of print file 7 8 Problems connected telephone 10 3 general 10 1 print quality 10 4 reception 10 2 sending 10 2 telephone 10 3 Production of several copies...

Page 146: ...receiving 5 4 Sender identification data Setting 3 5 Sending a document 4 7 Setting date and time 3 7 Setting delayed document transmission 4 14 Setting of automatic fax forwarding 5 5 Setting of manual fax forwarding 5 6 Setting page count function 4 12 Setting sender identification data 3 5 Setting the loudspeaker volume 2 14 Setting the one touch keys 3 8 Setting the quantity of redial attempts...

Page 147: ...ff the activity report 3 21 Switching on the activity report 3 20 Symbols 3 1 T Technical data 11 5 Telephone 8 1 Telephone call making 8 1 receiving 8 2 Time 3 7 Transferring a directory entry to a one touch key 3 19 Transmission 5 9 altering delayed 4 15 delayed 4 14 delete delayed 4 16 print report 4 17 setting delayed 4 14 Transmission speed 4 13 Transport rollers cleaning 11 3 Trouble shootin...

Page 148: ...Annex 11 Rev 1 1 1 22 10 99 MF 1400 11 15 V Volume loudspeaker 2 14 ringer 2 14 ...

Page 149: ...11 Annex 11 16 MF 1400 Rev 1 1 1 22 10 99 ...

Page 150: ...of delayed transmission report 4 17 Automatic reception Receiving faxes automatic 5 1 B Broadcast 4 23 Broadcasting of Fax Documents 4 18 4 21 C Call operator 8 6 Calling a fax transmission Polling 5 9 Calling statistics of directory number 3 17 Cancelling a procedure 3 4 Cancelling Broadcast Order 4 23 Caring for the machine 11 3 Cartridge installation 2 9 Change print settings 7 7 Characteristic...

Page 151: ...ime 4 16 Dialling a number 8 3 directory 8 4 one touch 8 3 redail 8 3 Dialling a number via a one touch key 4 9 Dialling a number via redial 4 8 Dialling a number via the directory 4 10 Dialling and number and monitoring a call 4 11 Dialling the number via the numerical keys 4 7 Digits 3 1 Digits and letters correcting 3 3 entering 3 2 Directory activity report manual print 3 21 activity report of...

Page 152: ...s 4 1 E ECM for one single fax transmission ON OFF 4 28 ECM ON OFF 4 27 ECM permanently ON OFF 4 27 Entering numbers into the directory 3 14 Error codes in the printed reports 10 13 External telephone 5 11 F Faxes answering machine 5 3 automatic reception 5 1 manual reception 5 2 selected 5 4 Faxes receiving 5 1 Features 11 1 H Half tone fax transmission 5 8 Hold 8 5 Housing cleaning 11 3 I Ink ca...

Page 153: ... entering 3 2 Location 2 6 Loudspeaker volume 2 14 M Machine overview 2 2 Manual reception Receiving faxes manual 5 2 Manually started print out of activity report 3 21 Memory reception during printer problem 5 8 O One touch keys altering 3 10 deleting 3 11 printing a list 3 12 setting 3 8 storing 3 9 Operation panel of Minoltafax 1400 2 4 Operator call 8 6 Optional accessory 11 6 Overseas transmi...

Page 154: ...roblem memory reception 5 8 Printing a list of allocated one touch keys 3 12 Printing from a DOS application in Windows 7 6 Printing from a pure DOS application 7 9 Printing list of directory entry 3 18 Printing of print file 7 8 Problems connected telephone 10 3 general 10 1 print quality 10 4 reception 10 2 sending 10 2 telephone 10 3 Production of several copies 6 2 Putting a call on hold 8 5 R...

Page 155: ...a Setting 3 5 Sending a document 4 7 Setting date and time 3 7 Setting delayed document transmission 4 14 Setting of automatic fax forwarding 5 5 Setting of manual fax forwarding 5 6 Setting page count function 4 12 Setting sender identification data 3 5 Setting the loudspeaker volume 2 14 Setting the one touch keys 3 8 Setting the quantity of redial attempts 4 25 Setting the ringer volume 2 14 Se...

Page 156: ...witching on the activity report 3 20 Symbols 3 1 T Technical data 11 5 Telephone 8 1 Telephone call making 8 1 receiving 8 2 Time 3 7 Transferring a directory entry to a one touch key 3 19 Transmission 5 9 altering delayed 4 15 delayed 4 14 delete delayed 4 16 print report 4 17 setting delayed 4 14 Transmission speed 4 13 Transport rollers cleaning 11 3 Trouble shooting 10 1 U Unpacking the fax ma...

Page 157: ... 30 OM Rev 1 1 1 07 06 99 ringer 2 14 ...

Reviews: