background image


B6 

B7 

B5 

B4 

B2 

B1 

B3 


HAV-TRHP10

KN


WIRELESS  
HEADPHONE 


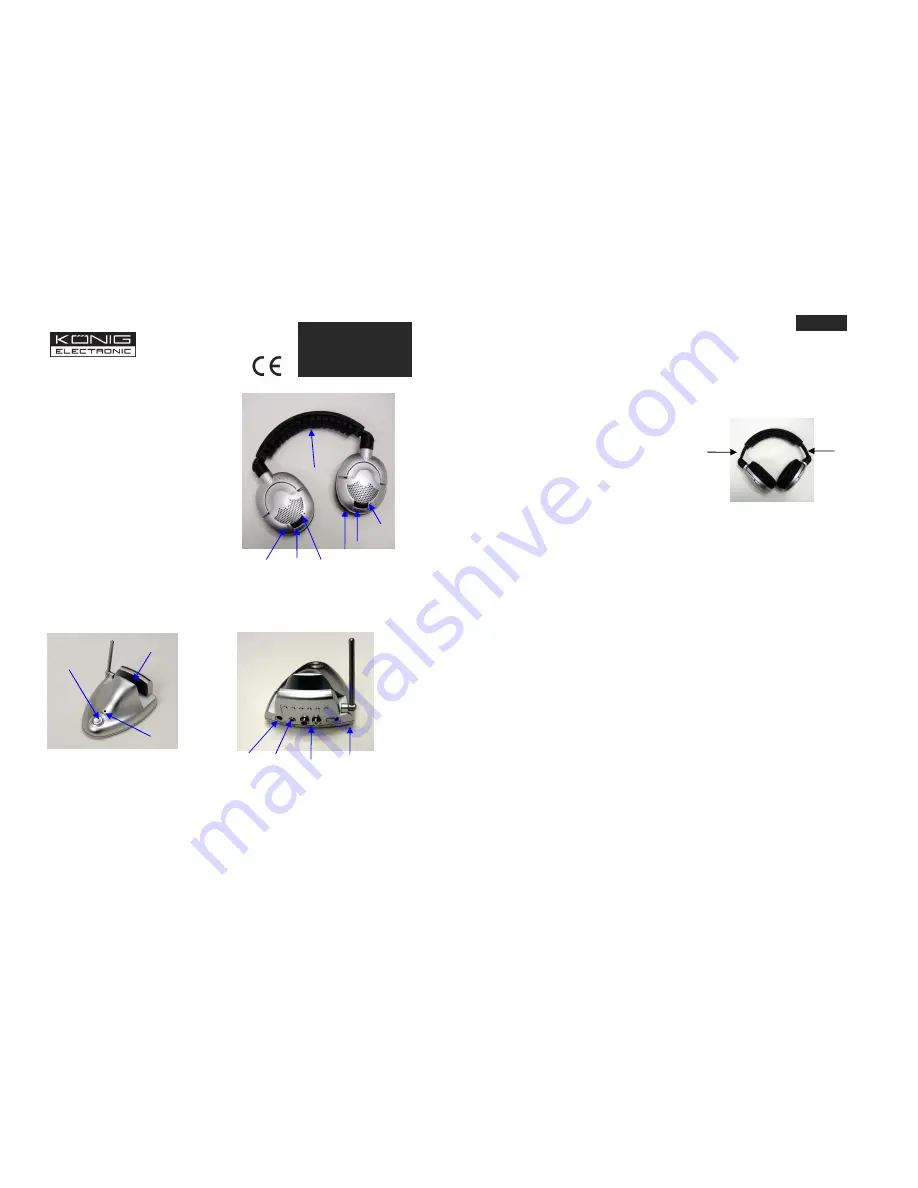
Headphone description: 


A1: Charge indicator 
A2: Power on/off button 
A3: Power on indicator 
A4: Volume control 
A5: Autoscan button 
A6: Autoscan indicator 
A7: Charge contact points 


Transmitter description: 

 
B1: Power on/off button  


B4:12v dc socket for power adapter 

B2: Power on indicator  


B5: 3.5mm audio input 

B3: Charge contact points 


B6: RCA audio input 


B7: Channel select switch 


Operation transmitter: 

 
1) Connect the RCA/3.5mm cable to the audio input (B5 or B6).  
2) Connect the RCA/3.5mm cable to the audio output of the external audio source. 
3) Select channel 1, 2 or 3. Select another channel in case of interference of distortion. 
4) Connect the AC/DC adapter to the DC input (B4) and the outlet. 
5) Turn on the transmitter with power button (B1). The LED indicator (B2) lights up. 
 

Note:

 the use of audio input B5 or B6 is depending on the connection possibility of the external 

audio source. 
 

Operation headphone: 
 

1) Open the battery compartment by turning the left cushion of the headphone anti-clockwise (if 
the cushion is in your left hand). 
2) Insert the 2 "AAA" rechargeable batteries and ensure the polarities are correct. 
3) Replace the cushion to the original position and turn clock-wise until the cushion is locked. 
4)  After  charging  the  batteries  (see  following  chapter)  turn  on  the  headphone  with  the  power 
button (A2). The LED indicator (A1) lights up. 
5) Push the auto scan button (A5). Automatic channel search will start. The auto scan indicator 
(A6) will flash during search and light up when a stereo signal is detected. 
6) Adjust the headphone to a desired volume level (A4). 
7) Adjust the head strap for a comfortable fit (see figure). 


Note:

    Only  use  rechargeable  batteries  to  avoid  risk  of 

electric shock or explosion by charging batteries that are 
not rechargeable. 


Charging: 
 

1) Turn off the headphone and insert the headphone into the slot with the charge contact points 
(A7 and B3) on the transmitter. 
2) When the contact points connect, the charge indicator (A1) will light up.  
3) Duration for charging is about 8 to 12 hours. The charge process will stop automatically. The 
recharge  indicator  will  go  off  when  recharging is complete.  The headphone  is ready  to  use for 
about 15 hours. 
 

Specifications: 

 
Transmission frequency: 864MHz  


Frequency response: 50Hz - 18.000Hz  
S/N ratio: 55dB 
Power supply: 12V DC, 200mA 
Range: 100m open area, 30m indoor (reception depending on conditions) 
Batteries: 2x AAA, NiMH, 650mAh (included) 


Safety precautions:  

To  reduce  risk  of  electric  shock,  this  product  should  ONLY  be  opened  by  an  authorized 
technician  if  service  is  required.  Disconnect  the  product  from  mains  and  other  equipment  if  a 
problem should occur. 

 
Warranty: 

No guarantee  or liability  can  be  accepted  for  any  changes and  modifications  of  the  product  or 
damage caused due to incorrect use of this product. 

 
General: 

Designs and specifications are subject to change without notice. 

 
DECLARATION OF CONFIRMITY: 

This product is in conformity with the Radio, EMC and LVD standards. 
Following the provisions of the 1999/5/EC R&TTE Directive. 
Conform  this  regulation  it’s  allowed  to  use  this  product  in  all  European  Community  &  EFTA 
countries. We are not responsible for use outside the EU & EFTA. 

 
  ENGLISH 

INSTRUCTIONS 

A3


A2 

A6 

A5 

A1 

A4 

A7 

EN 

Summary of Contents for HAV-TRHP10KN

Page 1: ...t up when a stereo signal is detected 6 Adjust the headphone to a desired volume level A4 7 Adjust the head strap for a comfortable fit see figure Note Only use rechargeable batteries to avoid risk of electric shock or explosion by charging batteries that are not rechargeable Charging 1 Turn off the headphone and insert the headphone into the slot with the charge contact points A7 and B3 on the tr...

Page 2: ... Passen Sie das Kopfband für einen komfortablen Sitz an siehe Bild rechts Anmerkung Verwenden Sie nur wiederaufladbare Batterien Akkus um die Gefahr eines elektrischen Schlages oder einer Explosion zu vermeiden indem Sie Batterien aufladen die nicht aufladbar sind Laden 1 Schalten Sie den Kopfhörer aus und setzen Sie den Kopfhörer in den Schlitz mit den Ladekontakt Punkten A7 und B3 am Sender 2 Si...

Page 3: ... Réglez le casque au volume désiré A4 7 Réglez le bandeau du casque pour un meilleur confort voir schéma ci contre Note Utilisez uniquement des piles rechargeables pour éviter les risques de chocs électriques ou explosions en rechargeant des piles qui ne sont pas rechargeables Recharge 1 Eteignez le casque et insérez le sur le slot avec les contacts de charge A7 et B3 sur le transmetteur 2 Quand l...

Page 4: ...al gevonden is 6 Stel de hoofdtelefoon in op een gewenst volumeniveau A4 7 Stel de hoofdband in zodat de hoofdtelefoon comfortabel zit zie afbeelding Opmerking gebruik uitsluitend oplaadbare batterijen om het gevaar van elektrische schokken of explosies te voorkomen bij het laden van batterijen die niet herlaadbaar zijn Laden 1 Schakel de hoofdtelefoon uit en plaats de hoofdtelefoon in de daarvoor...

Page 5: ...e Autoscan A6 lampeggerà durante la ricerca e rimane fisso quando viene rilevato il segnale stereo 6 Regolare la cuffia al livello di volume desiderato A4 7 Regolare il cerchietto per un comfort unico vedi figura Nota Utilizzare solo batterie ricaricabili per evitare pericolose scariche elettriche o esplosioni Ricarica 1 Spegnere la cuffia e inserirla nel vano della ricarica del trasmettitore A7 e...

Page 6: ...t A5 Megkezdődik az automata csatornakeresés Az auto kereső visszajelző A6 villog jel találása esetén folytonosan ég 6 Állítsa be a fejhallgatón a kívánt hangszintet A4 7 Állítsa be a fejpántot Kizárólag akkumulátort használjon így elkerülheti az elektromos sokkot ami az elemek töltése esetén léphet fel Töltés 1 Kapcsolja ki a fejhallgatót és helyezze be az akkukat majd csatlakoztassa a kapcsolódá...

Page 7: ...er upp när en stereosignal är funnen 6 Ställ in önskad volym i hörlurarna A4 7 Justera huvudbandet till en komfortabel passform se figur Notera Använd endast uppladdningsbara batterier för att på så sätt undvika risk för elektrisk stöt eller explosion genom laddning av batterier som ej är uppladdningsbara Laddning 1 Stäng av hörlurarna och sätt dem i spåret med laddningspunkterna A7 och B3 i sända...

Page 8: ...yessä 6 Säädä kuulokkeiden äänenvoimakkuus sopivaksi A4 7 Säädä kuulokkeiden varsi niin että kuulokkeet sopivat mukavasti päähän ks kuva Huomautus Käytä vain ladattavia paristoja välttääksesi sähköisku tai räjähdysvaaran joka uhkaa ladattaessa paristoja jotka eivät ole ladattavaksi tarkoitettuja Lataus 1 Kytke kuulokkeet pois päältä ja aseta ne lähettimessä olevaan latauksen kontaktipisteet sisält...

Page 9: ...ka Nabíjejte výhradně akumulátory k tomu určené Nezaměňujte staré s novými nebo akumulátory různých typů a značek V případě e nebudete sluchátka del í dobu pou ívat akumulátory z nich vyjměte předejdete tak mo nému vytečení elektrolytu a jejich následnému po kození Akumulátory ani sluchátka nevystavujte příli ným teplotám ani přímému slunečnímu svitu Nabíjení 1 Před nabíjením nejprve sluchátka vyp...

Reviews: