background image

MULTIFUNCTIONAL DIGITAL SYSTEMS

COMMAND CENTER 

Guide

Summary of Contents for TASKalfa 550c

Page 1: ...MULTIFUNCTIONAL DIGITAL SYSTEMS COMMAND CENTER Guide ...

Page 2: ... 2008 KYOCERA MITA Corporation All rights reserved ...

Page 3: ...ating System The official name of Windows Server 2003 is Microsoft Windows Server 2003 Operating System The official name of Windows Server 2008 is Microsoft Windows Server 2008 Operating System Microsoft Windows Windows NT and the brand names and product names of other Microsoft products are trademarks of Microsoft Corporation in the US and other countries Apple AppleTalk Macintosh Mac Mac OS Saf...

Page 4: ......

Page 5: ...ng Fax Internet Fax jobs 25 Deleting Fax transmission jobs 26 Managing Scan Jobs 27 Displaying scan jobs 27 Deleting a scan jobs 28 Chapter 4 DISPLAYING JOB LOGS Displaying Print Job Logs 30 Displaying Transmission Journals 31 Displaying Reception Journals 32 Displaying Scan Job Logs 33 Chapter 5 REGISTERING FROM COMMAND CENTER Managing Templates 36 Registering private template groups 36 Registeri...

Page 6: ... settings 186 Displaying version information 193 Maintenance From COMMAND CENTER 194 About the maintenance functions 194 Uploading the software 195 Removing the client software 196 Backing up data 197 Restoring data from backup file 200 Deleting the data from local folder 202 Managing directory service 203 Setting up notification 205 Importing and exporting the Address Book 209 Importing and expor...

Page 7: ...entication for Scan to Email 290 Chapter 8 OPTION SETUPS About Option Setups 298 Setting up IP Security Function 299 Setting up IPsec 300 Registering policies 301 Installing IPsec certificate 308 Flushing out IPsec sessions 314 Chapter 9 APPENDIX Installing Certificates for a Client PC 316 INDEX 323 ...

Page 8: ...6 CONTENTS ...

Page 9: ...VERVIEW This chapter describes overview of the COMMAND CENTER functions COMMAND CENTER Overview 8 Accessing COMMAND CENTER End User Mode 9 Accessing web utility COMMAND CENTER 9 COMMAND CENTER web site 15 ...

Page 10: ...ISTRATOR MODE End users can Display general device information including the status drawer accessory configuration and paper supply information Display and manage the status of print jobs fax internet fax transmission jobs and scan jobs submitted by the user Optional Fax Unit is required for displaying and managing the fax transmit jobs Display the job logs for print fax internet fax transmission ...

Page 11: ...ddress box of web browser To access it under a Windows Vista environment confirm the network connection status on the Network Map with the LLTD Link Layer Topology Discovery feature of Windows Vista and then click the displayed icon of this equipment P 9 Accessing COMMAND CENTER by entering URL P 10 Accessing COMMAND CENTER from Network Map Windows Vista Accessing COMMAND CENTER by entering URL 1 ...

Page 12: ...twork Map with the LLTD feature of Windows Vista and then click the displayed icon of this equipment You can install the driver required for web services by right clicking the icon and selecting Install For the driver required for web services refer to the Software Installation Guide Before using the LLTD feature enable the LLTD setting P 155 Setting up LLTD Setting Before beginning the installati...

Page 13: ...VIEW Accessing COMMAND CENTER End User Mode 11 1 OVERVIEW 2 Click Network and Internet The Network and Internet window appears 3 Click Network and Sharing Center The Network and Sharing Center window appears ...

Page 14: ... Private of Location type and then click Next The User Account Control dialog box appears If the user account control is disabled the Set Network Location Successfully set network settings window appears Go to step 7 6 Click Continue in the User Account Control dialog box The Set Network Location Successfully set network settings window appears 7 Click Close ...

Page 15: ... devices connected on the network appears in the Network Map window 9 Click the icon of this equipment The name IP address and MAC address of the devices appear as a result of your placing a pointer over each icon If the equipment is with the Finisher its icon is displayed together with the Finisher icon If not it is displayed by itself ...

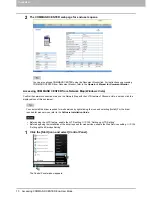
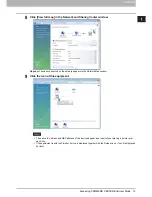
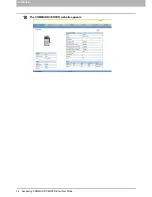
Page 16: ...1 OVERVIEW 14 Accessing COMMAND CENTER End User Mode 10 The COMMAND CENTER web site appears ...

Page 17: ...nction tab This provides access to main pages of COMMAND CENTER for each function 2 Menu bar This provides access to each menu page under the selected function tab 3 Submenu bar This provides access to each submenu page under the selected menu and function tab 4 Install Software link Click this to open the Install Client Software page to download the client software from COMMAND CENTER 5 Top link ...

Page 18: ...1 OVERVIEW 16 Accessing COMMAND CENTER End User Mode The COMMAND CENTER Online Help cannot be displayed in the following browsers Safari 2 0 ...

Page 19: ...2 CHECKING DEVICE STATUS This chapter describes the Device tab page in the COMMAND CENTER end user mode COMMAND CENTER Device Tab Page 18 Equipment status icons 19 ...

Page 20: ...e available size to receive the fax data Work Space Available Displays the percentages of available hard disk space to store the temporary data Contact Information Displays the contact name of the person responsible for managing this device Phone Number Displays the phone number of the person responsible for managing this device Message Displays the administrative message Alerts Displays the alert...

Page 21: ... You need to clear the hole punch paper bits from the Hole Punch Unit For information on resolving the error condition refer to Cleaning the Hole Punch Dust Bin in the Troubleshooting Guide An unrecommended toner cartridge is being used For information on resolving the error condition refer to Replacing a Toner Cartridge in the Troubleshooting Guide You performed saddle stitch printing with the pa...

Page 22: ...taples Empty This icon indicates no staples are left in the Finisher For information on resolving the error condition refer to Refilling the Staple in the Troubleshooting Guide Call for Service Contact your service representative to have the equipment inspected ...

Page 23: ...and scan jobs released by end users Managing Print Jobs 22 Displaying print jobs 22 Deleting print jobs 23 Releasing a print job 24 Managing Fax Internet Fax Jobs 25 Displaying Fax Internet Fax jobs 25 Deleting Fax transmission jobs 26 Managing Scan Jobs 27 Displaying scan jobs 27 Deleting a scan jobs 28 ...

Page 24: ... finished being printed are displayed in the Logs tab To sort the print jobs list so that a particular job is easier to find click the appropriate table heading The page refreshes to display the information in the order you requested The Print Job page display the following information for each print job User Name Displays the user account that released the print job Date Time Displays the date an...

Page 25: ...ge If you log in as an administrator the Delete All Private Print Jobs button is displayed next to the Release button Click Delete All Private Print Jobs to delete all private jobs in the list It may take a while to delete all private print jobs Deleting a print job 1 Click the Job Status tab and click the Print menu The Print Job page is displayed 2 Select an option button at the left of the prin...

Page 26: ...s cannot be released from COMMAND CENTER Releasing a print job 1 Click the Job Status tab and click the Print menu The Print Job page is displayed 2 Select an option button at the left of the print job that you want to release You can select only one print job at a time 3 Click Release The selected print job is immediately printed ...

Page 27: ...at have finished their transmission are displayed in the Logs tab To sort the fax transmission jobs list so that a particular job is easier to find click the appropriate table heading The page refreshes to display the information in the order you requested The Fax InternetFax Job page displays the following information for each fax transmission job File No Displays the file number to identify the ...

Page 28: ... fax transmission job 1 Click the Job Status tab and click the Fax Internet Fax menu The Fax InternetFax Job page is displayed 2 Select an option button at the left of the fax transmission job that you want to delete You can select only one fax transmission job at a time 3 Click Delete The selected fax transmission job is deleted ...

Page 29: ... to display the information in the order requested The Scan Job page displays the following information for each scan job To File Name When the job performs the Scan to File or USB or Scan to e Filing it displays the document name to be stored When the job performs the Scan to Email it displays the destinations to which the scanned document will be sent When OFF is selected for the Bcc Address Dis...

Page 30: ...can job Deleting a scan job 1 Click the Job Status tab and click the Scan menu The Scan Job page is displayed 2 Select an option button at the left of the scan job that you want to delete You can select only one scan job at a time 3 Click Delete The selected scan job is deleted ...

Page 31: ...MAND CENTER end users can display print job logs transmission journals reception journals and scan job logs Displaying Print Job Logs 30 Displaying Transmission Journals 31 Displaying Reception Journals 32 Displaying Scan Job Logs 33 ...

Page 32: ...ble heading The page refreshes to display the information in the order you requested The Print Log page display the following information for each print job log User Name Displays the computer name that released the print job Click the header link to sort the print job list by user name Document Name Displays the document name of the print job Click the header link to sort the print job list by do...

Page 33: ...ial number of the journals File No Displays the file number to identify the transmission job Date Time Displays the date and time the transmission job was performed Duration Displays the time length taken for the transmissions If it takes more than 1 hour 59 59 is indicated Pages Displays the number of pages the transmission job contains TO Displays the destinations set for the transmission job De...

Page 34: ...al number of the journals File No Displays the file number to identify the received job Date Time Displays the date and time of receiving the job Duration Displays the time taken for the receptions If it takes more than 1 hour 59 59 is indicated Pages Displays the number of pages the received job contains From Displays the sender s email address or fax number of the received job Dept Displays the ...

Page 35: ...name that was stored When the job performed the Scan to Email it displays the destinations where the scanned document was sent When OFF is selected for the Bcc Address Display setting Bcc Address is displayed instead of the actual Bcc e mail address P 171 Setting up Email Setting User Name Displays the account name of the user who has performed the scan job when the User Management Setting is enab...

Page 36: ...200 dpi 3 300 dpi 4 400 dpi 5 600 dpi A 8x3 85 line mm 203x98 B 8x7 7 line mm 203x196 C 8x15 4 line mm 203x391 D 16x15 4 line mm 400x391 D This describes the file format 0 e Filing 1 TIFF Multi 2 TIFF Single 3 PDF Multi or Encrypt PDF Multi 4 JPEG 5 PDF Single or Encrypt PDF Single 6 Slim PDF Multi 7 Slim PDF Single 8 XPS Multi 9 XPS Single A DIB E This describes the file color mode B Black G Gray...

Page 37: ... mailboxes Managing Templates 36 Registering private template groups 36 Registering private templates 43 Displaying public templates 73 Managing Address Book 74 Managing contacts in the Address Book 74 Managing groups in the Address Book 79 Managing Mailboxes 82 Setting up an Open Mailbox 83 Deleting an Open Mailbox 89 ...

Page 38: ...g any template look on your system to see what templates are available When users set up the templates and template group for the first time you must first create a template group according to how templates are grouped and then register the template that you require P 36 Registering private template groups P 43 Registering private templates In addition you can also display the templates list regis...

Page 39: ...e Templates page is displayed Skip to step 4 If you select the defined private template group that is protected by a password the Input Group Password page is displayed Go to the next step You can display only defined private template groups by clicking on the Defined Groups link The page displays all 200 private template groups in default page view If you know which private template group you wan...

Page 40: ...ions when creating a private template in this group 6 Click Save to apply changes 7 You can continue setting the group password or registering or editing templates in the group as required P 38 Setting group password P 43 Registering private templates Setting group password To set the group password you must register the private template group first You can set the password for the group that you ...

Page 41: ...xt step You can display only defined private template groups by clicking on the Defined Groups link The page displays all 200 private template groups in default page view If you know which private template group you want to define or edit click the number of the private template group in the Jump to links 3 When the Input Group Password page is displayed enter the 5 digit password or administrator...

Page 42: ...use 5 digit numbers for the password You can also enter the administrator password in the Old Password box If the password has not been set for the group leave the Old Password box blank Leaving the New Password and Retype Password box blank releases password protection for the group 6 Click Save The confirmation dialog box appears 7 Click OK The group password is set or modified ...

Page 43: ... Role Based Access Control is enabled only users who have registration privileges can login to the Registration tab page 2 Click the group name link that you want to reset If you select the private template group that is not protected by a password the Private Templates page is displayed Skip to step 4 If you select the private template group that is protected by a password the Input Group Passwor...

Page 44: ... Group Password page is displayed enter the 5 digit password or administrator s password for the selected private template group and click OK The Private Templates page is displayed 4 Click Reset The confirmation dialog box appears 5 Click OK The group information is reset ...

Page 45: ...e to e Filing agents Registering or editing a private template 1 Click the Registration tab and the Template menu The Template Groups page is displayed When User Management Setting and Role Based Access Control are enabled the login page will be displayed When Role Based Access Control is enabled only users who have registration privileges can login to the Registration tab page 2 Click the group n...

Page 46: ...plate or click the defined template name to edit the template If you select the private template that has not been defined the Template Properties page to select agents is displayed Skip to step 7 If you select the defined private template that is not protected by a password the Template Properties page is displayed Skip to step 6 If you select the defined private template that is protected by a p...

Page 47: ...e Input Template Password page is displayed enter the 5 digit password or administrator s password for the selected private template and click OK The Template Properties page is displayed 6 Click Edit to define or edit the template properties The Template Properties page to select agents is displayed ...

Page 48: ...ons This agent can also be combined with the Save as file agent or Store to e Filing agent Fax InternetFax Select this to create a fax and Internet Fax transmission template This agent can be combined with the Save as file agent Scan Select this to create a scan template combined with the Email Save as file and Store to e Filing agents When you select this select the agent from Email Save as file ...

Page 49: ...To Destination and Bcc Destination are displayed When the setting above is changed from To Bcc to To Cc an e mail address entered in Bcc Destination will be treated as Cc destination When the setting is changed from To Cc to To Bcc an e mail address entered in Cc Destination will be treated as Bcc destination P 171 Setting up Email Setting InternetFax Setting Click this to specify how the document...

Page 50: ...a Scan to e Filing agent P 64 Box Setting Private template Scan Setting Click this to specify how the document will be scanned This can be set only when creating the Save as file agent Scan to Email agent and Scan to e Filing agent This cannot be set when combining a Fax Internet Fax agent P 65 Scan Setting Private template 9 After configuring the desired template properties click Save The templat...

Page 51: ...on that will be displayed in the touch panel The icon is automatically designated according to the agent that you select 2 Caption1 Enter the text that will be displayed next to the icon in the touch panel You can enter up to 11 alphanumeric characters 3 Caption2 Enter the text that will be displayed next to the icon in the touch panel You can enter up to 11 alphanumeric characters 4 User Name Ent...

Page 52: ...170 Setting up Email settings Destination Setting Private template In the Recipient List page you can specify the destinations to which the fax Internet Fax or Scan to Email document will be sent When you are setting up the destinations for the Scan to Email agent you can only specify the email addresses for the destinations When you are setting up the destinations for the Fax Internet Fax agent y...

Page 53: ... added to the Recipient List page 5 Repeat steps 2 to 4 to add all additional recipients that you require You can remove the contacts that you added to the recipient list before submitting the destination settings P 56 Removing the contacts from the recipient list 6 Click Save The contacts are added as destinations Selecting the recipients from the address book You can select recipients from the a...

Page 54: ...e displayed in the Address Book page You can specify the fax number for the destination only when the optional Fax Unit is installed If you want to sort the recipient list by a specific group select the desired group name in the Group box 4 Click Add Selected recipients are added to the Recipient List page You can remove contacts that you have added to the recipient list before submitting the dest...

Page 55: ...st page 2 Click Address Group The Address Group page is displayed 3 Select the Group check boxes that contain the desired recipients 4 Click Add All recipients in the selected groups are added to the Recipient List page You can remove contacts that you have added to the recipient list before submitting the destination settings P 56 Removing the contacts from the recipient list 5 Click Save The con...

Page 56: ...the directory service name that you want to search for in the Directory Service Name box and enter the search terms in the boxes that you want to search If you select the model name of this equipment at the Directory Service Name box you can search for recipients in the address book of this equipment COMMAND CENTER will search for recipients who match the entries Leaving the box blank allows wild ...

Page 57: ...e displayed in the Search Address List page You can specify the fax number for the destination only when the optional Fax Unit is installed The value of company and department will depend on the settings determined by the administrator 6 Click Add The selected recipients are added to the Recipient List page You can remove contacts that you have added to the recipient list before submitting the des...

Page 58: ... be sent 1 Subject This sets the subject of the Internet Faxes Select Scanned from Device Name Template Name Date Time to automatically insert the subject or enter the desired subject in the box 2 From Address Enter the email address of the sender When the recipient replies to a received document the message will be sent to this email address 3 From Name Enter the sender name of the Internet Fax 4...

Page 59: ...he exposure for sending faxes Select Auto to automatically apply the ideal contrast or adjust the contrast manually in 11 stages 4 Transmission Type Select the send mode Memory Transmit Select the Memory TX mode to automatically send the document after it has been temporarily stored to memory This mode is useful if you want to return original files immediately You can also send the same originals ...

Page 60: ...lling that allows users to poll another fax after transmitting documents to the remote Fax on the same phone call You can select Transmit when you have created a template for Fax InternetFax not to be Saved as file When Fax InternetFax and Save as file settings are combined this item will be unselectable and will not be displayed 11 Password Enter the 4 digit security code for the document to be s...

Page 61: ...ile TIFF Single Select this to save scanned images separately as Single page TIFF files PDF Multi Select this to save scanned images as a Multi page PDF file PDF Single Select this to save scanned images separately as Single page PDF files Slim PDF Multi Select this to save scanned images as Multi page slim PDF files Select this when you give priority to minimizing the file size over the quality o...

Page 62: ...er Users cannot change the settings of the Encryption Level box and the Authority box noted below if they are not authorized to change the master password Ask the administrator for resetting these passwords For the details of the encryption setting refer to the MFP Management Guide Encryption Level Select the desired encryption level 40 bit RC4 Select this to set an encryption level to the one com...

Page 63: ...ly as Single page PDF files Slim PDF Multi Select this to save scanned images as Multi page slim PDF files Select this when you give priority to minimizing the file size over the quality of the image When no optional memory is installed Slim PDF will not apply for scanning more than Letter or A4 size originals Slim PDF Single Select this to save scanned images separately as Single page slim PDF fi...

Page 64: ... if they are not authorized to change the master password Ask the administrator for resetting these passwords For the details of the encryption setting refer to the MFP Management Guide Encryption Level Select the desired encryption level 40 bit RC4 Select this to set an encryption level to the one compatible with Acrobat 3 0 PDF V1 1 128 bit RC4 Select this to set an encryption level to the one c...

Page 65: ...TP Client by an administrator will be used If you do not know the default port number for FTP Client ask your administrator and change this option if you want to use another port number Network Path Enter the network path to store a scanned file When you select SMB as the protocol enter the network path to the network folder For example to specify the users scanned folder in the computer named Cli...

Page 66: ...ill be stored Password Enter the password if the specified Box number requires a password Retype Password Enter the password again if the specified Box number requires a password 2 Folder Name Enter the name of the folder where scanned images will be stored If the specified named folder does not exit the folder will be created automatically 3 Document Name Select how the scanned file will be named...

Page 67: ...this to scan both sides of originals with a vertical reversal to be bound along the horizontal side of the paper 3 Rotation Select how the scanned images will be rotated 4 Color Mode Select the color mode for scanning Black Select this to scan in black mode Gray Select this to scan in gray scale mode Full Color Select this to scan in full color mode Auto Color Select this to scan in auto color mod...

Page 68: ... the Color Mode box In that case set the exposure manually 9 Original Size Select the original size Select Auto to automatically detect the original paper size Mixed Original Sizes to allow scanning mixed original sizes or a desired paper size 10 Background Select the density level of the background of the scanned image Density can be adjusted in 9 levels The farther to the right that you set the ...

Page 69: ...template To set the template password you must register the private template first Setting the template password 1 Click the Registration tab and the Template menu The Template Groups page is displayed When User Management Setting and Role Based Access Control are enabled the login page will be displayed When Role Based Access Control is enabled only users who have registration privileges can log ...

Page 70: ...nt to set or change the password If the template list is displayed in the List view click the template name that you want to set or modify the password If the selected private template is protected by a password the Input Template Password page is displayed If not the Template Information page is displayed You can change the template list view by clicking on either Panel View or List View If you k...

Page 71: ...the private template The Change Template Password page is displayed 7 Enter the old password in the Old Password box and the new password in the New Password and Retype Password boxes You can only use 5 digit numbers for the password You can also enter the administrator password in the Old Password box If the password has not been set for the template leave the Old Password box blank Leaving the N...

Page 72: ...n to the Registration tab page 2 Click the group name link that contains the private template that you want to reset If you select the private template group that is not protected by a password the Private Templates page is displayed Skip to step 4 If you select the private template group that is protected by a password the Input Group Password page is displayed Go to the next step You can display...

Page 73: ...t If the templates list is displayed in the List view click the template name that you want to reset If you select the private template that is not protected by a password the Template Properties page is displayed Skip to step 6 If you select the private template that is protected by a password the Input Template Password page is displayed Go to the next step You can change the template list view ...

Page 74: ...plate Password page is displayed enter the 5 digit password or administrator s password for the selected private template and click OK The Template Properties page is displayed 6 Click Reset Template The confirmation dialog box appears 7 Click OK The selected template is reset ...

Page 75: ...s displayed When User Management Setting and Role Based Access Control are enabled the login page will be displayed When Role Based Access Control is enabled only users who have registration privileges can log in to the Registration tab page 2 Click the group name link for the Public Template Groups list 3 The templates list in the public group is displayed You can change the template list view by...

Page 76: ...lete a contact manually P 74 Adding editing or deleting contacts manually Add new contact searching for a recipient from the LDAP server P 78 Adding new contact from the LDAP server Adding editing or deleting contacts manually You can add or edit a contact by entering recipient information manually You can also delete the contact from the Address Book P 74 Adding or editing a contact P 77 Deleting...

Page 77: ...cipient You can enter up to 64 characters Department Enter the department name of the recipient You can enter up to 64 characters Keyword Enter the comment of the recipient You can enter up to 256 characters You must specify either the First Name or Last Name box and either the Email Address or Fax Number box to register the contact You cannot send originals to the fax numbers without the optional...

Page 78: ...he recipient facsimile You can enter up to 20 characters including numbers and hyphenations ECM Enable or disable the ECM Error Correction Mode If enabled it facilitates error free communications by automatically resending any portion of the document affected by phone line noise or distortion Line Select Select the line to be used If this is set to Auto this equipment automatically selects the lin...

Page 79: ...played When User Management Setting and Role Based Access Control are enabled the login page will be displayed When Role Based Access Control is enabled only users who have registration privileges can log in to the Registration tab page 2 Click the link that you want to delete in the contacts list The Contact Property page is displayed 3 Click Delete The contact is deleted from the Address Book ...

Page 80: ...hen Role Based Access Control is enabled only users who have registration privileges can log in to the Registration tab page 2 Click Search The Search Contact page is displayed 3 Select the directory service name that you want to search for in the Directory Service Name box and enter the search terms in the boxes that you want to search If you select the model name of this equipment at the Directo...

Page 81: ...inations instead of specifying each recipient separately when operating Scan to Email or fax or Internet Fax transmission You can also delete groups P 79 Adding or editing a group P 81 Deleting a group Adding or editing a group 1 Click the Registration tab and the Address Book menu The Address Book page is displayed When User Management Setting and Role Based Access Control are enabled the login p...

Page 82: ...You can cancel adding or editing a group by clicking Cancel 5 Select the Email check boxes of users to add Internet Fax recipients and select the Fax check boxes of users to add Fax recipients To perform the fax transmission the optional Fax Unit is required If the optional Fax Unit is not installed you cannot perform the fax transmission even if you specify the fax number 6 Click OK The group is ...

Page 83: ...ent Setting and Role Based Access Control are enabled the login page will be displayed When Role Based Access Control is enabled only users who have registration privileges can log in to the Registration tab page 2 Click the Groups submenu The groups list is displayed 3 Click the group link that you want to delete in the groups list The Group Properties page is displayed 4 Click Delete The selecte...

Page 84: ...mailbox The Forward mailbox allows you to transmit a received fax to various destinations using the following agents Internet Fax Relay agent When a document has been sent to a mailbox this equipment can call up the remote Fax via the public switched telephone line or send the Internet Fax via the Internet according to the destinations registered in the mailbox After the relay transmission the tra...

Page 85: ...ting and Role Based Access Control are enabled the login page will be displayed When Role Based Access Control is enabled only users who have registration privileges can log in to the Registration tab page 2 Click New to set up a new mailbox or click the box number link that you want to edit in the mailboxes list If you click New skip to step 5 If you click the box number link that is not protecte...

Page 86: ...orward mailbox of Internet Fax Relay agent This agent can be combined with the Save as file or Store to e Filing agent Save as file Select this to create a Forward mailbox of the Save as file agent This agent can be combined with the Internet Fax Relay Email or Store to e Filing agent Email Select this to create a Forward mailbox of the Email agent This agent can be combined with the Save as file ...

Page 87: ...ation will be treated as Cc destination When the setting is changed from To Cc to To Bcc an e mail address entered in Cc Destination will be treated as Bcc destination P 171 Setting up Email Setting InternetFax Setting Click this to specify how the document will be sent This can be set only when creating an Internet Fax Relay agent P 87 InternetFax Setting Mailbox Relay End Terminal Report Click t...

Page 88: ...r the box number of the mailbox You can enter up to 20 characters including numbers sharp marks and asterisks You can also specify the sender s fax number to enable the Inbound Fax Routing when registering a Forward mailbox If you specify the sender s fax number here the faxes that are received from the specified fax number will be routed according to the mailbox settings The Inbound Fax Routing i...

Page 89: ...ent When you are setting up the destinations for the Email agent you can only specify the email addresses for the destinations When you are setting up the destinations for the Internet Fax Relay agent you can specify both fax numbers and email addresses for the destinations You can specify the recipients by entering their email addresses or fax numbers manually selecting recipients from the addres...

Page 90: ...set for the transmission result list recipient Email Setting Mailbox In the Email Settings page you can specify the content of email document to be sent Instructions on how to do the Email setting for the mailbox are the same as for the Email setting for a private template P 59 Email Setting Private template Save as file Setting Mailbox In the Save as file Setting page you can specify how and wher...

Page 91: ... When User Management Setting and Role Based Access Control are enabled the login page will be displayed When Role Based Access Control is enabled only users who have registration privileges can log in to the Registration tab page 2 Click the box number link that you want to delete in the mailboxes list If you click the box number link that is not protected by a password skip to step 4 If you clic...

Page 92: ...5 REGISTERING FROM COMMAND CENTER 90 Managing Mailboxes 5 Click OK The selected mailbox is deleted ...

Page 93: ...6 MANAGING COUNTERS This chapter explains the Counter tab page in COMMAND CENTER end user mode Viewing Counters 92 Displaying the total counter 92 Displaying the department counter 93 ...

Page 94: ...ng the department counter Neither an end user nor an administrator can reset counters from COMMAND CENTER However an administrator can reset the department counters from the control panel Refer to the MFP Management Guide Displaying the total counter In the Total Count menu you can display the total counter information for the copy print counter for small paper copy print counter for large paper a...

Page 95: ...ter the department code Displaying the department counter 1 Click the Counter tab and the Department menu The Department management page is displayed 2 Enter a department code for the counter to be displayed in the Department Code box and click Enter The department counter for the specified department is displayed 3 Click the department name link to display the detailed counters for the department...

Page 96: ......

Page 97: ...vice settings 180 Setting up ICC Profile settings 186 Displaying version information 193 Maintenance From COMMAND CENTER 194 About the maintenance functions 194 Uploading the software 195 Removing the client software 196 Backing up data 197 Restoring data from backup file 200 Deleting the data from local folder 202 Managing directory service 203 Setting up notification 205 Importing and exporting ...

Page 98: ...rtment code 250 Deleting the department code 252 Setting up User Management 254 Enabling department management 254 Setting up User Management setting 256 Setting role information 284 Setting up User Authentication for Scan to Email 290 ...

Page 99: ...nal ID fax number line 2 number ringer volume monitor volume completion tone volume reception mode remote RX dial type dial type line 2 line 2 mode resolution original mode exposure TTI RTI ECM discard reduction duplex print rotate sort recovery transmit journal auto print memory transmission report multi transmission report polling report and relay originator The fax settings are available only w...

Page 100: ...he notification settings An administrator can enable or disable Email notifications for specific events that occur in this equipment An administrator specifies the Email address to send a notification Importing and exporting address book data An administrator can import export the address book data in CSV format Importing and exporting department code data An administrator can import export the de...

Page 101: ... COMMAND CENTER Displaying message logs An administrator can display the message logs from COMMAND CENTER in the administrator mode Registering department codes An administrator can manage department codes from the Counter tab Setting up authentication An administrator can configure the authentication for the operations in this equipment ...

Page 102: ...iscovery feature of Windows Vista and then click the icon of this equipment This section describes how to access it by entering its URL on the address box of web browser For instruction on how to access it from the Network Map of Windows Vista see P 10 Accessing COMMAND CENTER from Network Map Windows Vista The procedure after displaying the COMMAND CENTER web page is the same as that in other OSs...

Page 103: ...box Then click Login You cannot change a name in the User Name box It must always be Admin to log in to COMMAND CENTER in the administrator mode The Setup page is displayed The default administrator password is 123456 5 Click the menu and submenu to display the desired page To log out from the administrator mode click the Logout link that is displayed in the upper right ...

Page 104: ...h drawer cannot be set from COMMAND CENTER Set from the touch panel of the equipment For instructions on how to set the paper size for each drawer refer to the Copying Guide Setting up device settings In the General submenu in the Setup menu an administrator can configure the general settings such as Device Information Energy Save Date and Time and Web General Setting Some settings may not be refl...

Page 105: ...ting up Daylight Savings Time Setting P 107 Setting up WEB General Setting 4 Click Save The confirmation dialog box appears If you want to restore the current settings without saving the changes click Cancel Clicking Cancel cannot restore the defaults This can only clear the changes and restore the current settings before saving the changes 5 Click OK to apply the changes When using Internet Explo...

Page 106: ... 8 Work Space Available This displays the percentages of available hard disk space to store the temporary data 9 Department Code Select whether the department management is enabled or disabled 10 Department Code Enforcement Select whether invalid jobs for which a department code is not specified or an invalid department code is specified are printed or stored in the invalid job list when the depar...

Page 107: ...irst when accessing the COMMAND CENTER web site for users 19 Administrative Message Enter the message about this equipment for all users to read This is displayed in the Device tab page that appears first when accessing the COMMAND CENTER web site for users 20 Administrator s Password If you want to change the administrator s password used to log in functions from the touch panel and COMMAND CENTE...

Page 108: ...between 2 and 2 hours excluding 0 hour in 30 minute increments The default setting is 1 hour 3 Dates Select the applicable period for the daylight savings time Start Select or enter the start date and time of daylight savings time End Select or enter the end date and time of daylight savings time If you change the settings during the daylight saving time period the changes will be reflected to the...

Page 109: ...99 This setting also applies to the session data of e Filing web utility Setting up Network settings In the Network submenu in the Setup menu an administrator can configure the network settings such as TCP IP Filtering IPX SPX AppleTalk Bonjour LDAP Session DNS Session DDNS Session SMB Session NetWare Session HTTP Network Service SMTP Client SMTP Server POP3 Network Service SNTP Service FTP Client...

Page 110: ... Session P 121 Setting up NetWare Session P 122 Setting up HTTP Network Service P 123 Setting up SMTP Client P 125 Setting up SMTP Server P 126 Setting up POP3 Network Service P 127 Setting up SNTP Service P 128 Setting up FTP Client P 128 Setting up FTP Server P 129 Setting up SLP P 130 Setting up SNMP Network Service P 135 Setting up Security Service P 155 Setting up Web Services Setting P 155 S...

Page 111: ...at must be used select AUTO If the network is not stable power OFF the equipment then ON 2 Address Mode Select how to set the IP address Static IP Select this to assign the static IP address manually When this is selected enter the static IP address in the IP Address box Dynamic Select this to assign the IP address using the DHCP with Auto IP addressing enabled When this is selected the IP address...

Page 112: ...ondary WINS server addresses manually in the SMB Session In that case select Disable here and set the correct primary and secondary WINS server address in the SMB Session P 119 Setting up SMB Session 6 Obtain a SMTP Server Address automatically Select Enable when you want to obtain a SMTP server address automatically using the DHCP server This setting will apply only when No AutoIP or Dynamic is s...

Page 113: ...s to this equipment Filtering can be specified with an IP address or a MAC address MAC address filtering is given priority over IP address filtering 1 Enable IP Filtering Select Enable for IP address filtering When Enable is selected access from devices on a network to which the IP address specified in IP Filtering is set is restricted under conditions set in IP Filtering Rule IP address filtering...

Page 114: ... Filtering Rule 5 MAC Address Filtering Rule Select MAC address filtering rules Permit Select this to permit access from devices on a network to which the MAC address specified in MAC Address Filtering is set Deny Select this to deny access from devices to which the specified MAC address is set 6 MAC Address Filtering Enter the MAC address of a target client computer for MAC address filtering Up t...

Page 115: ... the stateless network environment IP Address Stateless Addresses obtained from routers are displayed Up to 7 IPv6 addresses can be retained When this equipment receives a router advertisement RA from a router of which M flag configuration is 0 the DHCPv6 function is disabled If you change a router advertisement RA M flag configuration from 0 to 1 it is necessary to reboot this equipment to enable...

Page 116: ...k printing 2 Device Name Enter the device name of the equipment that will be displayed in the AppleTalk network 3 Desired Zone Enter the zone name where the equipment will connect if required If you leave an asterisk in this box the equipment will connect to the default zone Setting up Bonjour In Bonjour you can enable or disable the Bonjour networking that is available for Mac OS X 1 Enable Bonjo...

Page 117: ...is enabled this equipment will connect the registered LDAP directory services using SSL first Then if the connection fails using SSL this will connect to the registered LDAP directory service without using SSL Therefore even if you enable the Enable SSL option this equipment can also connect to an LDAP directory service that does not require the SSL The SSL port number can be set for each LDAP dir...

Page 118: ...ver Address Specify the IP address of the primary DNS server when the DNS service is enabled 3 Secondary DNS Server Address Specify the IP address of the secondary DNS server when the DNS service is enabled as you require 4 Primary DNS Server Address IPv6 Specify the IP address of the primary DNS server when the DNS service is enabled in IPv6 5 Secondary DNS Server Address IPv6 Specify the IP addr...

Page 119: ...S and the IP address is assigned using DHCP enable 006 DNS Servers and 015 DNS Domain Name in the DHCP Server s Scope Options or Server Options When using DDNS make sure the Allow dynamic updates option is set to Yes for Windows 2000 Server or Nonsecure and secure for Windows Server 2003 for the Forward Lookup Zones and Reversed Lookup Zones If the setting of Windows Server 2003 is Secure mode or ...

Page 120: ...to perform a secure DDNS session using SIG 0 To select this you must upload a key file and a private key file If any of them is uploaded the security setting will be disabled 5 Primary Login Name Enter the primary login name if the security method selected in the above setting is GSS TSIG 6 Primary Password Enter the primary password if the security method selected in the above setting is GSS TSIG...

Page 121: ...ol Version IPv4 Select this to enable IPv4 IPv6 is disabled IPv6 Select this to enable IPv6 IPv4 is disabled Switching the SMB internet protocol version requires you to restart the equipment to reflect the change When Reboot the machine appears on the control panel of the equipment turn the power OFF and then back ON 3 NetBIOS Name Enter the NetBIOS name of this equipment The equipment uses MFP NI...

Page 122: ...fy the IP address of the primary WINS server when the WINS server is used to provide the NetBIOS name in your local area network This option would be more useful to access this equipment using the NetBIOS Name from a different subnet When the Obtain a WINS Server Address automatically option is enabled in the TCP IP settings the primary and secondary WINS server address can be obtained using the D...

Page 123: ...the client side Select this to make this equipment always access a SMB server with a digital signature When the SMB Signing of SMB Server is disabled in a SMB server the communication is not allowed Digital signature isn t done for the communication for the client Select this to communicate to a SMB server without the digital signature If the SMB Signing of SMB Server is always enabled in a SMB se...

Page 124: ...e encrypted using a private key when operating COMMAND CENTER and e Filing web utility To enable SSL you must create a self signed certificate or import a server certificate in Security Service If the self signed certificate is not created or a server certificate is not imported the SSL will not work correctly For Windows Vista you need to import certificates also to the client PC P 135 Setting up...

Page 125: ...e Select this to disable the SSL for SMTP transmission Verify with imported cert Select this to enable the SSL using the imported CA certificate Accept all certificates without CA Select this to enable the SSL without using imported CA certificate When Verify with imported cert is selected you must import the CA certificate in this equipment P 135 Setting up Security Service Not all operating syst...

Page 126: ...he SMTP server using the NTLM IWA authentication Auto Select this to access the SMTP server using the appropriate authentication that this equipment detects 7 Login Name Enter the login name to access the SMTP server if the SMTP authentication is enabled 8 Password Enter the password to access the SMTP server if the SMTP authentication is enabled 9 Maximum Email InternetFax Size Select the maximum...

Page 127: ...he e filing web utility If you set it by mistake use the control panel of the equipment to change the HTTP setting and enter the correct port number 3 Email Address Enter the Email address of this equipment When this equipment works as an SMTP server it can receive all Internet Faxes and Emails that contain its domain name If the Email address of the received document matches the address you set h...

Page 128: ...Qualified Domain Name of the POP3 server when Enable POP3 Client is enabled If you use FQDN to specify the POP3 server you must configure the DNS server and enable the DNS in the DNS Session When the Obtain a POP3 Server Address automatically option is enabled in the TCP IP settings the POP3 server address can be obtained using the DHCP server P 109 Setting up TCP IP 4 Authentication Enable or dis...

Page 129: ...ction Timeout 1 180 Enter timeout period for quitting communication when no response is received from the POP3 server from 1 to 180 seconds Setting up SNTP Service In SNTP Service you can specify the SNTP server to refresh the time settings of this equipment using SNTP service 1 Enable SNTP Select whether the SNTP service is enabled or disabled When this is enabled the time settings of this equipm...

Page 130: ...e is not created or a server certificate is not imported the SSL will not work correctly For Windows Vista you need to import certificates also to the client PC P 135 Setting up Security Service P 316 Installing Certificates for a Client PC Not all operating systems support SSL for all protocols 3 Default Port Number Enter the port number for the FTP server Generally 21 is used When the same port ...

Page 131: ...n the Administration tab page and that of the Location field of Device Information on the Device tab page If you have changed the setting of the Location field on the Device tab page turn the power of this equipment and then back ON so that the printer location information of SLP will be overwritten with a new one 1 Enable SLP Select whether SLP service is enabled or disabled 2 TTL Set TTL Time To...

Page 132: ...ommunication of the printer driver also will be unavailable so that obtaining the configurations confirming the department code and obtaining the available boxes in e Filing will be disabled 3 Read Write Community Enter the SNMP Read Write community name for the SNMP access If you specify a community name other than private for the Read Write Community the applications that use MIB TWAIN driver Fi...

Page 133: ...to use CBC DES 11 SNMP V3 Trap Privacy Password Enter a privacy password 12 Enable Authentication Trap Select whether to send SNMP Traps when this equipment is accessed using SNMP V1 V2 from a different read community 13 Enable Alerts Trap Select whether to send SNMP V1 V2 Traps when an alert condition occurs 14 IP Trap Address 1 to 10 Enter the IP address where the SNMP Traps will be sent You can...

Page 134: ... HMAC SHA Select this to use HMAC SHA Authentication Password Enter an authentication password within 31 characters Privacy Protocol Select a protocol for data encryption None Select this not to encrypt data CBC DES Select this to use CBC DES Privacy Password Enter a user information password within 31 characters Permissions Level Select a level for permitting access from SNMP users Read Only Sele...

Page 135: ...st and then click Export The Export SNMP User Information page is displayed When Please save the Network settings before exporting the user information appears click Save on the Network submenu page and then perform exporting 2 Right click the link for the file name of user information to be exported and then select Save Target As The Save As dialog box appears 3 Specify a directory to which the i...

Page 136: ...n Be sure that the administrator accesses this equipment from only one computer to export Deleting SNMP user information 1 Select the check box of SNMP user information that you want to delete from the SNMP user information list and then click Delete Click Delete All to delete all the SNMP user information The confirmation dialog box appears 2 Click OK The SNMP user information is deleted 3 Click ...

Page 137: ... set the IEEE802 1X authentication with the RADIUS server for the optional Wireless LAN Module GN 1050 you must install user certificate and CA certificate as required This equipment supports CA certificate and User certificate that are in the following encoding formats CA Certificate DER BASE64 PKCS 7 User Certificate PKCS 12 This equipment supports md5RSA and sha1RSA certificate Make sure to use...

Page 138: ...s 1 In the HTTP Network Service FTP Server and IPP Print if you create a self signed certificate for the equipment you need to install the self signed certificate to the client PC If you select to install an imported server certificate to the equipment also install the CA certificate to the client PC 2 For Windows Vista XP 2000 you can enable SSL by installing certificates only in the equipment In...

Page 139: ...ion code using two alphabet characters State or Province Name Enter the State or Province Name Locality Name Enter the city or locality name Organization Name Enter the company name or organization name Organizational Unit Name Enter the department name or organization unit name Common Name Enter your name or common name Email Address Enter your Email address Enter the following items in Common Na...

Page 140: ... Network submenu page to save the changes 6 Right click the link for the file name of the certificate to be exported in Server Certificate pem format or Client Certificate pfx format and then select Save Target As The Save As dialog box appears If a client certificate is not installed yet enter a password in Password and then click Create New File to create a new certificate 7 Specify a directory ...

Page 141: ...t Deleting a self signed certificate If you delete a self signed certificate registered to this equipment while SSL for HTTP network service is enabled access to the COMMAND CENTER is refused In this case temporarily disable SSL for HTTP network service on the control panel and then access COMMAND CENTER Then enable SSL again For HTTP network service see the following page For instructions on how ...

Page 142: ... to close the Security Service page 5 Click Save on the Network submenu page Installing an imported server certificate 1 Click Security Service The Security Service page is displayed 2 Click Browse of Import in Certificate for Server Protocols to select a server certificate file and then click Upload The alert message dialog box appears ...

Page 143: ...d then click Previous to close the Security Service page 5 Click Save on the Network submenu page 6 Before enabling SSL you must input the password for the imported server certificate from the touch panel of the equipment For instructions on how to input the password refer to the following section in the MFP Management Guide Chapter 2 SETTING ITEMS ADMIN Setting Network Functions Decrypting the us...

Page 144: ... Service page is displayed 2 Click DELETE of Import in Certificate for Server Protocols The confirmation dialog box appears If the server certificate has not been imported you cannot delete the server certificate 3 Click OK The server certificate is deleted 4 Click Previous to close the Security Service page 5 Click Save on the Network submenu page ...

Page 145: ... Address in Common Name in the Certificate Select whether to use the IP address or FQDN as the address of this equipment to be entered in the Common Name box of the certificate Timeout Enter a timeout period for quitting communication when no response is received from the CA server CA Challenge Enter the CA challenge If FQDN is used in CA Server address you need to configure a DNS server and enabl...

Page 146: ...ELETE of SCEP in Certificate for Server Protocols Then click Request to install a new CA certificate 4 Click Save on the Network submenu page 5 Then you can enable SSL for the following network settings P 115 Setting up LDAP Session P 122 Setting up HTTP Network Service P 123 Setting up SMTP Client P 126 Setting up POP3 Network Service P 128 Setting up FTP Server P 155 Setting up Web Services Sett...

Page 147: ... then click DELETE The confirmation dialog box appears A CA certificate already installed automatically will be deleted as well as the server certificate Deleting is disabled when no server certificate has been installed automatically 3 Click OK The server certificate is deleted 4 Click Previous to close the Security Service page 5 Click Save on the Network submenu page ...

Page 148: ...is equipment supports md5RSA and sha1RSA certificate Make sure to use the certificate in these algorithms P 146 Installing an imported user certificate for IEEE802 1X P 148 Deleting an imported user certificate for IEEE802 1X P 149 Installing user certificate for IEEE802 1X automatically P 152 Deleting user certificate for IEEE802 1X installed automatically Installing an imported user certificate ...

Page 149: ...t message shows that you must enter a password on the control panel of this equipment after you installed the user certificate for IEEE802 1X The certificate cannot be used unless you enter a password 4 Select either of CRL file PEM and CRL file DER according to the format of a CRL file that you want to use Then click Browse to specify a CRL file to be uploaded and then click Upload The selected C...

Page 150: ...fer to the following section in the MFP Management Guide Chapter 2 SETTING ITEMS ADMIN Setting Network Functions Decrypting the user certificate 9 Then you can enable IEEE802 1X for the following settings For instructions on how to enable the IEEE802 1X refer to the following section in the MFP Management Guide Chapter 2 SETTING ITEMS ADMIN IEEE 802 1X Authentication Setting Deleting an imported u...

Page 151: ...ppears If the user certificate for IEEE802 1X has not been imported you cannot delete the user certificate for IEEE802 1X 3 Click OK The user certificate for IEEE802 1X is deleted 4 Click Previous to close the Security Service page 5 Click Save on the Network submenu page Installing user certificate for IEEE802 1X automatically 1 Click Security Service The Security Service page is displayed ...

Page 152: ...munication when no response is received from the CA server CA Challenge Enter the CA challenge If FQDN is used in CA Server address you need to configure a DNS server and enable DNS settings If FQDN is selected in MFP s Address in Common Name in the Certificate the IP address of this equipment must be registered in the DNS server A server certificate is installed If you want to enable CRL Verifica...

Page 153: ...ally as well as a user certificate for IEEE802 1X If a CA certificate is already installed delete the existing one by clicking DELETE of SCEP in Certificate for IEEE802 1X Then click Request to install a new CA certificate 6 Click Save on the Network submenu page 7 Then you can enable IEEE802 1X for the following settings For instructions on how to enable the IEEE802 1X refer to the following sect...

Page 154: ... displayed 2 Select SCEP Automatic in Certificate for IEEE802 1X and then click DELETE The confirmation dialog box appears A CA certificate already installed automatically will be deleted as well as the server certificate Deleting is disabled when no server certificate has been installed automatically 3 Click OK The user certificate for IEEE802 1X is deleted 4 Click Previous to close the Security ...

Page 155: ...ficates IPsec certificates or IEEE802 1X certificates will not be counted into the number of registrations They can be registered separately Installing a CA certificate 1 Click Security Service The Security Service page is displayed 2 Select the encryption of the CA certificate and click Browse to select a CA certificate file Then click Upload The CA certificate is installed 3 Click Previous to cl...

Page 156: ...e The Security Service page is displayed 2 Select the CA certificate file that you want to delete in the Certificate File list and click DELETE The confirmation dialog box appears 3 Click OK The self signed certificate is deleted 4 Click Previous to close the Security Service page 5 Click Save on the Network submenu page ...

Page 157: ...quipment or a client computer For the details see the following pages P 135 Setting up Security Service P 316 Installing Certificates for a Client PC 3 Printer Name Assign the printer name for this equipment 4 Printer Information Assign the printer information for this equipment 5 Web Services Scan Select whether the Web Services Scan is enabled or disabled 6 Scanner Name Assign the scanner name f...

Page 158: ...ION CLEAR button on the control panel or after an Auto Clear time period Setting the copier setting 1 Access COMMAND CENTER in the administrator mode P 100 Accessing COMMAND CENTER Administrator Mode 2 Click the Setup menu and Copier submenu The Copier submenu page is displayed 3 In the Copier submenu page set the copier settings as required To set the Copier Settings see the following P 157 Setti...

Page 159: ... this to set the Auto mode as the default exposure for color copy The Auto mode automatically detects the density of the original to make copies at the optimum exposure Manual Select this to set the Manual mode as the default exposure for color copy The manual mode allows you to manually specify the density of the original 5 Exposure for Black Select the type of image density for black and white c...

Page 160: ...to 2 sided Mode Select how the 2 sided mode initially applies to copy settings when originals are set in the Automatic Document Feeder OFF Select this to initially apply 1 1 SIMPLEX when originals are set in the Automatic Document Feeder One sided Double sided Select this to initially apply 1 2 DUPLEX when originals are set in the Automatic Document Feeder Double sided Double sided Select this to ...

Page 161: ...on dialog box appears If you want to restore the current settings without saving the changes click Cancel Clicking Cancel cannot restore the defaults This can only clear the changes and restore the current settings before saving the changes 5 Click OK to apply the changes When using Internet Explorer the changes may not be reflected on the Fax page immediately after changing the settings and click...

Page 162: ...4 Monitor Volume Select the volume of the line monitor during transmission 5 Completion Tone Volume Select the volume of the line monitor when completing the print for received fax 6 Reception Mode Select how this equipment activates when a fax is received Auto Select this to automatically receive incoming originals when the bell rings Select this when the line is being used exclusively by the fax...

Page 163: ...ropriate for sending text originals Text Photo Select this to set the Text Photo mode as the default image quality mode appropriate for sending originals containing both text and photos Photo Select this to set the Photo mode as the default image quality mode appropriate for sending photo originals 12 Exposure Select the default exposure for sending faxes Select Auto to automatically apply the ide...

Page 164: ...en the multi address transmission is not successfully completed Always Print 1st Page Image Select this to print a multi address transmission report with the 1st page image for each multi address transmission completed ON ERROR Print 1st Page Image Select this to print a multi address transmission report with the 1st page image only when the multi address transmission is not successful 24 Polling ...

Page 165: ...ting the Save as file settings 1 Access COMMAND CENTER in the administrator mode P 100 Accessing COMMAND CENTER Administrator Mode 2 Click the Setup menu and Save as file submenu The Save as file submenu page is displayed 3 In the Save as file submenu page set the Save as file settings as required In the Save as file submenu page you can set the following P 164 Setting up Local Storage Path P 164 ...

Page 166: ... where files are stored when files are saved to the local folder by the Save as file functions 2 Send scanned documents to a sub folder in the storage path Select this to save the files in the sub folder that is named as Group Number Group Name Template Name 3 Send scanned documents directly to the storage path Select this to save the files directly in the storage path Setting up Storage Maintenan...

Page 167: ...stination for Remote 2 When you select Use Network Folder Destination Allow the following network folder to be used as a destination is initially selected for both Remote 1 and Remote 2 and other boxes are left blank If you do not change the settings an error message asking you to enter the required items to complete the setup will be displayed 3 Default file path Select the destination that will ...

Page 168: ...h day hour minute second and random number 2 digits and 0 are added 3 Page Number Format Select the number of digits of a page number applied to Page of the file name selected in File Name Format from 3 to 6 The added information will also be applied to file names attached to Emails 4 Sub ID Format This equipment automatically adds a sub ID identification number to the name of a file that you are ...

Page 169: ...s into a network folder specified in REMOTE 1 2 or not This setting is applied only when Use Network Folder Destination of the Destination setting for the Remote 1 or the Remote 2 is checked 1 User name and password of the device User names and passwords being logged in will not be applied Enter LOGIN USER NAME and PASSWORD as required when scanning originals 2 Login User Name and Password Templat...

Page 170: ...e Context name when NDS is available When you select NetWare TCP IP as the protocol enter the IP address of the NetWare file server 4 Port Number Command If you select FTP as the protocol enter the port number to be used for controls Generally is entered for the control port When is entered the port number that is set at FTP Client in the Network submenu of the Setup menu will be used Change this ...

Page 171: ...rotocol 2 Server Name When you select FTP as the protocol enter the FTP server name or IP address where an N W Fax document will be sent For example to send an N W Fax document to the ftp 192 168 1 1 user scanned FTP folder in the FTP server enter 192 168 1 1 in this box You can specify the directory at the Network Path box When you select NetWare IPX SPX as the protocol enter the NetWare file ser...

Page 172: ...e needed for Scan to Email operations Some settings may not be reflected on the touch panel immediately after saving them The settings will be updated by pressing the FUNCTION CLEAR button on the control panel or after an Auto Clear time period Setting the Email settings 1 Access COMMAND CENTER in the administrator mode P 100 Accessing COMMAND CENTER Administrator Mode 2 Click the Setup menu and E...

Page 173: ...and clicking Save If that happens click the Email submenu to refresh the page Setting up Email Setting You can specify the file format fragment message size and default body strings that apply to the Scan to Email documents 1 From Address Enter the email address of this equipment You must enter the email address in the From Address box to enable the Scan to Email unless the From Address is being d...

Page 174: ...ile size over quality of image XPS Multi Select this to save scanned images as a Multi page XPS file XPS Single Select this to save scanned images separately as Single page XPS files JPEG Select this to save scanned images as JPEG files Files saved in an XPS format can be used in Windows Vista or Windows XP SP2 Windows Server 2003 SP1 or later versions with Net Framework 3 0 installed 6 Number of ...

Page 175: ...Clear time period Setting the InternetFax settings 1 Access COMMAND CENTER in the administrator mode P 100 Accessing COMMAND CENTER Administrator Mode 2 Click the Setup menu and InternetFax submenu The InternetFax submenu page is displayed 3 In the InternetFax submenu page set the Internet Fax settings as required To set the InternetFax Setting see the following P 174 Setting up InternetFax Settin...

Page 176: ...e From Address is being determined automatically by the User Management Setting For more information about User Management Setting see the following section P 254 Setting up User Management 2 From Name Enter the name of this equipment 3 Message Header Inbound FAX Routing Select TTI to be used as a subject when the received InternetFax is forwarded 4 Number of Retry Enter the number of times to ret...

Page 177: ...s and the printer options needed for the raw print jobs Setting the printer settings 1 Access COMMAND CENTER in the administrator mode P 100 Accessing COMMAND CENTER Administrator Mode 2 Click the Setup menu and Printer submenu The Printer submenu page is displayed 3 In the Printer submenu page set the Printer settings as required To set the Printer Settings see the following P 176 Setting up Gene...

Page 178: ... period until they are deleted 2 LT A4 LD A3 Select whether printing a document intended for one paper size can be printed on paper of a different size For example you can print a document set up for Letter size on A4 paper When disabled this equipment will prompt users for the correct paper size 3 Wide A4 Mode for PCL Select whether the width of the printable area of copy paper is widened or not ...

Page 179: ...apled 6 Raw jobs Default Output Tray Select the default output tray that applies to a raw job A banner page that is created by NetWare UNIX and Windows operating systems also will be outputted to the tray set here 7 PCL Form Line Enter the number of lines printed per page 8 PCL Font Pitch Enter the font pitch when the selected font number represents a fixed pitch scalable font Pitch is measured by...

Page 180: ...ting both sides of a Raw print job whose total page number is odd Select Enable to print the last page on the same side back as the other odd number pages Select Disable to print it on the same side front as even number pages Setting up Raw Job Setting In Raw Job Setting you can add up to 16 LPR queue names and specify the raw job setting for each queue These queue names can be used when printing ...

Page 181: ...ts a proportionally spaced scalable font The Font Size option allows you to determine the point size height of the default font PCL Font Number Enter the font number of the internal PCL font to be used as the default font for printing You can check the font numbers and internal PCL fonts in the Internal PCL Font List Refer to the Printing Guide for the font number of internal PCL fonts PCL Line Te...

Page 182: ...leted Setting up Print Service settings In the Print Service submenu in the Setup menu an administrator can configure such print services as Raw TCP Print LPD Print IPP Print FTP Print NetWare Print and Email Print Setting the Print Service settings 1 Access COMMAND CENTER in the administrator mode P 100 Accessing COMMAND CENTER Administrator Mode 2 Click the Setup menu and Print Service submenu T...

Page 183: ...etting up NetWare Print P 185 Setting up Email Print 4 Click Save The confirmation dialog box appears If you want to restore the current settings without saving the changes click Cancel Clicking Cancel cannot restore the defaults This can only clear the changes and restore the current settings before saving the changes 5 Click OK to apply the changes When using Internet Explorer the changes may no...

Page 184: ...t to change the HTTP setting and enter the correct port number 3 Enable Raw bi directional Enable or disable Raw bi directional communication Setting up LPD Print In LPD Print you can set the LPD print options to enable the LPD LPR print service 1 Enable LPD Enable or disable LPD print service 2 Port Number If enabling the LPD enter the LPD port number Generally 515 is used When the same port numb...

Page 185: ...the URL for IPP printing This URL should be set as the print port when users set up the printer driver for IPP printing 5 Enable SSL Enable or disable SSL for IPP printing To enable SSL you must create a self signed certificate or import a server certificate in Security Service If the self signed certificate is not created or a server certificate is not imported the SSL will not work correctly P 1...

Page 186: ... for IPP printing 11 User Name Enter the user name when the Authentication option is enabled Users must enter this user name to create an IPP queue on the client computers 12 Password Enter the password when the Authentication option is enabled Users must enter this password to create an IPP queue on the client computers password has been set as the default Setting up FTP Print In FTP Print you ca...

Page 187: ...o print the body message when receiving Email print jobs 3 Maximum Email Body Print Enter the maximum number of pages to print the body strings of the received Email print job You can enter between 1 to 99 4 Enable Print Email Error Select whether to print the report when an error occurs for Email printing 5 Enable Email Error Forward Select whether to send an error message to an administrative Em...

Page 188: ...yed 3 In the ICC Profile submenu page set the ICC Profile settings as required In the ICC Profile submenu page you can set the following P 187 Setting up RGB Source Profile P 191 Setting up CMYK Source Profile P 192 Setting up Destination Profile 4 Click Save The confirmation dialog box appears When you click Cancel before saving the setting changes the changes will not be saved and they will retu...

Page 189: ...lt Profile Select an RGB source profile to be displayed as a default setting of the color profile setting of a printer driver You can select among the RGB source profiles already registered in this equipment 2 Maintenance Click this to perform maintenance of RGB source profiles The Maintenance RGB Source Profile page is displayed as you click this You can import profiles into this equipment or exp...

Page 190: ...of the selected profile and then click Import Importing starts 3 The profile is imported Click Previous to close the Maintenance Profile page The imported profile is added to the Current Profiles list Exporting profiles 1 Click Maintenance of the desired profile The Maintenance Profile page of the selected profile is displayed ...

Page 191: ... in the Current Profiles list and then click Export The Export page is displayed Profiles registered as a factory default cannot be exported 3 Right click the File Name link of a profile to be exported and select Save Target As The Save As dialog box appears 4 Select the file location and click OK 5 Click Close to close the Export page ...

Page 192: ...Profile page Deleting profiles 1 Click Maintenance of the desired profile The Maintenance Profile page of the selected profile is displayed 2 Select the desired profile in the Current Profiles list and then click Delete The confirmation dialog box appears Profiles registered as a factory default cannot be deleted ...

Page 193: ...MYK data 1 Default Profile Select an CMYK source profile to be displayed as a default setting of the color profile setting of a printer driver You can select among CMYK source profiles already registered in this equipment 2 Maintenance Click this to perform maintenance of CMYK source profiles The Maintenance CMYK Source Profile page is displayed as you click this You can import profiles into this ...

Page 194: ...ion Profile page is displayed as you click this You can import profiles into this equipment or export or delete the registered profiles For the details see the following P 187 Importing profiles P 188 Exporting profiles P 190 Deleting profiles 3 Rendering Intent Select how you perform color space conversion when you print images Perceptual This is recommended for photo images Relative Colorimetric...

Page 195: ...nformation of this equipment The version information can be displayed from the Setup menu Displaying the version information 1 Access COMMAND CENTER in the administrator mode P 100 Accessing COMMAND CENTER Administrator Mode 2 Click the Setup menu and Version submenu The Version submenu page is displayed 3 In the Version submenu page you can confirm the version information of the system software ...

Page 196: ... the data after updating the system software or hard disk replacement etc P 200 Restoring data from backup file Deleting files stored in the hard disk An administrator can delete scanned data transmission data and reception data in the hard disk This maintenance feature must be operated periodically to maintain the hard disk space for future operation P 202 Deleting the data from local folder Regi...

Page 197: ...trator mode P 100 Accessing COMMAND CENTER Administrator Mode 2 Click the Maintenance menu and Upload Software submenu The Upload Software submenu page is displayed 3 Select the language of the software that you are going to upload in the Language box 4 Select the software that you are going to upload in the Upload Files box Driver Files Select this to upload the setup files Macintosh PPD Files Se...

Page 198: ...n the Client Utilities CD ROM Point And Print Contact your dealer for information about obtaining these files 7 Click Upload Specified files are uploaded in this equipment Removing the client software You can remove client software from COMMAND CENTER so that it can no longer be installed from COMMAND CENTER The printer drivers for Point and Print that had been uploaded cannot be deleted However y...

Page 199: ...hard disk to secure the data from hard disk collapse Backing up data as files Before backing up the data confirm that there is no print job no scan job and no fax job The backup files cannot be created if there are any jobs that have been processed If backing up the data takes a long time perform backing up the data after the equipment turns into the Sleep Auto Shut Off mode The password for the t...

Page 200: ...he Combined Backup section to create a backup file of all data The Password dialog box appears 4 Enter the password of the backup file The backup file will be created and the backup file name and file size will be displayed Passwords must be from 1 to 128 one byte alphanumeric characters Creating the backup file may takes a few minutes depending on the file size ...

Page 201: ...t All Files in the Save as type box It is recommended to save the backup file as it is named If you change the file name the equipment cannot restore the data from the backup files The file name of each backup data must be the following name Address Book BACKUP_ADDR date tbf MailBoxes BACKUP_MBOX date enc Template BACKUP_TEMP date enc Combined Backup BACKUP_ALL date enc 7 Click Save The backup fil...

Page 202: ...ring data from backup files Before restoring the data from backup files confirm that there is no print job no scan job and no fax job The backup files cannot be restored if there are any jobs that have been processed If restoring the data takes a long time restore the data after the equipment turns into the Sleep Auto Shut Off mode 1 Access COMMAND CENTER in the administrator mode P 100 Accessing ...

Page 203: ...ice name of the selected backup file will be displayed If the backup file name is not the name as shown below the equipment cannot restore the data from the backup files Address Book BACKUP_ADDR date tbf MailBoxes BACKUP_MBOX date enc Template BACKUP_TEMP date enc Combined Backup BACKUP_ALL date enc 5 Click Upload The Restore screen displays the backup file information ...

Page 204: ...ENTER in the administrator mode P 100 Accessing COMMAND CENTER Administrator Mode 2 Click the Maintenance menu and Delete Files submenu The Delete Files submenu page is displayed 3 Select the check box of data that you want to delete and click Delete Files Scan The data in the SCAN folder within the FILE_SHARE folder of this equipment that are stored by Scan to File operations will be deleted Tran...

Page 205: ...service that allows users to search for Email addresses in the LDAP server Setting up the directory service 1 Access COMMAND CENTER in the administrator mode P 100 Accessing COMMAND CENTER Administrator Mode 2 Click the Maintenance menu and Directory Service submenu The Directory Service submenu page is displayed 3 Click New to add a new Directory Service or click the Directory Service name link t...

Page 206: ...ing the login authentication Plain Select this to access the LDAP server using the plain authentication Simple Bind Select this to access the LDAP server using the Simple Bind authentication Search Base Enter the search root suffix When you configure the Active Directory in Windows server make sure to enter this option User Name Enter the user name to access the LDAP server if required Password En...

Page 207: ...and receive Email notification of system errors To enable the Email notification the Email settings in the Setup menu page must be configured correctly P 170 Setting up Email settings Setting up the notifications of system errors and events 1 Access COMMAND CENTER in the administrator mode P 100 Accessing COMMAND CENTER Administrator Mode 2 Click the Maintenance menu and Notification submenu The N...

Page 208: ...ied When these are enabled the following events will be notified When Send email when an error occurs is enabled Failed to print or store the received fax or Internet Fax jobs When Error is enabled Failed to receive the Internet Fax jobs from the POP3 server When Warning is enabled Deleting files automatically by Storage Maintenance is successfully done When Information is enabled Deleting manuall...

Page 209: ... will be notified Failed to acquire resource Failed to delete files automatically by Storage Maintenance 7 In Scan Notification Events select the check boxes for scanning status to be notified When these are enabled the following events will be notified When Warning is enabled Deleting files automatically by Storage Maintenance is successfully done When Information is enabled Deleting manually by ...

Page 210: ...ling operations are successfully performed set the notification settings in the box properties using the e Filing web utility For instructions on how to set the notification settings in the box properties using the e Filing web utility refer to the e Filing Guide 9 In Fax Received Forward Notification Events select the check boxes for the events to be notified Even if you select the items in the F...

Page 211: ...characters as described below the address data will not be imported First Name 32 characters Last Name 32 characters Email Address 192 characters Tel Number 128 characters Company 64 characters Department 64 characters The group data are not included in the imported address book data Importing the address book data from a CSV file Before importing the address book data confirm that there is no pri...

Page 212: ...ep 5 The Import Method page is displayed 4 Select the desired import method and then click Save Addition Select this to add the imported address book data into the address book already registered in this equipment Overwrite Select this to delete all the address book data registered in this equipment and replace them with the imported address book data The Import Method page is closed 5 Click Brows...

Page 213: ...address book data You can export address information for use in another COMMAND CENTER address book or another address book program The group data are not included in the exported address book data Exporting the address book data as a CSV file 1 Access COMMAND CENTER in the administrator mode P 100 Accessing COMMAND CENTER Administrator Mode 2 Click the Maintenance menu and Export Clear Log submen...

Page 214: ...k area The CSV file name will be displayed If you previously exported address book data the exported file link and information are displayed in the Address Book area You can click the link to save the previously exported file 4 Right click the File Name link and select Save Target As The Save As dialog box appears ...

Page 215: ...ce From COMMAND CENTER 213 7 COMMAND CENTER ADMINISTRATOR MODE 5 Select the file location and select All Files or csv Document in the Save as type box 6 Click Save The CSV file that contains the address book data is saved in the selected location ...

Page 216: ...comma delimited CSV file and created in a suitable format for the department code data Importing the department code data from a CSV file Before importing the department code data confirm that there is no print job no scan job and no fax job The department code data cannot be imported if there are any jobs that have been processed If importing the department code data takes a long time restore the...

Page 217: ...are imported to the department code information Exporting the department code data You can export department code information for use in other equipment Exporting the department code data as a CSV file 1 Access COMMAND CENTER in the administrator mode P 100 Accessing COMMAND CENTER Administrator Mode 2 Click the Maintenance menu and Export Clear Log submenu The Export Clear Log submenu page is dis...

Page 218: ... information with counter information click Create New File in the Department Code Export Department Information All Counters area The CSV file name will be displayed If you previously exported department code data the exported file link and information are displayed in the Department Code Export area You can click the link to save the previously exported file 4 Right click the File Name link and ...

Page 219: ... the selected location Exporting the logs journals and counters An administrator can export logs and journals in this equipment as CSV files Before clearing them you can save the logs journals and counters as files Exporting the logs journals and counters as a CSV file 1 Access COMMAND CENTER in the administrator mode P 100 Accessing COMMAND CENTER Administrator Mode 2 Click the Maintenance menu a...

Page 220: ...Print Job Log Fax Transmission Journal Fax Reception Journal Scan Log Message Log Department Code Small Large Counter The CSV file name will be displayed If you previously exported data the exported file link and information are displayed in each area You can click the link to save the previously exported file 4 Right click the File Name link and select Save Target As The Save As dialog box appear...

Page 221: ...nals data is saved in the selected location Clearing the logs and journals An administrator can clear logs and journals in this equipment This maintenance procedure is recommended periodically to maintain the hard disk Clearing the logs and journals 1 Access COMMAND CENTER in the administrator mode P 100 Accessing COMMAND CENTER Administrator Mode 2 Click the Maintenance menu and Export Clear Log ...

Page 222: ...7 COMMAND CENTER ADMINISTRATOR MODE 220 Maintenance From COMMAND CENTER 3 Click Clear Log in the area of logs or journals that you want to clear The selected logs are cleared ...

Page 223: ... Accessing COMMAND CENTER Administrator Mode 2 Click the Maintenance menu and Reboot submenu The Reboot submenu page is displayed 3 Click Reboot to reboot the equipment The confirmation dialog box appears 4 Click OK The equipment is restarted While the equipment is being restarted the network will not be available COMMAND CENTER will display Please restart after waiting a few minutes The touch pan...

Page 224: ...ceived Forward can be registered only when the optional Fax Unit is installed Registering public templates Administrators create and maintain public templates and manage the public template group Users can display and use public templates but cannot modify them The public group can contain up to 60 public templates Typically these are general purpose templates available to all users COMMAND CENTER...

Page 225: ...t a public template that has not been defined the Template Properties page to select agents is displayed Skip to step 5 If you select a defined private template the Template Properties page is displayed Go to the next step You can change the template list view by clicking on either Panel View or List View If you know which public template you want to define or edit click the number of the public t...

Page 226: ...estinations This agent can also be combined with the Save as file agent or Store to e Filing agent Fax InternetFax Select this to create a fax and Internet Fax transmission template This agent can be combined with the Save as file agent Scan Select this to create a scan template combined with the Email Save as file and Store to e Filing agents When you select this select the agent from Email Save ...

Page 227: ...ting To Destination and Bcc Destination are displayed When the setting above is changed from To Bcc to To Cc an e mail address entered in Bcc Destination will be treated as Cc destination When the setting is changed from To Cc to To Bcc an e mail address entered in Cc Destination will be treated as Bcc destination P 170 Setting up Email settings InternetFax Setting Click this to specify how the do...

Page 228: ... notification settings for the template Instructions on how to set the Panel Setting for public templates are the same as for setting the Panel Setting for private templates P 49 Panel Setting Private template Destination Setting Public template In the Recipient List page you can specify the destinations to which the fax Internet Fax or Scan to Email document will be sent When you are setting dest...

Page 229: ...ngs for public templates are the same as for setting the Email settings for private templates P 59 Email Setting Private template Save as file Setting Public template In the Save as file Setting page you can specify how and where a scanned file will be stored Instructions on how to set the Save as file settings for public templates are the same as for setting the Save as file settings for private ...

Page 230: ...ng procedure Resetting a public template 1 Access COMMAND CENTER in the administrator mode P 100 Accessing COMMAND CENTER Administrator Mode 2 Click the Registration menu and Public Template submenu The Public Template submenu page is displayed 3 From the templates list click the template icon that you want to reset If the templates list is displayed in the List view click the template name that y...

Page 231: ...MMAND CENTER ADMINISTRATOR MODE Registering From COMMAND CENTER 229 7 COMMAND CENTER ADMINISTRATOR MODE 4 Click Reset Template The confirmation dialog box appears 5 Click OK The selected template is cleared ...

Page 232: ...ollowing procedure Resetting all public templates 1 Access COMMAND CENTER in the administrator mode P 100 Accessing COMMAND CENTER Administrator Mode 2 Click the Registration menu and Public Template submenu The Public Template submenu page is displayed 3 Click Reset The confirmation dialog box appears 4 Click OK The group information is cleared ...

Page 233: ... fax and Internet Faxes can be transmitted to the following destinations Other Internet Fax devices Local folder in this equipment or network folders Email addresses Box in this equipment Registering the Fax or Internet Fax received forward The procedures to register the Fax Received Forward and Internet Fax Received Forward are almost the same 1 Access COMMAND CENTER in the administrator mode P 1...

Page 234: ...k folders This agent can be combined with another agent Email Select this to transmit received fax or Internet Faxes to Email addresses This agent can be combined with the Save as file agent or Store to e Filing agent Store to e Filing Select this to transmit received fax or Internet Faxes to e Filing This agent can be combined with another agent The image quality of the file that is stored by Sav...

Page 235: ... Destination will be treated as Bcc destination P 170 Setting up Email settings InternetFax Setting Click this to specify how the document will be sent This can be set only when registering the Internet Fax agent P 238 InternetFax Setting Fax Internet Fax Received Forward Email Setting Click this to specify how the document will be sent This can be set only when registering the Email agent P 239 E...

Page 236: ...ally P 235 Selecting the recipients from the address book P 236 Selecting the groups from the address book P 237 Searching for recipients in the LDAP server P 238 Removing the contacts from the recipient list Entering the recipients manually Using this method you can add a recipient manually to the Recipient List 1 Click Destination Setting to open the Recipient List page 2 Click New The Contact P...

Page 237: ...k The Address Book page is displayed 3 Select the Email check boxes of users you want to add as the recipients If you want to sort the recipient list by a specific group select the desired group name in the Group box 4 Click Add The selected recipients are added to the Recipient List page You can remove contacts that you have added to the recipient list before saving the destination settings P 238...

Page 238: ...st page 2 Click Address Group The Address Group page is displayed 3 Select the Group check boxes that contain the desired recipients 4 Click Add All recipients in the selected groups are added to the Recipient List page You can remove contacts that you have added to the recipient list before saving the destination settings P 238 Removing the contacts from the recipient list 5 Click Save The contac...

Page 239: ...x and enter the search terms in the boxes that you want to search If you select the model name of this equipment at the Directory Service Name box you can search for recipients in the address book of this equipment COMMAND CENTER will search for recipients who match the entries Leaving the box blank allows wild card searching However you must specify at least one 4 Click Search COMMAND CENTER will...

Page 240: ...ontacts from the recipient list 1 Select the check boxes of the contacts that you want to remove from the recipient list and click Delete The selected contacts are removed from the recipient list 2 Click Save InternetFax Setting Fax Internet Fax Received Forward In the Internet Fax Setting page you can specify the content of the Internet Fax to be sent Instructions on how to set the Internet Fax s...

Page 241: ...i page TIFF file TIFF Single Select this to save scanned images separately as Single page TIFF files PDF Multi Select this to save scanned images as a Multi page PDF file PDF Single Select this to save scanned images separately as Single page PDF files XPS Multi Select this to save scanned images as a Multi page XPS file XPS Single Select this to save scanned images separately as Single page XPS f...

Page 242: ...cryption setting refer to the MFP Management Guide Encryption Level Select the desired encryption level 40 bit RC4 Select this to set an encryption level to the one compatible with Acrobat 3 0 PDF V1 1 128 bit RC4 Select this to set an encryption level to the one compatible with Acrobat 5 0 PDF V1 4 128 bit AES Select this to set an encryption level to the one compatible with Acrobat 7 0 PDF V1 6 ...

Page 243: ... as Single page TIFF files PDF Multi Select this to save scanned images as a Multi page PDF file PDF Single Select this to save scanned images separately as Single page PDF files XPS Multi Select this to save scanned images as a Multi page XPS file XPS Single Select this to save scanned images separately as Single page XPS files If the Forced Encryption setting is enabled only the PDF Multi and th...

Page 244: ...the accessibility feature 3 Destination Use local folder Select this to save a received document to the FILE_SHARE folder 4 Destination Remote 1 Select this check box to save a scanned file to Remote 1 How you can set this item depends on how your administrator configured the Save as file settings If Remote 1 does not allow you to specify a network folder you can only select Use Administrator Sett...

Page 245: ...mote 2 How you can set this item depends on how the 2nd Folder has been set up in the Save as file submenu in the Setup menu If Remote 2 does not allow you to specify a network folder you can only select Use Administrator Settings The protocol and the network path are displayed below this item If Remote 2 allows you to specify a network folder you can select Use User Settings and specify the netwo...

Page 246: ... number for e Filing Box Number Enter the Box number where a received document will be stored Password Enter the password if the specified Box number requires a password Retype Password Enter the password again if the specified Box number requires a password 2 Folder Name Enter the name of the folder where a received document will be stored 3 Document Name Display how the a received document will ...

Page 247: ...can display the system message logs such as job information warnings and errors You can use this page to find out what happened and troubleshoot the problem Displaying the message logs 1 Access COMMAND CENTER in the administrator mode P 100 Accessing COMMAND CENTER Administrator Mode 2 Click the Message Log menu The Message Log menu page is displayed ...

Page 248: ...or delete this default department group The department management function does not support Web Services Scan Web Services Scan jobs performed while the department management is enabled are always counted as Undefined Department Names You can also manage the department code in the Department Management submenu page that can be displayed by clicking the User Management tab and Department Management...

Page 249: ...in the Department Code box and click Enter The Department Management page is displayed 3 Click the department name link to display more details 4 The Department Information page opens Clearing the department counters An administrator can clear the counters for all departments at one time or individually Clearing all department counters 1 Click the Counter tab and the Department menu The Department...

Page 250: ...Click Reset All Counters The confirmation dialog box appears 4 Click OK The department counters for all departments are cleared Clearing the department counter for a department 1 Click the Counter tab and the Department menu The Department management page is displayed 2 Enter the administrator password in the Department Code box and click Enter The Department Management page is displayed ...

Page 251: ...OMMAND CENTER ADMINISTRATOR MODE 3 Click the department name link whose counter you want to clear The Department Information page opens 4 Click Reset Counters The confirmation dialog box appears 5 Click OK The department counters for the selected department are cleared ...

Page 252: ...difying the department code setting 1 Click the Counter tab and the Department menu The Department management page is displayed 2 Enter the administrator password in the Department Code box and click Enter The Department Management page is displayed 3 Click New to set up a new department code or click the department name link that you want to edit in the departments list The Department Information...

Page 253: ...for this department code when the Set Limitation for Full Color option is enabled Set Limitation of Black Select whether to enable the limitation for black outputs for this department code When you select ON enter the maximum number of black outputs for this department code in the Maximum reached for Black output box Maximum reached for Black output Enter the maximum number of black outputs for th...

Page 254: ...dividually Deleting all department code settings 1 Click the Counter tab and the Department menu The Department management page is displayed 2 Enter the administrator password in the Department Code box and click Enter The Department Management page is displayed 3 Click Delete All The confirmation dialog box appears 4 Click OK All department code settings are deleted ...

Page 255: ...rtment menu The Department management page is displayed 2 Enter the administrator password in the Department Code box and click Enter The Department Management page is displayed 3 Click the department name link that you want to delete The Department Information page opens 4 Click Delete The confirmation dialog box appears 5 Click OK The selected department code is deleted ...

Page 256: ...g the department management register the department code that you require P 250 Registering or modifying the department code Department management will not be enabled automatically even if the User Authentication is enabled When you configure the User Authentication you will not need to register more than one department code However if you want to enable Create User Information Automatically you m...

Page 257: ...ored in the invalid job list when the department code is enabled ON Select this to not print the invalid jobs and store them in the invalid job list Print Select this to print the invalid jobs Delete Select this to delete the invalid jobs without storing them in the invalid job list If the Department Code Enforcement is set to ON and the SNMP communication is enabled in the printer driver the user...

Page 258: ...llowing limitations and considerations for the User Management Setting The jobs cannot be printed or deleted from COMMAND CENTER When you want to print or delete the jobs perform the operation from the JOB STATUS on the touch panel When the Windows Domain or LDAP Authentication is enabled the password setting in the User Information will not be used for the authentication Do not specify a password...

Page 259: ...ng LDAP Authentication MFP Local Authentication When you do not have any network authentication systems in your network you can use the MFP Local Authentication When this is configured users must enter the user name and password that is registered in the MFP to perform any operations on the control panel of this equipment P 267 Enabling MFP Local Authentication If you want to change the authentica...

Page 260: ... select whether invalid jobs for which authentication has failed are printed or stored in the invalid job list ON Select this to not print the invalid jobs and store them in the invalid job list Print Select this to print the invalid jobs Delete Select this to delete the invalid jobs without storing them in the invalid job list If you want to automatically register user information entered in the ...

Page 261: ... is displayed PDC Enter the server name or IP address of the Primary Domain Controller BDC Enter the server name or IP address of the Backup Domain Controller as required Connection Timeout Enter timeout period for quitting communication when no response is received form PDC or BDC server in 1 to 180 seconds If the wrong primary or backup domain controller is specified the OK in the user authentic...

Page 262: ...nce menu When you configure the Active Directory in Windows server specify the domain administrator or account operator for the user name P 203 Managing directory service If you selected the Enable Guest User check box in Step 5 the Guest ACL Settings page is displayed Go to the next step If you did not select it go to Step 10 10 Select the items you want to allow for guest user operations and cli...

Page 263: ...e user name registered in the LDAP server If the user name is not found in the LDAP server this equipment sets the From Address as the User Name Mail Domain Name where User Name is the user name that is entered on the touch panel for authentication and Mail Domain Name is the domain name that is entered in the Mail Domain Name box When this is selected select the LDAP server in the LDAP Server box...

Page 264: ...n your network To enable LDAP with SSL see the following section P 115 Setting up LDAP Session Enabling LDAP Authentication 1 Click the User Management tab and the Authentication menu The login page is displayed 2 Enter the administrator password and click Login The Authentication page is displayed 3 Click User Management Setting The User Management Setting page opens ...

Page 265: ...d jobs in which authentication has failed are printed or stored in the invalid job list ON Select this to not print the invalid jobs and store them in the invalid job list Print Select this to print the invalid jobs Delete Select this to delete the invalid jobs without storing them in the invalid job list If you want to automatically register user information entered in the authentication screen o...

Page 266: ...r not LDAP Server Select the LDAP server that manages the Role Based Access Control When you enable Role Based Access Control you must export the role based data setting file embedded in this equipment or another equipment of the same series Then edit this file into the form required by the LDAP server setting and import it into the equipment For instructions on how to edit role based data setting...

Page 267: ... Share Select this to enable the file saving operation Enable Internet Fax Select this to enable the Internet Fax function Enable Print Select this to enable printing when the color mode is Black Enable e Filing Box Select this to enable the e Filing function Enable Fax Select this to enable the Fax function Enable Color Output Select this to enable color printing when the color mode is Full Color...

Page 268: ...egistered in the LDAP server If the user name is not found in the LDAP server this equipment sets the From Address as the User Name Mail Domain Name where User Name is the user name that is entered on the touch panel for authentication and Mail Domain Name is the domain name that is entered in the Mail Domain Name box When this is selected select the LDAP server in the LDAP Server box enter the at...

Page 269: ...count information first before enabling MFP Local Authentication This equipment also manages the counters for each user if MFP Local Authentication is enabled P 270 Creating or modifying user information After you register the user information enable MFP Local Authentication P 267 Enabling MFP Local Authentication Enabling MFP Local Authentication 1 Click the User Management tab and the Authentica...

Page 270: ...ication has failed are printed or stored in the invalid job list ON Select this to not print the invalid jobs and store them in the invalid job list Print Select this to print the invalid jobs Delete Select this to delete the invalid jobs without storing them in the invalid job list You can disable the User Management Setting by selecting Disable and click Next If you use your Card ID as a user na...

Page 271: ... Share Select this to enable the file saving operation Enable Internet Fax Select this to enable the Internet Fax function Enable Print Select this to enable printing when the color mode is Black Enable e Filing Box Select this to enable the e Filing function Enable Fax Select this to enable the Fax function Enable Color Output Select this to enable color printing when the color mode is Full Color...

Page 272: ... is used and the Create User Information Automatically option is enabled when enabling the User Management Setting the user information can be registered automatically in the equipment when a user enters the user name and password in the User Authentication screen and then enters the department code There is Undefined user information that is registered as the default This user information is used...

Page 273: ...ccount Manager Users who are registered as the Account Manager can log in to the User Information List submenu page Set Limitation of Full Color Select whether to enable the limitation for color outputs for this user When you select ON enter the maximum number of color outputs for this user in the Maximum reached for Full Color output box Maximum reached for Full Color output Enter the maximum num...

Page 274: ... Enter Admin in the User Name box enter the administrator password in the Password box and click Login The User Information List submenu page is displayed Users can also log in using a user name domain name required only when Windows Domain Authentication is enabled and password that have been set as Account Manager in User Information You do not have to select the Domain Name box when you log in ...

Page 275: ...The Undefined user information cannot be deleted 1 Click the User Management tab The login page is displayed 2 Enter Admin in the User Name box enter the administrator password in the Password box and click Login The User Information List submenu page is displayed Users can also log in using a user name domain name required only when Windows Domain Authentication is enabled and password that have ...

Page 276: ...box appears 4 Click OK to delete all user information All user information is deleted Resetting the counters for specific users When the user s jobs are in progress or the user is currently logged in the touch panel you cannot reset the user s counters 1 Click the User Management tab The login page is displayed ...

Page 277: ...n Authentication is enabled and password that have been set as Account Manager in User Information You do not have to select the Domain Name box when you log in as the Administrator 3 Select the check boxes of users whose counters are to be reset and click Reset Counters The confirmation dialog box appears 4 Click OK to reset the counters The counters of selected users are cleared Resetting the co...

Page 278: ...nformation List submenu page is displayed Users can also log in using a user name domain name required only when Windows Domain Authentication is enabled and password that have been set as Account Manager in User Information You do not have to select the Domain Name box when you log in as the Administrator 3 Click Reset All Counters The confirmation dialog box appears 4 Click OK to reset all count...

Page 279: ...leep Auto Shut Off mode It may take a long time if there is too much user information or the data including user names or domain names that are too long 1 Click the User Management tab The login page is displayed 2 Enter Admin in the User Name box enter the administrator password in the Password box and click Login The User Information List submenu page is displayed Users can also log in using a u...

Page 280: ... User Information All Counter Click Create New File here to export the counter information and user information If you have previously exported user information data the exported file link and information are displayed on the page You can click the link to save the previously exported file 5 Right click the File Name link and select Save Target As The Save As dialog box appears If the File Name li...

Page 281: ...V file The required items vary depending on the authentication type Yes Required No Not Required Be sure that any of the user ID and the user name information entered in the UserId and Username fields above is not overlapped in a CSV file to be imported If they are overlapped the correct user information will not be registered even if the CSV file was imported When a user sends a print job while i...

Page 282: ...submenu page is displayed Users can also log in using a user name domain name required only when Windows Domain Authentication is enabled and password that have been set as Account Manager in User Information You do not have to select the Domain Name box when you log in as the Administrator 3 Click the Export Import link at the upper right of the page The Export Import window appears 4 Click Impor...

Page 283: ...own user information by a user Users can view their own user information by logging in to the User Confirm Create Modify page When the Role Based Access Control is enabled users can also confirm the functions to be allowed 1 Click the User Management tab The login page is displayed 2 Enter your user name in the User Name box select a domain name required only when Windows Domain Authentication is ...

Page 284: ...ion only When the Local MFP Authentication is enabled not only an administrator or account managers but also each registered user can change the password himself 1 Click the User Management tab The login page is displayed 2 Enter your user name in the User Name box enter your password in the Password box and click Login The User Information page is displayed ...

Page 285: ...E 3 Click Change Password The Change Password window appears 4 Enter the following items and click Save Old Password Enter your login password New Password Enter a new login password You can enter up to 64 characters Retype Password Enter the new login password again 5 Click OK The password is changed ...

Page 286: ...iguration file Web Services Scanning is not given any restrictions by the user management setting Confirming role information You can confirm the set functions for role information on the User Confirm Create Modify page Confirming role information 1 Click the User Management tab The login page is displayed 2 Enter Admin in the User Name box enter the administrator password in the Password box and ...

Page 287: ... MODE Setting up User Management 285 7 COMMAND CENTER ADMINISTRATOR MODE 3 Click Role Information The Role Information page is displayed 4 Click the Export Import link at the upper right of the page The Export Import window appears ...

Page 288: ...ogin page is displayed 2 Enter Admin in the User Name box enter the administrator password in the Password box and click Login The User Information List submenu page is displayed Users can also log in using a user name domain name required only when Windows Domain Authentication is enabled and password that have been set as Account Manager in User Information You do not have to select the Domain N...

Page 289: ...k at the upper right of the page The Export Import window appears 5 Right click the File Name link and select Save Target As The Save As dialog box appears 6 Select the file location and select XML Document in the Save as type box Then click Save The XML file that contains the role information data is saved in the selected location ...

Page 290: ...r Information List submenu page is displayed Users can also log in using a user name domain name required only when Windows Domain Authentication is enabled and password that have been set as Account Manager in User Information You do not have to select the Domain Name box when you log in as the Administrator 3 Click Role Information The Role Information window appears 4 Click the Export Import li...

Page 291: ...89 7 COMMAND CENTER ADMINISTRATOR MODE 5 Click Import menu The Import page appears 6 Click Browse The Choose file dialog box appears 7 Select the XML file that contains the user information data and click Open 8 Click Import The data is imported to Role Information ...

Page 292: ...o Email SMTP LDAP Authentication When your network manages the network users using the LDAP this equipment can be managed using the LDAP Authentication When this is configured users must enter the user name and password that is registered in the LDAP server to perform Scan to Email on the control panel of this equipment P 293 Enabling User Authentication for Scan to Email LDAP When the User Authen...

Page 293: ...rform the Internet Fax transmission select the Internet Fax Not Allowed check box When you select this check box users can no longer perform Internet Fax transmissions When you want to disable the User Authentication for Scan to Email select Disable in the Method and click Next 5 Enter the IP address or FQDN Fully Qualified Domain Name of the SMTP server and select the authentication type in the A...

Page 294: ...he LDAP server this equipment sets the From Address as the User Name Mail Domain Name where User Name is the user name that is entered on the touch panel for authentication and Mail Domain Name is the domain name that is entered in the Mail Domain Name box When this is selected select the LDAP server in the LDAP Server box enter the attribute type to search the user name in the Attribute type of U...

Page 295: ...ication for Scan to Email The User Authentication for Scan to Email page opens 4 Select LDAP in the Method box and click Next This equipment can set authentication for Scan to Email but cannot set authentication for Internet Fax transmission If you do not want to allow users to perform the Internet Fax transmission select the Internet Fax Not Allowed check box When you select this box users can no...

Page 296: ...from the records of the attribute type in the LDAP server that you specify in the LDAP Server box and Attribute type of User Name box If the user name is found this equipment sets the From Address as the email address of the user name registered in the LDAP server If the user name is not found in the LDAP server this equipment sets the From Address as the User Name Mail Domain Name where User Name...

Page 297: ...7 COMMAND CENTER ADMINISTRATOR MODE Setting up User Management 295 7 COMMAND CENTER ADMINISTRATOR MODE 7 Click Finish User Authentication for Scan to Email is enabled ...

Page 298: ...7 COMMAND CENTER ADMINISTRATOR MODE 296 Setting up User Management ...

Page 299: ...escribes how to set up options from the COMMAND CENTER menus About Option Setups 298 Setting up IP Security Function 299 Setting up IPsec 300 Registering policies 301 Installing IPsec certificate 308 Flushing out IPsec sessions 314 ...

Page 300: ...a encryption using IPsec IP Security Protocol on this equipment On the COMMAND CENTER menus you can switch whether to enable or disable the IPsec function or set the registration modification or deletion of filters IKE keys profiles and policies used for IPsec P 299 Setting up IP Security Function Option setup menus on the COMMAND CENTER menu are displayed only when the corresponding option is ins...

Page 301: ... The IPSec Enabler GP 1080 optional is required to enable the IP security function IP security setup menus on the COMMAND CENTER menu are displayed only when the IP security function is available Administration tab Setup menu Network submenu IP Security Only the administrator can set up IP security function The normal filtering settings are given priority over IP security filtering A fallback func...

Page 302: ...e IPsec Enable Select this to enable IPsec Disable Select this to disable IPsec Policy Selects a policy to be used for IPsec You must select a policy to enable IPsec Policies must be set according to the IPsec environment that you use and must be registered into this equipment in advance For instructions on how to register policies see the following page P 301 Registering policies IPsec menu Selec...

Page 303: ... Security Association Database for any reason you can delete it in the same way For details see the following page P 314 Flushing out IPsec sessions Registering policies To enable data encryption communication using IPsec you need to create IPsec policies first according to your system environment You can create policies by combining IKE key exchange process setting filtering setting for registrat...

Page 304: ...Select this to use TCP only UDP Select this to use UDP only ICMP Select this to use ICMP only Source Port Sets the port number of the sender This setting is available only if you selected TCP or UDP in the protocol type setting Any Sets the desired source port Port Number Sets the port number of the sender Key in the port number in the port number entry box Destination Port Sets the port number of...

Page 305: ...ype IKEv1 Main Mode Select this to use IKEv1 Certificate Select this to use an electronic certificate To select this IPsec certificate must be installed in this equipment in advance For details see the following page P 308 Installing IPsec certificate Preshared Key Select this to perform authentication by sharing key information with the recipient of the communication in advance Enter key informat...

Page 306: ... regenerating key information of IPsec communication Set the interval period for regenerating key information for IPsec communication from 60 seconds to 604 800 seconds 7 days Enable PFS Select this check box to use PFS Perfect Forward Secrecy in IKE IKE Transforms Integrity Selects the authentication algorithm to be used in IKE SHA1 Select this to use SHA1 MD5 Select this to use MD5 Encryption Se...

Page 307: ... encryption algorithm to be used in ESP AES 256 CBC Select this to use AES CBC 256 bits AES 192 CBC Select this to use AES CBC 192 bits AES 128 CBC Select this to use AES CBC 128 bits 3DES CBC Select this to use 3DES CBC DES CBC Select this to use DES CBC None Select this not to perform data encryption AH Transforms Sets the transform to be applied to AH Integrity Selects the authentication algori...

Page 308: ...sec menu and then click Add To modify a policy already registered click the link for the desired policy name on the list The Add Policy Modify Policy page is displayed 8 Select the items below and then click OK Policy Name Enter the policy name You can enter up to 63 alphanumeric characters and symbols other than semicolon and comma Profile Name Profile settings already registered in this equipmen...

Page 309: ...delete Even if an IPsec policy is deleted the contents of filters IKE keys or profiles registered in the IPsec policy will not be deleted If you want to delete the contents of filters IKE keys or profiles you need to do this individually If you want to delete all policies set Enable IPsec to Disable and then delete them P 300 Setting up IPsec 1 Select Policy on the IPsec menu and select the check ...

Page 310: ...ional is required IPsec Certificate setup menus on the COMMAND CENTER menu are displayed only when the IPsec function is available Administration tab Setup menu Network submenu Security Service Certificate for IP SEC P 308 Installing an imported IPsec certificate P 310 Deleting an imported IPsec certificate P 311 Installing IPsec certificate automatically P 312 Deleting IPsec certificate installed...

Page 311: ...led due to network disconnection or other reasons If you switched the CRL Verification setting save the setting and then turn the power of this equipment OFF and then back ON 7 Select Import and then click Previous to close the Security Service page 8 Click Save on the Network submenu page 9 You must enter a password for IPsec certificate on the control panel of this equipment before setting up th...

Page 312: ...nistrator Mode 2 Click Setup and then Network P 107 Setting up Network settings 3 Click a link on the Network submenu or scroll down the menu and click Security Service The Security Service page is displayed 4 Click DELETE of Import in Certificate for IP SEC The confirmation dialog box appears If the IPsec certificate has not been imported you cannot delete the IPsec certificate 5 Click OK The IPs...

Page 313: ...for IP SEC CA Server address Enter the IP address or FQDN of CA server within 128 characters MFP s Address in Common Name in the Certificate Select whether you use the IP address or FQDN as the address of this equipment to be entered in the Common Name box of the certificate Timeout Enter timeout period for quitting communication when no response is received from CA server CA Challenge Enter the C...

Page 314: ...A CA certificate is installed automatically as well as an IPsec certificate If a CA certificate is already installed delete the existing one by clicking DELETE of SCEP in Certificate for IP SEC Then click Request to install a new CA certificate 7 Click Save on the Network submenu page 8 Then you can enable IPsec for the following settings P 299 Setting up IP Security Function Deleting IPsec certif...

Page 315: ... Automatic in Certificate for IP SEC and then click DELETE The confirmation dialog box appears A CA certificate already installed automatically will be deleted as well as the server certificate Deleting is disabled when no server certificate has been installed automatically 5 Click OK The IPsec certificate is deleted 6 Click Previous to close the Security Service page 7 Click Save on the Network s...

Page 316: ...SAD Security Association Database for any reason you can do it in the same way Flushing out IPsec sessions 1 Access the COMMAND CENTER administrator mode P 100 Accessing COMMAND CENTER Administrator Mode 2 Click Setup and then Network P 107 Setting up Network settings 3 Click a link on the Network submenu or scroll down the menu and click Flush Connections The confirmation dialog box appears 4 Cli...

Page 317: ...9 APPENDIX This chapter contains the following contents Installing Certificates for a Client PC 316 ...

Page 318: ...1 Open the command prompt type mmc and press the Enter key 2 From the File or Console menu of the window that appears select Add Remove Snap in The Add or Remove Snap ins dialog box appears 3 From the list of Available snap ins select Certificates and click Add For Windows XP 2000 click Add to display the list and then select Certificates The Certificates snap in dialog box appears 4 Select Comput...

Page 319: ...C 317 9 APPENDIX 5 Select Local computer the computer this console is running on and click Finish The Select Computer dialog box is closed 6 Make sure that Certificates Local computer is added under the Console Root Folder click OK 7 Save the setting ...

Page 320: ...t Control UAC to help protect your computer option and click OK 1 On the MMC select and right click on the appropriate folder to store the certificate and select All Tasks Import Select the appropriate folder according to the type of your certificate Self signed certificate crt Console Root Certificates Local Computer Trusted Root Certification Authorities Client certificate pfx Console Root Certi...

Page 321: ...Certificates for a Client PC 319 9 APPENDIX 3 From Browse select the certificate to install and click Next 4 Enter the password for the private key and click Next 5 Click Next Do not change the certificate store using Browse ...

Page 322: ... Yes 7 Click OK to complete the import If you are importing a client certificate pfx to a Windows Vista PC proceed to the next step Otherwise the installation is complete If you need to install another certificate repeat the steps from the beginning 8 Double click the imported client certificate The Certificate window appears ...

Page 323: ...9 APPENDIX Installing Certificates for a Client PC 321 9 APPENDIX 9 Click the Details tab and select Thumbprint to check the 40 digit thumbprint ...

Page 324: ...ng command netsh http add sslcert ipport 0 0 0 0 5358 certhash your 40 digit thumbprint appid 00112233 4455 6677 8899 AABBCCDDEEFF When inputting the thumbprint exclude the spaces When your client certificate is created with Certificate Revocation List CRL you need to check if the CA server is accessible by FQDN See the following figure If no FQDN connection is established ask your administrator t...

Page 325: ...Profile 191 Color Mode 65 157 Comment 86 Common Name 137 Company 75 Completion Volume 160 Compression 66 Confidential 84 Confidential mailbox 82 Confirm Password 105 Contact Adding 74 Deleting 77 Contact Information 18 105 Context 121 Context Name 132 Contrast 66 Controller Type 18 Copier Model 104 Copier Settings 157 Copier settings 156 Copy agent 46 224 Country Region Code 137 Create SNMP User I...

Page 326: ...Ramp 125 Enable Partial Email 185 Enable PFS 304 Enable POP3 Client 126 Enable Print 260 265 269 Enable Print Email Error 185 Enable Print Header 185 Enable Print Message Body 185 Enable Raw bi directional 182 Enable Raw TCP 182 Enable Remote Scan 260 265 269 Enable SLP 129 Enable SMTP Client 123 Enable SMTP Server 125 Enable SNMP V1 V2 130 Enable SNMP V3 130 Enable SNMP V3 Trap 131 Enable SNTP 12...

Page 327: ...v6 112 IPX Trap Address 131 IPX SPX 113 ITU T 82 J Journal Auto Print 161 K Key Selection 305 Keyword 75 L Last Name 75 LDAP Authentication 257 LDAP server 54 78 LDAP Session 115 Letterhead Print Mode 178 179 Line 2 Number 160 Line Select 57 76 Line 2 Mode 161 Link Local Address 112 Link Local Host Name 114 LLMNR 112 LLTD 155 Locality Name 137 Location 18 105 Login Name 124 185 Login page 100 Logi...

Page 328: ...or Black 157 Original Mode for Color 157 Original Size 66 Output Tray 179 Outside Erase 67 P Page Memory Size 18 Panel Setting Private template 47 49 Public template 226 Paper 18 Paper Size 179 Paper Source 177 179 Paper Type 179 Partial Wait Time 185 Password Box Setting 64 244 Directory Service Properties 204 Fax Setting 58 IPP Print 184 MailBox Setting 86 N W Fax Folder 170 NetWare Print 185 PO...

Page 329: ...d 63 64 168 170 243 RGB Adjustment 66 RGB Source Profile 187 Role Based Access 260 264 Rotate Sort 161 Rotation 65 RTI 161 S Saturation 66 Save as file Destination 165 File Composition 167 Folder Name 165 Format 166 Local Storage Path 164 N W Fax Destination 169 N W Fax Folder 169 Remote 1 and Remote 2 168 Searching Interval 167 Single Page Data Saving Directory 166 Storage Maintenance 164 User Na...

Page 330: ...ge Path 164 Store to e Filing agent 82 84 232 Store to e Filing Space Available 18 104 SUB 58 76 Subject 56 59 239 Submenu Bar 15 Subnet mask 111 Symbol set 177 179 T Tab Administration 100 Counter 92 93 Device 18 Job Status 22 25 27 Logs 30 31 32 33 Registration 36 74 83 User Management 254 TCP IP 109 Templates Editing 43 74 Managing 36 Registering 43 Terminal ID 160 Time Stamp 106 Top link 15 To...

Page 331: ......

Page 332: ...First edition 2009 5 ...

Reviews: