Mobility Wallbox Home / Home Pro
Wallbox
Bedienungsanleitung
Page 1: ...Mobility Wallbox Home Home Pro Wallbox Bedienungsanleitung...
Page 2: ...Bedienungsanleitung Mobility Wallbox Home Home Pro 2...
Page 3: ...Auspacken 9 4 2 Lieferumfang pr fen 9 5 Produkt lagern 10 6 Montage vorbereiten 11 6 1 Montageort w hlen 11 6 2 Montage beauftragen 11 6 3 Blenden austauschen 11 7 Bedienen 14 7 1 Produkt einschalten...
Page 4: ...nd Demontage Anleitung f r die Systemvernetzung Alle Dokumente k nnen Sie von der Website herunterladen www lappmobility com 1 2 Darstellungsmittel und Symbole Handlungsschritt Aufz hlung WARNUNG Ein...
Page 5: ...Fehler stromschutzschalter des Typs A angeschlossen ist F r den sicheren Betrieb des Produkts ist ein Leitungsschutzschalter in der Hausinstallation erforderlich siehe technische Daten Das Produkt is...
Page 6: ...m weichen trockenen Tuch Verletzungsgefahr durch besch digtes Produkt Ein besch digtes Produkt kann zu unvorhersehbaren Fehlfunktionen und Gef hrdungen f hren Pr fen Sie das Produkt und sein Zubeh r v...
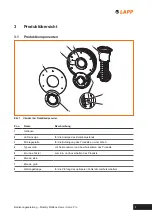
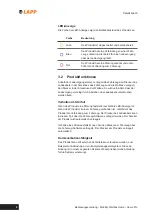
Page 7: ...Beschreibung 1 Geh use 2 LED Anzeige f r die Anzeige des Betriebszustands 3 Montageplatte f r die Befestigung des Produkts an einer Wand 4 Typenschild mit Seriennummer und Anschlussdaten des Produkts...
Page 8: ...So wird verhindert dass der Ladevorgang vorzeitig durch Abziehen des Ladekabels unterbrochen werden kann Verhalten im St rfall Wenn das Produkt eine St rung feststellt leuchtet die LED Anzeige rot We...
Page 9: ...agern zu k nnen siehe Kapitel 5 auf Seite 10 4 2 Lieferumfang pr fen Pr fen Sie ob der Lieferumfang vollst ndig ist und alle Teile unbesch digt sind Artikel St ckzahl Geh use 1 Montageplatte 1 Zugentl...
Page 10: ...Montage montiert Bei unsachgem er Lagerung kann das demontierte Produkt durch eindringenden Staub Schmutz oder Feuchtigkeit be sch digt werden Die Betriebssicherheit eines unsachgem gelagerten Produkt...
Page 11: ...eht die Gefahr eines Stromschlags Montieren Sie das Produkt keinesfalls selbst Beauftragen Sie eine Elektrofachkraft mit der Montage des Produkts WARNUNG Verletzungsgefahr durch besch digtes Produkt E...
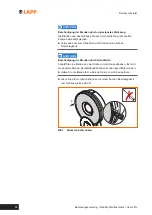
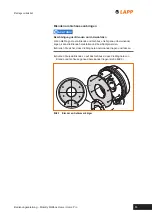
Page 12: ...n Sie zum Abnehmen der Blenden einen flachen Demontagekeil ACHTUNG Besch digung der Blenden durch Herabfallen Sobald Sie eine Blende an einer Stelle vom Geh use abheben l st sich die gesamte Blende He...
Page 13: ...allen Wenn die Magnete von Blende und Geh use nicht genau bereinander liegen kann die Blende herabfallen und besch digt werden Stellen Sie sicher dass die Magnete bereinander liegen und fassen Setzen...
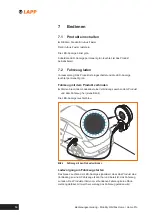
Page 14: ...r n Fahrzeug mit dem Produkt verbinden Stellen Sie mit dem Ladekabel eine Verbindung zwischen dem Produkt und dem Fahrzeug her siehe Bild 4 Die LED Anzeige leuchtet blau regi ster ed plea se con nec t...
Page 15: ...hrzeug und Produkt sind verriegelt um eine Unterbre chung des Ladevorgangs zu verhindern Eine Unterbrechung des Lade vorgangs kann zu St rungen am Produkt und an der Fahrzeug Software f hren Pr fen Si...
Page 16: ...o ab dass es nicht gequetscht oder ge knickt werden kann und keine Stolpergefahr entsteht 7 4 Produkt ausschalten ACHTUNG St rung durch vorzeitiges Ausschalten des Produkts Wenn Sie das Produkt aussch...
Page 17: ...ines Stromschlags Reinigen Sie das Produkt nie mit einem Hochdruckreiniger Reinigen Sie das Produkt nur wie in dieser Bedienungsanleitung beschrieben ACHTUNG Besch digung des Produkts durch unsachgem...
Page 18: ...che Ursache Empfohlene Ma nahme Funktioniert Ihre Ausstattung Fahrzeug Fahrzeug Software Beachten Sie die Anleitung Ihres Fahrzeugs Versuchen Sie ein Fahrzeug mit Steckertyp 1 zu laden Verwenden Sie e...
Page 19: ...an der elektrischen Installation des Produkts besteht die Gefahr eines Stromschlags Beauftragen Sie eine Elektrofachkraft mit der Demontage des Produkts Schalten Sie das Produkt aus siehe Kapitel 7 4...
Page 20: ...en nicht in den allgemeinen Hausm ll entsorgt werden Bitte bringen Sie diese Produkte nach Ende ihres Lebenszyklus zur Behandlung Aufarbeitung und Recycling gem Ihrer Landesgesetz gebung zu Ihren zust...
Page 21: ...ngskategorie III Netzfrequenz 50 60 Hz Leitungsschutzschalter 16 A installationsseitig vorzusehen Sicherung f r interne Versorgung 8 A tr ge Ladespannung 230 V 400 V Ladestrom max 16 A Ladeleistung ma...
Page 22: ...Bedienungsanleitung Mobility Wallbox Home Home Pro 22 13 Zubeh r Eine Liste der verf gbaren Zubeh rteile finden Sie unter www lappmobili ty com...
Page 23: ...2014 35 EU Bereitstellung elektrischer Betriebsmittel innerhalb be stimmter Spannungsgrenzen 2011 65 EU Beschr nkung der Verwendung bestimmter gef hrlicher Stoffe in Elektro und Elektronikger ten RoH...
Page 24: ...Lapp Mobility GmbH Oskar Lapp Str 2 D 70565 Stuttgart www lappmobility com 2784060000 Revision 03 03 2021...
Page 25: ...Mobility Wallbox Home Home Pro Charging station Operating Instructions...
Page 26: ...Operating Instructions Mobility Wallbox Home Home Pro 2...
Page 27: ...11 Disposal of product and packaging 20 12 21 13 Accessories 22 14 CE conformity 23 Manufacturer Lapp Mobility GmbH Oskar Lapp Str 2 D 70565 Stuttgart www lappmobility com Operating Instructions Mobi...
Page 28: ...ions for assembly and disassembly Instructions for system networking All documents can be downloaded from the website www lappmobility com 1 2 Means of representation and symbols Instruction for actio...
Page 29: ...use installation with a type A residual current circuit breaker For safe operation of the product a circuit breaker is required in the building installation see technical data The product is intended...
Page 30: ...soft dry cloth to clean the product Risk of injury due to damaged product A damaged product can lead to unforeseeable malfunctions and hazards Check the product and its accessories for obvious damage...
Page 31: ...s Name Description 1 Housing 2 LED display for displaying the operating status 3 Mounting plate for mounting the product on a wall 4 Nameplate with serial number and connection data of the product 5 O...
Page 32: ...he charging station This prevents the charging process from being interrupted prematurely by disconnecting the charging cable Response in the event of a malfunction If the product detects a malfunctio...
Page 33: ...embled product in it see chapter 5 on page 10 4 2 Checking the scope of delivery Check that the scope of delivery is complete and that all parts are undamaged Item Quantity Housing 1 Mounting plate 1...
Page 34: ...or on the original equipment for freestanding installation If stored improperly the dismantled product may be damaged by penetrating dust dirt or moisture The operational safety of an improperly store...
Page 35: ...tric shock when working on the electrical installation of the product Never install the product yourself Ask a qualified electrician to install the product WARNING Risk of injury due to damaged produc...
Page 36: ...p edges Use a flat dismantling wedge to remove the covers NOTICE Damage to the covers due to falling As soon as you lift a cover off the housing at one point the entire cover comes off Falling covers...
Page 37: ...falling down If the magnets of the cover and the housing are not exactly aligned the cover may fall down and be damaged Make sure that the magnets are aligned and in contact with each other Place each...
Page 38: ...green Connecting the vehicle to the product Use the charging cable to establish a connection between the product and the vehicle see Fig 4 The LED indicator lights up blue regi ster ed plea se con ne...
Page 39: ...The plugs on the vehicle and product are locked to prevent interruption of the charging process Interrupting the charging process can lead to faults in the product and the vehicle software Check whet...
Page 40: ...ked Place the charging cable so that it cannot be crushed or kinked and so that there is no risk of tripping 7 4 Switching off the product NOTICE Malfunction due to premature switching off of the prod...
Page 41: ...housing there is a risk of electric shock Never clean the product with a high pressure cleaner Only clean the product as described in these operating instructions NOTICE Damage to the product due to...
Page 42: ...cause Recommended measure Does your equipment work Vehicle Vehicle software Refer to the instructions for your vehicle Are you trying to charge the vehicle with a connector Type 1 Use a standardised T...
Page 43: ...to electric shock There is a risk of electric shock when working on the electrical installation of the product Ask a qualified electrician to dismantle the product Switch off the product see chapter 7...
Page 44: ...be disposed of with general household waste At the end of their life cycle please take these products to your local collection points for treatment refurbishment and recycling in accordance with your...
Page 45: ...ins frequency 50 60 Hz Circuit breaker 16 A to be provided on the installation side Fuse for the internal supply 8 A slow blow Charging voltage 230 V 400 V Max charging current 16 A Max charging power...
Page 46: ...Operating Instructions Mobility Wallbox Home Home Pro 22 13 Accessories A list of available accessories can be found at www lappmobility com...
Page 47: ...5 EU Making available on the market of electrical equipment designed for use within certain voltage limits 2011 65 EU Restriction of the use of certain hazardous substances in electrical and electroni...
Page 48: ...Lapp Mobility GmbH Oskar Lapp Str 2 D 70565 Stuttgart www lappmobility com 2784060000 Revision 21 02 2023 Translated from German...