background image

ITALIANO

Ediz. 02 - 07/2016

www.larius.eu

Pegaso

OPERA

TING AND MAINTENANCE INSTRUCTION

APPARATUS FOR SPRAYING

INTERIOR FINISHING LAYERS

Summary of Contents for Pegaso

Page 1: ...ITALIANO Ediz 02 07 2016 www larius eu Pegaso OPERATING AND MAINTENANCE INSTRUCTION APPARATUS FOR SPRAYING INTERIOR FINISHING LAYERS...

Page 2: ...Due to a constant product improvement programme the factory reserves the right to modify technical details mentioned in this manual without prior notice...

Page 3: ...ECHNICAL DATA p 3 DESCRIPTION OF THE EQUIPMENT p 6 TRANSPORT AND UNPACKING p 7 SAFETY RULES p 7 SETTING UP p 9 SETUP p 10 POSITION AND INSTALLATION OF THE TANK p 11 CONTROLS p 12 STARTUP p 13 WASHING...

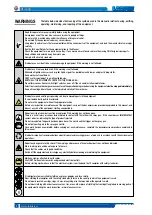
Page 4: ...ound and finger squashing risk due to movable parts in the equipment Tenersi lontano dalle parti in movimento Do not use the equipment without the proper protection Before any inspection or maintenanc...

Page 5: ...the pump start creating a soft flow of material When the trigger is released the flow stops The supply of vaporisation air only occurs if the trigger is squeezed A B POWER SUPPLY standard to request...

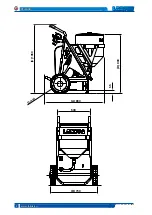
Page 6: ...Ediz 02 07 2016 www larius eu PEGASO 4 A 890 500 300 C 1050 D 900 55 B 730...

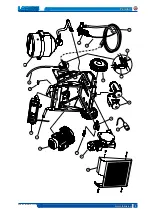
Page 7: ...Ediz 02 07 2016 www larius eu 5 PEGASO 14 3 1 5 4 6 7 12 8 13 9 10 11 2 15 16 17 18...

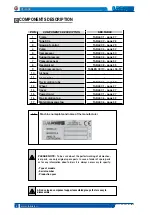
Page 8: ...ber Production year POS 1 2 3 4 5 6 7 8 9 10 11 12 13 14 15 16 17 COMPONENTS DESCRIPTION SEE TABLE Frame Tank 50 L Group of control Pump Compressor Support pressure Pressure sensor Reservoir air High...

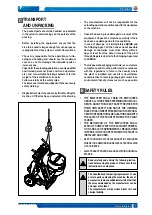
Page 9: ...s at least from the date of receipt of the plant throughRegisteredLettertotheShippingAgentand to LARIUS The disposal of packaging materials is a customer s competence and must be performed in accordan...

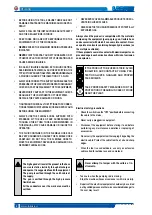
Page 10: ...plugged in equipment Disconnect the equipment before storing it and before performing any maintenance operation or replacing of accessories Do not carry the equipment neither unplug it by pulling the...

Page 11: ...use the hose provided with the standard kit NEVER use a damaged or a re paired flexible hose Check on power supply Check the plant is earthed Check the mains voltage corresponds to the equipment s ra...

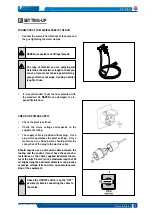
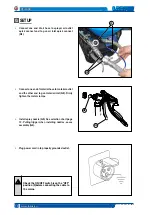
Page 12: ...air hose to sprayer air outlet quick connect and to gun air inlet quick connect G1 Connect one end of material hose to material outlet and the other end to gun material inlet G2 Firmly tighten the me...

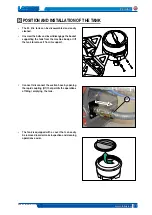
Page 13: ...insert disengage the basket supporting the tank from the machine body or lift the tank to remove it from its support Connect disconnect the suction hose by opening the rapid coupling H1 that permits...

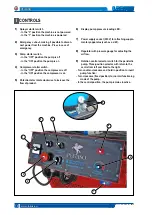
Page 14: ...mpressor is off In the ON position the compressor is on 5 Potentiometer rotate clockwise to increase the flow of product 6 Display pump pressure reading LED 7 Power supply socket 220 V for attaching s...

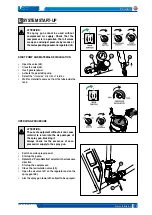
Page 15: ...t up the compressor Close the recirculation valve L3 Open the air valve L1 on the regulator and on the spray gun L2 Aim the spray gun toward the object to be sprayed ATTENTION The use of equipment wit...

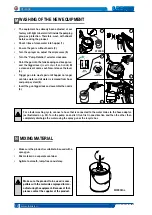
Page 16: ...en adjusted at our factory with light mineral oil left inside the pumping group as protection Therefore wash with diluent before sucking the product Pour 4 litres of clean water into hopper 1 Ensure t...

Page 17: ...Plastics EIFS Stucco Use the tooling after performing all the SETTING UP operations above described Fill the tank with suitably prepared material Install the nozzle depending on the material you wish...

Page 18: ...for your applications con sider size of aggregate in material and coarseness of spray pattern Remember the larger the nozzle the larger the pattern P3 MATERIAL FLOW ADJUSTMENT Test spray pattern on ca...

Page 19: ...keep the air channel in the gun clean Reduce pressure to the minimum turn counter clockwise the pressure control knob 1 Empty remaining material into bucket until most of texture material is out of ho...

Page 20: ...e from the sprayer 3 Insert the sponge sphere into the material hose 4 Reconnect the hose to the sprayer 5 Close the re circulation valve 6 Pour clean water in the tank and position the end of the hos...

Page 21: ...carried out all the operations described in the chapter concerning cleaning up after work make sure that the system is not pressurised Squeeze the trigger and wait for all the material to have come ou...

Page 22: ...estaddingafewdrops of light mineral oil Inspect for signs of wear Add drops of light oil underne ath the trigger Wesuggestaddingafewdrops of light mineral oil Check the product passage hose to see if...

Page 23: ...achine REMOVAL PROCEDURE FOR REPLACING THE HOSE 1 Remove the side casing photo 1 2 Loosen the upper metal clamp A and lean it on the connection nut as shown in the photo photo 2 3 Loosen the lower met...

Page 24: ...e photo 8 2 With the pump still rotating insert the hose on the side from which it was removed photo 7 Push the hose until it is completely inserted it must fit into the upper hose holdere 3 Turn the...

Page 25: ...emove the pump from the machine it is necessary to Remove the side casing A Loosen the metal clamps B C Remove the two attachment bolts D Pull the pump holding it by the handle fashioned inside the su...

Page 26: ...pistol B 3 Turn on the spray gun and the pump let the water REPLACEMENT In the case of sensor failure or malfunction use a size 30 he xagonal wrench for replacement operations Insert the wrench throug...

Page 27: ...material in the gun Sensor is bad Check air system for leaks Turn the compressor on open the compressedairpressureregulator on the gun Add water to thin material Use Material Thickness Gauge Check and...

Page 28: ...ontrol set too low Plugged or dirty gun Kinked hose Overload Magneto thermal switch tripped Remove the rear casing press button A indicated in the photo to reset the compressor Thin material Changenoz...

Page 29: ...l number Production year As regards spare parts you must also add the reference code and the explanatory table TABLE 1 2 3 4 5 6 7 8 9 10 Groupe PAGE 27 28 29 30 31 32 34 35 36 37 ACCESSORIES X 38 Gro...

Page 30: ...os Frame Vheel Screw Wascher Rubber buffer Nut Cover Screw Wascher Knob Eyebolts Bulkhead connector Cover Screw Wascher Gasket Cover Gasketkk 30511 20303 8371 95153 12454 52017 30516 54004 54003 21654...

Page 31: ...GROUP RESERVOIR rif 30560 Pos Pos Cover tank Tank 50L Tank Support Screw Wascher Nut Elbow Rapid attachment Rapid attachment Clamp Suction hose 18249 1 18249 18246 901568 34009 52017 20833 30503 2084...

Page 32: ...r Screw Box Knob Card 220 V Card 110 V Display Power plug 220 V 110 V Panel of closing Adhesive panel Screw ON OFF switch General interrupter Potentiometer PUMP ROTATION switch Gasket panel 30514 3400...

Page 33: ...ed manual TABLE 04 GROUP COMPRESSOR rif 30564 GROUP COMPRESSOR rif 36564 110 V Pos Pos Support Screw Wascher Nut Compressor 220 V Compressor 110 V Screw Wascher Fitting Fitting Reduction 2 30517 8371...

Page 34: ...rew Wascher Fitting Prolong Fitting Fitting Fitting Non return valve Solenoid valve Fitting Silencer Screw Nut Fitting Fitting Non return valve Pressure switch Stator 220 V Stator 110 V Connector 220...

Page 35: ...02 07 2016 www larius eu 33 PEGASO 25 5 15 26 21 20 2 3 4 5 6 7 8 33 10 5 12 13 14 16 17 18 19 20 21 22 23 24 23 11 4 1 28 29 30 31 32 27 9 TABLE 06 GROUP PUMPS rif 30561 GROUP PUMPS 110 V rif 30561...

Page 36: ...led Fitting Fitting Ball valve Rapid attachment Clamp Rapid attachment Hose pump Pipe of recycle Reduction Reduction Prolong Nipple Ball valve Hands rubber Rapid attachment 30538 30538 110 8371 34009...

Page 37: ...10 TABLE 07 GROUP OF CONTROL AIR rif 30565 Pos Pos Regulator air Fitting Prolong Elbow Gauge pressure Screw Wascher Plate of support Nut Ball valve 3344 510019 3343 3341 8167 54004 54003 510510 8042...

Page 38: ...3 2 6 5 4 1 1 TABLE 08 GROUP RESERVOIR AIR rif 30563 Pos Pos Reservoir air Support Fitting Valve security Screw Wascher Screw Wascher Nut ll 30540 30518 91557 30559 8371 34009 91062 54003 8042 kk 1 2...

Page 39: ...lete material road Material road Head Ring OR Ring OR Thorn latch sphere Sphere Spring closing sfera Body ros material Cap complete gasket Cap Gasket Ring OR Support rod material Support poster rod ma...

Page 40: ...GASO 38 3 4 5 2 1 0 TABLE 10 GROUP GUN TEX GUN rif 30567 Pos Pos Complete gun without tip Attack for material pipe Nipple Ball valve Check valve Fitting 30540 30525 19165 3563 9902 5313 0 1 2 3 4 5 Co...

Page 41: ...ACCESSORIES Pos Tip 3 Tip 4 Tip 6 Tip 8 Tip 10 Tip 12 21073 21074 21075 21076 21077 21078 1 2 3 4 5 6 Code Description Pos Filtering kit Filter Filter joint 30356 20101 30355 0 1 2 Code Description Po...

Page 42: ...Ediz 02 07 2016 www larius eu PEGASO 40 1 2 1 Pos Tank 100 lt Bag squeezing kit 18243 18244 1 2 Code Description Pos Mod TIX 100 ER portable electric mixer 217570ss 1 Code Description...

Page 43: ...11 6 10 5 8 9 12 1 1 Compressor 30542 2 Solenoid Valve 30537 3 Stator 30537 1 4 Connector 30537 2 5 Pressure switch 30536 6 Reservoir air 30540 7 Regulator air 3344 8 No return valve 50558 9 No retur...

Page 44: ...O C H C T I W S P M U P 6 7 8 Y C N E G R E M E 9 2 1 1 1 0 1 0 2 9 1 8 1 7 1 5 1 6 1 C A C A 4 1 3 1 E V L A V D I O N E L O S R O S S E R P M O C Y A L P S I D I E C E S A F O N O M D R E W O P R O...

Page 45: ...Ediz 02 07 2016 www larius eu 43 PEGASO...

Page 46: ...9 0341 621256 Fax 39 0341 621234 www larius eu 23801 CALOLZIOCORTE LECCO ITALY Via Antonio Stoppani 21 TEL 39 0341 62 11 52 Fax 39 0341 62 12 43 E mail larius larius com Internet http www larius eu MA...

Reviews: