background image

ENGLISH

MAINTENANCE INSTR

UCTION

MAINTENANCE INSTR

UCTION

OPERA

TING AND

OPERA

TING AND

Summary of Contents for Pegaso

Page 1: ...ENGLISH MAINTENANCE INSTRUCTION MAINTENANCE INSTRUCTION OPERATING AND OPERATING AND ...

Page 2: ......

Page 3: ...efore using the equipment An improper use of this machine can cause injuries to people or things It indicates important recommendations about disposal andrecycling process of products in accordance with the environmental regulations A B C D E F G H P Q R S T O U V Y I L X M N W Z STARTING THE SPRAYING OPERATIONS p 14 REGULATIONS p 15 CLEANING AT THE END OF THE WORK p 16 PROCEDURE OF DECOMPRESSION ...

Page 4: ...minum inox MAX 70 db A 980 730 1050 900 110 Kg A B FORWATER BASED MATERIALS ONLY WORKING PRINCIPLE The PEGASO apparatus is an electric pump used for spraying wall plaster or synthetic materials for covering indoor and outdoor walls The apparatus is equipped with a 50 litre tank easy to fill and funnel shaped which makes it easy for the material to fall into the peristaltic pump The pump easy to ma...

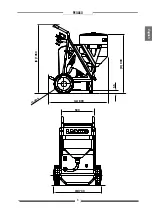
Page 5: ...3 PEGASO English A 890 500 Ø 300 C 1050 D 900 55 B 730 ...

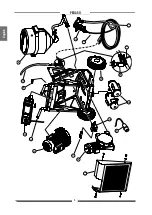
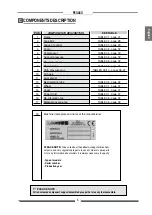
Page 6: ...4 PEGASO English 14 3 1 5 4 6 7 12 8 13 9 10 11 2 15 16 17 18 ...

Page 7: ...or for any information about orders it is always necessary to specify Type of models Serial number Production year Frame Tank 50 L Group of control Pump Compressor Support pressure Pressure sensor Reservoir air High pressure Gun Air hose Air material Recirculation tube Wheel Cover Power Cord Re circulation tap Material passage tap TABLE 01 page 27 TABLE 02 page 28 TABLE 03 page 29 TABLE 06 page 32...

Page 8: ...D ALSO ENVIRONMENTAL regulations in force in the country where the plant is installed and used Read carefully and entirely the following instructions before using the product Please save these instructions in a safe place The unauthorised tampering replacement of oneormorepartscomposingthemachine the useofaccessories tools expendablematerials other than those recommended by the manu facturer can b...

Page 9: ...t The pump is earthed through the earth cable of the supply The gun is earthed through the high pressure flexible hose All the conductors near the work area must be earthed NEVER SPRAY OVER FLAMMABLE PRODUCTS OR SOLVENTS IN CLOSED PLACES NEVER USE THE TOOLING IN PRESENCE OF POTEN TIALLY EXPLOSIVE GAS Always check the product is compatible with the materials composing the equipment pump spray gun f...

Page 10: ...ower supply Check the plant is earthed Check the mains voltage corresponds to the equip ment s rating The supply cable is provided without plug Use a plug whichguaranteestheplantearthing Onlyatechnician or a skilled person should perform the connection of the plug to the electric cable Should anyone use an extension cable between the tooling and the socket it must have the same cha racteristics as...

Page 11: ...to material outlet and the other end to gun material inlet G2 Firmly tighten the metal clamps Install spray nozzle G3 See selection chart page 12 Pullingtriggerwheninstallingnozzles easesassembly G4 Plug power cord in to properly grounded outlet PLEASE NOTE Check the ON OFF switch is on the OFF position 0 before connecting the cable to the mains G G1 G2 G3 G4 ...

Page 12: ...e the basket supporting the tank from the machine body or lift the tank to remove it from its support Connect disconnect the suction hose by opening the rapid coupling H1 that permits the operations of filling emptying the tank The tank is equipped with a cover that can easily be removed in order make inspection and cleaning operations easier H H1 ...

Page 13: ...s off In the ON position the compressor is on 5 Potentiometer rotate clockwise to increase the flow of product 6 Display pump pressure reading LED 7 Power supply socket 220 V for attaching supple mentary apparatus such as a drill 8 Regulator with pressure gauge for adjusting the air flow 9 Rotation control selector switch for the peristaltic pump Three position selector with return to the centre f...

Page 14: ...sert the pump switch Turn the Pump Rotation selector clockwise Close the recycle valve L3 Aim gun into hopper and squeeze gun riger Excessive or prolonged use of Prime Switch can causa to back up into gun air passages causing blockage and or gun air valve failure ALTERNATIVE METHOD WITH RE CIRCULATION Turn sprayer main power ON Turn fluid flow regulator up as necessary Open the recirculating valve...

Page 15: ...un into waste pail until hopper no longer contains water and all water is removed from hose and pump system 5 Insert the gun trigger lock and assemble the nozzle 6 MIXING MATERIAL Make sure the product is suitable to be used with a spray gun Mix material in a separate container Agitate to smooth lump free consistency Make sure the product to be used is com patible with the materials employed for m...

Page 16: ...mmediately Inspect material hose for kinks which could restrict fluid flow Fog Simulates Acoustic Orange Peel Splatter Coat Knock down Elastomers Plastics EIFS Stucco STARTINGTHE SPRAYING OPERATIONS Use the tooling after performing all the SETTING UP operations above described Fill the tank with suitably prepared material Install the nozzle depending on the material you wish to use See the nozzle ...

Page 17: ...urapplications consider size of aggregate in material and coarseness of spray pattern Remember the larger the nozzle the larger the pattern P3 MATERIAL FLOW ADJUSTMENT Test spray pattern on card board Hold gun 18 to 30 in 500 to 700 mm from surface Use this spray distance for most applications Always proceed with regular strokes and circular movements overlap the strokes by 50 Check the evenness o...

Page 18: ...thetriggerdownto expel any remaining product until clean water sprays out WARNING Carry out the re circulation operation repeatedly until only clean water comes out of the gun In case of long storage we recommend you to suck and to leave light mineral oil inside the pumping group and the flexible hose Remove the nozzle from the pistol and was it accura tely PLEASE NOTE In the case of prolonged per...

Page 19: ...flexible material passage hose from the sprayer 3 Insert the sponge sphere into the material hose 4 Reconnect the hose to the sprayer 5 Close the re circulation valve 6 Pour clean water in the tank and position the end of the hose in a bucket 7 Start the sprayer and turn the pump on let the wa ter circulate until the sphere comes out of the hose 8 Retrieve the sponge sphere and wash it with clean ...

Page 20: ...ve come out If you suspect that there may be residual pressure in the hoses due to material clogging loosen the metal hose clamps very slowly until you feel a decrease in pressure owing to the expulsion of the material MOVINGTHE SPRAYER To move the sprayer backwards or forwards it is necessary to tilt it slightly This is done by lightly pushing on the handles with your hands and simultaneously pus...

Page 21: ...ressor Support pressure Flexible product hose Checking for wear or breaks Clean and wash internal parts Wash accurately Wash the internal hose No maintenance required Drain the water We suggest adding a few drops of light mineral oil Inspect for signs of wear Adddropsoflightoilunderneath the trigger We suggest adding a few drops of light mineral oil Checktheproductpassagehose to see if it is worn ...

Page 22: ...he two bolts D photo 4 5 Extract the product passage hose E remove the lower clamp from the hose photo 5 PROCEDURE FOR REPLACINGTHE HOSE WARNING Before starting to replace the hose accura tely clean the machine REMOVAL 1 Remove the side casing photo 1 2 Loosen the upper metal clamp A and lean it on the connection nut as shown in the photo photo 2 ...

Page 23: ... the pump still rotating insert the hose on the side from which it was removed photo 7 Push the hose until it is completely inserted it must fit into the upper hose holdere PLEASE NOTE In order to facilitate the opera tion push the mouth of the hose with the palm of your hand so as to close it photo 9 3 Turn the pump off and disconnect the power supply to the machine 4 At this point reassemble and...

Page 24: ...ump from the machine it is necessary to Remove the side casing A Loosen the metal clamps B C Remove the two attachment bolts D Pull the pump holding it by the handle fashio ned inside the support To reposition it insert the pump pressing it against a positioning stop ...

Page 25: ... from the recycle hose C CLEANING AND REPLACING THE SENSOR CLEANING CLEANING 1 If present insert a flexible hose A connected to the water mains or fill the tank with clean water 2 Closethetaponthevalveregulatingtheflowofmaterial from the pistol B REPLACEMENT In the case of sensor failure or malfunction use a size 30 hexa gonal wrench for replacement operations Insert the wrench through the slot as...

Page 26: ...e sure the power line is connec ted properly Check the extension cord Ensure the On Off switch is on the on position and turn clockwise the pressure control knob Verify and replace it if necessary Verify and replace it if necessary Dischargethepressureinthecircuit and turn the machine off Dismantle the peristaltic pump hose clean it and if necessary replace it Turn the compressor on open the compr...

Page 27: ...l set too low Plugged or dirty gun Kinked hose Overload Magneto thermal switch tripped Thin material Changenozzlestoalargersize See Operation Manual Recommended Nozzle Selection Chart Increase flow control setting Relieve Pressure Clean gun Disentangle the hoses Removetherearcasing pressbutton A indicatedinthephototoresetthe compressor A ...

Page 28: ...duction year NOTE As regards spare parts you must also add the reference code and the explanatory table TABLE Group strutures RIF 30566 Group reservoir RIF 30560 Group of control RIF 30569 Group compressor RIF 30564 Group valves RIF 30562 Group pumps RIF 30561 Group of control air RIF 30565 Group reservoir air RIF 30563 Group gun Turbo Gun RIF 30568 Group gun Tex Gun RIF 30567 1 2 3 4 5 6 7 8 9 10...

Page 29: ...Wascher Knob Eyebolts Bulkhead connector Cover Screw Wascher Gasket Cover Gasketkk 30511 20303 8371 95153 12454 52017 30516 54004 54003 21654 20272 19176 30515 54004 54003 30541 20585 30650k 1 2 3 4 5 6 7 8 9 10 11 12 13 14 15 16 17 181 Code Description Code Description 16 1 2 3 4 2 6 5 13 15 14 10 11 12 7 7 8 9 17 18 ...

Page 30: ... Cover tank Tank 50L Tank Support Screw Wascher Nut Elbow Rapid attachment Rapid attachment Clamp Suction hose 18249 1 18249 18246 901568 34009 52017 20833 30503 20842 30552 30576 1 2 3 4 5 6 7 8 9 10 11 Code Description Code Description 1 2 3 4 5 6 11 7 8 9 10 ...

Page 31: ...x Knob Card 220 V Card 110 V Display Power plug 220 V 110 V Panel of closing Adhesive panel Screw ON OFF switch General interrupter Potentiometer PUMP ROTATION switch Gasket panel 30514 34009 8371 30545 4255 30570 30570 110 30544 30543 30546 30523 96028 30547 30548 30549 30612 30358 1 2 3 4 5 6 6A 7 8 9 10 11 12 13 14 15 16 Code Description Code Description ...

Page 32: ...PRESSOR rif 30564 2 3 6 7 5 1 8 4 9 10 Pos Pos Support Screw Wascher Nut Compressor 220 V Compressor 110 V Screw Wascher Fitting Fitting Reduction 2 30517 8371 95153 53002 4 30542 30542 110 6130 33005 5359 510049 30555 l 1 2 3 4 5 5A 6 7 8 9 10 1 Code Description Code Description GROUP COMPRESSOR rif 36564 110 V ...

Page 33: ...r Fitting Prolong Fitting Fitting Fitting Non return valve Solenoid valve Fitting Silencer Screw Nut Fitting Fitting Non return valve Pressure switch Stator 220 V Stator 110 V Connector 220 V Connector 110 V Prolong 30519 8371 34009 30556 3378 8123 8063 3365 9902 30537 11719 510423 11765 53002 4 30557 22012 30558 30536 30537 1 30589 30537 2 30590 22027 1 2 3 4 5 6 7 8 9 10 11 12 13 14 15 16 17 18 ...

Page 34: ...32 PEGASO English TABLE 06 GROUP PUMPS rif 30561 GROUP PUMPS 110 V rif 30561 110 25 5 15 26 21 20 2 3 4 5 6 7 8 33 10 5 12 13 14 16 17 18 19 20 21 22 23 24 23 11 4 1 28 29 30 31 32 27 9 ...

Page 35: ...pe of recycle Reduction Reduction Prolong Nipple Ball valve Hands rubber Rapid attachment 30538 30538 110 8371 34009 30535 30553 30522 8371 34009 30520 96842 18153 30521 8406 30513 30539 54003 54004 30524 30534 8373 30532 30533 30552 30575 30528 30578 30507 30597 20837 96252 96253 30598 20843 1 1A 2 3 4 5 6 7 8 9 10 11 12 13 14 15 16 17 18 19 20 21 22 23 24 25 26 27 28 29 30 31 32 33k Code Descrip...

Page 36: ...if 30565 Pos Pos Regulator air Fitting Prolong Elbow Gauge pressure Screw Wascher Plate of support Nut Ball valve 3344 510019 3343 3341 8167 54004 54003 510510 8042 4004gg 1 2 3 4 5 6 7 8 9 10 Code Description Code Description 2 1 2 3 4 5 9 8 1 6 7 10 ...

Page 37: ...VOIR AIR rif 30563 Pos Pos Reservoir air Support Fitting Valve security Screw Wascher Screw Wascher Nut ll 30540 30518 91557 30559 8371 34009 91062 54003 8042 kk 1 2 3 4 5 6 7 8 9 1 Code Description Code Description 3 8 9 3 7 3 2 6 5 4 1 1 ...

Page 38: ...itting1 Complete material road Gasket Working pressure plate Ball valve Air attack OR 21050 21051 21052 21053 21054 21056 21057 1 21058 21059 21060 21061 21062 21063 21064 21083 21065 96729 21066 21067 18755 21084 21068 21069 21070 52019 21072 21098 21079 21081 21082 4004 53131 82009 1 2 3 4 5 6 7 8 9 10 11 12 13 14 15 16 17 18 19 20 21 22 23 24 25 26 27 28 29 30 31 32 33 Code Description Code Des...

Page 39: ...BLE 10 GROUP GUN TEX GUN rif 30567 Pos Pos Complete gun without tip Attack for material pipe Nipple Ball valve Check valve Fitting 30540 30525 19165 3563 9902 5313 0 1 2 3 4 5 Code Description Code Description 3 4 5 2 1 0 ...

Page 40: ...Ø 6 Tip Ø 8 Tip Ø 10 Tip Ø 12 21073 21074 21075 21076 21077 21078 1 2 3 4 5 6 Code Description Pos Filtering kit Filter Filter joint 30356 20101 30355 0 1 2 Code Description Pos Toolbox Box with sponge balls 7200 30588 1 2 Code Description 2 3 4 5 6 1 2 0 1 2 ...

Page 41: ...39 PEGASO English Pos Tank 100 lt Bag squeezing kit 18243 18244 1 2 Code Description Pos Mod TIX 100 ER portable electric mixer 217570ss 1 Code Description 1 2 1 ...

Page 42: ... 8 9 12 1 1 Compressor 30542 2 Solenoid Valve 30537 3 Stator 30537 1 4 Connector 30537 2 5 Pressure switch 30536 6 Reservoir air 30540 7 Regulator air 3344 8 No return valve 50558 9 No return valve 9902 10 Security valve 30559 11 Ball valve 4004 12 Bulkhead connector 19176 2 3 4 ...

Page 43: ...7 8 Y C N E G R E M E 9 2 1 1 1 0 1 0 2 9 1 8 1 7 1 5 1 6 1 C A C A 4 1 3 1 E V L A V D I O N E L O S R O S S E R P M O C Y A L P S I D I E C E S A F O N O M D R E W O P R O C P M U P 1 R K 0 0 1 1 R K 0 0 1 1 F A 0 2 1 F A 0 2 C A R O T O M C A R O T O M 1 2 C A R O T O M C A R O T O M 1 2 2 F A 0 2 2 F A 0 2 H C T I W S WIRING DIAGRAM Z ...

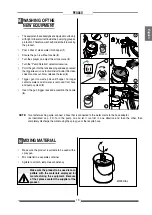
Page 44: ...42 PEGASO English ...

Page 45: ......

Page 46: ...ail larius larius com Internet http www larius com MANUFACTURER DIRECT LINE Tel 39 0341 621256 Fax 39 0341 621234 CUSTOMERS TECHNICAL SERVICE Due to a constant product improvement programme the factory reserves the right to modify technical details mentioned in this manual without prior notice ...

Reviews: