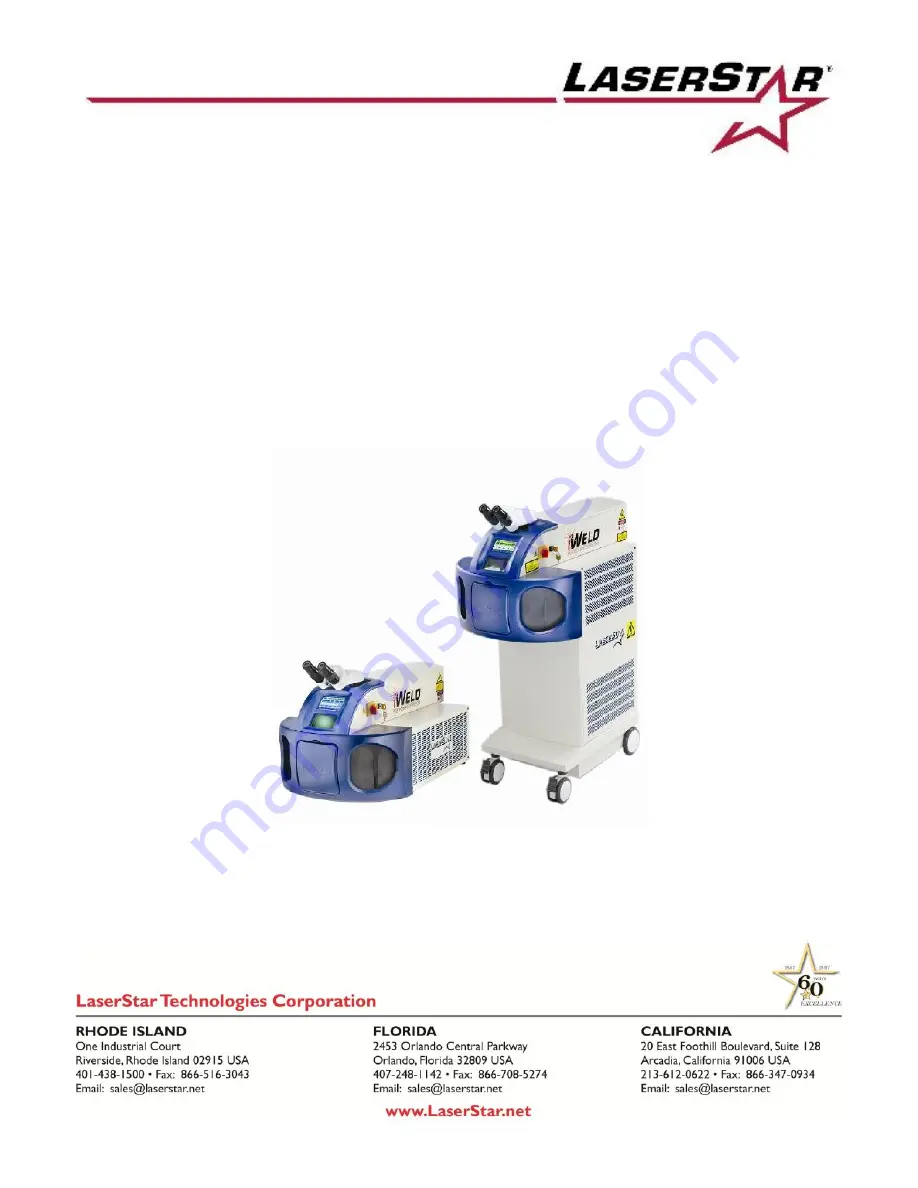
background image

iWeld

®

Laser Systems

900 Series

Operation & Maintenance Manual

(Doc#-87-99990-991)

(Version 991.6 November 2019)

© 2019 All Rights Reserved

Benchtop

Professional

Summary of Contents for iWeld 900 Series

Page 1: ...iWeld Laser Systems 900 Series Operation Maintenance Manual Doc 87 99990 991 Version 991 6 November 2019 2019 All Rights Reserved Benchtop Professional...

Page 2: ...LaserStar Workstation Operation Maintenance Manual 900 Series Ver 991 6 November 2019 2...

Page 3: ...ltage Directive 2014 30 EU EMC Directive Standard s to which Conformity is Declared IEC 60825 1 2014 Ed 3 0 IEC 61010 1 2010 Ed 3 0 IEC 61000 6 2 2006 IEC 61000 6 4 2007 This declaration is issued und...

Page 4: ...r Electrical Equipment for Measurement Control and Laboratory Use Part 1 General Requirements CAN CSA C22 2 61010 12 2012 Ed 3 U2 Safety Requirements for Electrical Equipment for Measurement Control a...

Page 5: ...Capacitor Bank Simmer Supply 22 Heat Exchanger 22 Inert Gas Supply 23 Foot Pedal 23 Exhaust Unit 23 Control Elements External to Welding Chamber Area 23 Control Elements in the Welding Chamber Area 23...

Page 6: ...ent 53 Setting Operation Parameters 55 Storing Operating Parameters 62 Recalling Stored Parameters 65 Welding 65 Resetting Pulse Count 67 Text Entry Mode 67 Switching OFF 67 Status Indications 68 Puls...

Page 7: ...Service E Cap Charging Supplies 121 Service F Memory Battery Replacement Control Board 122 Service G Benchtop Fuse Replacement Rear System Description and 124 Connections Service H Professional Fuse...

Page 8: ...nce Manual 900 Series Ver 991 6 November 2019 8 Appendix D Pulse Performance Profile Technology 149 a Background A1 b About P3 Technology A2 c Getting Started A2 d Using P3 Technology A3 e Memory Loca...

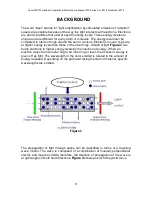
Page 9: ...than those in the inner rings A flash of light Figure 1 can bump electrons to higher energy levels by the injection of energy When an electron drops from an outer ring to an inner ring or level the ex...

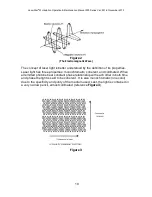
Page 10: ...roperties Laser light has three properties monochromatic coherent and collimated When all emitted photons bear constant phase relationship with each other in both time and phase the light is said to b...

Page 11: ...Fig 4 The photons leave through the photons back and forth continuing this partially silvered mirror at one end This is process of stimulated emission and laser light 1 amplification Figures 1 to 4 s...

Page 12: ...t on the material can be influenced by the operating parameters VOLTAGE and PULSE LENGTH width The voltage has influence on the amplitude the pulse length influences the width of the laser pulse In pr...

Page 13: ...ngs for other materials can be obtained by following the adjustment technique described The quality of the weld can be increased for certain materials by using inert gas This product is equipped with...

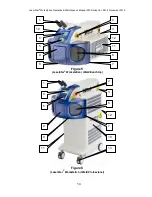
Page 14: ...Operation Maintenance Manual 900 Series Ver 991 6 November 2019 14 Figure 5 LaserStar Workstation iWeld Benchtop Figure 6 LaserStar Workstation iWeld Professional 1 3 2 4 5 6 7 8 9 12 11 10 13 1 4 5...

Page 15: ...del dependent 10 Microprocessor and control system inside cabinet 11 Power Supply Unit flashlamp power supply capacitor bank heat exchanger INSIDE CABINET 12 EZ LINK USB connector Front or Rear of mac...

Page 16: ...ozzle for cooling work pieces Foot pedal switch for triggering laser pulses and inert gas supply argon Welding chamber area exhaust system with filter Specifications Laser crystal Nd YAG Wavelength 10...

Page 17: ...s Cooling Internal water air heat exchanger Particle filter and de ionization water filter within the internal cooling water circuit Maximum temperature of cooling water 50 C or 65 C model dependent M...

Page 18: ...hutter within the Stereo Microscope Supply Voltage System Ready Optical Viewing System Various optical viewing systems with crosshair with various magnifications Observation window for direct observat...

Page 19: ...otective glass lens 5 The view shutter 2 protects the eyes against laser radiation and the plasma light including the ultra violet components that is produced during the welding pulse The view shutter...

Page 20: ...pulse triggering Laser Delivery System Typical Rail Configuration All components of the high energy pulse laser are mounted on an optical rail The individual components are explained in the following...

Page 21: ...oduct It controls The flashlamp power supply for laser pulse generation All operating and indicating elements The safety elements view shutter in the optical viewing system and laser shutter Performs...

Page 22: ...ally discharging the capacitors of the capacitor bank For this a transistor switch connects the charged capacitor bank to the laser flashlamp triggered by fully pressing the pedal switch The on time i...

Page 23: ...cooling The welding chamber area has a fixed gas nozzle for the inert gas and a flexible plastic inert gas line or an optional factory installed compressed air nozzle Foot Pedal There is a two stage...

Page 24: ...l laser functions can only be switched on with the aid of the key switch 3 Joystick s Safety Shutter Button Store Button Recall Button Gas control and Dimmer control are normally inside the welding ch...

Page 25: ...ating Parameters Model dependent Used to store optimized parameters for specific applications 6 Recalling Stored Parameters Model dependent Used to recall selected sets of operating parameters Digital...

Page 26: ...etime of the touch screen display Inappropriate items i e pencils pointers pens etc can cause the touch screen to have erratic or faulty operation and will reduce the lifetime and void the warranty Ev...

Page 27: ...ssing and holding down the foot pedal o If the Burst Mode B is set the laser will release the number of pulses that the operator chooses by depressing and holding the foot pedal Remote Interlock Conne...

Page 28: ...and heeding all the information in this Manual Carrying out all the necessary inspections and maintenance work In addition to general information on the safety regulations that ensure safe operation o...

Page 29: ...afe Use of Lasers on accident prevention for laser radiation or the equivalent national or international regulations e g IEC 60825 1 2014 working with the laser equipment If a modification by the user...

Page 30: ...ed laser injury has occurred immediately Turn off the laser Mains Power Switch Notify your laser safety officer and safety specialist Consult a doctor or go to the hospital When operated without the w...

Page 31: ...tallation must be complied with especially the OHSA regulations ANSI Z136 1 2014 Safe Use of Lasers on accident prevention for laser radiation or the equivalent national or international regulations e...

Page 32: ...lent national or international regulations e g IEC 60825 1 2014 To read the chapter concerning safety and warnings in this Manual and confirm this by their signature Dangers when working with the Prod...

Page 33: ...adiation or the equivalent national or international regulations e g IEC 60825 1 2014 are allowed to work with the device Trainees are only allowed to work with this product under the supervision of s...

Page 34: ...xious Gases and Vapors Avoid welding vapor by correct use of the inert gas The laser radiation produced by this laser product is capable of melting burning or vaporizing almost any material Depending...

Page 35: ...e training from LaserStar Technologies on the proper use of the LaserStar Workstation Please note This laser product may only be used for the intended purpose Never aim the laser beam at humans or ani...

Page 36: ...LING Figure 1 9 Labeling Housing Front Sides and Etc Typical Figure 1 Mains Power Key Switch Figure 2 Right Side View Figure 3 View Window 1a 71 40026 2 810 00 019 9 810 8001 10 Note Read the Manual b...

Page 37: ...403 XXX Model Dependent 11 403 450 8a 01 40010 4 13 40011 8a 01 40010 6a 71 40028 13 15 479 34XX AC Voltage Label Note Same VAC rating as Cert ID Label 10 01 40009 10 8a 6a 71 40028 Note Required on a...

Page 38: ...ew iWeld Professional Figure 7 Focus Head Assembly 2 810 00 019 Warning Label 1a 01 40026 6a 71 40028 4 13 40011 7 403 XXX Model Dependent 8a 01 40010 Note Locate Above or Near AC input panel 13 15 47...

Page 39: ...ual 900 Series Ver 991 6 November 2019 39 Figure 8 Pump Chamber Figure 9 iWeld Professional Flashlamp Cap Charging Power Supplies 12 01 40012 10 01 40009 Danger High Voltage Remove Power before Servic...

Page 40: ...and 1040 11 except for deviations pursuant to Laser Notice No 50 dated July 26 2001 1a or 1b Aperture Label model dependent 1a 71 40026 1b 01 40026 2 Warning Label 2 810 00 019 3a or 3b Laser Radiatio...

Page 41: ...1 5 Visible Laser Radiation Output and Standards Information Label Model Dependent 5 48 40004 6a or 6b Non Interlocked Protective Housing Label Model Dependent 6a 71 40028 6b 01 40028 7 Certification...

Page 42: ...Plug prior to opening cabinet Label 8b High Voltage Warning Label Use caution when opening 8a 8b 01 40010 810 00 016 9 The user has to read the manual prior to use label 9 810 8001 10 10 Warning High...

Page 43: ...Manual 900 Series Ver 991 6 November 2019 43 12 Wait 5 Minutes Discharge Label 12 01 40012 13 100 Volts AC Label Model Dependent 13 479 3412 14 120 Volts AC Label Model Dependent 14 479 3413 15 208 24...

Page 44: ...e product should not be positioned so it is difficult to operate the disconnecting device The product may be connected to the installation site s optional external filtration or exhaust system by conn...

Page 45: ...ersion and accessories The delivery can optionally include additional parts Please compare the delivered parts with your packing slip Instructions for lifting and carrying the iWeld Benchtop The iWeld...

Page 46: ...upply cord the user must use a supply cord with the appropriate RATING DO NOT USE INADEQUATELY RATED CORDS Installation Brackets for iWeld Benchtop and Professional Series for Floor or Wall Installati...

Page 47: ...orm A contact normally open that is held closed to enable laser operation A licensed professional in compliance with applicable electric codes should perform the wiring The shorting connection in the...

Page 48: ...ection IX Service A or B Initial Filling Refilling of the Distilled Cooling Water which is model dependent Electromagnetic Compatibility This device meets the EMC standards listed in the Declaration o...

Page 49: ...he flashlamp chamber located in the top of the laser rail must be drained and the balance of the system hoses pumps drained These activities should only be performed by our LaserStar technicians or au...

Page 50: ...actions of the product that are marked by the symbol The system can be operated from the Digital Messaging Touch Screen Display or the Joystick Panel Touch Screen Buttons are Icons Pictograms used to...

Page 51: ...r area may come on Note Depends on Dimmer setting Wait until the self test has complete Figure 2 The indicator located within the OK display button in the Digital Message Touch Screen Display will tur...

Page 52: ...ce Adjusting the Binocular Stereo Microscope The binocular stereo microscope is factory adjusted for normal sighted persons It may be necessary to readjust it for specific operators or if the operator...

Page 53: ...re 4 Secure scope by tightening two Mounting screws Referring to diagram the mounting screws are located between the center adjustment screw and the left and right adjustment screws For EZ VIEW Cobra...

Page 54: ...LaserStar Workstation Operation Maintenance Manual 900 Series Ver 991 6 November 2019 54 Figure 4 Cross Hair Alignment...

Page 55: ...cator Screen Description OK Red System is not ready to operate Safety shutter will not open OK Green System is ready to operate The safety shutter can be opened OK Pressing this button will enter the...

Page 56: ...st or Pulse Suppression o Hertz Press this button to change the value The display will start to blink Use the up down arrows to change the value and then press OK o Burst Press this button to change t...

Page 57: ...the memory location has been selected Note The second button activation is in response to a question Recall memory XX The memory location description will change from gray to yellow in color when the...

Page 58: ...R ATTENTION User must input desired weld parameters when returning to Main Screen Energy Usage 0 Up Dn to select SHOW Press ENTER SYS Press ENTER CLEAR Press ON Volt Adj 0 0 Up Dn to set value ENTER B...

Page 59: ...letely clears the memory location description Pressing these arrows to select the alpha numeric characters SAVE Press this button to save memory location description BS Press this button to delete the...

Page 60: ...LaserStar Workstation Operation Maintenance Manual 900 Series Ver 991 6 November 2019 60 Figure 8a Memory Screen Figure 8b Clear Memory 4 by Pressing CLEAR Figure 9 ABC Screen Volts 300 Volts 300...

Page 61: ...LaserStar Workstation Operation Maintenance Manual 900 Series Ver 991 6 November 2019 61 Figure 10 123 Screen Figure 11 Recall Screen Figure 12 Memory Recalled Screen...

Page 62: ...erating parameters except pulse suppression using the joystick in the welding chamber area This panel has Save Recall buttons Reference Section I The LaserStar Workstation Control Elements in Welding...

Page 63: ...tory text Pulse Profile Shape P Technology Beam Expander Offset Model Option Dependent Note The beam expander offset allows the user to maintain the same screen value for DIA but the actual beam diame...

Page 64: ...all memory location settings parameters You can use the joystick memory save button in the welding chamber area or you can use the Digital Messaging Touch Screen Display to save operating parameters i...

Page 65: ...ation number is blinking Once the memory location number stops blinking the weld parameters revert back to the previous values Press the recall button on the touch screen twice or press the recall but...

Page 66: ...lue for voltage is reduced the Safety Shutter is closed for safety reasons For inert gas welding the gas outlet at the end of the gas tube is to be positioned near to the laser focal point A position...

Page 67: ...the other on the same welding point After each laser pulse and after changes to the voltage value the OK button indicator will turn red When the system is ready to fire the OK button indicator will t...

Page 68: ...ator is green in the OK button the system is ready to weld In the LaserStar Workstation the micro controller monitors the conditions for pulse release on the basis of the following criteria If the saf...

Page 69: ...r welding system s internal operating system via a personal computer This feature offers many advanced communication features allowing the user to perform a wide range of tasks Some of the Key feature...

Page 70: ...ipment is live using a voltmeter or a voltage tester Measure the conductors against each other and against the protective ground conductor to check whether they are live Always ground first Short circ...

Page 71: ...ntenance Interval Alert Reminders The laser is equipped with the following maintenance interval reminders that will appear in the system display at the intervals indicated in the table below Note The...

Page 72: ...LaserStar Workstation Operation Maintenance Manual 900 Series Ver 991 6 November 2019 72 Digital Messaging Touch Screen Display Maintenance Alerts Table 1 Note DI refers to Distilled Water...

Page 73: ...mable can be used with a lint free wipe After cleaning the lens use a clean lint free wipe to remove any haze Note When metal splashes adhere to the protective disk a replacement disk will be needed T...

Page 74: ...fer to section titled Filter Replacement in the Maintenance section of this manual 5 Check and replace the all Laser cabinet air filters if dirty 6 Check the laser s energy as follows Set parameters a...

Page 75: ...illing of Distilled Cooling Water Bleeding the Pump Etc Reference Service Section Replacement of the Splash Protective Window and Laser Protective Window The observation window is a combination of two...

Page 76: ...gon socket screws The windows must fit well to the front elements of the frame and must not clatter after being fitted Filter Replacement Chamber Area Exhaust 1 Turn off the key and the main power swi...

Page 77: ...s spilled onto touch panel soak it up immediately with absorbent cloth Cleaner must be neither acid nor alkali neutral pH When using cleaner avoid contact with the edges of the film or glass Wipe the...

Page 78: ...the failure has not yet been eliminated During maintenance activities with an opened device OSHA regulations about accident prevention for laser radiation or equivalent national or international regu...

Page 79: ...pressing the foot pedal will produce the number of laser pulses that the operator has selected Storing Into Memory Save S key depressed Parameters are being stored into a memory location Memory Recall...

Page 80: ...rge Fault Power supply is not discharging IGBT Fault Reset fault or turn key switch off on Beam Expander Low Fault Beam Expander zero signal not detected Operation can continue however beam diameter i...

Page 81: ...LaserStar Workstation Operation Maintenance Manual 900 Series Ver 991 6 November 2019 81 ALARMS Table 1...

Page 82: ...157 Ceramic Reflector 31 10045 Chamber opening protective cuff flap 81 66038 Control Board Assembly P3 111 30 3007 DI Water Pump 100VAC 405 3500 25 DI Water Pump 120VAC 185 00 0011 DI Water Pump 220VA...

Page 83: ...equired 466 025 O ring YAG Rod 2 required 466 0915 Power Cord 120 VAC Model SJT 3x14AWG 60 300V 405 6199 314 Power Cord 208 240 VAC Model SVT 3X18AWG 60 C 300V 405 6199 255 Power Supply 24VDC All mode...

Page 84: ...ts flashlamp protective disk flashlamp connectors water filters air filters De ionized water filters cuffs fuses halogen lamps LED lamps F Theta Lens The machinery warranty applies to all products whe...

Page 85: ...nse of the Buyer Authority for return of equipment for repair MUST have a RMA or CRA number assigned and clearly marked on the exterior of the container Governing Law The sale and purchase of the equi...

Page 86: ...e Mains AC Power and Key Switch will need to be on for part of the test Extreme care must be taken when observing the state of internal led indicators topping off the Distilled Water Bottle purging ai...

Page 87: ...op Towels Blue Clean Room Vinyl PVC Gloves Powder Free DEHP DOP Free Clean plastic container bucket 6 Liters 1 5 gallons Small Funnel ATTENTION The system must be filled with distilled water before tu...

Page 88: ...he bottle still in the base of the machine enclosure 8 To prime the water cooling system insert the by pass hose back into the bottle and open the by pass pinch valve clamp Figure 1 9 Plug in the main...

Page 89: ...to the maximum level line using a clean funnel in the fill hole and reinstall the by pass hose Figure 1 6 Replace the side panel and install the screws Note Make sure the ground wire is connected 7 Pl...

Page 90: ...ap and attach the top hose to the bottle cap Attention Please make sure the top hose disconnect fitting is threaded on correctly and the fitting is tight as shown in Figure 2 10 Fill the distilled wat...

Page 91: ...e Off for at least five minutes before servicing 4 Remove the two screws securing left side panel Lift up the panel and disconnect the ground wire Note Be careful not to break the panel ground wire 5...

Page 92: ...wn in Figure 5 and blow the air through the cooling system until there is no water going into the water bottle 13 Empty the water bottle and re connect the front cooling hose female fitting to the fro...

Page 93: ...le Cap Filter Assembly By pass pinch valve normally closed By pass Hose Distilled water fill hole Note Distilled water bottle filling can be done from the left side of the machine by using the fill by...

Page 94: ...ure 3 Water Bottle Bottom Disconnect Fitting Level Sensor Connector Figure 4 Distilled Water Filter Replacement Four socket head cap screws Distilled water filter Bottom water bottle disconnect fittin...

Page 95: ...er 991 6 November 2019 95 Figure 5 Pump Chamber Assembly with Cooling Hose Connections 1 Front pump chamber male cooling hose fitting 2 Front cooling hose female fitting 3 Rear pump chamber male cooli...

Page 96: ...ter from a reputable supplier Use of tap water will damage the device and void the warranty A Initial Filling of the Laser Welding System with Distilled Water 1 Make sure the machine switches are OFF...

Page 97: ...r bottle twist cap as shown in Figure 9 Note Make sure the Twist Cap is tight 14 Make sure the Mains Power switch and Key switch are OFF 0 Plug in the AC Power Cord Attention Failure to comply with th...

Page 98: ...the Distilled Water Bottle Note Reference the procedure steps described in Section A Initial Filling of the laser Welding System with Distilled Water C Changing the Distilled Water Filter Replacing th...

Page 99: ...r male cooling hose fitting 1 as shown in Figure 10 Attention Place a paper towel below fitting before loosening to collect any water 6 Connect the female garden hose air assembly to the front pump ch...

Page 100: ...moved Ground Wire Carefully slide Top Cover back until it can be lifted off Note Be careful of the ground wire Place top cover on other side of the welder enclosure or remove Note The Max Filter In li...

Page 101: ...ovember 2019 101 Figure 3 Top Cover Removed Left Side Cover Fasteners being Removed Figure 4 Left Side Cover Removed Remove the ground wire Remove the blue filter media screw screw screw screw Remove...

Page 102: ...Series Ver 991 6 November 2019 102 Figure 5 Distilled Water Bottle Located in Rear of Enclosure Figure 6 Remove the Distilled Water Bottle Cap Distilled Water Bottle Assembly Remove Distilled Water B...

Page 103: ...assembly out of the bottle and place in clean container Note Distilled Water may leak out Attention Please do not touch filter media with bare hands Carefully pour Distilled Water into Distilled Wate...

Page 104: ...ure 10 Pump Chamber Assembly with Cooling Hose Connections Re install the Distilled Water Filter Assembly screw on the Twist Cap Twist Cap should be tightened by hand Distilled Water 2 Front Cooling H...

Page 105: ...Room Vinyl PVC Gloves Powder Free DEHP DOP Free Lint Free Cloth or preferred LaserStar P N 810 2356 quantity 1 or 810 2354 quantity 90 Absorbent Paper Towels Ex Scott Shop Towels Blue or good quality...

Page 106: ...must be full before replacing the flashlamp Proceed to Service B section of this manual and select the appropriate section for servicing Note The reason for lowering the water in the bottle is to allo...

Page 107: ...pump chamber O rings must not be reused The iWeld Laser Pump Chamber Repair Instructions 87 99990 187 are available on the LaserStar Customers Website Note Please contact the LaserStar Service Depart...

Page 108: ...Figure 2a Disconnect Flashlamp Wires Left Side View of Laser Rail Figure 2b Figure 2c Benchtop Trigger Transformer Connector Professional Trigger Transformer Connector Disconnect Red L and Black L fl...

Page 109: ...Attention Do not disconnect either hose fitting at this time Figure 3 Paper Towels Placed Below Hose Fittings Step 4 Figure 4 Remove the 3 screws securing the pump chamber assembly to the rail Figure...

Page 110: ...mediately rotate the chamber with the hose fittings up Attention Keep a small bucket available to empty any remaining water from the pump chamber Please make sure paper towels are available to wipe up...

Page 111: ...sing a M2 5 Hex Key Wrench Figure 7 Remove End Cap Step 8 Figure 8 Rotate pump chamber red wire facing outward remove the end cap screws and end cap and then gently pull on the red wire until the O ri...

Page 112: ...page 107 of this operation manual Please discard the flashlamp per applicable regulations Figure 9 Removing the Flashlamp Step 10 Figure 10 Remove the new flashlamp assembly from the box and straight...

Page 113: ...Install a new O ring on both ends of the flashlamp assembly Figure 11 New O ring Installed Step 12 Figure 12 Install end caps with screws on both ends of the Pump Chamber Assembly Attention Do not tig...

Page 114: ...pump chamber Figure13 Flashlamp Installed Step 14 Figure 14 Tighten the end cap screws on both ends of the pump chamber assembly and verify that each end of the flashlamp extends equally Note Red wire...

Page 115: ...htened Figure 19 Position Pump Chamber Assembly against End Stop Rail Reference Edge Carefully place the Pump Chamber Assembly back in the Laser Rail up against the End Stop Put the screws that retain...

Page 116: ...res to the flashlamp rail connector as shown in Figure 18 Figure 17 Flashlamp Wires Connected Step 18 Figure 18 Flashlamp wire connections Figure 18 Flashlamp Wires Left Side View of Laser Rail Connec...

Page 117: ...y will age after just a few pulses causing rapid loss of laser power and any contamination on the lamp surface will dramatically shorten the lamp s life Step 19 Figure 19a Benchtop 19b Professional Co...

Page 118: ...not block the laser beam path Figure 20 Install Dust Covers in Laser Rail Assembly Step 21 Figure 21 Connect the water cooling hoses to the pump chamber and tighten Figure 21 Connect Tighten Both Hos...

Page 119: ...lamp O ring seals and pump chamber hose connections Step 23 Install the enclosure side cover and top cover Attention Make sure to connect the ground wire Step 24 The welder is ready for use In the int...

Page 120: ...d bottom Red on Lamp not okay Figure 1 Simmer Supply Assembly Notes All measurements taken across the flashlamp contacts with a voltmeter set to a range greater than 500 VDC Lamp Good Led For and outp...

Page 121: ...rvice E Cap Charging Supplies There are four 4 basic configurations of the Cap Charging Supplies Figure 1 Cap Charger Single Supply 120VAC or 220 230VAC Power Indicator Green lit power on Green off po...

Page 122: ...urn the Key switch to O Off turn Mains Power switch to O Off 2 Make sure the AC power is Off shut off the Mains Circuit Breaker on the rear of the machine pull out the mains plug or shut off the wall...

Page 123: ...Carefully slide the battery out in the direction of the arrow Reference Figure 1b Note Take care not to over bend the battery retaining clip Battery Retaining Clip Battery removal or replacement meth...

Page 124: ...y AC power has been disconnected 2 Move machine to allow access to rear 3 Remove external fuses and check replace as needed 4 Re connect AC power Test Figure 1 Rear View Fuses Note Refer to Label Repr...

Page 125: ...n the rear of the machine and compare with the power conditions at the installation site Picture of Remote Interlock Connector Plug which is installed in this input receptacle Remote Interlock Connect...

Page 126: ...ductions for detail label description Figure 1 Rear View Air Argon Gas EZ Link Remote Interlock Video Out Panel Exhaust Output Mains Power Panel Heat Exchanger Fan 7 Certification Identification ID La...

Page 127: ...2 Table 1 1 Verify AC power has been disconnected 2 Move machine to allow access to rear 3 Remove external fuses and check replace as needed 4 Re connect AC power Test Figure 2 Mains Power Panel Caut...

Page 128: ...e 3 Air Argon Gas EZ Link Remote Interlock Video Out Panel Picture of Remote Interlock Connector Plug which is installed in this input receptacle Air Input Connector Optional Argon Gas Inert Gas Input...

Page 129: ...Power Control Water Bottle Figure 2 Left Side Control Power Supply 24VDC Cap Charging Supply Note AC Voltage Flashlamp Chamber Safety Shutter AC Line Filter AC Simmer Supply behind 24VDC Power Supply...

Page 130: ...ance Manual 900 Series Ver 991 6 November 2019 130 Laser Rail Figure 3 Laser Rail Typical Rear Mirror Assembly Flashlamp Chamber Trigger Transformer Safety Shutter Front Mirror Assembly Electronic Bea...

Page 131: ...System Components Power Control Distilled Water Bottle Figure 1 Power Control Distilled Water Right Side Simmer Supply Control Board Flashlamp Supply Cap Charging Supply Memory Back Up Battery Replac...

Page 132: ...ies Fan Controller Left Side Laser Rail Figure 3 Laser Rail Typical Power Supply 24VDC AC Line Filter Power Supply 48VDC Heat Exchanger Fan Light Dimmer Board Fan Controller Board Ground Bus Rear Mirr...

Page 133: ...ed in all iWeld models prior to shipment iWeld Benchtop Figure 1 Brackets iWeld Professional Figure 2 Brackets in Upper Position Figure 3 Brackets in Lower Position Note Use an 8mm socket wrench for t...

Page 134: ...LaserStar Workstation Operation Maintenance Manual 900 Series Ver 991 6 November 2019 134...

Page 135: ...LaserStar Workstation Operation Maintenance Manual 900 Series Ver 991 6 November 2019 135 X APPENDIXES...

Page 136: ...LaserStar Workstation Operation Maintenance Manual 900 Series Ver 991 6 November 2019 136...

Page 137: ...n the display for the parameter flashing Menu The Joystick is pushed toward the Menu symbol to select the parameter to be changed going to the left in the display The selected parameter will flash Men...

Page 138: ...oystick This function is used to recall stored operating parameters The following example will show how to store recall operating parameters STORE RECALL DEFINITIONS EXAMPLE Joystick The following are...

Page 139: ...th the previous parameters A left motion of the Joystick will exit the store or recall mode Example on next page Example Joystick Action Display Line Display Information Values Currently in Display TL...

Page 140: ...velop a technical description of this memory location Before entering the Text Mode the user must select the appropriate memory location to be changed updated The Text Mode is now entered by pressing...

Page 141: ...sed III Press O for 5sec TL Version 5 30iJ BL Configuration Move J Down 2X TL Configuration BL Text Description Move J Right RT 1X TL 24III_ BL UpDn Sel RT Accept Move J Up or Down to E TL 24IIIE BL U...

Page 142: ...o e TL 24IIIExample BL UpDn Sel RT Accept Move J Right RT 1X TL 24IIIExample_ BL UpDn Sel RT Accept Move J Left Exit 1X TL 200V 1 0mS 3Hz 0B 0 2mm BL Laser SHTR closed III Note If all 15 locations are...

Page 143: ...en Figure 1 Password protection is enabled ON Password Protection ON restricts the usable buttons on the touch screen display The following buttons on the Main Screen are still active Figure 1 Press t...

Page 144: ...e second digit 0 will start to blink Figure 7 Press the UP arrow to set the second number Press MENU on the Password Screen and a will be loaded into the second digit and the third digit 0 will start...

Page 145: ...LaserStar Workstation Operation Maintenance Manual 900 Series Ver 991 6 November 2019 145 Figure 3 Up or Down Arrow NO or YES Figure 4 YES ON EXIT EXIT Figure 5 MEM...

Page 146: ...tar Workstation Operation Maintenance Manual 900 Series Ver 991 6 November 2019 146 Figure 6 MENU UP or DN ARROW 4 Figure 7 MENU UP or DN ARROW 3 Figure 8 MENU UP DN 8 MENU JOULES 500 JOULES 500 JOULE...

Page 147: ...LaserStar Workstation Operation Maintenance Manual 900 Series Ver 991 6 November 2019 147 Appendix C Yearly Maintenance Chart Checklist...

Page 148: ...LaserStar Workstation Operation Maintenance Manual 900 Series Ver 991 6 November 2019 148...

Page 149: ...y 28 Weekly 28 Weekly 28 Weekly 28 Weekly 29 Monthly 29 Monthly 29 Monthly 29 Monthly 29 Monthly 29 Monthly 29 Monthly 29 Monthly 29 Monthly 29 Monthly 29 Monthly 29 Monthly 30 Monthly 30 Monthly 30 M...

Page 150: ......

Page 151: ...LaserStar Workstation Operation Maintenance Manual 900 Series Ver 991 6 November 2019 149 Appendix D Pulse Performance Profile Technology...

Page 152: ...LaserStar Workstation Operation Maintenance Manual 900 Series Ver 991 6 November 2019 150...

Page 153: ......

Page 154: ......

Page 155: ......

Page 156: ......

Page 157: ......

Page 158: ......

Page 159: ......

Page 160: ......

Page 161: ...R SIZETHIN 295V 5 0MS 2 0HZ 3 CLICKS SILVER SIZETHICK 305V 6 5MS 2 0HZ 3 CLICKS WHITE GOLD SIZETHIN 220V 9 0MS 2 0HZ 3 CLICKS WHITE GOLD SIZETHICK 230V 9 5MS 2 0HZ 3 CLICKS JUMP RINGS 240V 4 0MS 2 0HZ...

Page 162: ...240V 4 0MS 2 0HZ 0 35MM Basic Profile SILVER SIZETHIN 250V 3 0MS 2 0HZ 0 40MM Ramp Down Profile SILVER SIZETHICK 270V 3 5MS 2 0HZ 0 30MM Ramp Down Profile WHITE GOLD SIZETHIN 200V 4 0MS 2 0HZ 0 50MM...

Page 163: ...ic Profile SILVER SIZETHIN 250V 4 0MS 2 0HZ 0 50MM Ramp Down Profile SILVER SIZETHICK 265V 5 0MS 1 0HZ 0 70MM Ramp Down Profile WHITE GOLD SIZETHIN 204V 3 5MS 2 0HZ 0 70MM Ramp Up Profile WHITE GOLD S...

Page 164: ...2 0HZ 0 60MM Basic Profile YELLOW GOLD SIZETHICK 220V 4 0MS 2 0HZ 0 70MM Basic Profile PLATINUM SIZETHIN 215V 3 0MS 2 0HZ 0 65MM Basic Profile PLATINUM SIZETHICK 225V 3 5MS 2 0HZ 0 75MM Basic Profile...

Page 165: ...0MS 2 0HZ 0 30MM Basic Profile SILVER SIZETHIN 250V 3 0MS 2 0HZ 0 40MM Ramp Down Profile SILVER SIZETHICK 280V 4 0MS 2 0HZ 0 30MM Ramp Down Profile WHITE GOLD SIZETHIN 180V 3 0MS 2 0HZ 0 40MM Ramp Up...

Page 166: ...5MS 2 0HZ 0 40MM Basic Profile SILVER SIZETHIN 285V 4 7MS 2 0HZ 0 50MM Ramp Down Profile SILVER SIZETHICK 310V 6 5MS 1 5HZ 0 60MM Ramp Down Profile WHITE GOLD SIZETHIN 215V 8 5MS 2 0HZ 0 40MM Ramp Up...

Page 167: ...0MS 2 0HZ 0 30MM Basic Profile SILVER SIZETHIN 250V 3 0MS 2 0HZ 0 40MM Ramp Down Profile SILVER SIZETHICK 280V 4 0MS 2 0HZ 0 30MM Ramp Down Profile WHITE GOLD SIZETHIN 180V 3 0MS 2 0HZ 0 40MM Ramp Up...

Page 168: ...MS 1 5HZ 0 60MM Basic Profile SILVER SIZETHIN 300V 3 9MS 1 5HZ 0 45MM Ramp Down Profile SILVER SIZETHICK 330V 4 6MS 1 5HZ 0 50MM Ramp Down Profile WHITE GOLD SIZETHIN 218V 9 0MS 2 0HZ 0 40MM Ramp Up P...

Page 169: ...S 2 0HZ 0 40MM Basic Profile SILVER SIZETHIN 280V 4 5MS 2 0HZ 0 50MM Ramp Down Profile SILVER SIZETHICK 300V 6 0MS 2 0HZ 0 60MM Ramp Down Profile WHITE GOLD SIZETHIN 207V 6 0MS 3 0HZ 0 45MM Ramp Up Pr...

Page 170: ...0MS 2 0HZ 0 50MM Basic Profile SILVER SIZETHIN 250V 4 0MS 2 0HZ 0 50MM Ramp Down Profile SILVER SIZETHICK 300V 4 5MS 1 5HZ 0 50MM Ramp Down Profile WHITE GOLD SIZETHIN 195V 4 5MS 2 0HZ 0 40MM Ramp Up...

Page 171: ...MS 3 0HZ 0 40MM Basic Profile SILVER SIZETHIN 310V 7 0MS 2 5HZ 0 25MM Ramp Down Profile SILVER SIZETHICK 380V 7 0MS 1 5HZ 0 30MM Ramp Down Profile WHITE GOLD SIZETHIN 215V 4 8MS 3 0HZ 0 40MM Ramp Up P...

Page 172: ...ile SILVER SIZETHIN 250V 3 0MS 2 0HZ 0 40MM Ramp Down Profile SILVER SIZETHICK 260V 5 0MS 1 5HZ 0 65MM Ramp Down Profile WHITE GOLD SIZETHIN 195V 4 5MS 2 0HZ 0 45MM Ramp Up Profile WHITE GOLD SIZETHIC...

Reviews: