background image

ENGLISH

1

Model 1600E

User’s Guide

Summary of Contents for 1600E

Page 1: ...ENGLISH Model 1600E User s Guide...

Page 2: ...to correct the interference at his or her own expense Caution Changes or modifications not expressly approved by the party responsible for compliance could void the user s authority to operate the eq...

Page 3: ...wires no worries and no more excuses for being late About Your Atomic Clock In addition to a regular quartz time clock the Model 1600E contains an antenna and a microchip The antenna receives the off...

Page 4: ...of the clock It may cause mechanism trouble and danger especially when the unit is hung on the wall Lithium battery contains perchlorate material special handling may apply Please go to web site http...

Page 5: ...installed at the factory Sample pack of Weekly TruAlign Time Cards Key User s manual Cover Display Push bar Key hole AC adapter Display Program modes Ribbon cassette Print head Control buttons 3 CONT...

Page 6: ...k follow next steps Step 1 Unlock the key and remove the cover Remove the PROTECTION PAD and plug the AC adapter into the time clock Plug the AC adapter into the AC outlet and program the clock Replac...

Page 7: ...ace the cover and lock Step 3 WALL MOUNTING Caution The supplied screws are intended for use on a thick wooden wall or wooden column Do not use them on any other materials The time clock may come off...

Page 8: ...s SELECT You can select the desired program setting mode by pressing this SELECT button Selected program setting mode is indicated by the mark on the display CHANGE When you press the CHANGE button yo...

Page 9: ...Change Date 24 Hour 19 Formats Available 4 Digit YYYY 24 Hour 1 10 1 100 1 20 of an hour Enabled 13 Comments Available French Spanish Portuguese Left Semi Automatic Manual Tru Align Change Start Disa...

Page 10: ...luded You can purchase additional Tru Align Time Cards online at http shop lathem com Enabling Tru Align By default Tru Align is Off To enable Tru align follow two easy steps 1 Set Print Position Adju...

Page 11: ...pproximately 1 3 16 30mm necessary for Tru Align time cards 9 ADJUST PRINT POSITION JAN 31 AM 12 00 JAN 31 AM 12 00 JAN31 A 15mm 30mm Print position adjuster Located on the bottom of the 1600E The pri...

Page 12: ...changed Change the Hour In case of the example press the SET button because the hour is not to be changed At that moment the flashing changes from Hour to Minute Step 1 TIME SELECT CHANGE SET Change...

Page 13: ...ECT CHANGE SET DATE SELECT CHANGE SET DATE SELECT CHANGE SET DATE SELECT CHANGE SET Change the Month In case of the example press the SET button because the month is not to be changed At that moment t...

Page 14: ...1 HOUR SELECT CHANGE SET After you finish setting the 12 24 hour press the SET button once again Now the 12 24 hour setting has been completed Replace the cover and lock IMPORTANT If you do not comple...

Page 15: ...MPORTANT If you do not complete Step 2 the clock will not print Step 2 1 2 3 4 5 6 7 8 9 10 11 12 13 14 15 16 17 18 19 Order Option M D H Min D M H Min M D Y H Min D M Y H Min Y M D H Min Y M D H Min...

Page 16: ...R DIGIT SELECT CHANGE SET YEAR DIGIT SELECT CHANGE SET After you finish setting the year digit press the SET button once again Now the year digit setting has been completed Replace the cover and lock...

Page 17: ...2 Order Options 12 Hour 24 Hour Print Example JAN 31 PM3 00 JAN 31 15 00 After you finish setting the hour minute press the SET button once again Now the hour minute setting has been completed Replac...

Page 18: ...EADING ZERO SELECT CHANGE SET SELECT CHANGE SET After you finish setting the leading zero press the SET button once again Now the leading zero setting has been completed Replace the cover and lock IMP...

Page 19: ...ent setting has been completed Replace the cover and lock IMPORTANT If you do not complete Step 2 the clock will not print Step 2 1 2 3 4 5 6 7 8 9 10 11 12 13 Order Options RCVD SENT IN OUT CFMD FILE...

Page 20: ...CHANGE SET SELECT CHANGE SET After you finish setting the language press the SET button once again Now the language setting has been completed Replace the cover and lock IMPORTANT If you do not compl...

Page 21: ...der Options of the print direction The flashing means it can be changed In case of the example press the CHANGE button to set at 2 And then press the SET button At that moment the flashing changes fro...

Page 22: ...ep 3 PRINT DIRECTION PRINT ACTIVATION SELECT CHANGE SET 1 2 3 4 Order Options Automatic Semi automatic Manual Tru Align Change the Print Activation Automatic will allow the clock to print by simply in...

Page 23: ...daylight saving time is already set to start on the second Sunday of March and to end on the first Sunday of November However if you once disabled this function and want to set it again or change star...

Page 24: ...SET button once again Now the starting date of D S T setting has been completed Go on to the SETTING THE ENDING DATE OF DAYLIGHT SAVING TIME Step 4 D S T START SELECT CHANGE SET Change the Month Pres...

Page 25: ...D S T END SELECT CHANGE SET Change the Month Press the CHANGE button to set at 11 And then press the SET button At that moment the flashing changes from Month to Date Step 2 Change the Date Press the...

Page 26: ...e flashing changes from Month to Date Step 2 Press the SET button again At that moment the flashing changes from 08 to Step 3 Press the SET button once again Now the D S T deleting has been completed...

Page 27: ...u want to make the 1600E attempt to receive a radio signal without changing the current time zone press SET button twice after Step 1 below Adjusts just minute and second by the WWVB radio signal You...

Page 28: ...zone press the SET button once again Now the time zone setting has been completed Replace the cover and lock IMPORTANT If you do not complete Step 3 the clock will not print and start reception of rad...

Page 29: ...SET In case of the example press the CHANGE button to set at 34 And then press the SET button Step 2 TU WE TH FR SA SU MO After you finish registering the password press the SET button once again Now...

Page 30: ...ashes The flashing means it can be changed In the example press the CHANGE button to set at 12 And then press the SET button At that moment the flashing changes to last two digits Step 1 SELECT CHANGE...

Page 31: ...shes The flashing means it can be changed In case of the example press the CHANGE button to set at 12 And then press the SET button At that moment the flashing changes to last two digits Step 1 TIME S...

Page 32: ...g changes to last two digits 34 Step 3 Press the CHANGE button to set at 00 And then press the SET button Step 4 After you finish canceling the password press the SET button once again Now the passwor...

Page 33: ...will be deleted and will revert to the factory defaults when the reset switch is pushed To make new settings please refer to SETTING ADVANCED FUNCTIONS Reset switch Set button ENGLISH RESETTING THE C...

Page 34: ...ING THE RIBBON CASSETTE Place the cassette inside the time clock as shown in the figure Keep on pushing in the cassette until the clasps at both sides catch and you hear a pop sound If it is difficult...

Page 35: ...print head and the ribbon mask Printing will not come out properly if the ribbon is placed behind the ribbon mask Turn the knob of the cassette in the direction of the arrow to tighten the ribbon Step...

Page 36: ...reception For instance it is best to position the clock away from metal studs and toward the direction of the tower in Colorado Since this time recorder contains a highly accurate quartz timer it wil...

Page 37: ...or contents Action OTHER FAILURES The time clock does not operate Ensure the AC adapter is properly plugged into the AC outlet The time clock does not print Ensure the ribbon is installed correctly Th...

Page 38: ...ears of cumulative power failure hours after the date of shipment Temperature 5 to 45 C 23 to 113 F Humidity 20 to 80 no condensation The unit operates normally at temperatures of 5 C or below but the...

Page 39: ...will not assume any responsibility for any loss or damage incurred in shipping 6 WARRANTY DISCLAIMER AND LIMITATION OF LIABILITY Except only the limited express warranty set forth above the products a...

Page 40: ...ENGLISH Q7168 61200...
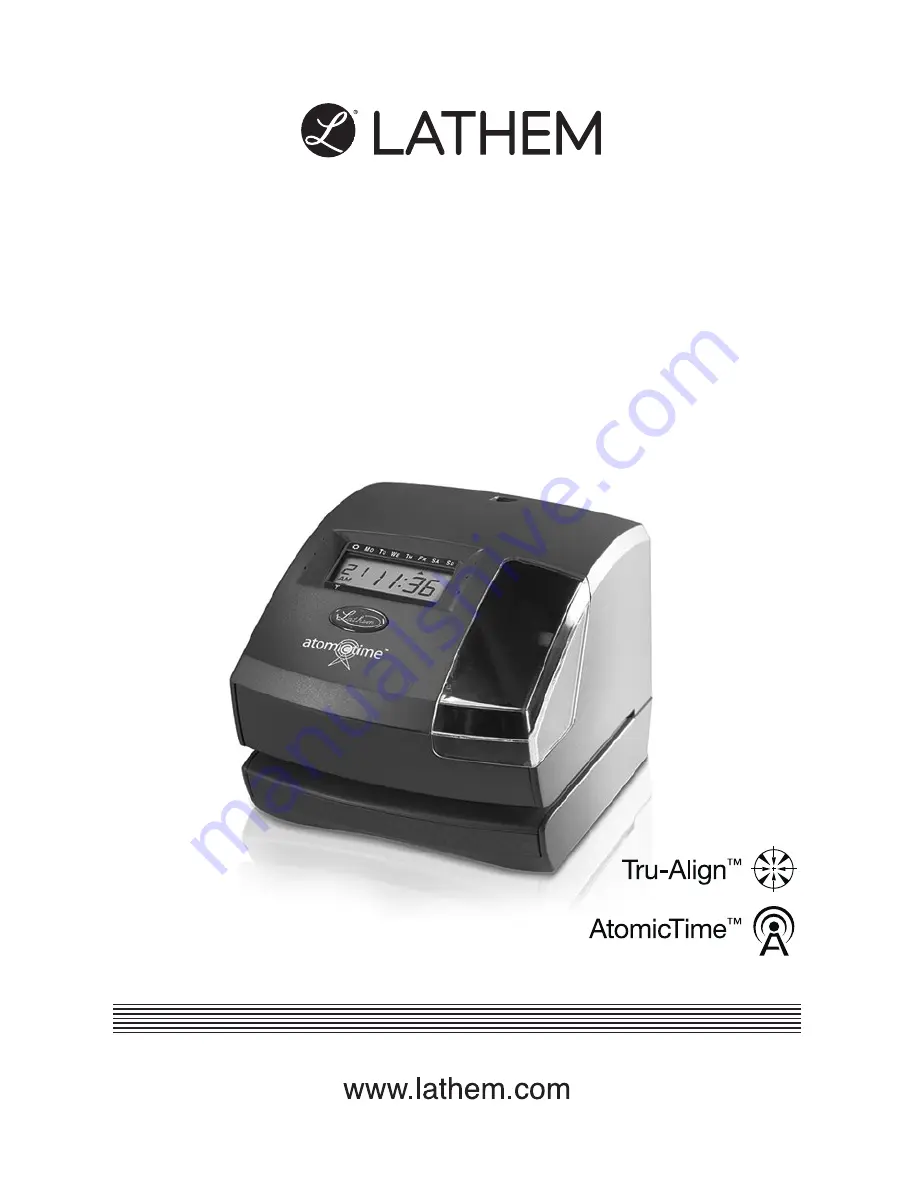
Reviews: