background image

Version: V1.00.000

Revised Date: 2017-11-01

Product Model: HTT
Product Name: 

Vehicle VIN Checking Terminal

Company Name: LAUNCH TECH. CO., LTD. 
Company Address: LAUNCH TECH. CO., LTD. Launch Industrial Park, 
North of Wuhe Avenue, Banxuegang, Bantian, Longgang, Shenzhen, 
China

Summary of Contents for HTT

Page 1: ...te 2017 11 01 Product Model HTT Product Name Vehicle VIN Checking Terminal Company Name LAUNCH TECH CO LTD Company Address LAUNCH TECH CO LTD Launch Industrial Park North of Wuhe Avenue Banxuegang Ban...

Page 2: ...ts by LAUNCH Trademark Information LAUNCH is a registered trademark of LAUNCH TECH CO LTD LAUNCH in China and other countries All other LAUNCH trademarks service marks domain names logos and company n...

Page 3: ...ompletely discharged it is normal that the tool will not power on while being charged Please charge it for a period of 5 minutes and then turn it on DANGER Do not attempt to replace the internal recha...

Page 4: ...gin 10 4 2 Job Menu 13 4 3 Update 13 5 Start VIN Inspection 15 5 1 Auto Detect 16 5 2 Manually Detect 18 6 Check Data 20 7 Settings 21 7 1 My Information 21 7 2 Change Password 21 7 3 Activate Device...

Page 5: ...ic research institute to perform VIN enquiries e VIN can read all the electronically embedded Vehicle Identification Numbers VINs from all the parts in modern vehicles The results can be checked and c...

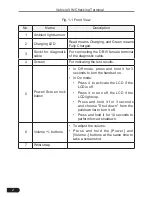
Page 6: ...ts 5 Power Screen lock button In Off mode press and hold it for 3 seconds to turn the handset on In On mode Press it to activate the LCD if the LCD is off Press it to turn off the LCD if the LCD light...

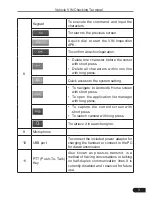
Page 7: ...To navigate to Android s Home screen with short press To open the application list manager with long press To capture the current screen with short press To launch camera with long press To retrieve...

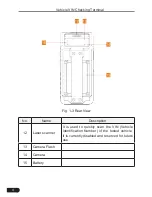
Page 8: ...Fig 1 3 Rear View No Name Description 12 Laser scanner It is used to quickly scan the VIN Vehicle Identification Number of the tested vehicle It is currently disabled and reserved for future use 13 Ca...

Page 9: ...8 Core processor ROM 16GB RAM 2GB Screen 5 inch capacitive touch screen with a resolution of 1280 720 pixels Battery 4680mAh fast recharging supported Camera Rear facing 13 MP camera Scan Laser Suppor...

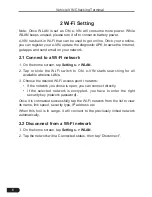
Page 10: ...r slide the Wi Fi switch to ON e VIN starts searching for all available wireless LANs 3 Choose the desired Wi Fi access point network If the network you chose is open you can connect directly If the s...

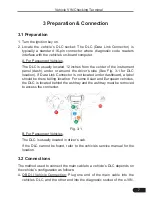
Page 11: ...If Data Link Connector is not located under dashboard a label should be there telling location For some Asian and European vehicles the DLC is located behind the ashtray and the ashtray must be remove...

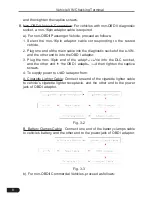
Page 12: ...her end to into the OBD I adaptor 3 Plug the non 16pin end of the adaptor cable into the DLC socket and the other end to the OBD I adaptor and then tighten the captive screws 4 To supply power to OBD...

Page 13: ...corresponding to the tested vehicle 2 Plug the non 16pin end of the adaptor cable into the DLC socket and the other end to the main cable 3 Connect the other end of the main cable to the DB15 diagnos...

Page 14: ...e accounts Account swtiching will be available soon in the coming version 4 1 Startup Login 1 Press Power button to turn your e VIN on 2 On the home screen tap e VIN to run it a screen similar to the...

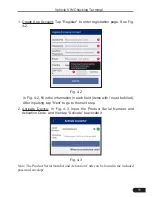
Page 15: ...in the information in each field Items with must be filled After inputting tap Next to go to the next step 2 Activate Device In Fig 4 3 input the Product Serial Number and Activation Code and then tap...

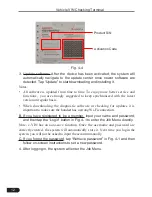
Page 16: ...oading the diagnostic software or checking for updates it is important to make sure the handset has a strong Wi Fi connection B If you have registered to be a member input your name and password and t...

Page 17: ...Update To update the APK and all available vehicle inspection software Settings To manage personal information change password activate device and configure Wi Fi printer 4 3 Update Once some newer s...

Page 18: ...minal please be patient to wait To pause downloading tap Stop To resume it tap Continue If network connection failure occurs tap Retry to try again Once download is finished the software packages will...

Page 19: ...VIN is properly connected to the vehicle s DLC For details see Chapter 3 2 1 On the home screen tap e VIN to run the application 2 Input the username and password and then tap Login to navigate to th...

Page 20: ...to inspect a vehicle VIN Note Different vehicle models have different options and operation steps Tap YES in Fig 5 1 a prompt message appears Fig 5 2 Tap OK to switch the ignition key to ON and the s...

Page 21: ...the vehicle VIN a Once decoding is complete and the current VIN is consistent with the original one the screen displays as follows Fig 5 5 Tap Complete to end the inspection session To print the test...

Page 22: ...e the screen displays as follows Fig 5 6 Tap to return to the previous screen To print the test result tap Print Befor printing you need to configure the Wi Fi printer For details refer to Chapter 8 4...

Page 23: ...from the bottom to select the vehicle model Alternatively you can also tap the search bar and then use the virtual keyboard to quickly locate the vehicle model Input the desired vehicle model to start...

Page 24: ...k Data This optin is designed to review and manage the inspection data Tap Check Data a screen similar to the following appears Fig 6 1 All inspection data are listed in date sequence Tap on the right...

Page 25: ...lets you manage personal information change password activate device and configure Wi Fi printer Fig 7 1 7 1 My Information This item enables you to view and modify personal information 7 2 Change Pas...

Page 26: ...e and then tap Activate to activate the device 7 4 My Device This option allows you to view the relevant information about the device 7 5 Firmware Fix Use this item to upgrade and fix diagnostic firmw...

Page 27: ...odify the current print information Tap Delete to clear the current print information Tap to create a new print information Once the information is complete tap the Default print to set it as the defa...

Page 28: ...8 4 to learn to how to configure Wi Fi printer 7 8 About The software version information and disclaimer are included 7 9 Exit from the current account Login To logout the current user ID tap Exit fr...

Page 29: ...eing free of paper spindle it is also simple and fast to load printing paper In addition to the included DC power adaptor it can be powered alternatively by the built in rechargeable battery which ena...

Page 30: ...jack Note The USB port next to it is disabled Do not attempt to insert the cable into it 8 Rechargeable battery 8 2 Thermal paper loading This Wi Fi printer applies thermal paper roll with size of 30...

Page 31: ...t down until you hear a click Fig 8 4 Notes A After loading the paper users need to check whether the paper can be fed normally For details please refer to How to print test results B If the printer k...

Page 32: ...3 Using the rechargeable battery The included rechargeable battery must be installed to ensure that the printer can print the test result normally This printer utilizes a 7 2V 1200mAh rechargeable Lit...

Page 33: ...r keeps unattended for a long period please remove the rechargeable battery 8 4 Wi Fi Connections A While used as a Wi Fi peer to peer P2P printer follow the steps described below to make Wi Fi connec...

Page 34: ...ect the Wi Fi printer to LAN Tap Scan to select the desired local Wi Fi network from the list and type in the security password If it is an open network password is not required and then tap Confirm 3...

Page 35: ...that manual mode is off Press the POWER button for 2 seconds to turn it on the MODE indicator blinks and then remains steady on Every time you load or change the paper press the MODE button to turn th...

Page 36: ...ntative of LAUNCH has any authority to bind LAUNCH to any affirmation representation or warranty concerning LAUNCH automotive meters except as stated herein Disclaimer The above warranty is in lieu of...

Page 37: ...zhen Guangdong P R China 518129 Launch website http www cnlaunch com http www golo365 com Statement All information specifications and illustrations in this manual are based on the latest information...

Page 38: ...is no guarantee that interference will not occur in a particular installation If this equipment does cause harmful interference to radio or television reception which can be determined by turning the...

Reviews: