LAURA ASHLEY
IL2898
Issue 2 08/17
SORRENTO FLOOR LAMP
ASSEMBLY INSTRUCTIONS
These instructions are provided for your safety.
Please read carefully before commencing work and retain for future reference.
SAFETY INFORMATION
*
The supply cable runs through the inside of this product. Take care not to place undue stress on the cable whilst unpacking
to prevent the possibility of a poor connection.
*
If you are in any doubt consult a person competent to give advice on the assembly of electrical equipment.
*
Always be sure to use the correct type and wattage of bulbs as indicated on the fitting. Do not exceed wattage stated.
*
If the external flexible cable of the lamp is damaged it shall be exclusively replaced by the manufacturer or his service
agent or a similar qualified person in order to avoid a hazard.
*
To prevent electrocution switch off at the mains supply before assembling or maintaining this fitting. Ensure the plug is
not connected to any power supply and read instructions before assembly.
*
When changing the bulb, always unplug from the mains and allow the old bulb to cool down before handling. Dispose of
used bulbs carefully.
ASSEMBLY INSTRUCTIONS
1.
Unpack the product and remove all packaging. Be careful not to scratch the surface of
the product whilst removing the plastic wrapping.
2.
Lay the product out on the floor. If the floor is not carpeted please cover it with a soft
cloth to avoid damage to the flooring and surface of the product. Assembly should
take place with the product lying flat.
3.
It may be necessary to remove protective packaging (plastic / cardboard) located at
cable entry points of the product.
4.
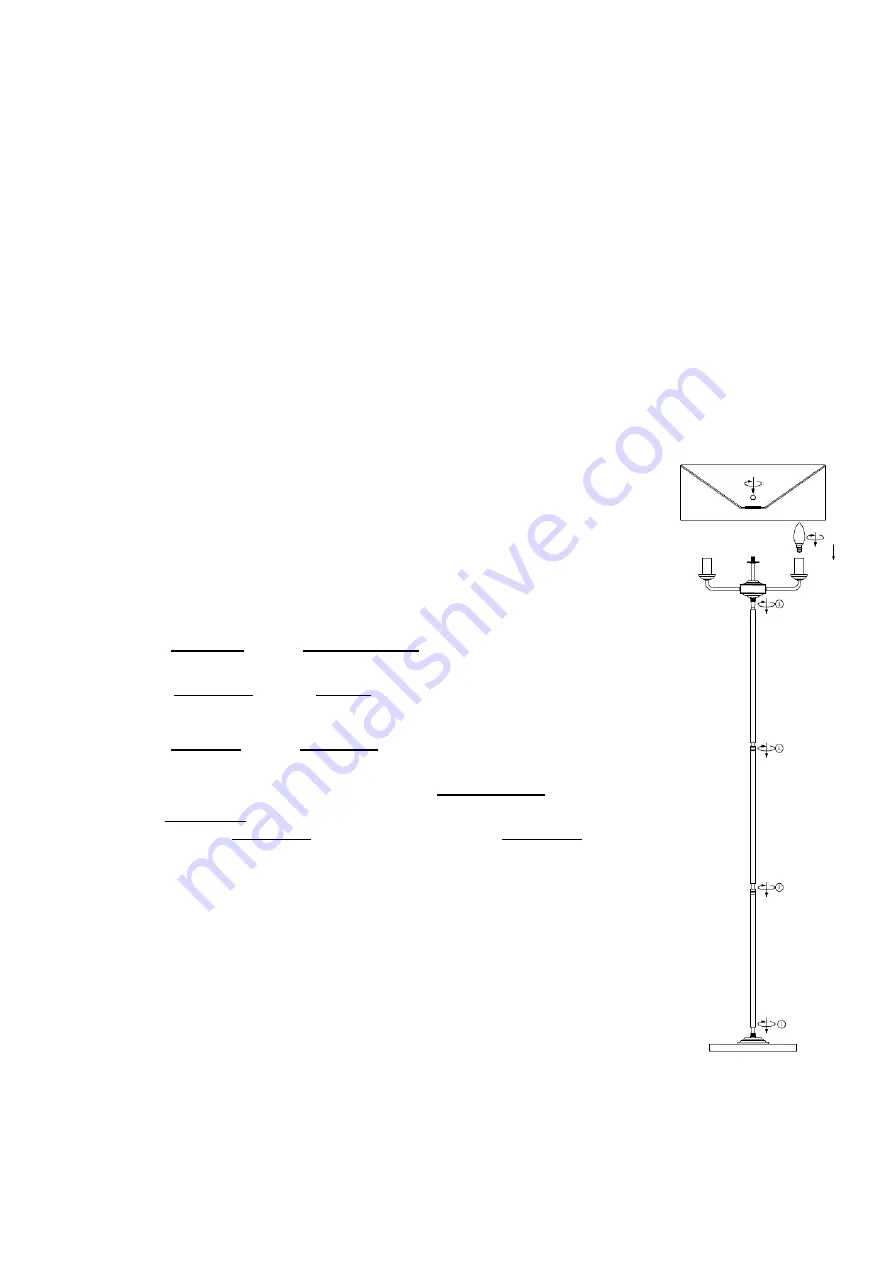
Screw the
upper pole
onto the
lampholder body
of the item ensuring that the head is
kept still and that the pole is threaded on ensuring that the cable does not twist.
5.
Screw the
middle pole
onto the
top pole
with the shaded section attached. Hold the
head still and only rotate the middle pole so as not to twist the internal cable.
6.
Screw the
lower pole
onto the
middle pole
with the shaded section attached. Hold the
head still and only rotate the lower pole so as not to twist the internal cable.
7.
Gently pull the excess cable out of the base until the
assembled poles
meet the base.
8.
Turn the
base section
onto the other sections. Keep the poles parallel to avoid cross
threading. Keep the
upper poles
stationary and only rotate the
base section
.
9.
Ensure all of the excess cable is removed from the base.
10.
Stand the floor lamp upright and ensure all the assembled parts are fully tightened.
11.
Remove the finial ball from the top threaded stem on the lampholder section. Remove
all wrapping from the shade and place the shade to sit onto the threaded stem. Secure
the shade in position using the finial ball. Carefully tweak the shade if required to
ensure that it is level.
12.
Fit bulb: type and wattage as indicated on fitting.
The wattage indicated must not be
exceeded.
13.
Floor lamp is now ready for use
.
GENERAL INFORMATION
This product is designed for internal use only.
Do not use polish or abrasive cleaner – just a soft dry cloth.