background image

INSTRUCTIONS GUIDE AND USER

's

 MANUAL 

ISLAND MOUNT HOODS

IMPORTANT:

Read and save these instructions.

NOTICE:

Installer: Leave this guide with the homeowner

Homeowner: Keep this guide for future reference

Summary of Contents for ISLAND MOUNT HOODS

Page 1: ...INSTRUCTIONS GUIDE AND USER s MANUAL ISLAND MOUNT HOODS IMPORTANT Read and save these instructions NOTICE Installer Leave this guide with the homeowner Homeowner Keep this guide for future reference ...

Page 2: ...ollowing a Never leave surface units unattended at high settings Boilovers cause smoking and greasy spillovers that may ignite Heat oils slowly on low or medium settings b Always turn hood ON when cooking at high heat or when flambeing food i e Crepes Suzette Cherries Jubilee Peppercorn Beef Flambe c Clean ventilating fans frequently Grease should not be allowed to accumulate on fan or filter d Us...

Page 3: ... or drilling into the wall or ceiling DO NOT DAMAGE electrical wiring and other utilities d Ducted fans must always be vented to the outdoors WARNING TO REDUCE THE RISK OF FIRE USE ONLY METAL DUCTWORK CAUTION To reduce the risk of fire and properly exhaust air be sure to duct air towards outdoors Do not vent and or exhaust air inbetween walls into the attic or garage or through crawl spaces GROUND...

Page 4: ...d Venting requirements Mount heights clearance Venting methods Electrical Requierements Preparations Installation 10 USE AND CARE 11 12 13 14 15 Range hood operations Troubleshooting Use and care information Specifications 15 16 17 MAINTENANCE WARRANTY Warranty Coverage Exceptions 18 3 ...

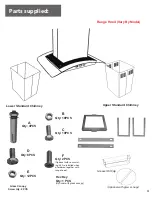
Page 5: ...imney A Qty 4PCS B Qty 10PCS C Qty 10PCS F Qty 2PCS Hex Key Qty 1 PCS Optional with glass canopy D Qty 8PCS E Qty 12PCS Glass Canopy Screw Qty 4 PCS 4 Optional with re circulat ing kit Pre installed when kit ordered together with range hood Optional with glass canopy Grease Oil Cup ...

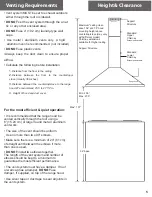
Page 6: ...ood be vented vertically through the roof using a 6 15 24 cm or larger round metal aluminum vent work The size of the vent should be uniform Use no more than two 90 elbows Make sure there is a minimum of 24 61 cm of straight vent between the elbows if more than one is used DO NOT install two elbows together The length of the vent system and number of elbows should be kept to a minimum to guarantee...

Page 7: ...uld be no higher than 30 It is important to install the hood at the proper mounting height Hoods mounted too low could result in heat damage and constitute a fire hazard while hoods mounted too high will be hard to reach and will loose performance and efficiency If available also refer to the stove manufacturer s height clearance requirements and recommended hood mounting height above range WARNIN...

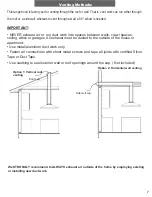
Page 8: ... ceiling attics or garages All exhaust must be ducted to the outside of the house or apartment Use metal aluminum duct work only Fasten all connections with sheet metal screws and tape all joints with certified Silver Tape or Duct Tape Use caulking to seal exterior wall or roof openings around the cap Not included We STRONGLY recommend to ALWAYS exhaust air outside of the home by employing existin...

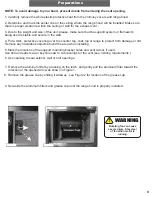
Page 9: ...ook top or range to protect from damage or dirt Remove any hazardous objects around the area when installing 5 Mark the locations of the support mounting bracket holes and vent cutout if used Use drill and saber saw or keyhole saw to cut openings for the vent see Venting requirements 6 Use caulking to seal exterior wall or roof openings 7 8 9 Remove the aluminum filter by pressing on the latch and...

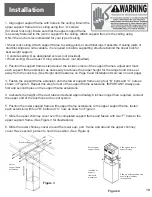
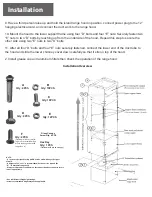
Page 10: ...ge 5 and Installation Overview on next page 3 Fasten the support frame extension onto the lower support frame using four B bolts and C nuts as shown in Figure 3 Repeat this step for rest of the support frame extensions IMPORTANT Always use first and second holes on the support frame extensions 4 Calculate the height of the duct tube and extend approximately 6 inches longer than required connect th...

Page 11: ...Installation Overview IMPORTANT Minimum height Longest chimney 1 inch A E B C B C D E Air Movement Direction Upper support frame Support frame extensions Hole to hole distance inch 6 Round duct exhaust Electric circuit box Island mount range hood Motor housing Re circulating kit exhaust Re circulating kit not shown A Qty 4PCS B Qty 10PCS C Qty 10PCS F Qty 2PCS Hex Key Qty 1 PCS Optional with glass...

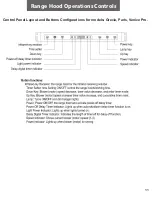
Page 12: ...Control Panel Layout and Buttons Configurations for models Grecia Paris Venice Pro Range Hood Opeations Controls Range Hood Operations Controls 11 ...

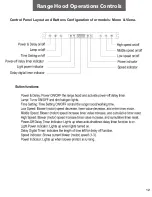
Page 13: ...Control Panel Layout and Buttons Configurations for models Moon Viena Range Hood Operations Controls 12 ...

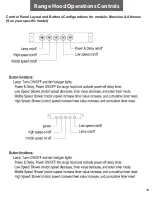
Page 14: ...Control Panel Layout and Buttons Configurations for models Messina Athenas See your specific model Range Hood Operations Controls 13 ...

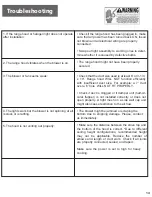
Page 15: ...ct size used is at least 6 or 3 1 4 x 10 Range hood WILL NOT function efficiently with insufficient duct size For example a 7 duct over a 6 hole WILL NOT FIT PROPERLY Check if duct is clogged or if damper unit half cir cular flapper is not installed correctly or does not open properly A tight mesh on a side wall cap unit might also cause restriction to the air flow The blower might be jammed or sc...

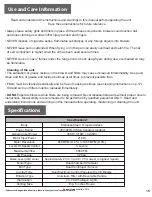
Page 16: ...eriodically and be free of cooking residues see cleaning instructions on p 17 Old and worn out filters must be replaced immediately DO NOT operate blowers while filters are being removed Never disassemble parts without proper how to instructions Disassembly is recommended to be performed by qualified personnel ONLY Read and understand instructions and warnings in this manual before operating manta...

Page 17: ...as 3M or ZEP to polish and buff out the stainless luster and grain Always scrub lightly with a clean cotton cloth following the grain DO NOT allow deposits to accumulate or remain on the hood DO NOT use ordinary steel wools or steel brushes Small bits of steel may adhere to the surface creating rust DO NOT allow salt solutions disinfectants bleaches or cleaning compounds to remain in contact with ...

Page 18: ...able for any damages to the motor or damages caused by fire as an aftermath of inappropriate maintenance or failure to observe the above safety recommendations Disconnect the cooker hood from the main supply Remove the lamp cover use a screw driver as a lever Fig 5 Replace the old bulb with a new one of the same type Replace the lamp cover If the light does not come on make sure the bulb has been ...

Page 19: ...on information has been altered obliterated or removed has not been handled or packaged correctly or has been sold as second hand What is Not Covered Consumable parts such as light bulbs and metal the natural wear of finish and wear due to improper maintenance use of corrosive and abrasive cleaning products pads and oven cleaning products Chips dents or cracks due to abuse misuse freight damage or...

Reviews: