background image

Supporting 

Children

Squiggles Stander

User Manual

English

Summary of Contents for Squiggles Stander

Page 1: ...Supporting Children Squiggles Stander User Manual English...

Page 2: ...rd leaning supine standing posture The stander is modular in design and interfaces with a choice of bases which have been developed for use in school or at home This manual shows how to quickly safely...

Page 3: ...ord 07 Safety information 08 Precautions and Contraindications 09 How to unpack and assemble the Stander 10 Fitting the cushions 11 Clinical setup for postural management 12 Frequent adjustments for d...

Page 4: ...s are encouraged Children presenting with developmental delay who are currently non ambulating Children where early intervention is indicated SECTION 02 CERTIFICATION The Squiggles Stander is classifi...

Page 5: ...m the product as quickly as is safely possible 4 CAUTION FINGER PINCH HAZARD While the user is in the product the carer should strive to keep product adjustments to a minimum Take care when assembling...

Page 6: ...issue inspections and annual inspections of this product do not use running water on the upholstery whilst it is still attached to the seat See section Cleaning care information 8 CAUTION CLEANING POW...

Page 7: ...ng Leckey equipment 3 Only use Leckey approved components with your product Never modify the product in any way Failure to follow instructions may put the user or carer at risk and will invalidate the...

Page 8: ...ity device Always place the user in an upright position before moving the stander Hold the back of the plastic chest support when moving the stander 12 The product contains components which could pres...

Page 9: ...y including compromised respiratory or cardiovascular function Dependant on 3rd party life sustaining apparatus such as oxygen tanks Significant learning disabilities and or behavioural issues Contrai...

Page 10: ...cut through the tape as you may damage some of the parts contained inside All of the parts will be contained in polythene bags with each one clearly labelled Carefully remove them from the box and che...

Page 11: ...Pivot chassis and the Easel chassis 9 1 FOLDING AND UNFOLDING THE PIVOT CHASSIS 9 2 ATTACHING THE STANDER TO ITS CHASSIS To attach the stander to the Pivot Chassis pull the locking pin out slide the...

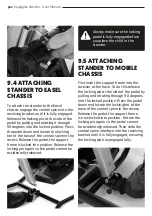
Page 12: ...G STANDER TO EASEL CHASSIS Always make sure the locking pedal is fully engaged before you place the child in the stander First insert the support frame into the receiver at the base To do this release...

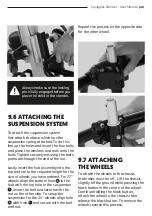
Page 13: ...the suspension C insert the bolt and secure with the nut on the other side To setup the suspension for the 24 wheels align hole with hole C and secure with the bolt and nut 9 6 ATTACHING THE SUSPENSI...

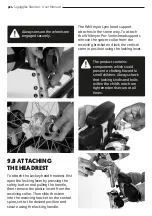
Page 14: ...ceiving bracket on the central spine set to the desired position and secure using the locking handle The Whitmyer Lynx head support attaches in the same way To attach the Whitmyer Pro Series headsuppo...

Page 15: ...ed To remove or replace the attachment bolt reverse this process C 9 10 ATTACHING THE SANDALS Place the sandal so that the attachment bolt goes through the slot in the footplate To secure on the under...

Page 16: ...e of the tray plate so the plastic teeth mesh Replace the knob on the outside and secure Repeat on other side Ensure both horizontal tubes are aligned so they locate in the tray bracket receivers 9 12...

Page 17: ...always be facing the child To attach the tray whilst in the prone version ensure that the tray receiving tubes are at their maximum height prone Always use caution to ensure the childs hands or arms d...

Page 18: ...ing the Velcro panels 10 2 LATERAL CUSHIONS To attach the lateral support padded cushions simply slide the cushions on with the padded side towards the inside of the stander Sleeve the plastic buckle...

Page 19: ...hem to the Velcro panels as shown Finally pull the Velcro receiving straps around the user to secure the user in the harness 10 5 HIP SUPPORT HARNESS The hip support should be attached around the pelv...

Page 20: ...panel adjust the straps to the required length and then replace the panel 10 7 PADDED SPINE CAP Place the padded spine cap over the spine of the standing support and place the plastic loops around the...

Page 21: ...s in place Bring the lower flap under the plate and snap the two remaining fasteners in place 10 10 FLAT HEADREST LATERALS To attach the headrest lateral covers simply slide the covers on with the pad...

Page 22: ...of the main frame with the multi tool Sliding the inner stem to the desired height and retightening the allen bolt A calibration strip is fitted on the side of the inner frame to help you record the s...

Page 23: ...adjust the width of the lateral supports and retighten when you have achieved the desired position If the lateral supports are attached with bolts instead of hand knobs they can be adjusted with the m...

Page 24: ...g the chest harness 11 7 ADJUSTING THE STERNUM PAD The sternum pad can be raised to provide additional support to assist thoracic extension This also allows the chest support to be set lower to enable...

Page 25: ...then retighten 11 10 CONTOURED AND FLAT HEADREST ADJUSTMENT The headrest should only be used when the child is in supine standing To adjust the height depth and angle of the contoured headrest loosen...

Page 26: ...position you require and re fasten the knob To position the user s feet in the sandals secure the Velcro straps provided so the foot is held in place The straps should be placed over the bridge of th...

Page 27: ...headrest as outlined under Attaching the Headrest and attach the tray with the cutout facing the child Loosen the sandals and turn through 180 degrees and you are ready for prone standing 11 15 PRODU...

Page 28: ...or push the chair Do not place hot objects on the tray greater than 40 degrees Celsius Please note that the tray is for the use of the user only Do not lean or place heavy objects on the tray greater...

Page 29: ...ion as outlined in section 14 of this user manual Before transferring the child into the product lock all the castors ensuring that they are facing outwards to maximise product stability Make sure the...

Page 30: ...one side leaving the other inner buckle attached Reverse the process when placing the user back in the product Always make sure the plastic buckles are fully engaged 12 4 SANDALS To position the user...

Page 31: ...e required height and retighten 12 6 ADJUSTING THE DEPTH AND ANGLE OF THE TRAY Loosen the adjustment knob C on either side slide the tubes along the receiving brackets to achieve the desired depth and...

Page 32: ...lbs 12 7 GRAB RAIL ADJUSTMENT To set the depth of the grab rail to suit the childs reach loosening knob adjust to the required depth and then re tighten To set the height of the rail loosen knob slide...

Page 33: ...mobile chassis push the levers down on either side of the chassis to unlock push the levers up 12 11 PIVOT CHASSIS ANGLE ADJUSTMENT The angle can be adjusted whilst the user is in the stander You sho...

Page 34: ...required angles and engage the poppers C again Finally retighten the plastic knobs securely Do not adjust the angle of the Easel chassis with the child in the stander C C 12 13 FOLDING EASEL CHASSIS...

Page 35: ...sponge Routine soap and warm water sponging is effective for ordinary soiling and minor spills Be careful not to over wet the fabric as this will cause the staining to spread 4 Antiseptic cleaning age...

Page 36: ...Y Product Specialist Dealer Leckey recommend that each product should be subject to a detailed inspection at least once a year and every time the product is reissued for use This inspection should be...

Page 37: ...prescribing the product has carried out an equipment compatibility check for the new user and has ensured that the product being re issued contains no modifications or special attachments A detailed t...

Page 38: ...d of all product inspections carried out during the reissue of the product Note Always clean the product first to remove accumulated soiling prior to disinfecting sanitisin 1 Where possible we recomme...

Page 39: ...hassis 129 601 Mobile chassis with suspension Accessories Codes prefixed by an asterix are available in four colour options 01 Green 02 Orange 03 Blue 04 Pink 152 1600 Size 1 Sandals 152 2600 Size 2 S...

Page 40: ...Width Min 160mm 6 25 inches Max 230mm 20 8 inches Hip Support Height Distance from footplate to mid buttock Min 300mm 11 8 inches Max 530mm 20 8 inches Distance between mid line of knees Min 140mm 5 5...

Page 41: ...825mm 32 5 inches Pivot chassis footprint Minimum dimensions for storage 5 5kg 12 1lbs Width 550mm 21 7 inches Length 700mm 27 6 inches Height 300mm 11 8 inches Easel chassis 1 5kg 3 3lbs Width 540mm...

Page 42: ...er User Manual Symbol Meaning Medical Device Read the Instructions for Use CE mark Warning Manufacturer Serial number Product code Max occupancy weight Date of Manufacture For indoor use only Latex fr...

Page 43: ...quiggles Stander User Manual p43 Symbol Meaning Unique Device Identification Machine wash water temperature 40 C Tumble dry low heat Do not iron Do not bleach Handwash Do not dry clean TABLE OF SYMBOL...

Page 44: ...LS168 11...

Reviews: