background image

沥拓科技(深圳)有限公司

http:www.leetop.top

用户手册

LEETOP-A203 Carrier Board

User Gride 1.0

Summary of Contents for A203

Page 1: ...沥拓科技 深圳 有限公司 http www leetop top 用户手册 LEETOP A203 Carrier Board User Gride 1 0 ...

Page 2: ... 3 0 W11 Micro SD W12 风扇接口 W13 M 2 KEY E接口 W14 硬件安装 A203核心板安装 功能介绍 系统安装 Operating system setup 1 硬件准备 Hardware preparation 2 环境配置 Environment requirements 3 Recovery模式 Recovery mode 4 安装系统镜像 Install system image 5 切换工作模式 Switching working modes Xshell 的使用 系统配置 查看系统版本 制作备份镜像 安装Jtop工具 Installation of Jtop tools 接入固态硬盘 Developer Tools JetPack L4T DeepStream SDK on Jetson Isaac SDK Jetpack 的主要功能 KEY F...

Page 3: ...anual carefully before install operate or transport Leetop device 在给设备供电之前 确保使用正确的电源范围 Ensure that the correct power range is being used before powering the device 避免热插拔设备接口 Avoid hot plugging 要正确关闭电源 请先关闭Ubuntu系统 然后再切断电源 由于Ubuntu系统的特殊性 在Nvidia的开发套件 沥拓 套件 上 如启动未完成的时候强行断电 会有0 03 的概率出现异常 进而导致设备无法启动 To properly turn off the power please shut down the Ubuntu system first and then cut off the power Due...

Page 4: ...No 4 29 ...

Page 5: ...保证由我们制造的产品在保修期内没有材料和工艺上的缺陷 在退回任何物品进行维修或更换之前 请联系 service leetop top 以获得退货授权 RMA 产品必须以其原始包装退回 以防止在运输过程中损坏 在退回任何产 品进行维修之前 建议备份您的数据并删除任何机密或个人数据 Warranty content Leetop warrants the product manufactured by us to be free from defects in material and workmanship during warranty period Please contact service leetop top for return material authorization RMA prior to returning any items for repair or exchan...

Page 6: ... 2 0 Micro AB M 2 KEY M 1x M 2 KEY M NVMe SSD Serial 1x CAN Camera 1x CSI CAMERA M 2 KEY E PCIE 1x PCIE 2242 SIZE I2S 1x I2S 3 3V Level Misc 2x I2C Link 3 3V I O 5x GPIO 1x UART 2x SPI Power Requirements 9V to 19V DC Input 3A Operating Temperature 25 to 65 Weight 100g Accessories Cables Leetop 203产品介绍 简介 Brief Leetop 203是一款嵌入式人工智能计算机 能够为众多终端设备赋予高达21TOPS INT8 的计算力 Leetop 203提供快速 的被动散热设计 可以满足抗震防静电等工...

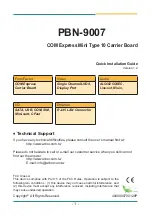
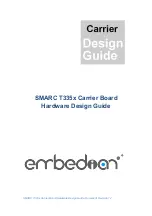
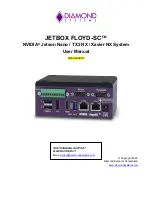
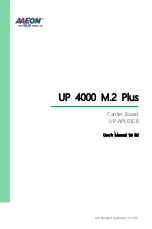
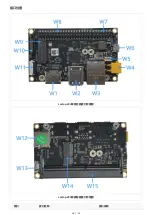
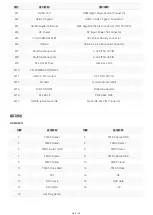
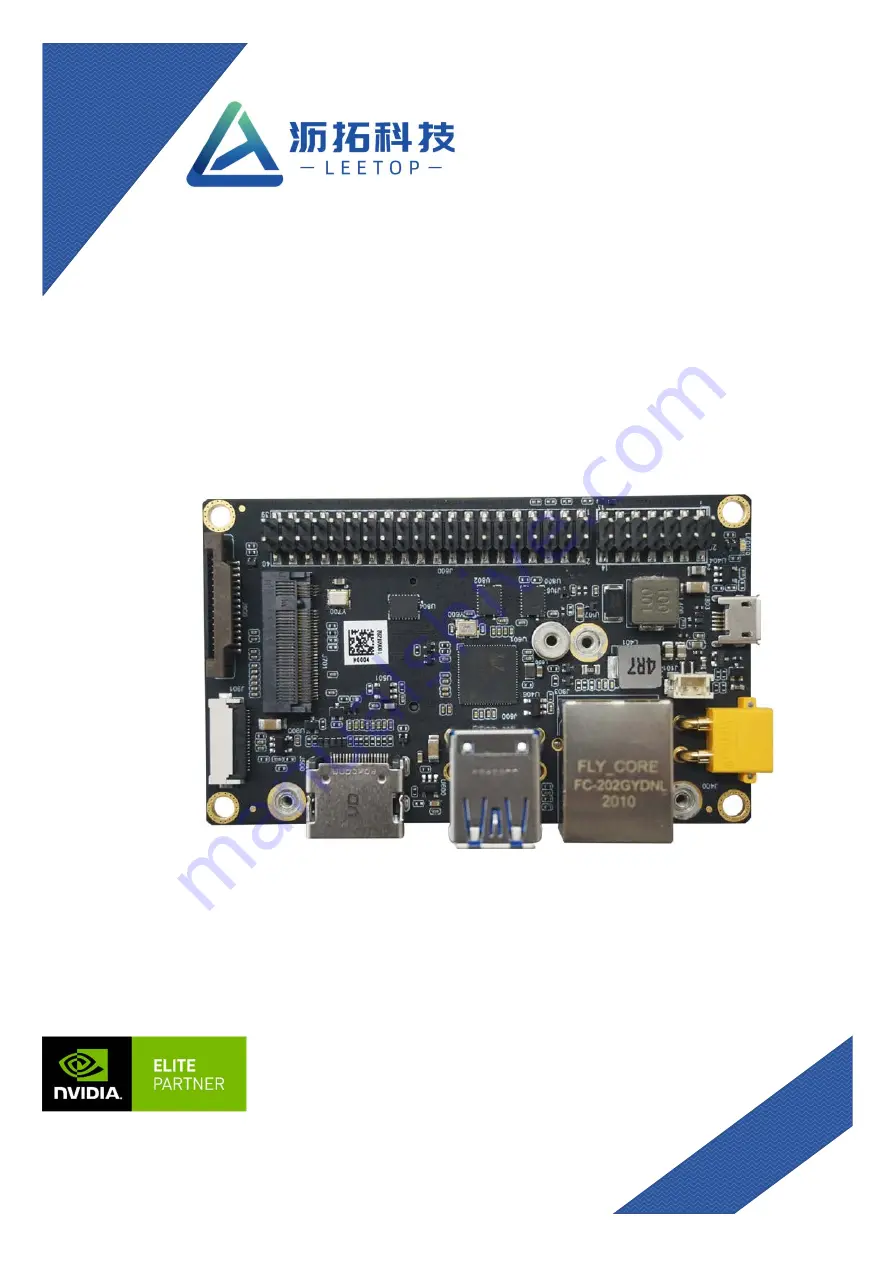
Page 7: ...Leetop 203载板正面接口示意图 Leetop 203载板背面接口示意图 接口 接口名称 接口说明 接口位置 No 7 29 ...

Page 8: ...ltifunctional port 2 54 PITCH 40 PIN W9 M 2 KEY M Disk Disk size 2240 W10 CSI CAMERA0 CONNECT W11 USB 3 0 ZIF connect 0 5 PITCH 20 PIN W12 SD Card 1x microSD Card Slot W13 FAN CONNECT PicoBlade Header W14 M 2 KEY E PCIE 2242 SIZE W15 NVIDIA Jetson Nano NX Nano NX 260 PIN Connector 引脚 信号名称 引脚 信号名称 1 TMDS Data2 2 TMDS Data2 GND 3 TMDS Data2 4 TMDS Data1 5 TMDS Data1 GND 6 TMDS Data1 7 TMDS Data0 8 T...

Page 9: ...B 2 0 D 13 GND 14 SSRX 15 SSRX 16 GND 17 SSTX 18 SSTX 引脚 信号名称 引脚 信号名称 1 TP0 2 TP0 3 TP1 4 TP2 5 TP2 6 TP1 7 TP3 8 TP3 引脚 信号名称 引脚 信号名称 1 电源DC正 2 GND 引脚 信号名称 引脚 信号名称 1 GND 2 BBAT 引脚 信号名称 引脚 信号名称 1 VBUS 2 USB 2 0 D 3 USB 2 0 D 4 USB ID 5 GND 双层USB 3 0 W2 网口 W3 DC电源接口 W4 注 电源输入范围 直流 9V 19V 后备电池 W5 micro USB W6 No 9 29 ...

Page 10: ...ART1_RTS_3 3V 12 I2S0_SCLK_3 3V 13 SPI1_SCLK_3 3V 14 GND 15 GPIO12_ 3 3V_LEVEL 16 SPI1_CS1_3 3V 17 3 3V 18 SPI1_CS0_3 3V 19 SPI0_MOSI_3 3V 20 GND 21 SPI0_MISO_3 3V 22 SPI1_MISO_3 3V 23 SPI0_SCK_3 3V 24 SPI0_CS0_3 3V 25 GND 26 SPI0_CS1_3 3V 27 ID_I2C_SDA_3 3V 28 ID_I2C_SCL 29 GPIO1_ 3 3V_LEVEL 30 GND 31 GPIO11_ 3 3V_LEVEL 32 GPIO7_ 3 3V_LEVEL 电源LED LED 插入电源正常开机后 电源LED灯亮 红色 多功能接口 14PIN 按键 W7 注 RESET...

Page 11: ...11 PCIE0_TX3_N 12 3 3V 13 PCIE0_TX3_P 14 3 3V 15 GND 16 3 3V 17 PCIE0_RX2_N 18 3 3V 19 PCIE0_RX2_P 20 NC 21 GND 22 NC 23 PCIE0_TX2_N 24 NC 25 PCIE0_TX2_P 26 NC 27 GND 28 NC 29 PCIE0_RX1_N 30 NC 31 PCIE0_RX1_P 32 NC 33 GND 34 NC 35 PCIE0_TX1_N 36 NC 37 PCIE0_TX1_P 38 NC 39 GND 40 I2C2_ CLK 41 PCIE0_RX0_N 42 I2C2_DAT 43 PCIE0_RX0_P 44 M2_KEYM_ALERT 45 GND 46 NC 47 PCIE0_TX0_N 48 NC 49 PCIE0_TX0_P 50...

Page 12: ...ND 2 CSI_A_D0_N 3 CSI_A_D0_P 4 GND 5 CSI_A_1_N 6 CSI_A_D1_P 7 GND 8 CSI_A_CLK_P 9 CSI_A_CLK_N 10 GND 11 CAM1_PWDN 12 CAM1_MCLK 13 CAM_I2C_SCL 14 CAM_I2C_SDA 15 3 3V 引脚 信号名称 引脚 信号名称 1 5V 11 USB3 0_SSTX_N 2 5V 12 USB3 0_SSTX_P 3 5V 13 GND 4 5V 14 USB3 0_SSRX_N 5 5V 15 USB3 0_SSRX_P 6 GND 16 GND 7 USB2 0_DN 17 GND 8 USB2 0_DP 18 GND 9 GPIO_01 19 GND CSI Camera接口 W10 多功能接口 20PIN USB 3 0 W11 No 12 29 ...

Page 13: ... 2 5V 3 FAN_TACH 4 FAN_PWM 引脚 信号名称 引脚 信号名称 1 GND 2 3V3 3 USB1_DP 4 3V3 5 USB1_DN 6 NC 7 GND 8 I2S1_SCLK 9 NC 10 I2S1_LRCK 11 NC 12 I2S1_SDIN 13 NC 14 I2S1_DOUT 15 NC 16 NC 17 NC 18 GND 19 NC 20 BT_M2_WAKE 21 NC 22 UART0_RXD 23 NC 24 UART0_TXD 25 GND 26 UART0_CTS 27 PCIE1_TX0_P 28 UART0_RTS 29 PCIE1_TX0_N 30 NC Micro SD W12 风扇接口 W13 注 风扇FAN不支持风扇转速控制 M 2 KEY E接口 W14 No 13 29 ...

Page 14: ...K_P 40 NC 41 PCIE1_CLK_N 42 CLK_32K 43 GND 44 PCIE1_RST 45 PCIE1_CLKREQ 46 W_DISABLE2 47 PCIE1_WAKE 48 W_DISABLE1 49 GND 50 I2C2_SDA 51 NC 52 I2C2_SCL 53 NC 54 M2_E_ALERT 55 GND 56 NC 57 NC 58 NC 59 NC 60 NC 61 GND 62 NC 63 NC 64 3V3 65 NC 66 3V3 67 GND 注 M 2 KEY E接口在NX核心板可用 在Nano核心板不可用 No 14 29 ...

Page 15: ...red thermal solution on the module 2 Install the module a Start with baseboard that has suitable standoff to match SODIMM connector height b Insert module fully at an angle of 25 35 degree into the SODIMM connector c Arc down the module board until the SODIMM connector latch engages d Secure the module to the baseboard with screws into the standoff spacer The developer kit shown in Figure 3 2 uses...

Page 16: ... the information service leetop top Unzip the image package and enter the Linux for Tegra L4T directory This tool makes use of USB mass storage during flashing therefore automount of new external storage device needs to be disabled temporarily during flashing On most distributions of Debian based Linux you can do this using the following command cd nx_nvme_jp4 6 cat mfi_jetson_xavier_nx_devkit tar...

Page 17: ...he light is on release the power key wait for 2S and release the recovery key Or in the power on state press and hold the reset key and recovery key release the reset key for 2S and then release the recovery key Note Please follow the steps of the update manual for system update when entering USB recovery mode the system will not start and the serial port will not have debugging information output...

Page 18: ...ll 通 过互 联网到远程主机的安全连接以及它创新性的设计和特色帮助用户在复杂的网络环境中享受他们的工作 Xshell 可以在 Windows 界面 下用来访问远端不同系统下的服务器 从而比较好的达到远程控制终端的目的 xshell 不是必需品 但是它能更好的辅助 我们使用 设备 他可以将你的Windows 系统和你的Ubuntu 系统链接起来 让你在Windows 系统下 去操作你的Linux 系统 安装 xshell 可 以在网上百度搜索下载安装即可 当产品无法进入桌面系统的情况时 也可以通过xshell 来进行远程控制 修改配置上的错 误 打开xshell cd mfi_jetson xavier nx devkit emmc sudo tools kernel_flash l4t_initrd_flash sh flash only massflash num showlogs T...

Page 19: ...新建 填写名称以及主机ip 正常情况下可以通过网络ip 来连接 若不知道ip 的情况下 可以通过usb 数据线连接电脑和设备 OTG 口 填写固定ip来进行连接 192 168 55 1 1 No 19 29 ...

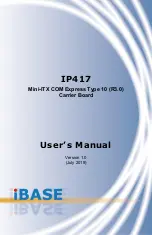
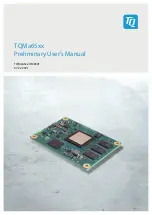
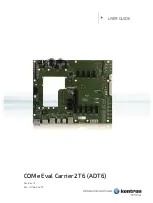
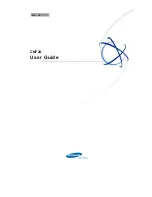
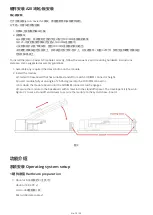
Page 20: ...输入用户和密码 点击连接进入命令行界面 No 20 29 ...

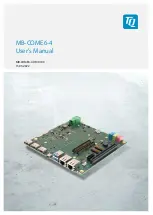
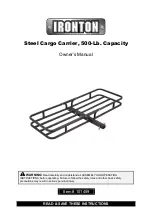
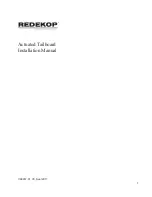
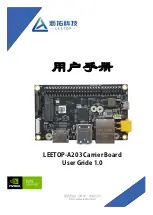
Page 21: ...通过xshell 远程操作jetson 设备 No 21 29 ...

Page 22: ...untu 18 04系统 默认用户名 nvidia 密码 nvidia 开发资料及论坛 L4T开发资料 https developer nvidia com embedded linux tegra 开发者论坛 https forums developer nvidia com 查看系统版本 查看安装的系统包版本 查看安装的JetPack信息 制作备份镜像 制作备份镜像需在命令行刷机的环境下进行 只备份 system img 文件 1 用USB线将Ubuntu18 04系统的PC电脑的USB Type A与Leetop 203的micro USB相连 2 给Leetop 203上电 并进入Recovery模式 3 进入 Linux_for_tegra 目录 调用flash sh脚本进行备份 备份Jetson NX核心模块的指令 cat etc nv_tegra_release 1 sudo...

Page 23: ...real time 安装步骤Installation steps 1 安装pip3工具 Installing the pip3 tool 2 用pip3安装jtop包 Installing jtop packages with pip3 3 重启后可运行jtop Restart to run jtop 运行后如下图所示When run the image below shows sudo flash sh r k APP G clone img jetson nano emmc mmblk0p1 1 sudo mv bootloaber system img bootloader system img bak 先备份原有的system img sudo cp clone img bootloader system img 将备份的clone img替换system img sudo fla...

Page 24: ...No 24 29 ...

Page 25: ...NN CUDA Toolkit VisionWorks GStreamer and OpenCV all built on top of L4T with LTS Linux kernel JetPack 包含 NVIDIA 容器运行时 可在边缘支持云原生技术和工作流 JetPack includes NVIDIA container runtime enabling cloud native technologies and workflows at the edge JetPack SDK Cloud Native on Jetson L4T 英伟达L4T为Jetson平台提供了Linux内核 引导程序 驱动程序 闪光实用程序 样本文件系统等 你可以对L4T软件进行定制 以适应你的项目的需要 通过遵循平台适应性和带入指南 你可以优化使用完整的Jetson产 品功能集 遵循以下链接 了解...

Page 26: ... and bring up guide you can optimize your use of the complete Jetson product feature set Follow the links below for details about the latest software libraries frameworks and source packages DeepStream SDK on Jetson NVIDIA 的 DeepStream SDK 为基于 AI 的多传感器处理 视频和图像理解提供了完整的流分析工具包 DeepStream 是 NVIDIA Metropolis 的一个组成部分 该平台用于构建端到端服务和 将像素和传感器数据转化为可操作见解的解决方案 在我们的 开发者新闻 中了解最新的 5 0 开发者预览功能 NVIDIA s DeepStream...

Page 27: ...2VisionWorks 将不再包含在 JetPack 4 6 x 之后 开发人员应改为使用 VPI 库进行计算机视觉和图像 处理 请参阅公告此处 Developer Tools CUDA Toolkit 为使用 CUDA 库构建高性能 GPU 加速应用程序的 C 和 C 开发人员提供了一个全 面的开发环境 该工具包包括 Nsight Eclipse 版 包括 Nsight Compute 在内的调试和分析工具以 及用于交叉编译应用程序的工具链 NVIDIA Nsight Systems 是一个 低开销系统范围的分析工具 提供开发人员分析和优化软件性能所需的洞察力 NVIDIA Nsight Graphics 是一个独立的应用程 序 用于调试和分析图形应用程序 JetPack 4 6 包括 NVIDIA Nsight Systems 2021 2 JetPack 4 6 包括 NVIDIA...

Page 28: ... NSight Systems用于应用多核CPU分析 在Linux主机上运行 通过识别代码的缓慢部分 帮助你提高应用程 序的性能 支持所有Jetson产品 NVIDIA Nsight 计算内核剖析器 一个针对CUDA应用程序的互动式剖析工具 它通过一个用户界面和命令 行工具提供详细的性能指标和API调试 NSight Graphics用于图形应用程序的调试和分析 一个控制台级别的工具 用于调试和优化OpenGL和 OpenGL ES程序 在Linux主机上运行 支持所有Jetson产品 Developer Tools JetPack includes the following developer tools Some are used directly on a Jetson system and others run on a Linux host computer connected...

Page 29: ...nce metrics and API debugging via a user interface and command line tool NSight Graphics for graphics application debugging and profiling A console grade tool for debugging and optimizing OpenGL and OpenGL ES programs Runs on the Linux host computer Supports all Jetson products No 29 29 沥拓科技 深圳 有限公司 http www leetop top ...

Reviews: