Optional
Control button FLEX height
adjustable solutions
No image
1 Ensure the power plug and, in case of external
sources, the video-cable plugs are installed correctly
at both ends.
2. Check if the main power switch is set to “|“
3. Check if the e-Screen is not in standby mode
by pressing the on/off button on the remote or
e-Screen control pad.
4. Make sure the correct input is selected.
5. Check that source equipment is operating correctly,
for instance:
- The source is turned on and not in standby or
sleep mode
- All video cables are not damaged (e.g. cable
breaks or bent pins inside the connector)
- If possible check with other source and cables
6. In case of long video cables (>5m): check signal
transmission with the originally supplied cables.
7. In case of installations with peripheral equipment
such as distribution amplifiers, matrix switchers, sig-
nal boosters, etc.: check the working of the screen
with the source directly connected to the e-Screen,
using the originally supplied cables.
Bad image quality of source signal
1. Check that source equipment is operating correctly,
for instance:
All video cables are installed correctly at both ends
and are not damaged (e.g. cable breaks or bent
pins inside the connector).
Make sure the resolution of the input signal
is set to the native resolution of the e-Screen
3840x2160@30Hz or 60Hz).
2. If possible check with other source and cables.
The image is positioned incorrectly
1. Disconnect and reconnect the signal cable
2. Restart the entire system, make sure to first switch
on the monitor and secondly the source or OPS PC
3. Perform a factory reset from the menu of the
e-Screen
The image is too light or too dark
1. Adjust the brightness and contrast of the e-Screen
2. Make sure no direct light source shines on the
brightness sensor on the backside of the e-Screen
The picture color looks poor
1. Check the colour picture settings of the e-Screen
2. Perform a factory reset from the menu of the
e-Screen
No Touch
1. Make sure the USB cable is installed correctly at
both ends and is not damaged
2 Disconnect and reconnect the USB cable after 10
seconds, please allow the PC to detect the hard-
ware. This can take a few seconds
3. Reboot the PC.
Touch performance is poor or touch recognition is
not at the correct position.
1. Make sure there are no unwanted objects in range
of the touch system (e.g. jacket sleeves).
2. Make sure there are no light sources (e.g. halogen
lamps or sun light) shining directly at the surface of
the e-Screen.
3. Place your finger or stylus in a 90 degree angle on
the touch surface.
4. Do not hold the stylus too close towards the tip.
5. Please make sure the inside of the bezel (where the
touch sensors are placed) is clean(ed) and free of
items blocking the view of the sensors.
6. Turn off scaling in the display settings of the source.
Touch recognition is slow
1. Close all active windows on the PC
2. Reboot the PC
Information in this document is subject to change without notice.
2018 Legamaster International B.V. All rights reserved.
Reproduction in any manner whatsoever without the written
permission of Legamaster International is strictly forbidden.
Trademarks used in this text: Legamaster and the Legamaster logo
are trademarks of edding AG. Other trademarks and trade names
may be used in this document to refer to either the entities claiming
the marks and names or their products. Legamaster International
disclaims any proprietary interest in trademarks and trade names
other than its own.
QUICK SETUP GUIDE
STX-7550/8650UHD
Version 1.0
ENGLISH
Legamaster
– QUICK SETUP GUIDE
TROUBLESHOOTING
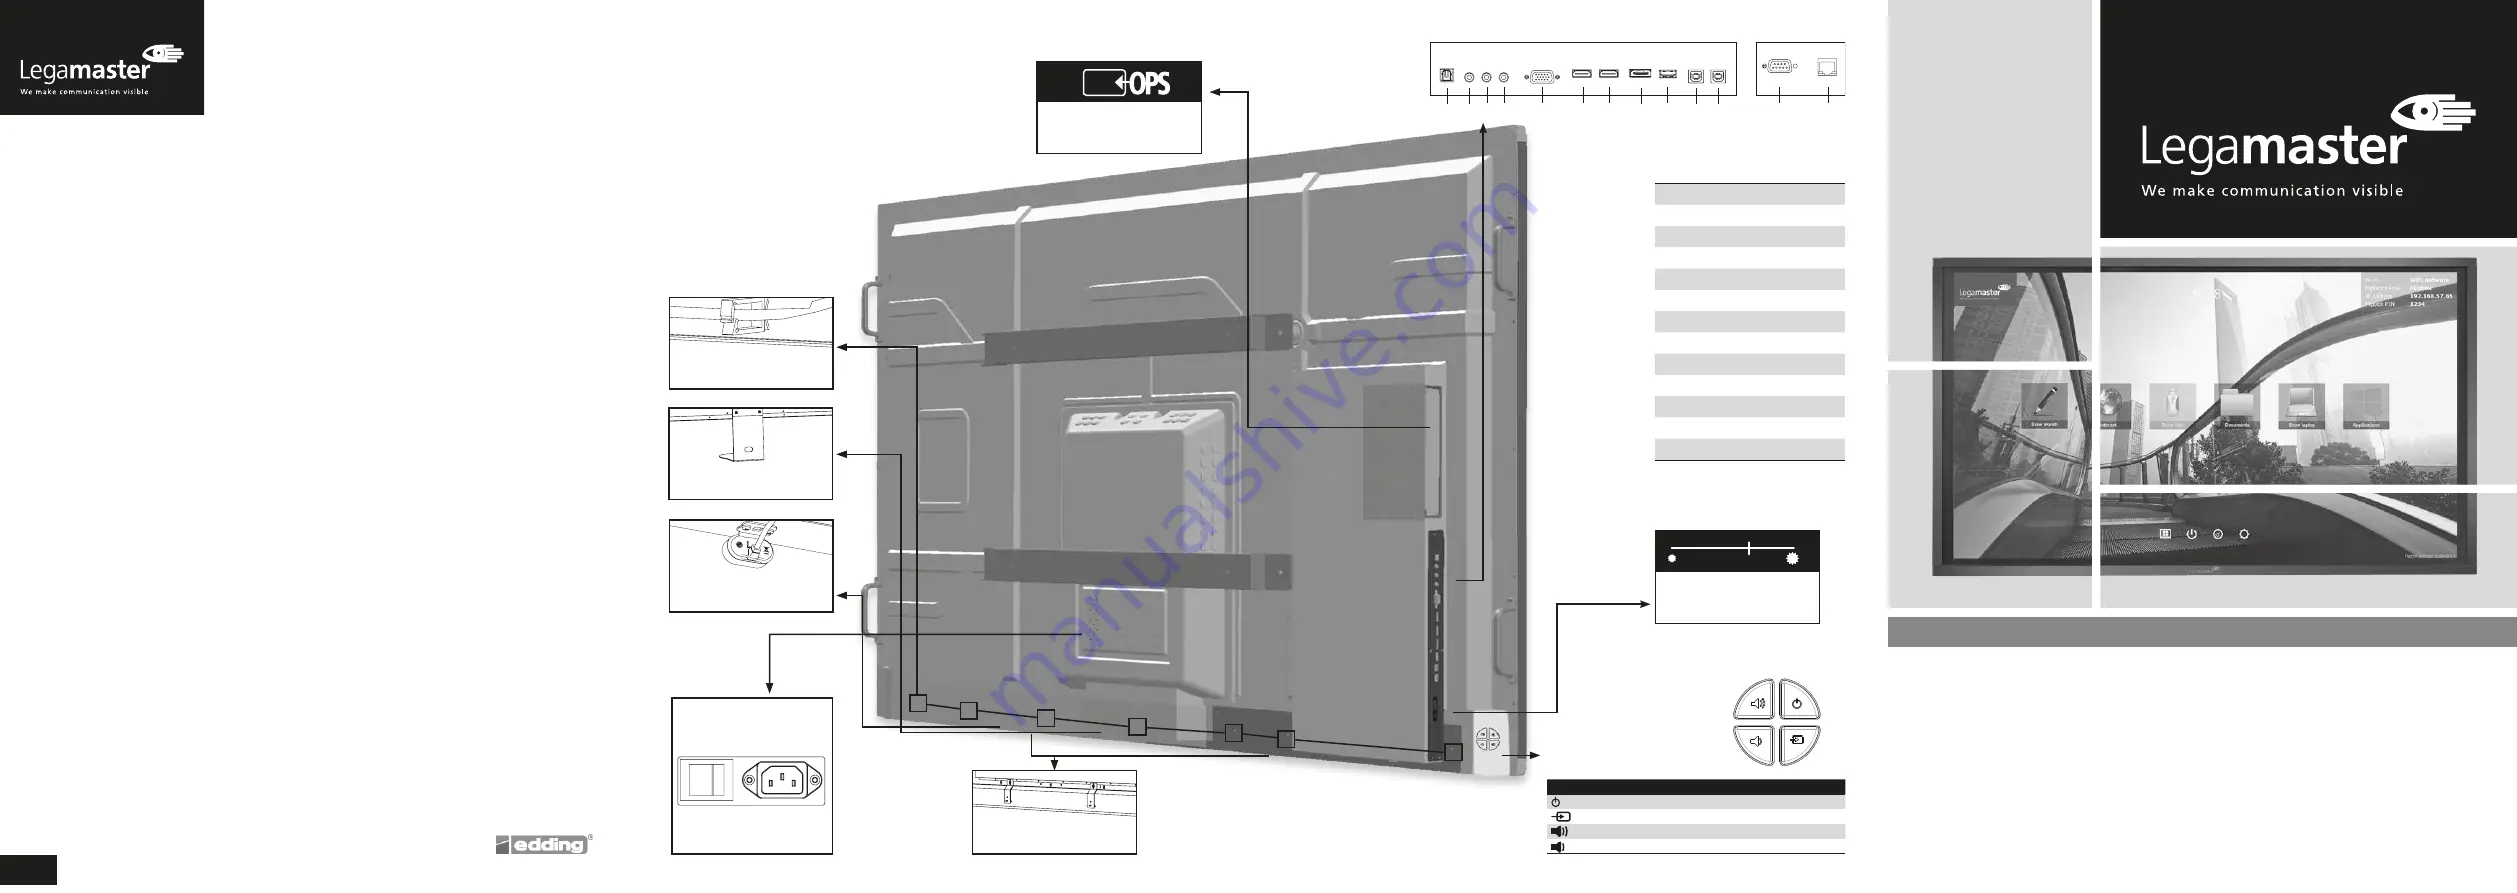
Ambient light sensor
1
2
10
4
3
5
6
11
13
12
7
8
9
CONNECTOR TABLE
1
SPDIF
2
Audio Out
3
IR Extender
4
PC Audio In
5
VGA in (15-pin D-sub)
6
HDMI 2 (HDMI 2.0)
7
HDMI 1 (HDMI 2.0)
8
DisplayPort
9
Service USB Port
10
Touch USB 1
11
Touch USB 2
12
RS-232C
13
Ethernet
“I“ is power on
“O” is power off
Main power –
Switch
AC In socket
Legamaster, brand of the edding group
Legamaster International B.V.
Postbus 111
7240 AC Lochem
tel.: (+31) (0)573-713000
email: info@legamaster.com
internet: www.legamaster.com
Included accessory
EasyFix Cable Clips
OPS slot
Optional
camera mount
CONTROL PAD TABLE
Key
Description
Power (up)
Power Switch; Power ON/OFF
Source (Down)
Source Selection
(Right)
Volume- (Left)
Volume -
Optional
EasyFix Soundbar bracket


