background image

9/0

7/2

01

0

INSTALLATION AND OPERATION MANUAL


Report No. 116-S-53-2

Save These Instructions 

For Future Reference

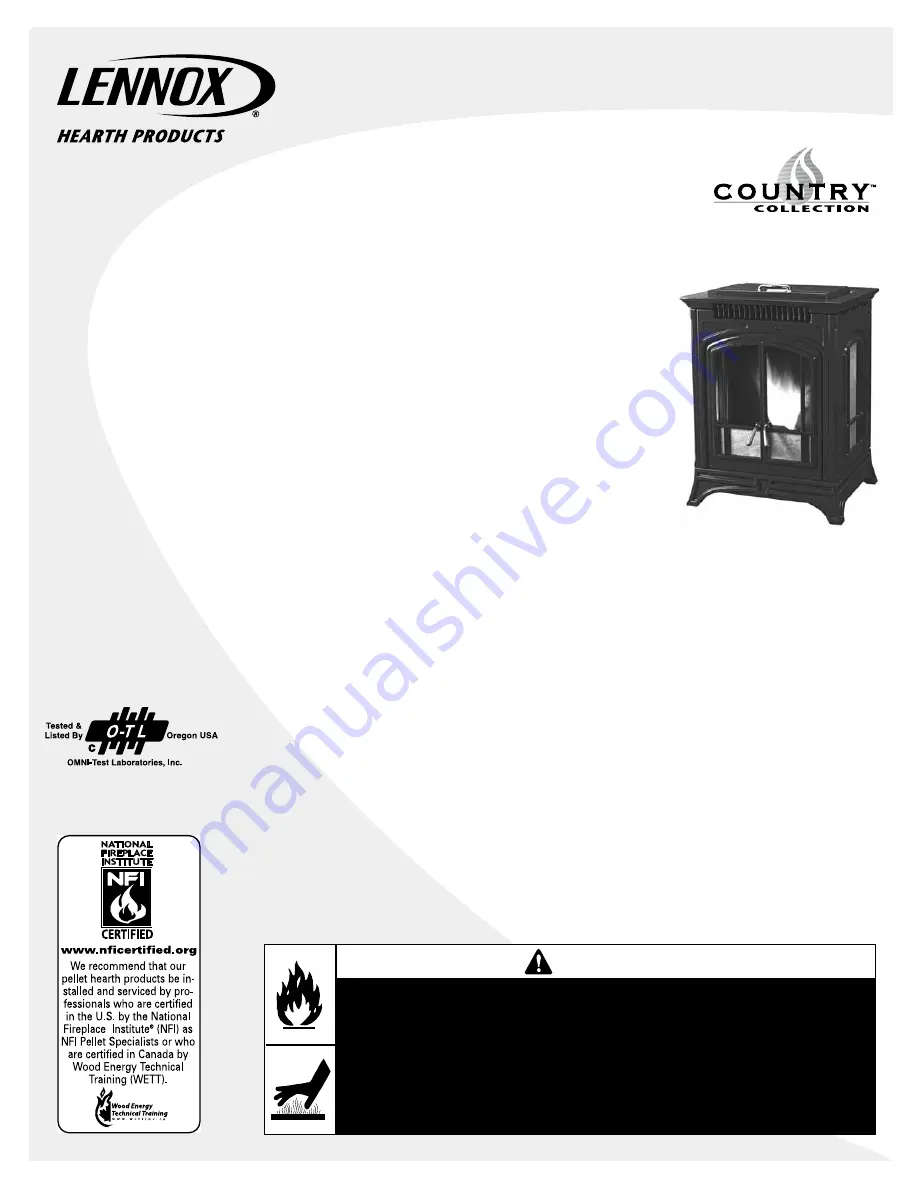
Free-Standing 

Pellet Stove

P/N 775226M, Rev. C, 11/2010

Pellet Stove

Model Bella™

US

Portland


WARNINGS


Hot! Do not touch!  The glass and surfaces of this appliance will be 

hot during operation and will retain heat for a while after shutting off 

the appliance.   Severe burns may result. 

• 


Carefully supervise children in the same room as appliance.


Lennox Hearth Products pellet-burning appliances are designed for 

use as a supplemental heater.   They are not intended for continuous 

use as a primary heat source.

A French manual is available upon request. Order P/N 775226CF.

Ce manuel d’installation est disponible en francais, simplement en faire la demande. Numéro de la pièce 

775226CF.

This appliance must be properly installed and operated in order to prevent the possibility 

of a house fire. Please read this entire manual before installation and use of this 

pellet fuel-burning room heater.  Failure to follow these instructions could result 

in property damage, bodily injury or even death. Contact your local building 

or fire officials to obtain a permit and information on any installation 

requirements and inspection requirements in your area.

Summary of Contents for BELLA

Page 1: ...as a supplemental heater They are not intended for continuous use as a primary heat source A French manual is available upon request Order P N 775226CF Ce manuel d installation est disponible en francais simplement en faire la demande Numéro de la pièce 775226CF Thisappliancemustbeproperlyinstalledandoperatedinordertopreventthepossibility of a house fire Please read this entire manual before insta...

Page 2: ...s in pellet form Failure to comply with this restriction will void all warranties and the safety listingofthestove ConsultwithyourLennoxHearthProducts dealer for more information on approved pellet fuels 12 CONTINUOUS OPERATION When operated correctly this appliance cannot be overfired Continuous operation at a maximum burn can however shorten the life of the electri cal components blowers motors ...

Page 3: ...m heater The safety listing label is located on the bottom side of the hopper lid Please read this safety label carefully It contains important information about installation and operation of this appliance Thisapplianceistestedandlistedforresidentialinstallationaccording to current national and local building codes This appliance is on the Colorado Approved pellet stoves list EPA Environmental Pr...

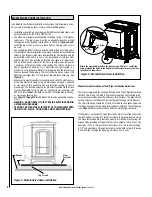
Page 4: ...installation is not allowed Power Supply Requirements continued These requirements must be met unless otherwise specified by state or local authorities Power Cord The power cord must be plugged into a standard 120 Volt 60 Hz grounded electrical outlet with proper ground and polarity The power cord must be routed to avoid contact with any of the hot or sharp exterior surface areas of the stove Powe...

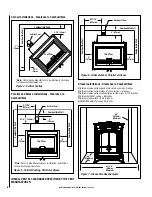
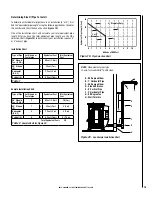
Page 5: ...ibles is 4 feet minimum Clearances to combustibles for the appliance can only be reduced by means approved by the regulatory authority CLEARANCES Back Front 0 0mm 3 76mm Min 3 76mm Min 6 152mm Min Note Refer to Page 4 for chimney venting floor protection requirements and recommendations Note Refer to pipe Manufacturer s installation instructions for minimum pipe clearances Note Refer to pipe Manuf...

Page 6: ...ng Parallel or Alcove Figure 7 Alcove Size Requirements 8 11 16 221mm 3 76mm 4 7 8 124mm 5 127mm 5 127mm Vertical Vent 8 11 16 221mm 2 51mm 5 127mm 5 127mm Horizontal Vent 33 3 4 857mm Minimum 60 1524mm Minimum 48 1220mm Max Figure 6 Horizontal Vent Parallel or Alcove Vertical Vent Corner Installations Clearance to Combustibles Combustible Wall Combustible Wall 3 1 2 89mm 3 1 2 89mm Figure 4 Verti...

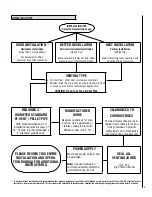
Page 7: ...mination kit If installation requires in excess of 15 of pipe it is recommended a 4 diameter pipe be used MANUFACTURED HOME Requires outside air for com bustion Use a galvanized or stainless steel pipe for duct Minimum duct size 3 I D CLEARANCES TO COMBUSTIBLES Ensure all clearances are main tained in accordance to instruc tions contained on product safety label and in compliance with pipe venting...

Page 8: ...ve must be dedicated for this purpose Grounding must comply with NFPA 70 latest edition standards CSA C22 1 latest edition in Canada as well as any local codes SeePages12through18foradditionalinformationonventingrequire ments WARNING DO NOT INSTALL THIS STOVE IN A SLEEPING ROOM IN A MANUFACTURED HOME CAUTION THE STRUCTURAL INTEGRITY OF THE MANUFACTURED HOME FLOOR WALLS CEILING ROOF MUST BE MAINTAI...

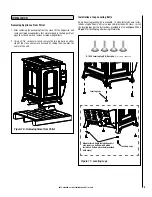
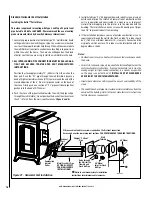
Page 9: ...he hopper Next open the stove door and remove all prepackaged items 2 Using a 7 16 socket or wrench remove the two lag bolts on either side of the stove and remove brackets by sliding them towards the center of the unit INSTALLATION Figure 10 Removing Stove From Pallet Installation of Leg Leveling Bolts An optional leg leveling kit is available In manufactured home instal lations a leg bolt down k...

Page 10: ...ry to continue adjusting it in increments until proper combustion is achieved the flame should become a brighter yellow and begin to dance Once the draft adjuster has been properly set and if the routine main tenance is performed as needed the draft adjuster should not require readjustment unless you are changing from a premium grade pellet to a standard or high ash pellet in which case the draft ...

Page 11: ...ombustion air include unburned fuel lazy smoky or red orange flame excessive ash or soot excessive buildup on glass Contributing factors High Altitude Lack of oxygen Restrictive Venting elbows horizontal runs cold external chimneys etc Dirty Poor Quality Fuel Lack of Maintenance Note Excessive amounts of fly ash built up in the Burn Pot clinkers in the Burn Pot or leakage of air if the Burn Pot is...

Page 12: ...t not be a lawn F Since sparks may escape from the exhaust pipe of any stove use caution when positioning the vent pipe Refer to pipe manufacturer s instructionswheninstallingandterminatingtheexhaust Theventpipe should be horizontal and never run the pipe in a downward direction recommend a 1 4 7 mm rise per foot horizontal VENTING REQUIREMENTS ItisrecommendedthatonlyanLennoxHearthProductsdealerin...

Page 13: ...ator vent outlet min 72 1 8m K Clearance to non mechanical air supply inlet to build ing or the combustion air inlet to any other appliance min 48 1 2m L Clearance to a mechanical air supply inlet min 120 3 1m M Clearance above paved sidewalk or a paved driveway located on public property min 84 2 1m N Clearance under veranda porch deck or balcony min 12 30cm Notes Local codes or regulations may r...

Page 14: ... 3m see Figure 17 Check with your local building officials for additional requirements for your area To pass inspection in nearly any jurisdiction the chimney must meet both safety and exhaust flow requirements The 3 by 2 by 10 rule applies to both masonry and factory built chimneys Ref USA National Standard NFPA 211 latest edition and Canada National Standard CSA B365 01 latest edition Vents inst...

Page 15: ... 1 2 3 4 5 6 7 8 9 10 Figure 19 Pipe Selection Chart A E F H G B C D Figure 20 See Sample Installation Chart A 90 Degree Elbow B 1 Horizontal Pipe C 45 Degree Elbow D Standoff Braces E 8 Vertical Pipe F 2 Horizontal Pipe G 90 Degree Tee H Wall Thimble NOTE All equivalent pipe styles shown for model Bella pellet stove Type of Pipe of Elbows or Feet of pipe Equivalent Feet Total Equivalent Feet 90 E...

Page 16: ... of obstruction while unit is in operation and constructed in a manner so as to prevent material from dropping into the inlet or into the area beneath the dwelling The inlet shall also have a screen with openings not larger than 1 4 to prevent rodents from entering 5 If the installation includes a source of outside combustion air cut a separate hole through the wall for the fresh air tube This tub...

Page 17: ...r wind may direct flue gases toward the house causing discoloring problems For this reason horizontal and up 6 feet or hori zontal and through the eave installations are recommended See Figures 24 and 25 Clean Out Tee Clean Out Tee Vent Configurations 45 90 A vertical run of 6 feet is recommended Listed Rain Cap all installations Listed Rain Cap all installations Exterior Vertical Vent Interior Ve...

Page 18: ...himney the pellet pipe can terminate just above the damper However it is recommended to run the pellet pipe to the top of the chimney Figure 28 Vertical Vent Into a Factory Built Fireplace Figure 26 Vertical Vent Into a Masonry Flue Figure 27 Positive Flue Connection Into a Masonry Chimney Figure 29 Positive Flue Connection Into a Factory Built Fireplace Complete Liner and Listed Termination Cap C...

Page 19: ...in the Burn Pot see Page 10 If the draft adjuster is too far outward the flame might burn erratically See Page 21 for further instructions on adjusting the draft adjuster using thermo stat vs manual modes No 7a Followthetroubleshooting section in this manual Contact your Lennox Hearth Products dealer for further assistance 10 Thank you for purchasing a Lennox Hearth Products Pellet Stove END Does ...

Page 20: ...dialtothe off positionandthenbacktoyourdesired heat setting It is important to always empty when cool the Burn Pot of pellets before starting the stove a second time Filling the Hopper To fill the hopper when stove is off 1 Lift the hopper lid to it s full opened position 2 Fill the hopper with pellets 3 Check to make sure there are no remaining pellets on top of the hopper that may prevent the ho...

Page 21: ... stove is in IGNITE START UP mode which is a preset sequence which will run 11 to 20 minutes and will switch to NORMAL HEATING mode when sufficient temperature has been reached 2 HEATING 1A H E A T I N G 1B H E A T I N G 2 2 Your stove has entered NORMAL HEATING mode and is burning on the heat setting indicated in the lower right corner of the LCD Screen as well as the heat control dial Manual Ope...

Page 22: ...cool down sequence and hasenteredtheFINALSHUTDOWNmode Refertoscreen 9forlistofpossible causes Turn heat control dial to off and then back on to restart 17 HOPPER OPEN SHUTDOWN 1A S H U T T I N G D O W N 1B H O P P E R L E F T O P E N 2 O F F I N M I N 17 The hopper lid has been left open too long or isn t fully closed To clear the error make sure hopper lid is closed then reset the stove by turnin...

Page 23: ...NTACT DEALER 1A O V E R H E A T E R R O R 1B O V E R H E A T E R R O R 2 C O N T A C T D E A L E R 27 The high limit snap switch has been activated due to excessive heat or a failed component and the stove is currently off Contact your dealer or service rep resentative This error can only be cleared by an authorized representative 28 SOFTWARE VERSION 1A C O N T R O L L E R 1B C O N T R O L L E R 2...

Page 24: ...rbon dioxide and unpleasant odors It is recommended that persons sensitive to an imbalance in the indoor air quality avoid the stove during the curing process Convection Blower Operation Your Bella pellet stove comes equipped with a temperature activated convection blower that extracts heat from the stove After the stove warms up a heat activated switch will turn the blower on The speed of the blo...

Page 25: ...are not permitted to be burned in these appliances Shelled corn can be burned in the Bella pellet stove when it is mixed with wood pellet fuel The mixture can contain a maximum of 50 percent corn Burning corn may create more ash than wood pellets and may necessitate the need to clean the Burn Pot and glass more frequently Store corn in a tight container and use methods to ensure the corn does not ...

Page 26: ...m the stove body only the right side door 4 Hold the right side door closed tightly while you carefully return the front cast iron door to the closed position paying special attention to the narrow gap between the two doors 5 Once the front cast iron door is in the closed position the right side door can be opened 6 When maintenance is complete be sure to re fasten the right side door by repeating...

Page 27: ...door and close the front cast iron door see Figure 35 CAUTION DisposalofAshes Ashesshouldbeplacedinametal container with a tight fitting lid The closed container should be placedonanon combustiblefloorortheground wellawayfrom all combustible materials pending final disposal If the ashes are disposed of by burial in soil or otherwise locally dispersed they should be retained in the closed container...

Page 28: ...o the low ers 5 Check flue clean out cover gaskets for any damage and replace if necessary 6 Once the flue passageways are clear of ash build up reinstall the three cover plates A Figure 36 WARNING DO NOT USE BRUSH ON HOT STOVE B C Figure 37 D Figure 38 Heat Exchange Scrapers Cleaning the Combustion Blower and Proof of Fire Switch Recommended Frequency of 1 year or after every 100 bags of fuel use...

Page 29: ...n Removing the Lower Main Cover 1 Unplug stove 2 Locatethecover Figure40 usinga5 32 allenwrench loosenthetwo screws on the bottom of the panel it is not necessary to completely remove them 3 Using an 1 8 allen wrench remove the six screws attaching the top and right next to the flue sides of the cover 4 Remove by pulling the cover directly back just far enough to clear the cast iron side door and ...

Page 30: ...aint Models with Black Painted Finish The stove body is painted with a quality high temperature stove paint Use only stove touch up paint shown below Do not touch up your stove with any other paint Cat No H8159 Touch Up Paint Metallic Black Using one small piece of 320 grit sand paper and lightly sand the blem ish so that the edges are feathered or smooth to the touch between the painted and bare ...

Page 31: ...anel Kits Brick Panel Kits Log Set Leg Leveling Kit Remote Control and Wall Thermostat u In Canada floor protection is required directly underneath and 2 from the sides of the flue or chimney adapter Recommended in the US vBurn times hopper capacity and BTU input may vary depending on the size and type of fuel used wFuses are rated as fast acting Flue Outlet Combustion Air Inlet NOTE DIAGRAMS ILLU...

Page 32: ...wn the stove if it does not detect the heat of a fire at the end of the initial startup period or if your stove has emptied the hopper Pre High Limit Snap Switch F200 40F N C H This snap switch is N C and opens at 200 F It will close when the temperature cools to 160 F It is located on the back right of the stove in the snap switch bracket with the high limit snap switch and blower snap switch Thi...

Page 33: ...ntrol Connector 6 pin Female 1 2 3 4 5 6 Control Wiring Harness DC Auger Power Source Brown To Controller White Black Proof of Fire Sensor Hopper Lid Sensor Vacuum Sensor Green Brown Brown Brown Brown Conv Fan Sensor Pre High Limit Sensor Sensor Connector 7 pin Female 1 2 3 4 5 6 7 White Yellow White Blue Blue To DC Auger Board Assembly 1 2 3 4 DC Auger Motor Control Connector 4 pin Female Blue Bl...

Page 34: ...ns on Page 28 Vacuum Switch Shuts Stove Down Message Air Seal Error Front door is not sealing Latch or adjust the front door Replace door gasket if worn or dam aged Ash pots are not sealing Close latches adjust latches or replace drawer gaskets Flue gas passageways restricted Clean the passageways see Page 28 Vent pipe restricted Clean the vent pipe see Page 29 Vacuum hose plugged Clean or replace...

Page 35: ... outlined on Pages 24 and 25 Pellets not Feeding Hopper empty Fill the hopper Auger jammed Call service technician Flue gas passageways restricted Call service technician Auger motor not operating Call service technician Over Temperature Snap Switch Shuts Stove Down Message Overheat Error Possible Problem Solution Convection blower not running Blower dirty blower snap switch bad or blower broken F...

Page 36: ...t front 18 H7650 Left door bottom hinge bracket 19 H7649 Right door bottom hinge bracket 20 H7635 Hopper lid hinge assembly 22 H7634 Hopper lid brass latch u H7632 3 16 Silicone Gasket Kit includes the following 1 ea Hopper lid gasket 1 ea Hopper lid handle gasket 1 ea Auger to firebox gasket 1 ea Hopper to auger gasket 1 ea Gasket flue passageway upper right 1 ea Gasket flue passageway upper left...

Page 37: ... left 72 H7652 Ash pot right 73 H7653 Control board box 74 H5147 Horizontal pipe adapter 75 H7614 Hopper Cover Corner 76 H7615 Hopper Cover Side 77 H7654 Hopper Cover Top 78 H7655 Hopper Cover Bottom 79 H7665 Leg Bolt Down Kit Manufactured Homes ELECTRICAL Item Cat No Description 34 H7625 D C auger motor wiring harness 35 H7624 Controller wiring harness 36 H7623 Power wiring harness 37 H7618 Neutr...

Page 38: ...NOTE DIAGRAMS ILLUSTRATIONS ARE NOT TO SCALE 38 16 68 15 3 8 24 10 11 23 7 20 22 16 14 2 68 REPLACEMENT PARTS DIAGRAMS ...

Page 39: ...39 10 11 17 68 1 9 13 5 6 4 NOTE DIAGRAMS ILLUSTRATIONS ARE NOT TO SCALE 10 11 79 REPLACEMENT PARTS DIAGRAMS 54 34 35 36 71 72 67 64 66 62 50 63 65 12 78 73 59 45 77 31 51 52 53 fuses ...

Page 40: ...NOTE DIAGRAMS ILLUSTRATIONS ARE NOT TO SCALE 40 REPLACEMENT PARTS DIAGRAMS 42 58 25 41 40 48 19 39 38 57 37 44 29 55 30 28 18 75 27 76 60 32 33 61 26 49 43 74 70 69 47 46 56 9 places ...

Page 41: ... BELLA PK SS Stone Panel Kit Beatrice Soapstone ref Form 506033 11 5 H3483 BELLA LOG Decorative Log Kit ref Form 506033 12 6 H0251 RCL STAT Deluxe Remote Timer T Stat Clock ref Form 750 129M 7 H4635 DWTK Digital Wall Thermostat Kit 8 H8159 TSPK B Touch up Paint Kit Metallic Black 12 oz Spray Can 9 12050004 Cleaning Brush ref Form 14720036 10 H7638 BELLA LLK Leveling Leg Kit 4 per pkg ref Form 5060...

Page 42: ...UBLES É SIGNALÉTIQ LA TRÉMIE DE COMBU SURCHARG Homologué pour le Canadaet les états unis Comme radiateur FonCtionne aux granules de bois CertiFiées peut être installé dans les maisons mobiles ou préFabriquées installer et utiliser l appareil en ConFormité aveC les direCtives d installation du FabriCant et des autorités loCales en bâtiment ou le serviCe de prévention des inCendies Communiquer aveC ...

Page 43: ...43 NOTES ...
Page 44: ...our other documents for future refer ence Product reference information We recommend that you record the following important information about your fireplace Please contact your Lennox Hearth Products dealer for any questions or concerns For the number of your nearest Lennox Hearth Products dealer please call 1 800 9 LENNOX Replacement parts See Pages 36 through 40 for a complete replacement parts...

Reviews: