background image

Summary of Contents for 32LC50CS - - 32" LCD TV

Page 1: ...32LC50CS 42PG65C 32LCSDCB 32LCSOCB 42PG60C 37LCSDC 32LX50C 37LC5DCB 32LXSOCS 37LCSDC1 37LC50C 42LC5DC 37LCSOCB 32LXSDC 42LBSOC 32LXSDCS 42LC50C 42LBSDC Please read this manual your set Retain it for serial number of the set bed on the back cover and quote rmation to your dealer when you require service P NO MFL34797007 0809 REVIO Printed in Korea i j i ...

Page 2: ...dio or televi sion reception which can be determined by turning the equipment off and on the user is encouraged to try to correct the interference by one or more of the following measures Reorient or relocate the receiving antenna increase the separation between the equipment and receiver Connect the equipment to an outlet on a circuit different from that to which the receiver is con nected Consul...

Page 3: ...od bracket or table specified by the manufacturer or sold with the apparatus When a cart is used use caution when moving the cart apparatus com bination to avoid injury from tip over O Unplug this apparatus during lighting storms or when unusedfor long periods of time Refer all servicing to qualified service personnel Servicing is required when the apparatus has been damaged in any way such as pow...

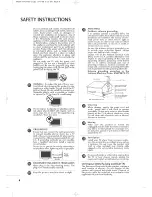
Page 4: ...tenna is installed follow the precautions below An outdoor antenna system should not be located in the vicinity of over head power lines or other electric light or power circuits or where it can come in contact with such power lines or circuits as death or serious Injury can occur Be sure the antenna system is grounded so as to provide some protection against voltage surges and built up static cha...

Page 5: ...Setup 28 On Screen Menus Selection 29 Troubleshooting 32 Maintenance 34 Product Specifications 35 HOW TO USE THE OWNER S MANUAL ON THE CD ROM To view the Owner s Manual on the CD ROM Adobe Acrobat Reader must be installed on your PC The ACRORD folder on the CD ROM contains the installation programs for them If you want to install those programs Open the My Computer _Open the LG _Open the ACRORD _ ...

Page 6: ...on Guide Refer to p 5 for Commercial Mode Polishing Cloth This feature is not available for all models 77i_ y 77_7 stZZ77o o_ Z7 exterior only with the polishing cloth for the product exterior if there is stain or fingerprint on surface of the exterion Do not wipe roughly when remov ing stain Please be cautions of that excessive pressure may cause scratch or discoloration I1iiii iiiiii_ Remote Con...

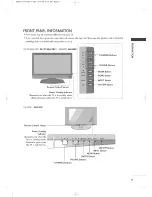
Page 7: ...e it 32 37 42LC5DC 32 37 42LCSOC 42LB5DC 42LB50C Remote Control Sensor Power Standby Indicator Illuminates red when the TV is in standby mode Illuminates green when the TV is switched on Buttons Buttons Button Button Button IOFF Button D z 32LX5DC 32LX50C Remote Control Sensor Power Standby Indicator Illuminates red when the TV is in standby mode Illuminates green when the TV is switched on ON OFF...

Page 8: ...inates blue when the set is switched on INPUT Button MENU Button ENTER Button 1 VOLUME Buttons 1 CHANNEL _V i Buttons 42PX8DC This TV s stand is sold separately ON OFF Button INPUT Button MENU Button ENTER Button VOLUME Buttons Remote Control Sensor CHANNEL Buttons Power Standby Indicator llluminates red when the TV is in standby mode llluminates green when the TV is switched on 8 i 4 _ I j i ...

Page 9: ... Page 9 i ST _ t r i BACK PANELINFORMATION Here shown may be somewhat different from your TV 52 57 42LC5 DC 52 57 42LCSOC 42LBSDC 42LB50C 52LXSDC 52LX50C m z 42PX8DC 42PG60C 42PG65C 777777777777777i iD _ 7 7 7 717_ 7777 9 i S 4 _ I j i ...

Page 10: ... these ports do not work M P I RESET UPDATE REMOTE CONTROL OUT SERVICEONLY RGB IN PC Connect the output from a PC AUDIO IN RGB DVI Connect the audio from a PC or DTV SPEAKER OUT 80 AV Audio Video IN Connect audio video output from an external device to these jacks S VIDEO Connect S Video out from an S VIDEO device COMPONENT IN Connect a component video audio device to these jacks RJP INTERFACE Pow...

Page 11: ...tect prod uct and screen from damage i Assemble the product stand with the product as shown Securely install the 4 bolts provided 42PG65C Carefully place the TV screen side down on a cushioned surface to protect the screen from damage Assemble the product stand with the product as shown _ _ _S_ I Tighten the 4 bolts securely using the holes in the back of the TV D m z 11 i j i ...

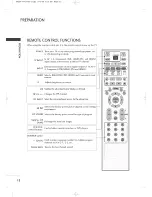
Page 12: ...Selects RGB HDMI1 DVI HDMI2 and Component input sources _ Adjusts brightness on screen PIP PIP CH i PIP INPUT Switchesthe sub picture Double Window or off mode Changes the PIP channel Select the connected input source for the sub picture Selects the factory preset picture depend on the viewing EZ PIC environment EZ SOUND Selects the factory preset sound for type of program SWAP or PIP SWAP Exchang...

Page 13: ...tings to your preference Right ENTER EXIT or RETURN MENU INFO Clears all on screen displays and returns to TV viewing from any menu Displays the main menu Display information at the top of the screen VOLUME UP DOWN TIMER Increase decrease the sound level Select the amount of time before your TV turns off auto matically MUTE Switch the sound on or off CHANNEL UP DOWN PAGE UP DOWN Select available c...

Page 14: ...s O onnect the cables as necessary To connect an additional equipment see the EXTERNAL EQUIPMENT SETUP section Secure the power cable with the PROTECTIVE BRACKET and the screw as shown It will help prevent the power cable from being removed by accident Install the CABLE HOLDER as shown Install the CABLE MANAGEMENT as shown PROTECTIVE BRACKET CABLE HOLDER CABLE MANAGEMENT BOLT 14 i 4 _ j jJ i ...

Page 15: ...ABLE HOLDER loosen the bolt installed the set m _o z O O Connect the cables as necessary To connect an additional equipment see the EXTERNAL EQUIPMENT SETUP section Secure the power cable with the PROTECTIVE BRACKET and the screw as shown It will help prevent the power cable from being removed by accident Install the CABLE HOLDER as shown PROTECTIVE BRACKET BOLT CABLE HOLDER 15 i 4 _ I jJ i ...

Page 16: ... the cables as necessary To connect an additional equipment see the EXTERNAL EQUIPMENT SETUP section Install the CABLE MANAGEMENT CLIP as shown Except 42PG60C model If your TV has CABLE HOLDER fix it as shown and bundle the cables Install the CABLE MANAGEMENT as shown ABLE MANAGEMENT CABLE HOLDER CLIP How to remove the CABLE MANAGEMENT CLIP Except 42PG60C model First press the cable management Hol...

Page 17: ...e bolts position before inserting the eye bolts loosen the bolts Secure the wall brackets with the bolts not provided as parts of the product must purchase separately on the wall Match the height of the bracket that is mounted on the wall to the holes in the product Ensure the eye bolts or brackets are tightened securely I Use a sturdy rope not provided as parts of the product must pur chase separ...

Page 18: ...fferent from your TV The TV must be attached to desk so it cannot be pulled in a forward backward direction potentially causing injury or damaging the product 32 37 42LC5DC 32 37 42LC50C 42LB5DC 42LB50C gQ 32LX5DC 32LX50C 4 Screws Stand 42PX8DC 42PG65C 2 Screws Stand T Desk Stand T Desk gll 4 Screws Stand Desk 18 4 _ I jJ i ...

Page 19: ...ing interface pad optional There 4 threaded holes are available for attaching the bracket 42PG60C 42PX8DC 400 400 600 400 m 0 z DESKTOP PEDESTALINSTALLATION For proper ventilation allow a clearance of 4inches on each side from the wall m Image shown may differ from your TV 4 i 4 inches 4 inches 4 inches 19 i j i ...

Page 20: ...oaxial Wire 75 ohm Single family Dwellings Houses Connect to wall jack for outdoor antenna Copper Wir_ Be careful not to bend the bronze wire when connecting the antenna Ca w_ Ja_ M _ _ RFCoaxial Wire 7S ohm 3 Using both cable and antenna RF Coaxial Wire 75 ohm Diplexer Signal Combinner UHF VHF I To improve the picture quality in a poor signal area please purchase a signal amplifier and install pr...

Page 21: ... external device refer to the figure as shown below When connecting Component cable 1 How to connect Connect the video outputs Y PB PR of the digital set top box to the COMPONENT IN VIDEO jacks on the set Match the jack colors Y green PB blue and PR red Connect the audio output of the digital set top box to the COMPONENT IN AUDIO jacks on the set 2 How to use I Turn on the digital set top box Refe...

Page 22: ...t 2 How to use I Turn on the DVD player insert a DVD i Select Component input source with using the INPUT button on the remote control i Refer to the DVD player s manual for operating instructions When connecting HDM cable 1 How to connect Connect the HDMI output of the DVD to the HDMI DVI IN 1 DVI or 2 jack on the set No separated audio connection is necessary HDMI supports both audio and video 2...

Page 23: ...by using the INPUT button on the remote control ii_i If connected to AV IN2 select AV2 input source m x q m _o z m c o m z m q c 0 When connecting with an S Video cable 1 How to connect Connect the S VIDEO output of the VCR to the S VIDEO input on the set Connect the audio outputs of the VCR to the AUDIO input jacks on the set 2 How to use I Insert a video tape into the VCR and press PLAY on the V...

Page 24: ...GB DVI jack on the set 2 How to use I Turn on the PC and the TV i Select RGB PC input source by using the INPUT button on the remote control When connecting HDM to DV cable 1 How to connect Connect the DVI output of the PC to the HDMI DVI IN 1 DVl jack on the set Connect the PC audio output to the AUDIO IN RGB DVI jack on the set 2 How to use I Turn on the PC and the set i Select HDMI1 DVI input s...

Page 25: ... 56 476 70 06 60 023 75 02 47 720 59 799 4Z130 59 658 Supported Display Specifications RGB HDMII DTV 31 50 60 00 31 47 HDMI1 DTV 31 469 59 94 44 96 59 94 45 00 60 00 33 72 59 94 33 75 60 00 31 500 60 00 31 469 59 94 44 960 59 94 45 000 60 00 33 720 59 94 33 750 60 00 Supported Display Specifications Y CB PB CR PR 15 73 59 94 15 73 60 00 31 47 59 94 31 50 60 00 44 96 59 94 45 00 60 00 33 72 59 94 3...

Page 26: ... 33 720 59 94 33 750 60 00 67 500 60 00 Supported Display Specifications Y CB PB CR PR 71_i i i_i_ ii iiiiiiiii_ii_ii_i7i i_i__i7iiiiiiiiiiiiiiiiiiiii 15 73 59 94 11111111117 15 73 6o o o 31 47 59 94 31 50 60 00 _i i i i i i i i i i i i i i i i i i i i i i i i i i i i i i i i i i i i i i i i i i i i i i i i i i i i i i i i i i i i i i i i i i i i i i _ 65 317 59 978 74 537 59 869 66 587 59 934 33 ...

Page 27: ...control i This TV is programmed to remember which power state it was last set to even if the power cord is out When finished using the TV press the POWER button on the remote con trol The TV reverts to standby mode N Z CHANNEL SELECTION Press the CH or or CH or v or NUMBER buttons to select a channel number VOLUME ADJUSTMENT Adjust the volume to suit your personal preference Press the VOL or butto...

Page 28: ...Scan again after any Antenna Cable connection changes A password is required to gain access to EZ Scan menu if the Lock System is turned on Press the MENU button and then use or or or v button to select the SETUP menu Pressthe or button and then use or or or v button to select EZ Scan Press the ENTER button to begin the channel search Allow EZ Scan to complete the channel search cycle for ANTENNA ...

Page 29: ...ZZZII _ _I z VIDEO i Selects the factory preset picture depend on the viewing environment Daylight Normal Night Time User1 User2 i Choose one of three automatic color adjustments Cool Normal Warm User i It is LG Electronic s unique picture improving technology to display a real HD source through an advanced digital signal processing algorithm i Select Auto or Manual XD Contrast XD Color XD NR MPEG...

Page 30: ... whether or not your viewing area observes Daylight Saving time Set the clock manually i Select On or Off _ Select On or Off llllllllllllll i i iiiiiiii Select the amount of time before your TV turns off auto matically Off 10 20 50 60 90 120 180 240 OPTION Only 42PXSDC model IIIIIIII Select the desired picture format Set by program 4 5 16 9 Horizon Zoom1 Zoom2 iiiiiiii Select a caption mode for di...

Page 31: ...o block iiiiiiiiiiiiiiiiiiii i IIIIIIii Blocks movies according to the movie ratings limits specified IIIIIIII Prevents children from watching certain children s TV programs according to the ratings limit set _Bzeci onti4e Ztingzi_ iocks ce _tai nTVpzg_am7 tflat you and your family do not want to view m Selecting canadian english language rating system _ ig re _ _ Se ec ing c _ n _ d a n f re n ch...

Page 32: ...l power outlet i Check your antenna direction and or location i Test the wall power outlet plug another product s power cord into the outlet where the product s power cord was plugged in i This is normal the image is muted during the product startup process Please contact your service centen if the picture has not appeared after five minutes i Adjust Color in menu option i Keep a sufficient distan...

Page 33: ...noise when the product is turned on or off and does not indicate a fault with the product 7 ii IIIIIIII Adjust resolution horizontal frequency or vertical frequency iiiiiiii Check the input source iiiiiiii Work the Auto configure or adjust clock phase or H V position Option 11111111 Check the signal cable Reinstall the PC video card m z E I x 33 i _ _ I j ...

Page 34: ...loth until it s almost dry and then use it to wipe the screen Make sure the excess water is off the screen and then let it air dry before you turn on your TV Cleaning the Cabinet I To remove dirt or dust wipe the cabinet with a soft dry lint free cloth i Please be sure not to use a wet cloth Extended Absence PRODUCT SPECIFICATIONS Width x Height x Depth inches mm Weight pounds kg _2 P_ Z g5 C I _ ...

Page 35: ...and 4Z2 pounds 21 4 kg Without Stand 36 8 pounds 16 7 kg 40 7 x 29 6 x 11 6 inches With Stand 1033 1 x 750 7 x 294 2 mm 4 b 7 x27 bx 4 7 iJi_e_ Without Stand 1033 1 x 686 5 x 110 2 mm With Stand 61 3 pounds 2Z8 kg Without Stand 4Z2 pounds 21 4 kg With Stand 36 3 x 24 2 x 11 3 inches 922 0 x 615 0x 288 0 mm 3 3 x_i Sx3k iZi Z Without Stand 922 0 x 546 0 x 98 0 mm With Stand 39 0 pounds 1Z7 kg Witho...

Page 36: ...MFL34797007en simp 9 8 08 3 15 PM Page 36 i ST_ t r i LG nits In i j i ...

Reviews: