background image

OWNER’S MANUAL

ELECTRIC RANGE

Please read this guide thoroughly  before operating

and keep it handy for reference at all times.

MODELS

LRE30453SW

LRE30453SB

LRE30453ST

MFL57206002 

www.lg.com

ENGLISH

ESPAÑOL

Summary of Contents for LRE30453SB

Page 1: ...WNER S MANUAL ELECTRIC RANGE Please read this guide thoroughly before operating and keep it handy for reference at all times MODELS LRE30453SW LRE30453SB LRE30453ST MFL57206002 www lg com ENGLISH ESPAÑOL ...

Page 2: ...or future reference We also suggest that you record the details of any contact with LG LG Electronics USA Inc concerning this unit Staple your receipt here to verify your retail purchase Model No Serial No Dealer Dealer Phone No Customer Relations LG Electronics U S A Inc Service Division Bldg 3 201 James Record Rd Huntsville AL 35824 0126 Thank you for purchasing an LG electric oven Thermostat ad...

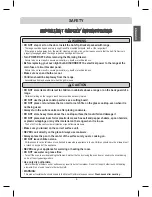
Page 3: ...sp the top rear edge of the range back guard and carefully attempt to tilt it forward Verify that the anti tip devices are engaged Warming drawer or Storage drawer Remove drawer and visually inspect that the rear leveling leg is fully inserted into the anti tip bracket Refer to the installation manual for proper anti tip bracket installation SURFACE COOKING UNITS Use Proper Pan Sizes This applianc...

Page 4: ...gasket Do Not Use Oven Cleaners No commercial oven cleaner or oven liner protective coating of any kind should be used in or around any part of the oven Clean in the self clean cycle only parts listed in this manual Before self clean the oven remove the broiler pan and any utensils of foods from the oven Before Self Cleaning the Oven Remove broiler pan and other utensils Never keep pet birds in th...

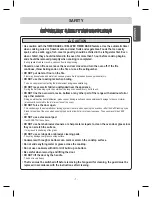
Page 5: ... or store items that can melt or catch fire on the glass cooktop even when it is not being used Always turn the surface units on after placing cookware DO NOT store heavy items above the cooktop surface that could fall and damage it DO NOT place aluminum foil or plastic items such as salt and pepper shakers spoon holders or plastic wrappings or any other material on the range when it is in use The...

Page 6: ...RYLGHG GLUHFWO DERYH FRRNLQJ VXrface limit it to items that are infrequently used and can be safely stored in an area subjected to heat Temperatures may be unsafe for items such as volatile liquids cleaners or aerosol sprays 2 127 WRXFK VXrface elements until it has cooled down sufficiently The surface elements may still be hot and burns may occur 1 9 5 OHDYH IRRG XQDWWHQGHG DW KLJK RU PHGLXP KLJK...

Page 7: ...num foil or any other material Doing so will destroy heat distribution produce poor baking results and cause permanent damage to the oven interior aluminum foil will melt to the interior surface of the oven 2 127 IRUFH WKH GRRU RSHQ This can damage the automatic door locking system Use care when opening the oven door after the Self Cleaning cycle Stand to the side of the oven when opening the door...

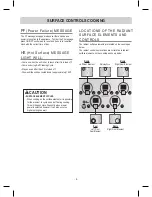
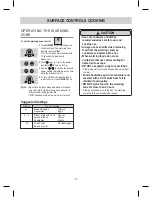
Page 8: ...e to reset the clock with the correct time of day HS Hot Surface MESSAGE LIGHT WILL RPH RQ ZKHQ WKH XQLW LV KRW WR WRXFK DIWHU LW LV WXUQHG RII RPH RQ GXULQJ 6HOI OHDQLQJ FOH 6WD RQ HYHQ DIWHU WKH XQLW LV WXUQHG RII ORZ XQWLO WKH XQLW KDV FRROHG GRZQ WR DSSUR LPDWHO F Single Left Rear Element Single Right Front Element Dual Left Front Dual Element Warming Zone Single Right Rear Element CAUTION SUR...

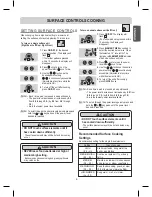
Page 9: ...ting for the single dual elements Each time a pad is pressed a beep will sound The power level decreases or increases by 0 5 from 9 0 through 3 0 by 0 2 from 3 0 through 1 0 Lo is the lowest power level available Note Each time a pad is pressed a beep will sound The power level decreases or increases by 0 5 from 9 0 through 3 0 by 0 2 from 3 0 through 1 0 Lo is the lowest power level available Not...

Page 10: ...ll appear when the unit is hot to touch Note Setting Type of cooking Lo 2 4 Hi Breads Pastries Casseroles Dinner Plate with Food Soups Cream Vegetables Fried Foods Soups Liquid Gravies Eggs Sauces Stews Meats Hot Beverages CAUTION 8VH RQO FRRNZDUH DQG GLVKHV recommended as safe for oven and cooktop use OZD V XVH RYHQ PLWWV ZKHQ UHPRYLQJ food from the warming center as cookware and plates will be h...

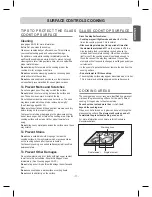
Page 11: ...ing surface after the area is heated Continuously cooking on a soiled surface may will result in a permanent stain To Prevent Other Damages Do not allow plastic sugar or foods with high sugar content to melt onto the hot cooktop Should this happen clean immediately See Cleaning pages 29 30 Do not let a pan boil dry as this will damage the surface and pan Do not use cooktop as a work surface or cut...

Page 12: ...ler 1 Place a ruler across the bottom of the pan 2 Hold it up to the light 3 No light should be visible under the ruler R QRW XVH D VPDOO SDQ RQ D ODUJH HOHPHQW 1RW RQO does this waste energy but it can also result in spillovers burning onto the cooking area which requires extra cleaning R QRW XVH QRQ IODW VSHFLDOW LWHPV WKDW DUH RYHUVL HG or uneven such as round bottom woks rippled bottom and or ...

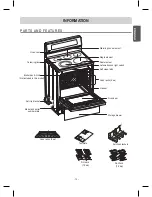
Page 13: ... in this model Anti tip bracket Model and serial number plate Oven racks 2 ea Storage drawer Oven door Gasket Oven racks 2 ea Self clean latch Automatic oven light switch Dual element Single element Warming zone element Template ENGLISH 12 ea Screws Anti tips brackets 12 ea Anchors ENGLISH ...

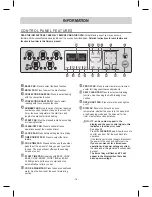
Page 14: ...nvection function NUMBER PADS Use to set any function requiring numbers such as the time of day on the clock the timer the oven temperature the start time and length of operation for timed baking START PAD Must be pressed to start any cooking or cleaning function CLEAR OFF PAD Press to cancel all oven operations except the clock and timer CLOCK PAD Press before setting the time of day TIMER ON OFF...

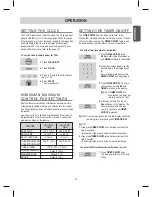
Page 15: ...me will count down with 5 00 and TIMER will show in the display 4 When the set time has run out End will show in the display The clock will sound with 3 beeps every 15 seconds until TIMER ON OFF is pressed 1 Press TIMER ON OFF once The display will return to the time of day To set the Timer example for 5 minutes To cancel the Timer before the set time has run out SETTING THE TIMER ON OFF The TIMER...

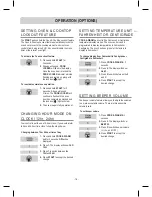
Page 16: ...OCKED will flash in the display Once the oven door is locked the DOOR LOCKED indicator will stop flashing and remain on along with the lock icon light To activate the Oven Lockout feature 1 Press and hold START for 3 seconds A beep will sound 2 times The DOOR LOCKED will continue to flash until the oven door has completely unlocked and the lock icon light will clear 2 The oven is again fully opera...

Page 17: ...to reject the change if necessary To decrease the oven temperature THERMOSTAT ADJUSTMENT The temperature in the oven has been preset at the factory When first using the oven be sure to follow recipe times and temperatures If you think the oven is too hot or too cool the temperature in the oven can be adjusted Before adjusting test a recipe by using a temperature setting that is higher or lower tha...

Page 18: ...hose will stop before coming completely out To remove racks 1 Pull the rack straight out until it stops 2 Lift up the front of the rack and pull it out To replace racks 1 Place the end of the rack on the support 2 Tilt the front end up and push the rack in 1 Press BAKE 350 will appear in the display 2 Press 3 7 and 5 BAKE will flash 3 Press START The display will show BAKE and the changing tempera...

Page 19: ...and cook for a selected length of time At the end of the cooking time the oven will turn off automatically 1 End and the time of day will show in the display The oven will shut off automatically 2 The control will continue to beep 3 times every minute until CLEAR OFF is pressed Place food in the oven after preheating if the recipe calls for it Preheating is so important for good results when bakin...

Page 20: ...ress START At the set time a short beep will sound The oven will begin to Bake When the oven has reached the desired temperature a long beep will sound 5 times and oven lamp will flash The display will show 300 and BAKE To program the oven for a Delay Start and to shut off automatically example for baking at 300 F for 30 minutes and starting at 4 30 SETTING DELAYED TIMED BAKE The BAKE COOK TIME an...

Page 21: ...ore browning Pan frying is recommended Slash fat Broil skin side down first Cut through back of shell Spread open Brush with melted butter before broiling and after half of broiling time Handle and turn very carefully Brush with lemon butter before and during cooking if desired Increase time 5 to 10 minutes per side for 11 2 thick or home cured ham Slash fat Slash fat Grease pan Brush steaks with ...

Page 22: ...with no sides or very low sides to allow heated air to circulate around the food Food baked on pans with a dark finish will cook faster KHQ XVLQJ RQYHFWLRQ DNH ZLWK D VLQJOH UDFN SODFH RYHQ rack in position D If cooking on multiple racks place the oven racks in positions B and D for 2 racks Place in positions B D and F for 3 racks DNHV KDYH EHWWHU UHVXOWV ZKHQ EDNHG XVLQJ WKH SDG you can still use...

Page 23: ...h the convection fan and element to roast meats and poultry Preheating is not necessary for meats and poultry Heated air circulates around the food from all sides sealing in juices and flavors Foods are crispy brown on the outside while staying moist on the inside RQYHFWLRQ 5RDVW LV HVSHFLDOO JRRG IRU ODUJH WHQGHU FXWV RI meat uncovered Press CLEAR OFF to cancel this mode at any time OPERATION CAU...

Page 24: ...CONV BAKE CONV ROAST or DELAYED TIMED BAKE CONV BAKE CONV ROAST 1 Press COOK WARM 2 Press START 3 To turn Cook Warm OFF press CLEAR OFF at any time To set Cook Warm 1 Set the cooking feature that you want to use TIMED BAKE CONV BAKE CONV ROAST DELAY TIMED BAKE CONV BAKE CONV ROAST refer to the relevant previous page 2 Press START 3 Press COOK WARM COOK WARM mode is set to turn on automatically aft...

Page 25: ...well ventilated to get rid of normal odors associated with cleaning Before a Self Clean Cycle We recommend venting your kitchen with an open window or using a ventilation fan or hood during the first self clean cycle Remove the oven racks broiler pan broiler grid all cookware and aluminum foil or any other material from the oven Wipe up heavy soil on the oven bottom Do hand clean door Don t hand c...

Page 26: ...n R QRW IRUFH WKH RYHQ GRRU RSHQ ZKHQ 2 LV GLVSOD HG The oven door will remained locked until the oven temperature has cooled Forcing the door open will damage the door After the Self Clean cycle You may notice some white ash in the oven Wipe it off with a damp cloth or a soapfilled steel wool pad after the oven cools These deposits are usually a salt residue that cannot be removed by the clean cy...

Page 27: ...the glide slots on the range 4 Push the drawer into the range until levers click approximately 2 inches Pull the drawer open again to seat bearing glides into position If you do not hear the levers click or the bearing glides do not feel seated remove the drawer and repeat steps 2 4 This will minimize possible damage to the bearing glides OVEN VENT The oven vent is located above the left rear surf...

Page 28: ...od has burned on sprinkle the grid with cleaner while hot and cover with wet paper towels or a dishcloth Soaking the pan will remove burned on foods Both the broiler pan and grid may be cleaned with a commercial oven cleaner Both the broiler pan and grid can also be cleaned in a dishwasher Oven Racks Remove the oven racks before operating the Self Clean cycle Leaving the racks in place could cause...

Page 29: ...ain and protect the surface of your glass cooktop follow these steps 1 Before using the cooktop for the first time clean it with Ceramic Cooktop Cleaner This helps protect the top and makes cleanup easier 2 Daily use of Ceramic Cooktop Cleaner will help keep the cooktop looking new 3 Shake the cleaning cream well Apply a few drops of Cleaner directly to the cooktop 4 Use a paper towel clean the en...

Page 30: ...d the risk of damage to the glass ceramic surface For your safety please wear an oven mitt potholder while cleaning the hot cooking surface Metal Marks and Scratches 1 Be careful not to slide pots and pans across your cooktop It will leave metal markings on the cooktop surface These marks are removable using the Ceramic Cooktop Cleaner with the Cleaning Pad for Ceramic Cooktops 2 If pots with a th...

Page 31: ...ottom of the slot Step 3 Open the door fully If the door will not open fully the indentation is not seated correctly in the bottom edge of the slot Step 4 Push the hinge locks up against the front frame of the oven cavity to the locked position Step 5 Close the oven door DOOR CARE INSTRUCTIONS 0RVW RYHQ GRRUV FRQWDLQ JODVV WKDW FDQ EUHDN Read the following recommendations 1 Do not close the oven d...

Page 32: ...uit breaker tripped Replace the fuse or reset the circuit breaker Cooktop controls improperly set Check to see the correct control is set for the surface unit you are using 7KLV LV QRUPDO 7KH XQLW LV VWLOO RQ DQG KRW Food spillovers not cleaned before next use See Cleaning the glass cooktop section Hot surface on a model with a light colored cooktop This is normal The surface may appear discolored...

Page 33: ...OHPHQW 5HSRVLWLRQ WKH UDFN WR SURYLGH SURSHU FOHDUDQFH EHWZHHQ WKH meat and the element Preheat broil element for searing 0HDW QRW SURSHUO SUHSDUHG 5HPRYH H FHVV IDW IURP PHDW XW UHPDLQLQJ IDWW HGJHV WR prevent curling but do not cut into lean QVHUW RQ EURLOHU SDQ ZURQJ VLGH XS DQG JUHDVH QRW GUDLQLQJ OZD V SODFH JULG RQ WKH EURLOHU pan with ribs up and slots down to allow grease to drip into pan ...

Page 34: ...E section page 29 0LQHUDO GHSRVLWV IURP ZDWHU DQG IRRG 5HPRYH XVLQJ D FHUDPLF JODVV FRRNWRS FOHDQLQJ cream Use cookware with clean dry bottoms 7KH RYHQ WHPSHUDWXUH LV WRR KLJK WR VHW D VHOI FOHDQ RSHUDWLRQ Allow the range to cool and reset the controls 2YHQ FRQWUROV LPSURSHUO VHW See the using the self cleaning oven section 6HOI OHDQ F FOH FDQQRW EH VWDUWHG LI 2YHQ RFNRXW IHDWXUH LV DFWLYH RU UDGL...

Page 35: ...cess set a self clean cycle for a minimum of 3 hours See the Self Clean section page 26 FRQYHFWLRQ IDQ PD DXWRPDWLFDOO WXUQ RQ DQG RII This is normal 7KH VKLQ VLOYHU FRORUHG UDFNV ZHUH FOHDQHG LQ D VHOI FOHDQ F FOH Apply a small amount of vegetable oil to a paper towel and wipe the edges of the oven racks with the paper towel RQYHFWLRQ IDQ VWRSV GXULQJ D FRQYHFWLRQ EDNH F FOH This is normal and is...

Page 36: ... Repairs to parts or systems resulting from unauthorized modifications made to the appliance 7 Replacement parts or repair labor costs for units operated outside the united states 8 Any labor costs during the limited warranty period This warranty is extended to the original purchaser for products purchased for home use within the USA In Alaska the warranty excludes the cost of shipping or service ...

Page 37: ...MANUAL DEL PROPIETARIO ESTUFA ELÉCTRICA Lea este manual con atención antes de utilizar el equipo y guárdelo para futuras consultas LRE30453SW LRE30453SB LRE30453ST P No MFL57206002 www lg com ESPAÑOL ...

Page 38: ...serie de esta unidad para consultarlo en el futuro Le sugerimos también que anote todos los detalles de cualquier contacto con LG LG Electronics USA Inc en relación con esta unidad Para comprobar su compra grape aquí su factura Número de modelo Número de serie Distribuidor Número de teléfono del distribuidor Relaciones con los clientes LG Electronics U S A Inc Service Division Bldg 3 201 James Rec...

Page 39: ...lación correcta de la ménsula anti volcaduras UNIDADES DE SUPERFICIE DE COCCIÓN Siempre utilice cacerolas del tamaño adecuado Este artefacto viene equipado con una o más unidades de superficies de cocción de distintos tamaños Elija utensilios con fondo plano y suficientemente grandes para cubrir todo el elemento de calefacción de la unidad de superficie Si se utilizan utensilios más pequeños se po...

Page 40: ...les o ningún tipo de recubrimientos protectivos del forro en ninguna parte del horno Solamente las piezas enumeradas en este manual pueden limpiarse con el ciclo de limpieza automática Antes de la limpieza automática del horno retire la bandeja del asador y todos los utensilios con alimentos del interior del mismo Antes de la limpieza automática del horno Retire la bandeja del asador y otros utens...

Page 41: ...rficie de cocción de vidrio artículos que podrían derretirse o incendiarse aunque no se esté utilizando Siempre encienda las unidades de superficie solamente después de haber puesto el utensilio de cocina encima de la misma Nunca guarde artículos pesados encima de la superficie de cocción ya que podrían caerse y dañar la superficie Nunca ponga papel aluminio o artículos de plástico como serían sal...

Page 42: ...uedan guardarse sin riesgo en una zona sujeta a temperaturas altas Esa temperatura podría ser peligrosa para artículos tales como líquidos volátiles limpiadores o atomizadores de aerosol 1R WRTXH ODV XQLGDGHV GH VXSHrficie hasta que se hayan enfriado Es posible que los elementos de superficie sigan estando calientes y se pueden producir quemaduras 181 GHMH DOLPHQWRV VLQ DWHQFLyQ HQ ODV FRQILJXUDFL...

Page 43: ...QGR GH GHO KRUQR DQDTXHOHV R FXDOTXLHU RWUD parte del horno Si lo hace se altera la distribución del calor se obtienen resultados deficientes al hornear y se puede dañar permanentemente el interior del horno el papel de aluminio se derrite sobre la superficie interior del horno 12 IXHUFH OD SXHrta del horno para abrirla El hacerlo puede dañar el sistema de bloqueo automático de la puerta del horno...

Page 44: ...OFF para restablecerlo y cerciórese de que restablece el EL MENSAJE HS SUPERFICIE CALIENTE 6H HQFLHQGH FXDQGR OD XQLGDG HVWi D Q PX FDOLHQWH después de haberla apagado 6H HQFLHQGH GXUDQWH HO FLFOR GH OLPSLH D DXWRPiWLFD RQWLQ D HQFHQGLGR DXQTXH VH KD D DSDJDGR OD XQLGDG O EULOOR FRQWLQ D KDVWD TXH OD XQLGDG VH KD HQIULDGR D 150 F 65 C Sencillo Elemento posterior izquierdo Sencillo Elemento anterio...

Page 45: ...dados Ajuste recomendado para los elementos sencillos y dobles Cada vez que presione un botón se escuchará un pitido El nivel de potencia se disminuye o aumenta desde 9 0 hasta 3 0 en unidades de 0 5 en unidades de 0 2 desde 3 0 hasta 1 0 Lo es el nivel de potencia más bajo posible Nota Cada vez que presione un botón se escuchará un pitido El nivel de potencia se disminuye o aumenta desde 9 0 hast...

Page 46: ...la para elegir el ajuste de potencia deseado Ajustable en cualquier momento mientras el elemento está encendido 4 Para apagar la unidad después de que el alimento está listo para servirse presione ON OFF una vez Ajustes sugeridos PRECAUCIÓN 8VH VROR UHFLSLHQWHV FRFFLyQ SODWRV recomendados como seguros para uso en horno y en anafe 6LHPSUH XWLOLFH JXDQWHV GH FRFLQD FXDQWR quite alimentos del centro ...

Page 47: ...apermanente Cómoprevenirotrosdaños Nodejederretirplástico azúcaruotrosalimentosconaltocontenidode azúcarenlasuperficiedecocción Sillegaraasucederlímpielo inmediatamente VeaLimpiezapáginas29 30 Nunca dejeunacacerolahirviendoensecoyaqueasísepuededañar tantolasuperficiecomolacacerola Nouse lasuperficiedecoccióncomozonadetrabajoocomotablade corte Nunca cocinealimentosdirectamentesobrelasuperficie ZONA...

Page 48: ...a el fondo de la cacerola 2 Póngalo a contraluz 3 La regleta no debe permitir el paso de la luz No use una cacerola pequeña con un elemento grande No sólo se gasta energía sino que pueden presentarse desbordes que se queman en la zona de cocción y el trabajo de limpieza será más pesado Nunca use artículos especializados que no tengan fondo plano y que sean más grandes o irregulares como serían los...

Page 49: ...l número de serie y modelo Cajón de almacenamiento Puerta del horno Empaquetadura Anaqueles estándar 2 c u Cerrojo de limpieza automática Interruptor de la lámpara automática del horno Elemento doble Elemento sencillo Elemento de la zona de calentamiento Anaqueles estándar 2 c u Plantilla Tornillos 12 c u Anclas 12 c u Ménsulas anti volcaduras ESPAÑOL ESPAÑOL ESPAÑOL ...

Page 50: ... la hora del día en el reloj el temporizador la temperatura del horno y la hora de inicio para horneo cronometrado y su duración START PAD botón Iniciar Debe de presionarse para iniciar cualquier función de cocción o de limpieza CLEAR OFF PAD botón Eliminar apagar Presionar para cancelar todas las operaciones del horno exceptuando el reloj y el temporizador CLOCK PAD botón Reloj Presionar antes de...

Page 51: ...isualización 4 Una vez que transcurrió el tiempo fijado se visualiza End Sonarán 3 pitidos cada 15 segundos en el reloj hasta que se presione TIMER ON OFF 1 Presione TIMER ON OFF una vez solamente Se regresa a la visualización de la hora del día Para ajustar el temporizador se muestra el ejemplo para 5 minutos Para cancelar el Temporizador antes de que transcurra el tiempo fijado CÓMO AJUSTAR EL T...

Page 52: ...ra conmutar entre 12H y 24H 4 Presione START para aceptar el cambio deseado Para cambiar el horario del día de 12 horas a 24 horas CÓMO CAMBIAR EL MODO HORARIO DEL RELOJ 12HR 24HR El control está ajustado para usar un horario del reloj de 12 horas Si prefiere un horario de reloj de 24 horas siga los pasos siguientes 1 Presione COOK WARM por 3 segundos 2 Presione 3 Se visualiza BEEP Hi 3 Presione 3...

Page 53: ...temperatura y entonces aparece la hora del día en la visualización Si es necesario rechazar el cambio presione CLEAR OFF Para reducir la temperatura del horno AJUSTE DEL TERMOSTATO La temperatura del horno viene ajustada de fábrica Cuando use el horno por primera vez obedezca los horarios y temperaturas de las recetas Si considera que el horno está muy caliente o muy frío puede ajustarse la temper...

Page 54: ...s antes de que se salgan completamente Para retirar los anaqueles 1 Tiredel anaquel hacia fuera hasta quesedetenga 2 Levanteel frentedel anaquel y tiredeél hacia fuera Para reponer los anaqueles 1 Coloqueel extremo del anaquel en el soporte 2 Inclineel frentehacia arriba y empujeel anaquel hacia adentro Fig 1 Fig 2 Tipo de alimento Posición del anaquel Bizcochoblanco tartascongeladas PastelesBundt...

Page 55: ...po seleccionado Al final del tiempo de cocción el horno se apagará automáticamente 1 Se visualiza End y la hora del día El horno se va a apagar automáticamente 2 El control va a seguir emitiendo 3 pitidos por minuto hasta que se presione CLEAR OFF Si la receta lo solicita coloque los alimentos en el horno después del precalentamiento El pre calentamiento es muy importante para obtener los mejores ...

Page 56: ...ará hornear Después de que el horno alcance la temperatura deseada se escucharán 5 pitidos prolongados y empezará a destellar la lámpara del horno Se visualizará 300 y BAKE Para programar el horno para encendido y apagado retrasado automáticamente por ejemplo para hornear a 300 F por 30 minutos y comenzando a las 4 30 AJUSTE DE DELAYED TIMED BAKE horneo con tiempo de retraso Los botones BAKE COOK ...

Page 57: ...los Se recomienda freírlos en bandeja Recorte la grasa Áselo primero por el lado de la piel Corte por la parte trasera de la concha Ábralo en cruz Aplique mantequilla derretida antes de asar y a la mitad del tiempo de asado Manipúlelo y déle vuelta muy cuidadosamente Si se desea aplique mantequilla de limón antes y durante la cocción Aumente el tiempo de 5 a 10 minutos por lado para jamones de 1 d...

Page 58: ...earse en bandejas sin lados o con lados muy bajos para dejar que el aire caliente circule alrededor de los alimentos Los alimentos horneados en bandejas con acabados oscuros se cocinarán más rápidamente Cuando use Convection Bake con un sólo anaquel coloque el anaquel en la posición D Si se cocina con varios anaqueles coloque los anaqueles en las posiciones B y D para 2 anaqueles Colóquelos en las...

Page 59: ...o el pre calentamiento para carnes y aves El aire calentado circula por todos los lados alrededor de los alimentos sellando los jugos y el sabor Los alimentos quedan doraditos y crujientes por fuera y jugosos por dentro RQYHFWLRQ 5RDVW HV DGHFXDGR HVSHFLDOPHQWH SDUD FRUWHV GH carne grandes y tiernos destapados Presionar CLEAR OFF si desea cancelar este modo en cualquier momento OPERACIÓN PRECAUCIÓ...

Page 60: ...La lámpara del horno no puede encenderse si está activada la función de limpieza automática Nota La lámpara interior del horno se enciende automáticamente al abrir la puerta del horno La lámpara del horno puede encenderse o apagarse manualmente presionando el botón OVEN LIGHT CÓMO ENCENDER O APAGAR LA LÁMPARA DEL HORNO No utilice el modo de fermentación para calentar alimentos o para mantenerlos c...

Page 61: ...es originados por la limpieza Antes de un ciclo de limpieza automática Le recomendamos ventilar su cocina abriendo una ventana o con un ventilador o campana durante el primer ciclo de limpieza automática Retire del horno los anaqueles la bandeja de asado todos los utensilios de cocina y cualquier papel de aluminio cualquiera Limpie toda la suciedad densa en el fondo del horno Nunca limpie la puert...

Page 62: ...opuedeverseLOCK bloqueado La puertadelhornopermanecerábloqueadahastaquelatemperaturadel hornosehayaenfriado Tratardeabrirlapuertaalafuerzadañarálapuerta Cuando se usa la característica Self Clean No podrá iniciarse un ciclo Self Clean si es que está activa la característica Oven Lockout UnavezquesehaconfiguradoSELFCLEAN limpieza automática lapuertadelhornosebloquearádemanera automática Ustednopodr...

Page 63: ...ajón dentro de la estufa hasta que escuche que las correderas hacen clic aproximadamente 2 Vuelva a tirar del cajón para abrirlo y lograr que las correderas con cojinetes se asienten en su sitio Si no escucha el clic de las palancas o las correderas con cojinetes no dan la impresión de estar bien asentadas desmonte el cajón y repita los pasos de 2 al 4 De esta forma se evitarían los daños posibles...

Page 64: ...gua caliente con un estropajo de plástico o relleno de jabón Si se ha adherido algún alimento quemado rocíe la rejilla con limpiador mientras esté caliente y cúbrala con toallas de papel húmedas o con un trapo de cocina Se logran quitar los alimentos quemados adheridos remojando la bandeja Tanto la bandeja de asado como la rejilla pueden limpiarse con un limpiador de hornos comercial Tanto la band...

Page 65: ...rficie de su superficie de cocción de vidrio siga los pasos siguientes 1 Antes de utilizar la superficie de cocción por primera vez Límpiela con un limpiador de superficies de cocción de cerámica o el limpiador proporcionado Así se ayuda a proteger la superficie y se facilita la limpieza 2 El uso diario del limpiador de superficies de cocción de cerámica o el limpiador proporcionado ayudará a mant...

Page 66: ...o raspar pintura de los vidrios esto no dañará la superficie Sujete el raspador formando un ángulo aproximado de 30 con la placa Paso 2 Una vez que la superficie de cocción se haya enfriado aplique pequeñas cantidades tamaño de una moneda pequeña de un limpiador aprobado sobre cada quemador y extienda la crema sobre la superficie de cocción con un papel de cocina húmedo como si limpiara una ventan...

Page 67: ... Paso 3 Abra la puerta completamente Si la puerta no puede abrirse completamente la muesca no se ha asentado correctamente en el borde del fondo de la ranura Paso 4 Presione los seguros de la bisagra contra el marco delantero de la cavidad del horno hasta la posición de bloqueo Paso 5 Cierre la puerta del horno INSTRUCCIONES PARA EL CUIDADO DE LA PUERTA D PD RUtD GH ODV SXHUWDV GH KRUQRV VRQ GH YL...

Page 68: ...aunfusibleosedispararaundisyuntorensucasa Repongaelfusibleorestablezcaeldisyuntor Seajustaronincorrectamenteloscontrolesdelasuperficiedecocción Compruebequeseajustóelcontrolcorrespondientedelaunidaddesuperficiequeestéusando Estoesnormal Launidaddecontrolestáaúnencendidaycaliente Noselimpiaronlosderramesdealimentosantesdeusarlaestufadenuevo ConsultelasecciónCómolimpiarlasuperficiedecoccióndevidrio ...

Page 69: ...uelparalograrlaholguraadecuadaentrela carneyelelemento Precalienteelelementodelasadorparadorarrápidamente Lacarnenoestabapreparadacorrectamente Quitelagrasasobrantedelacarne Solamenterecortelosbordes grasientosparaimpedirqueseenrosquen peronocortelacarne Insértelaconelladocontrariohaciaarribaenlabandejadelasadoryquelagrasanoseestéescurriendo Siempre coloquelarejillaenlabandejadeasadoconlostravesañ...

Page 70: ...ágina29delasecciónMANTENIMIENTO Depósitosmineralesdelaguaodelosalimentos Quítelosconunacremalimpiadoradesuperficiesde coccióndevidriocerámico Useutensiliosdecocinaconfondolimpioyseco Latemperaturadelhornoesdemasiadoaltaparaajustarunaactividaddelimpiezaautomática Dejeenfriarelhornoyrestablezcaloscontroles Seajustaronincorrectamenteloscontrolesdelhorno ConsultelasecciónHornodelimpiezaautomática Nopo...

Page 71: ...rasalmenos Consultelapágina26delasecciónLimpiezaautomática Unventiladordeconvecciónpodríaencenderseoapagarseautomáticamente Estoesnormal Losanaquelesbrillantes decolorplateadoselimpiaronconunciclodelimpiezaautomática Apliqueunpocodeaceitevegetalaunatoalladepapelylimpielosextremosdelosanaquelesdelhornocon latoalladepapel Elventiladordeconvecciónsedetieneduranteunciclodecocciónporconvección Estoesco...

Page 72: ...enido el cuidado debido tal como se describe en el Manual del propietario y guía de cocción 6 Las reparaciones de piezas o sistemas que resulten de modificaciones no autorizadas a los artefactos 7 Los costos de piezas de reemplazo o de mano de obra para unidades que funcionan fuera de los Estados Unidos 8 Cualquier costo de mano de obra durante la vigencia de la garantía limitada Esta garantía se ...

Page 73: ...MEMO ...

Page 74: ...MEMO ...

Page 75: ...MEMO ...

Page 76: ...Printed in Mexico www lg com Register your product Online LG Customer Information Center 1 800 243 0000 1 888 865 3026 1 888 542 2623 USA Consumer User USA Commercial User CANADA ...

Reviews: