background image

MASTER LOAD     750

OPERATORS MANUAL

IM575

May, 2006

Safety Depends on You

Lincoln arc welding and cutting
equipment is designed and built
with safety in mind. However, your
overall safety can be increased by
proper installation ... and thought-
ful operation on your part.

DO

NOT INSTALL, OPERATE OR
REPAIR THIS EQUIPMENT
WITHOUT READING THIS
MANUAL AND THE SAFETY
PRECAUTIONS CONTAINED
THROUGHOUT.

And, most

importantly, think before you act
and be careful.

For use with equipment code number 10401.

• Sales and Service through Subsidiaries and Distributors Worldwide •

Cleveland, Ohio 44117-1199  U.S.A.   TEL: 216.481.8100   FAX: 216.486.1751   WEB SITE: www.lincolnelectric.com

• World's Leader in Welding and Cutting Products •

Copyright © 2005 Lincoln Global Inc.

Summary of Contents for MASTER LOAD 750

Page 1: ... NOT INSTALL OPERATE OR REPAIR THIS EQUIPMENT WITHOUT READING THIS MANUAL AND THE SAFETY PRECAUTIONS CONTAINED THROUGHOUT And most importantly think before you act and be careful For use with equipment code number 10401 Sales and Service through Subsidiaries and Distributors Worldwide Cleveland Ohio 44117 1199 U S A TEL 216 481 8100 FAX 216 486 1751 WEB SITE www lincolnelectric com World s Leader ...

Page 2: ... PACEMAKER WEARERS SHOULD CONSULT WITH THEIR DOCTOR BEFORE OPERATING Read and understand the following safety highlights For additional safety information it is strongly recommended that you purchase a copy of Safety in Welding Cutting ANSI Standard Z49 1 from the American Welding Society P O Box 351040 Miami Florida 33135 or CSA Standard W117 2 1974 A Free copy of Arc Welding Safety booklet E205 ...

Page 3: ...ood electrical earth ground 3 f Maintain the electrode holder work clamp welding cable and welding machine in good safe operating condition Replace damaged insulation 3 g Never dip the electrode in water for cooling 3 h Never simultaneously touch electrically hot parts of electrode holders connected to two welders because voltage between the two can be the total of the open circuit voltage of both...

Page 4: ...hem to prevent the welding sparks from starting a fire Remember that welding sparks and hot materials from welding can easily go through small cracks and openings to adjacent areas Avoid welding near hydraulic lines Have a fire extinguisher readily available 6 b Where compressed gases are to be used at the job site special precautions should be used to prevent hazardous situations Refer to Safety ...

Page 5: ...appropriés et non inflamma bles 4 Des gouttes de laitier en fusion sont émises de l arc de soudage Se protéger avec des vêtements de protection libres de l huile tels que les gants en cuir chemise épaisse pantalons sans revers et chaussures montantes 5 Toujours porter des lunettes de sécurité dans la zone de soudage Utiliser des lunettes avec écrans lateraux dans les zones où l on pique le laitier...

Page 6: ... Bank should be used in a cool well ventilated area 7 Allow cool room air to pass into the unit to cool the elements Do not allow the unit to be placed where hot exhaust air can recirculate back through the unit causing a constant rise in cooling air temperature 8 After running a load test residual heat may be removed from the load bank by allowing the blow er to operate for a few minutes after lo...

Page 7: ...n information below for future reference This information can be found on your machine nameplate Product _________________________________________________________________________________ Model Number ___________________________________________________________________________ Code Number or Date Code_________________________________________________________________ Serial Number_____________________...

Page 8: ...LLATION BEFORE INSTALLATION 3 LOCATION 3 AIRFLOW CONSIDERATIONS 3 POWER REQUIREMENTS 3 OPERATION PURPOSE AND USE OF CONTROLS 4 LOAD BANK OPERATION 4 OPERATING INSTRUCTIONS 4 MAINTENANCE ROUTINE AND PERIOD MAINTENANCE 5 TROUBLESHOOTING HOW TO USE TROUBLESHOOTING GUIDE 6 TROUBLESHOOTING GUIDE 7 DIAGRAMS WIRING DIAGRAM 10 DIMENSION PRINT 11 PARTS appendix ...

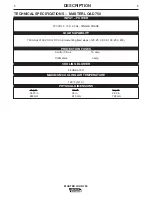
Page 9: ...LITY PROTECTION FUSES COOLING BLOWER Height Width Depth 34 75 in 24 in 28 5 in 883 mm 610 mm 724 mm PHYSICAL DIMENSIONS 120 VOLT 15 A 60 Hz SINGLE PHASE 750 Amps 50V AC or DC in incrementing fixed steps of 25 25 50 50 100 250 250 Control Circuit 15 amp Voltmeters 3 amp 120 F 50 C MAXIMUM COOLING AIR TEMPERATURE ...

Page 10: ...ecirculate back through the unit caus ing a constant rise in cooling air temperature The Master Load 750 Load Bank contains a blower approximately 82dBA at 3 ft which provides the nec essary cooling air for the load elements An exhaust temperature sensor is provided to monitor the exhaust temperature This switch is electrically interlocked with the load application circuit If an unsafe tempera tur...

Page 11: ...icted when two or more load banks have air inlets positioned too close to each other This competition for cooling air caus es a low pressure area restricting adequate air flow It is important to install the Load Bank properly Installation errors may result in a catastrophic failure The over temperature switch a protective device in the load bank will guard against some of these prob lems If protec...

Page 12: ...dropping out shut off the POWER switch at once Remove all power to the unit and check for proper operation of fan safety circuit Failure to correct cool ing air loss condition will result in destruction of the Load Bank Refer to the Load Bank Safety section of this manual OPERATING INSTRUCTIONS 1 Connect Load Bank to 120 volts single phase 60 Hz power source 2 Connect a wire from the Load Bank fra...

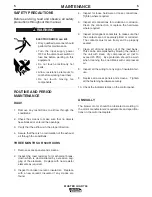
Page 13: ...ng of the elements Replace with new resistor elements as required 3 Inspect for broken ceramic insulators Replace with a new ceramic insulator if any cracks are found 4 Inspect for loose hardware or loose connections Tighten where required 5 Inspect all connections for oxidation or corrosion Clean the connection or replace the hardware where required 6 Inspect all magnetic contactors to make sure ...

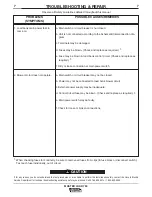
Page 14: ... in the Safety Sections of this manual to avoid electrical shock or danger while troubleshooting this equipment This Troubleshooting Guide is provided to help you locate and repair possible problems Step 1 LOCATE PROBLEM SYMPTOM Look under the column labeled PROBLEM SYMPTOMS This column describes possible symptoms that your unit may exhibit Find the listing that best describes the symptom that you...

Page 15: ...b Unit is not connected according to the Schematic Interconnection dia gram c Terminals may be damaged d Fuses may be blown Check and replace as required 1 e Fuse may be blown in load bank control circuit Check and replace as required 1 f Dirty or loose connection at main power switch a Main switch or circuit breaker may not be closed b Power may not be connected to load bank blower circuit c Exte...

Page 16: ... load bank intake or exhaust b Maximum rating of the load bank may have been exceeded a Fan blade motion may be obstructed b Fan blade may be loose at hub or is not keyed properly a Check to see if over temperature indicator is lit See problem 3 b A blower failure may exist See problem 2 c Master load switch may be faulty d Control power may be inadequate e Fuse may be blown in load bank control c...

Page 17: ...ION PROBLEMS SYMPTOMS POSSIBLE CAUSES REMEDIES 6 Contactor chattering exists 7 Load bank or load step does not give rated load a Contacts and or core may be dirty b Check for loose or faulty connections to the contactor coil c Control circuit line voltage may be too low a Applied load voltage may be either derated or inadequate b Contactor may not be closing properly c Load step resistor element m...

Page 18: ...10 DIAGRAMS 10 MASTER LOAD 750 D26300 3 5 97 MASTERLOAD 750 WIRING DIAGRAM ...

Page 19: ...11 DIAGRAMS MASTER LOAD 750 11 SB2561 2 22 96 MASTERLOAD 750 DIMENSION PRINT ...

Page 20: ...PARTS MASTER LOAD 750 D26244 SHT 1 2 3 6 97 MASTERLOAD 750 GENERAL ASSEMBLY ...

Page 21: ...8720 22 1 X 24 Line Cord P1 M18720 23 1 X 25 Control Panel M18720 24 1 X 26 Schematic Wiring Diagram M18720 25 1 X 27 Relay K1 K4 M18720 26 4 X 28 Relay K5 M18720 27 1 X 29 Support Motor M18720 28 1 X 30 Terminal Connector W1 W2 S16656 4 2 X 31 Relay K6 K7 M18720 29 2 X 32 Fuseholder XF1 XF3 M18720 30 1 X 33 Fuse 15A F1 M18720 31 1 X 34 Motor 1 4 HP 120V B1 M9983 4 1 X 35 Fuse 3A F2 F3 M18720 32 2...

Page 22: ...onductor Rectifier CR1 M18720 52 1 X 59 60 Shunt 800A 50MV R10 M18720 53 1 X 61 Wire Electrical 2 AWG M18720 54 75ft X 62 63 Nut 1 2 13 M18720 56 4 X 64 Washer Flat 1 2 M18720 57 1 X 65 Recommended Spare Part 3 18 97 Use only the parts marked x in the column under the heading number called for in the model index page Indicates a change this printing ITEM DESCRIPTION PART NO QTY 1 2 3 4 5 6 7 8 9 ...

Page 23: ...NOTES ...

Page 24: ...NOTES ...

Page 25: ...NOTES ...

Page 26: ...electrically live parts or electrode with skin or wet clothing Insulate yourself from work and ground No toque las partes o los electrodos bajo carga con la piel o ropa moja da Aislese del trabajo y de la tierra Ne laissez ni la peau ni des vête ments mouillés entrer en contact avec des pièces sous tension Isolez vous du travail et de la terre Berühren Sie keine stromführenden Teile oder Elektrode...

Page 27: ...gute Be und Entlüftung des Arbeitsplatzes Mantenha seu rosto da fumaça Use ventilação e exhaustão para remover fumo da zona respiratória Turn power off before servicing Desconectar el cable de ali mentación de poder de la máquina antes de iniciar cualquier servicio Débranchez le courant avant l entre tien Strom vor Wartungsarbeiten abschalten Netzstrom völlig öff nen Maschine anhalten Não opere co...

Page 28: ...s and Service through Subsidiaries and Distributors Worldwide Cleveland Ohio 44117 1199 U S A TEL 216 481 8100 FAX 216 486 1751 WEB SITE www lincolnelectric com World s Leader in Welding and Cutting Products ...

Reviews: