background image

Featuring

71-1300-250

9/11

Lionel

 2-10-4 Texas

Steam Locomotive

Owner’s Manual

Lionel

 2-10-4 Texas

Steam Locomotive

Owner’s Manual

Summary of Contents for 2-10-4 Texas Steam Locomotive

Page 1: ...Featuring 71 1300 250 9 11 Lionel 2 10 4 Texas Steam Locomotive Owner s Manual Lionel 2 10 4 Texas Steam Locomotive Owner s Manual ...

Page 2: ...f StationSounds Pullmor ElectroCoupler Magne Traction CAB 1 Remote Controller American Flyer Lionel ZW ZW MagniVision TMCC Lionelville Wireless Tether Powerhouse LionMaster Conventional Classics Postwar Celebration Series TruRail PH 1 Powerhouse Powermaster Powerstation Powerhouse Accessory Motor Controller AMC Accessory Switch Controller ASC Action Recorder Controller ARC Track Power Controller 3...

Page 3: ...ouncements in the LEGACY environment 17 LEGACY RailSounds sound system dialog on a round trip 18 Installing a nine volt alkaline battery 19 TrainMaster Command Control operations CAB 1 Remote Controller commands 20 CAB 1 Remote Controller numeric keypad commands 21 22 Setting the smoke level 22 Conventional transformer operations Using the LEGACY RailSounds sound system in the conventional environ...

Page 4: ...e Start Up key on your LEGACY CAB 2 Remote shown in Figure 3 Then throttle up and move em out Your engine sound will start up and the locomotive specific touch screen buttons will populate the remote For information on the Cylinder Steam smoke effect refer to page 9 For more information on operating your locomotive with the LEGACY system please refer to the LEGACY section of this manual Additional...

Page 5: ... rails to your locomotive which will not respond until it recognizes its unique ID TrainMaster Command Control gives you the power to operate multiple Command equipped locomotives on the same track at the same time 1 Turn off track power and then plug in the Command Base and connect it to the track 2 Place your locomotive and tender on the track and connect the drawbar as shown in Figure 1 on page...

Page 6: ...ds sound system starts press the DIRECTION button on your transformer to sequence your locomotive through the repeating pattern of operations neutral forward neutral reverse neutral and so on You may also briefly turn off track power to advance the locomotive to the next operating state Adjust the throttle until your locomotive moves at your desired speed For information on the Cylinder Steam smok...

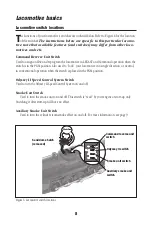
Page 7: ...erate your locomotive without smoke locate the smoke unit switch under the sand dome hatch on the top of the locomotive and slide it to the OFF position Refer to Figure 6 on page 8 for the location of the switch For best performance we recommend using Lionel smoke fluid only Adding fluid to your locomotive s smoke generator Note The RailSounds volume control is concealed on the tender deck as illu...

Page 8: ... LEGACY and Command operation when the switch is in the PGM position Also used to lock your locomotive in a single direction or neutral in conventional operation when the switch is placed in the PGM position Odyssey II Speed Control System Switch Used to turn the Odyssey II Speed Control System on and off Smoke Unit Switch Used to turn the smoke unit on and off This switch is read by your engine a...

Page 9: ...en set Be sure to record the new ID for your reference Locomotive basics Cylinder Steam smoke effect Note Assigning your locomotive a new ID Legacy and TMCC Your locomotive features a cylinder steam smoke effect When the locomotive s auxiliary smoke unit switch is in the ON position see Figure 6 on page 8 this feature operates automatically in both the Conventional and Command Control environments...

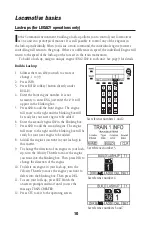
Page 10: ...pear in the blinking box 5 Press ADD to add the front engine The engine will move to the right and the blinking box will be ready for your next engine to be added 6 Enter the second engine ID in the blinking box 7 Press ADD to add the second engine The engine will move to the right and the blinking box will be ready for your next engine to be added 8 Add all the engines you want in your lash up in...

Page 11: ...et Button Used to set Engine address and for programming Info Button Used to enter view the info options of selected components CTC Button Press and hold to turn your remote on and off Tap this button to enter the remote and base options Tap it again to return to the main screen Soft Keys These keys directly correlate to the 5 selection boxes located at the bottom of the main display These are als...

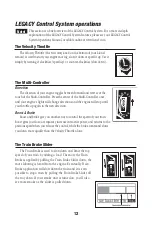
Page 12: ...n you release the control while the brake command slows you down more quickly than the Velocity Throttle alone LEGACY Control System operations The Velocity Throttle The Multi Controller The Train Brake is used to slow down and limit the top speed of your train by adding a load The more the Train Brake is applied by pulling the Train Brake Slider down the more laboring is heard from the engine Eve...

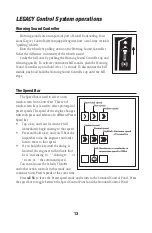
Page 13: ...ect a new touch screen Icon Control set This set of touch screen keys is used to select prototypical preset speeds The speed of the engine changes with each press and release of a different Preset Speed key Tap a key and your locomotive will immediately begin moving to that speed Press and hold a key and you ll hear the dispatcher radio the engineer and order him to move to that speed If you hold ...

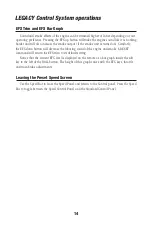
Page 14: ... smoke A RESET command will return the EFX trim to its default setting Notice that the current EFX level is displayed on the remote as a bar graph inside the soft key to the left of the ROLL button The height of this graph varies with the EFX keys throttle and train brake adjustments LEGACY Control System operations EFX Trim and EFX Bar Graph Use the Speed Bar to leave the Speed Panel and return t...

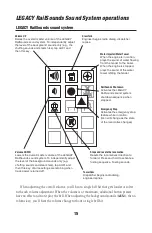
Page 15: ...d sounds only e g chuffing sounds and steam hiss tap AUX1 and then this key Volume settings are retaining when track power is turned off RailSounds Shutdown Activates the LEGACY RailSounds sound system shutdown sequence when stopped Emergency Stop Activates the emergency stop feature while in motion Icon will change as the state of the locomotive changes Stops and resets the locomotive Resets the ...

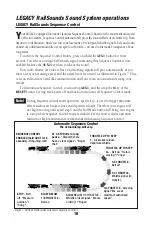
Page 16: ...nd then tap the 0 key or the RESET button Cycling track power off and back on also turns off Sequence Control mode During sequence control mode operation speed step 1 is used to trigger departure effects such as air brake release and departure whistle Therefore your engine will not begin moving until speed step 2 and the Roll Mode button will bring your engine to a stop while Sequence Control mode...

Page 17: ...er Be sure to listen for the different combinations of words and phrases that comprise these exchanges Refer to Table 1 below for the dialog commands The dialog in the table provides examples of the conversations you can trigger The actual dialog will vary Locomotive Commands Example dialog Stopped AUX1 2 Crew Ask To Depart Tower Deny Departure AUX1 7 Tower Ask To Standby Crew Acknowledge 2 Crew A...

Page 18: ...d by 7 You are clear 5 or AUX1 5 Crew shutdown announcement Shutdown sequence AUX1 7 You are clear inbound 7 All clear ahead AUX1 2 Are we clear No stand by 2 Can we go yet Yes you are clear RECENT DEPARTURE 2 Train is underway Roger you are clear AUX1 2 Crew reports coal or water levels and current speed Locomotive IN MOTION The actual dialog will vary Locomotive STOPPED The actual dialog will va...

Page 19: ...y need to replace the battery 1 Remove the body screws from the underside of the tender 2 Lift the body off the frame Be careful to avoid pulling on the wires that connect the body to the frame 3 Remove the protective cover from the battery harness 4 Snap the battery harness onto the nine volt alkaline battery s terminals 5 Slide the battery into the battery holder which is attached to the body 6 ...

Page 20: ...ct Activates the locomotive s whistle Release the button to discontinue the sound Whistle horn sound Toggles the bell sound on and off Bell sound Changes the locomotive s direction The locomotive decelerates to a stop and continues in the opposite direction when you increase the throttle Air release sound Increases the locomotive s speed while the button is pressed Release the button to return to ...

Page 21: ...our water level which can be refilled independently using the 3 button Refueling sequence Raises the overall master volume of the LEGACY RailSounds sound system To independently adjust the level of the background sounds only e g the chuffing and steam hiss tap AUX1 and then this key Sound volume increases When adjusting the overall volume you ll hear a single bell hit that gets louder or softer wi...

Page 22: ...n the shutdown sequence the smoke unit will turn off if it was already on Triggers the Blowdown sound r Dispatcher begins radio dialog engineer replies see page 17 TowerCom announcement Turns off the smoke units Let off sound Turns on the smoke units if the smoke units switches are in the ON position Be sure to add smoke fluid before turning on the smoke unit to prevent damage to your locomotive L...

Page 23: ...r the location of the volume control knob In the conventional environment you will experience several features of the LEGACY RailSounds sound system DynaChuff Your locomotive s speed automatically determines the character of the chuffing sounds At low speeds the chuffing sounds are longer When you highball down the mainline the chuffing intensity becomes more percussive MultiWhistle A different wh...

Page 24: ...blast triggers a please standby dialog If the locomotive has been stopped for longer than 15 seconds a short whistle blast triggers a cleared outbound dialog If the locomotive has started moving within the last seven seconds a short whistle blast will trigger a train is underway dialog If the locomotive has been moving for more than seven seconds a short whistle blast will trigger a are we clear d...

Page 25: ...he Command reverse unit s sequencing function 1 Use your transformer s DIRECTION button or interruptions in track power to get your locomotive moving slowly in the desired direction or into neutral 2 Slide the Command reverse unit switch to the PGM position At this point the locomotive is locked into your chosen direction See Figure 6 on page 8 for the location of this switch To restore the forwar...

Page 26: ...m also allows for extremely slow movement that will amaze any scale enthusiast The Odyssey II Speed Control system is automatically operational when you operate your locomo tive in conventional non Command Control mode as long as the Odyssey II Speed Control system switch is in the ODY position see Figure 6 on page 8 This means that your locomotive will maintain a constant speed compensating for g...

Page 27: ...tored when you reprogram the locomotive 1 Slide the program run switch to the PGM position 2 Plug in and connect your LEGACY Base 3 Place your locomotive on the track then power up the track 4 Press ENG and enter the locomotive s ID 5 Press SET 6 Turn off track power and wait ten seconds 7 Slide the program run switch back to the RUN position At this point your locomotive has been reset Restore po...

Page 28: ...nd that the lubrication points illustrated in Figure 10 appear dry lubricate your locomotive after you have removed any accumulated dirt and dust There are two basic rules to keep in mind when you are lubricating your locomotive use only a small amount of lubrication and avoid getting grease or oil on your locomotive s wheels roller pick ups or the track Figure 10 Lubrication points Lubricate with...

Page 29: ...ceable If service is required we recommend that you have your locomotive serviced at a Lionel Factory Trained Authorized Service Station Maintaining and servicing your locomotive Servicing your locomotive s LEDs If the locomotive is powered up and the lights are not on check that the AUX2 command was not used to turn the lamps off Note ...

Page 30: ...Lionel has provided extra traction tires to replace the installed traction tires if they ever wear out The traction tires are replaced by unscrewing the drive rod screws using the supplied wrench See Figure 11 Slip off the old traction tire and remove it from under the drive rod Place the new traction tire Lionel part no 6000222108 on the wheel and re tighten the drive rod screw Replacing the trac...

Page 31: ...eration to attempt to clear the problem The locomotive will immediately check itself again If the problem persists the cab light will blink the code again Note that smoke related errors can be reset a maximum of three times On the third try if the problem still persists the smoke unit will be shut down and must be returned to Lionel Service for repair Turning the smoke unit switch to the off posit...

Page 32: ...s warranty gives you specific legal rights and you may have other rights which vary from state to state Instructions for Obtaining Service If service for this Lionel LLC product is required bring the item along with your DATED sales receipt and completed warranty information at the bottom of this page to the nearest Lionel Authorized Service Station Your nearest Lionel Service Station can be found...

Reviews: