background image

www.livall.com

BH6X&MT

BH6X&MT Neo

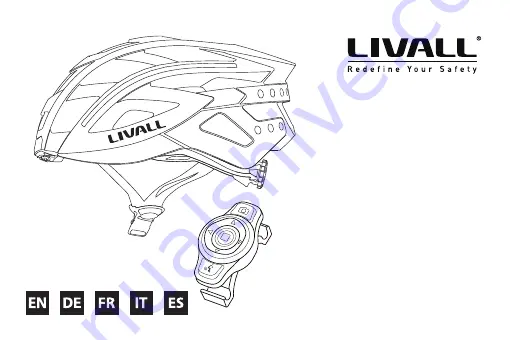
Smart cycling helmets

Quick Start Guide

Summary of Contents for BH6X Neo

Page 1: ...www livall com BH6X MT BH6X MT Neo Smart cycling helmets Quick Start Guide ...

Page 2: ...rom the picture the real product shall prevail 2 Due to different version some control unit use and buttons some may use and buttons both represent the same function A few models are not equipped with remote controller due to different configurations of the products Button Button Microphone Button Button Button Charging port Speaker Speaker Tail light Front Main control Front chinstrap Rear chinst...

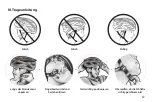
Page 3: ...2 III Wearing Instructions Incorrect Incorrect Correct Adjustthelengthof thechinstrap Leaveagapasthick asonefinger Correctlyposition thehelmet Checkwhetherthe buckleisproperly fastened ...

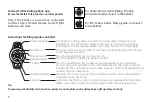
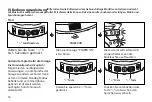
Page 4: ...button button Press the button for 3 to 5 seconds First hold the button Then press the button to switch between languages You will hear a voice saying POWER ON This device is successfully powered up when the rear lights come on Change the language of the voice prompt the default language is English To switch the language of the voice prompt follow the procedure below when in normal standby mode an...

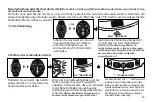
Page 5: ...ng connection to the helmet The helmets without Bluetooth speakers could not hear such voice prompts Connecting for the first time or switching devices Please refer to specific functions of the helmet when using the remote controller keys 5m 1 Connecting for the first time One helmet can be connected to up to three LIVALL authorized devices at the same time After the handlebar remote control is co...

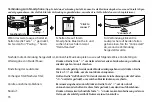
Page 6: ...e control to play pause music Adjust Volume When calls are made or music is played press the buttons on the helmet to adjust the speaker volume Previous Song Next Song Press the up down buttons on the handlebar remote control or press and hold buttons on the helmet to cycle through the music Answer Reject Calls When there s an incoming call press the button to answer the call or press and hold to ...

Page 7: ... rear lights go off Charging To charge Plug the USB charging cable into the USB port on the helmet The tail charging light is illuminated in red indicating that the helmet is being charged Charging time It is recommended that the power of the charger is no less than 0 5A Charging time takes about 3hours Charging complete When the charging indicator light turns off it indicates that charging is com...

Page 8: ...key to play pause music and answer end incoming calls Hold down the confirmation key to reject incoming calls Double click the confirmation key to make a phone call from the last dialing out number on your smartphone Press direction down key one time to decrease volume Hold down direction down key to play next song Hold down the intercom key to communicate your message with team riders Make sure t...

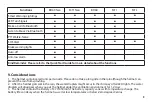
Page 9: ...ventilation environment for 1 2 days 3 The helmet contains the battery of 3 7V 450mAh The battery capacity varies with temperature change The battery life can decay when the helmet is used at low temperatures or below Zero degrees Celsius Functions BH6X Neo MT1 Neo BH6X MT1 MTL Smart Warning Lightings LED Turn Signals Make a Call Via Bluetooth Listen to Music Via Bluetooth PTT Walkie Talkie SOS Al...

Page 10: ... clean the golden colour contacts of the charging plug sheet with metal or hard tools such as blades or tweezers is strictly forbidden Please use cotton swabs with clean water or alcohol in case of cleaning Please make sure the charging plug is clean and try while charging the helmet 5 If the electronic functions do not work please charge the helmet for 3 hours and then check if it works normally ...

Page 11: ...vere impact should be discarded and destroyed A statement of the danger of modifying or removing any of the original component parts of the helmet other than as recommended by the manufacturer and that helmets should not be adapted for the purpose of fitting accessories in a way not recommended by the manufacturer During the usage if the following troubles occur please charge the product according...

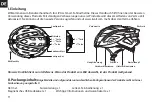
Page 12: ... Das Bild dient nur als Referenz Wenn das Produkt vom Bild abweicht ist das Produkt maßgebend Taste Taste Mikrofon Taste Taste Taste Ladeanschluss Lautsprecher Lautsprecher Rückleuchte Vorderseite Hauptsteuerung Vorderer Kinnriemen Hinterer Kinnriemen Einstellknopf Schließe Rückseite II Packungsinhalt Einige Modelle sind aufgrund der unterschiedlichen Konfigurationen der Produkte nicht mit einer F...

Page 13: ...12 III Trageanleitung Falsch Falsch Richtig Helm richtig positionieren Überprüfen ob die Schließe richtig geschlossen ist Länge des Kinnriemens anpassen Fingerbreiten Abstand bestehen lassen ...

Page 14: ...nden gedrückt Halten Sie zuerst die Taste gedrückt Drücken Sie anschließend die Taste um zwischen den Sprachen zu wechseln Die Sprachansage POWER ON ist zu hören Dieses Gerät wird erfolgreich eingeschaltet wenn die Rückleuchten aufleuchten Ändern der Sprache für die Ansage die Standardsprache ist Englisch Folgen Sie den nachfolgenden Anweisungen um die Sprache der Ansage zu ändern wenn der Helm si...

Page 15: ...elches eine Verbindung zum Helm hergestellt werden muss Die Helme ohne Bluetooth Lautsprecher konnten solche Sprachansagen nicht hören Erste Verbindung oder Wechsel der Geräte Bitte beachten Sie die spezifischen Funktionen des Helms wenn Sie die Tasten der Fernbedienung verwenden 5m 1 Erste Verbindung Ein Helm kann gleichzeitig mit bis zu drei von LIVALL autorisierten Geräten verbunden werden Nach...

Page 16: ...instellung der Lautstärke Wenn Anrufe getätigt werden oder Musik wiedergegeben wird drücken Sie die Tasten am Helm um die Lautstärke anzupassen Vorheriger Titel Nächster Titel Halten Sie die Auf Abwärts Tasten der Lenker Fernbedienung oder die Tasten am Helm gedrückt um zwischen Musikstücken zu wechseln Anrufe annehmen ablehnen Bei einem eingehenden Anruf drücken Sie die Taste um den Anruf anzuneh...

Page 17: ... Rücklichter ausgehen Aufladen Aufladen Verbinden Sie das USB Ladekabel mit dem USB Anschluss am Helm Die Rück und Ladeleuchte leuchtet rot Dies zeigt an dass der Helm aufgeladen wird Ladedauer Das Ladegerät sollte einen Mindestladestrom von 0 5 A haben Die Ladezeit beträgt etwa 3 Stunden Ladevorgang abgeschlossen Wenn die Rück und Ladeleuchte erlischt zeigt dies an dass der Ladevorgang abgeschlos...

Page 18: ...nten Drücken Sie einmal auf den Foto Knopf der Fernbedienung Dies schaltet den Kamera Modus ihres Smartphons ein Ein erneuter Druck auf die Taste nimmt das Bild auf Hierzu müssen Sie mit der LIVALL App verbunden sein Ein kurzer Druck auf diese Taste erhöht die Lautstärke ein langer Druck schaltet weiter auf den vorherigen Song Blinker rechts Blinker links Ein Druck auf die mittlere Taste schaltet ...

Page 19: ...l der LED Rückleuchten Wassertropfen angesammelt haben Die Wassertropfen verdundsten wenn Sie den Helm für 1 2 Tage bei guter Belüftung trocknen lassen Funktionen BH6X Neo MT1 Neo BH6X MT1 MTL Intelligente Warnleuchten LED Blinker Anrufe über Bluetooth Musik über Bluetooth hören PTT Walkie Talkie SOS Warnung Bremswarnleuchten Auto off Anti Verlust Alarm Zur Erinnerung Weitere Informationen zu den ...

Page 20: ... benutzen Sie Wattestäbchen mit sauberem Wasser oder Alkohol sollte eine Reinigung notwendig sein Bitte vergewissern Sie sich dass der Ladestecker sauber ist und versuchen Sie den Helm aufzuladen 5 Falls die Elektronik nicht funktioniert laden Sie den Helm bitte 3 Stunden lang und prüfen Sie dann ob er funktioniert 6 Der Helm umfasst Aufprallerfassungsvorrichtungen Die SOS Warnfunktion ist nur akt...

Page 21: ...Benutzer nur schützen falls dieser die richtige Größe hat Im Zweifelsfall verschieden Größen versuchen und die Größe nehmen die gut passt und angenehm sitzt b der Helm sollte so eingestellt werden dass er dem Benutzer passt d h die Riemen sollten nicht die Ohren bedecken oder der Verschluß sollte nicht am Kiefer liegen Die Riemen sollten eng anliegen aber trotzdem noch angenehm zu tragen sein c de...

Page 22: ...ue L image sert uniquement de référence S il existe des différences entre l objet réel et l image l objet réel prévaut Bouton Bouton Microphone Bouton Bouton Bouton Port de charge Haut parleur Haut parleur Feu arrière Avant Commande principale Mentonnière avant Mentonnière arrière Bouton de réglage Boucle Arrière II Liste d emballage Il existe différents modelés sans télécommande Casque x 1 Guide ...

Page 23: ...2 III Instructions de port Incorrect Incorrect Correct Ajustez la longueur de la mentonnière Laissez un jeu d un seul doigt Positionnez correctement le casque Vérifiez si la boucle est correctement fixée ...

Page 24: ...secondes Appuyez sur le bouton d abord Appuyez ensuite sur le bouton pour basculer entre les langues Vous entendrez une invite vocale POWER ON Cet appareil est correctement mis sous tension lorsque les feux arrière s allument Changement de la langue de l invite vocale la langue par défaut est l anglais Pour changer la langue de l invite vocale suivez la procédure ci dessous en mode veille normal e...

Page 25: ...essitant une connexion au casque Les casques sans haut parleurs Bluetooth ne peuvent pas reproduire des messages vocaux Connexion pour la première fois ou changement du dispositif Lire attentivement le manuel pour utiliser la télécommande 5m 1 Connexion pour la première fois Un casque peut être connecté à un maximum de trois dispositifs autorisés par LIVALL en même temps Une fois la télécommande s...

Page 26: ...de la musique Réglage du volume Lors de l émission d un appel ou de la lecture de la musique appuyez sur les boutons sur le casque pour régler le volume des haut parleurs Morceau précédent suivant Appuyez sur les boutons haut bas de la télécommande sur le guidon ou appuyez enfoncés les boutons sur le casque pour basculer la musique Prise Rejet d un appel Quand il y a un appel entrant appuyez sur l...

Page 27: ...ux arrière s éteignent Recharge Pour charger Branchez le câble de charge USB dans le port USB sur le casque Le voyant de charge s allume en rouge ce qui signifique que le casque est en cours de charge Temps de charge Il est recommandé que la puissance du chargeur n est pas inférieure à 0 5A Le temps de charge prend environ 3 heures Charge terminée Lorsque le voyant de charge est éteint cela indiqu...

Page 28: ...l application LIVALL Appuyer une fois sur la touche flèche Haut pour augmenter le volume Appuyer sur la touche flèche Haut en la maintenant enfoncée pour lire la piste précédente Appuyer sur la touche flèche Droite pour actionner le clignotant droit Appuyer sur la touche flèche Gauche pour actionner le clignotant gauche Appuyer sur la touche de confirmation touche centrale pour lire mettre en paus...

Page 29: ...uillé sous la pluie les gouttelettes d eau peuvent se produire dans la cheminée des feux LED Les gouttelettes d eau disparaîtront lorsque vous mettez le casque dans un environnement de Fonction BH6X Neo MT1 Neo BH6X MT1 MTL Lumières d avertissement intelligentes Signaux de tour LED Passe un appel via Bluetooth Écouter de la musique via Bluetooth PTT Walkie Talkie Alerte SOS Feux d avertissement de...

Page 30: ...ger le front et ne pas être trop enfoncé au niveau de l arrière de la tête d un casque ne suffit pas toujours à éviter les blessures ventilation pendant 1 2 jours 3 Le casque contient la batterie de 3 7V 450mAh La capacité de la batterie varie en fonction du changement de température La vie de la batterie peut se détériorer lorsque le casque est utilisé à basse température ou en dessous de zéro de...

Page 31: ...s de lecture de la musique est de 3 à 6 heures Température Température de stockage 20 C 45 C Température d utilisation 0 C 40 C Température pendant la charge 0 C 40 C Remarques Les données ci dessus est mesurée par LIVALL dans un environnement contrôlé à la température ambiante à 25 C motifs lumineux spécifiques et des volumes téléphone intelligent à 60 Les données peuvent varier en fonction de l ...

Page 32: ...ativo Qualora il prodotto appaia diverso da quanto indicato nella figura varranno le caratteristiche del prodotto reale Tasto Tasto Microfono Tasto Tasto Tasto Porta di carica USB Altoparlante Altoparlante Luce posteriore Parte anteriore Comando principale Cinturino sottogola Cinturino posteriore Manopoladi regolazione Fibbia Parte posteriore II Contenuto della confezione Alcuni modelli non sono d...

Page 33: ...are il casco Errato Errato Corretto Regolare la lunghezza del cinturino sottogola Lasciare uno spazio pari alla grandezza di un dito Posizionare il casco correttamente Verificare che la fibbia sia chiusa in modo corretto ...

Page 34: ...nere premuto il tasto Quindi premere il tasto per spostarsi sulla lingua desiderata Si udirà una voce pronunciare POWER ON Questo dispositivo si accende correttamente quando si accendono le luci posteriori Modifica della lingua per i messaggi vocali la lingua predefinita è l inglese Per cambiare la lingua dei messaggi vocali seguire le istruzioni sottostanti in modalità stand by e con il casco sco...

Page 35: ...anze che richiede il collegamento al casco I caschi senza speakes Bluetooth non possono emettere avvisi vocali Primo collegamento o sostituzione dei dispositivi Leggere il manuale per poter utilizzare al meglio il telecomando 5m 1 Primo collegamento È possibile collegare un casco a un massimo di tre dispositivi autorizzati LIVALL contemporaneamente Dopo aver eseguito la connessione del telecomando...

Page 36: ... l ascolto di musica premere i tasti del casco per regolare il volume degli altoparlanti Selezione del brano precedente successivo premere il tasto su giù del telecomando oppure tenere premuti i tasti del casco per selezionare i brani Risposta rifiuto di una chiamata all arrivo di una chiamata premere il tasto per rispondere oppure tenere premuto per riagganciare Richiamata premere rapidamente due...

Page 37: ...L Riding per collegare il casco A connessione riuscita la funzione SOS in caso di caduta e la gestione delle luci possono essere configurate Spegnimento POWER OFF Tasto funzione Tenere premuto il tasto funzione per 3 secondi Si udirà il messaggio vocale POWER OFF I caschi senza speakes Bluetooth non possono emettere avvisi vocali Questo dispositivo si spegne correttamente quando si spengono le luc...

Page 38: ...el telefono premere di nuovo il tasto per scattare la foto L applicazione LIVALL deve essere connessa per questa funzione Premere per diminuire il volume tenere premuto per canzone precedente Premere per attivare freccia destra Premere per attivare freccia sinistra Premere tasto conferma tasto centrale per riprodurre mettere in pausa la musica o per rispondere terminare le telefonate Tenere premut...

Page 39: ... 2 giorni 3 Il casco contiene una batteria da 3 7v 450 mAh la durata varia in base alla temperatura ambientale se utilizzato sotto 0 gradi Celsius la durata sarà inferiore Funzioni BH6X Neo MT1 Neo BH6X MT1 MTL Luci di avviso intelligenti Segnali di svolta a LED Effettua una chiamata tramite Bluetooth Ascoltare musica tramite Bluetooth PTT Walkie Talkie Avviso SOS Spie dei freni Auto off Allarme a...

Page 40: ...n avanti d Il casco non protegge da tutti gli urti e un casco che subisce un forte urto deve essere buttato f non rimuovere o modificare alcun componente originale del prodotto se non raccomandato dal produttore non applicare accessori non raccomandati dal produttore 4 Non pulire i contatti del connettore di ricarica con strumenti metallici o duri come le pinzette Utilizzare coton fioc inumidito c...

Page 41: ...un ambiente controllato con temperatura ambiente a 25 C schemi di luce specifici e volume dello smartphone al 60 I dati possono variare a seconda dell ambiente V Specifiche tecniche Sito Web LIVALL www livall com Standard di prestazione USA CPSC1203 1998 FCC Part 15 Rules Europa EN 62479 2010 EN 301 489 1 V1 9 2 2011 09 EN 301 489 17 V2 2 1 2012 09 EN 300 328 V1 8 1 2012 06 EN 60950 1 2006 A11 200...

Page 42: ... como referencia SI el producto real es distinto de la imagen el producto real prevalecerá Botón Botón Micrófono Botón Botón Botón Puerto de carga Altavoz Altavoz Luz trasera Delante Control principal Correa delantera Correa trasera Perillade ajuste Hebilla Atrás II Lista de contenido Algunos modelos no están equipados con mandos a distancia debido a las diferentes configuraciones de los productos...

Page 43: ...2 III Instrucciones de uso Incorrecto Incorrecto Correcto Ajuste la longitud de la correa Deje un espacio de un dedo de anchura Coloque correctamente el casco Compruebe que la hebilla esté bien ajustada ...

Page 44: ... el botón entre 3 y 5 segundos En primer lugar mantenga pulsado el botón A continuación pulse el botón para cambiar entre idiomas Oirá una voz que dice POWER ON Este dispositivo se enciende con éxito cuando se encienden las luces traseras Cambiar el idioma de las indicaciones de voz el idioma predeterminado es el inglés Para cambiar el idioma de las indicaciones de voz siga el procedimiento siguie...

Page 45: ...luetooth no pueden escuchar audios Por favor revisar la parte trasera del casco Conectar dispositivos por primera vez o cambiar entre dispositivos Por favor ceñirse a las instrucciones de uso de los cascos para su óptimo funcionamiento 5m 1 Conectar por primera vez Un casco puede estar conectado a hasta tres dispositivos autorizados por LIVALL a la vez Después de conectar el control remoto del man...

Page 46: ...realizar llamadas o reproducir música mantenga pulsadoslos botones en el casco para ajustar el volumen de los altavoces Canción anterior canción siguiente Pulse los botones arriba abajo del control remoto del manillar o los botones en el casco para pasar cíclicamente por la música Responder rechazar llamadas Al recibir una llamada pulse el botón para responderla o púlselo y manténgalo pulsado para...

Page 47: ... conexión seleccione un contacto en la aplicación y pulse el botón de walkie talkie del control remoto del manillar para hablar con el contacto pulse el botón de la cámara para activar la cámara del teléfono y hacer fotos Apagar POWER OFF Botón de función Mantenga pulsado el botón durante 3 segundos Escuchará POWER OFF Los cascos sin altavoces bluetooth no pueden escuchar audios Por favor revisar ...

Page 48: ...erior se ilumina en color rojo para indicar que el casco se está cargando Tiempo de carga Se recomienda que el cargador sea de 0 5 A como mínimo La carga tarda unas 3 horas Carga completa Cuando la luz indicadora de carga se apaga significa que la carga se ha completado Puerto USB Luz roja 0 5A 3 H ...

Page 49: ... días 3 El casco contiene una batería de 3 7V 450mAh La capacidad de la batería varía con el cambio de temperatura La duración de la batería puede disminuir cuando el casco se usa a bajas temperaturas o por debajo de cero grados Celsius Funciones BH6X Neo MT1 Neo BH6X MT1 MTL Luces de advertencia inteligentes Señales de giro LED Realiza una llamada a través de Bluetooth Escuchar música a través de...

Page 50: ...recibir mensajes SOS con éxito 2 Para mantener una vida útil eficiente de la batería se recomienda que el casco se cargue completamente antes de cualquier almacenamiento a largo plazo seis meses a un año 4 Para la limpieza del dispositivo de carga esta totalmente prohibido raspar los contactos magnéticos con objetos punzantes de metal Por favor usar bastoncillos de algodón con agua limpia o alcoho...

Page 51: ...15 CPSC1203 1998 Europa EN 62479 2010 EN 301 489 1 V1 9 2 2011 09 EN 301 489 17 V2 2 1 2012 09 EN 300 328 V1 8 1 2012 06 EN 60950 1 2006 A11 2009 A1 2010 A12 2011 Australia AS NZS 2063 2008 A1 2009 AS NZS CISPR 22 2009 A1 2010 AS NZS 4268 2012 A1 2013 Radiation Protection Series Publication No 3 ...

Page 52: ...Designed and Manufactured in Shenzhen China BH6X QO V2 6 LIVALL HELP CENTER ...

Reviews: