background image

IAN 286954

 LED-STRAHLER  18 W / LED  SPOTLIGHT  18 W /  

 PROJECTEUR À LED 18 W


 PROJECTEUR À LED 18 W

 Instructions de montage, d‘utilisation et  

 consignes de sécurité


 LED-SCHIJNWERPER  18 W

 Montage-, bedienings- en veiligheidsinstructies


 LED-STRAHLER  18  W

 Montage-, Bedienungs- und Sicherheitshinweise


 LED SPOTLIGHT 18 W 

 Assembly, operating and safety instructions


 REFLETOR LED 18 W 

 Indicações de montagem, utilização e segurança


 FOCO LED 18 W 

 Instrucciones de montaje, de uso y de seguridad


 LED REFLEKTOR 18 W 

 Pokyny k montáži, obsluze a bezpečnostní pokyny

Summary of Contents for 286954

Page 1: ...PER 18W Montage bedienings en veiligheidsinstructies LED STRAHLER 18W Montage Bedienungs und Sicherheitshinweise LED SPOTLIGHT 18W Assembly operating and safety instructions REFLETOR LED 18W Indica es...

Page 2: ...12 FR BE Instructions de montage d utilisation et consignes de s curit Page 19 NL BE Montage bedienings en veiligheidsinstructies Pagina 26 CZ Pokyny k mont i obsluze a bezpe nostn pokyny Strana 33 ES...

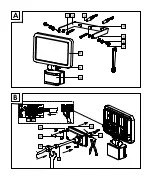
Page 3: ...A B 4 5 13 7 6 14 8 9 10 1 2 3 11 12 16 17 18 15...

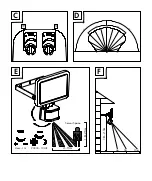
Page 4: ...C 0M 1M 1M 10M D Sensor Space 1 8 2 5m 4 10m 20000 10LUX 4min 10s E 7m 10m 4m 1 8 2 5m F 19 20...

Page 5: ...Daten Seite 7 Lieferumfang Seite 7 Allgemeine Sicherheitshinweise Seite 7 Vor der Montage Seite 8 Montage Seite 9 Inbetriebnahme Seite 10 Bewegungsmelder einstellen Seite 10 Leuchtdauer einstellen Sei...

Page 6: ...Bedien und Sicherheitshinweisen vertraut Benutzen Sie das Produkt nur wie beschrieben und f r die angegebenen Einsatzbereiche H ndi gen Sie alle Unterlagen bei Weitergabe des Produkts an Dritte mit a...

Page 7: ...d des Produkts 1 LED Strahler mit Bewegungsmelder 2 D bel 8mm 2 Schrauben 5 mm x 50 mm 1 Montageb gel 1 Kabelverankerung 2 Zahnscheiben 2 Unterlegscheiben 2 Federscheiben 2 Feststellschrauben 1 Bedien...

Page 8: ...e Hitze entwickeln 1 0m BRANDGEFAHR Montieren Sie das Produkt mit einer Entfernung von mindestens 1 0m zu ange strahlten Materialien Eine berm ige W r meentwicklung kann zu Brandentwicklung f hren Da...

Page 9: ...er 8mm und f h ren Sie die D bel 3 ein Befestigen Sie den Montageb gel 2 mittels der Schrauben 1 und pr fen Sie den festen Sitz ffnen Sie die Anschlussbox 13 indem Sie mit einem Kreuzschlitzschraubend...

Page 10: ...auch bei Tageslichtniveau solange ca 20 000lx nicht berschritten werden Bewegungsmelder ausrichten Hinweis Sie sollten diese Einstellung bei D mmerung durchf hren L sen Sie die Feststellschraube Bewe...

Page 11: ...h bei Ihrer zust ndigen Verwaltung informieren Garantie Das Produkt wurde nach strengen Qualit tsrichtli nien sorgf ltig produziert und vor Anlieferung ge wissenhaft gepr ft Im Falle von M ngeln diese...

Page 12: ...ope of delivery Page 14 General safety instructions Page 14 Before installation Page 15 Installation Page 16 Start up Page 16 Adjusting the motion detector Page 16 Setting the lighting duration Page 1...

Page 13: ...ion and instructions for use Only use the product as described and for the speci fied applications If you pass the product on to anyone else please ensure that you also pass on all the documentation w...

Page 14: ...V S D GS certified Scope of delivery Check immediately after unpacking that the parts are complete and that the product is in proper condition 1 LED spotlight with motion detector 2 Wall plugs 8mm 2...

Page 15: ...To prevent burns verify the product is switched off and has cooled down for at least 15 min before touching it The product can become very hot 1 0m FIRE HAZARD Fit the product so that it is at least 1...

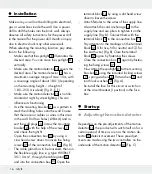
Page 16: ...crosshead screw driver to loosen the fixing screws 17 of the connection box 13 Fig B The cable gland has to be loosened then run the flexible supply line e g type H05RN F 3G 1 0mm2 through the cable...

Page 17: ...h the coverage area until you are satisfied with the response characteris tics of the motion detector 10 To find the proper orientation change the orientation of the motion detector 10 When you have a...

Page 18: ...rights against the retailer of this product Your legal rights are not limited in any way by our warranty detailed below The warranty for this product is 3 years from the date of purchase Should this p...

Page 19: ...enu de la livraison Page 21 Instructions g n rales de s curit Page 21 Avant le montage Page 22 Montage Page 23 Mise en service Page 24 R gler le d tecteur de mouvement Page 24 R glage de la dur e d cl...

Page 20: ...t de s curit du produit Ce produit doit uniquement tre utilis conform ment aux instructions et dans les domaines d ap plication sp cifi s Lors d une cession tiers veuillez galement remettre tous les d...

Page 21: ...Certifi T V S D GS Contenu de la livraison Imm diatement apr s le d ballage du produit veuillez toujours contr ler que le contenu de la li vraison est complet et que le produit se trouve en parfait t...

Page 22: ...u produit 230V 50Hz Si ce n est pas le cas ne pas monter le produit ATTENTION RISQUE DE BR LURES V rifier que le produit est teint et refroidi depuis au moins 15 min avant de le manipu ler Le produit...

Page 23: ...qu aucune conduite ou c ble ne se trouve dans cette zone du mur Percez les deux trous de fixation 8mm et placez y les chevilles 3 Fixez l trier de montage 2 l aide des vis 1 fournies et v rifiez leur...

Page 24: ...x Lorsque le bouton est r gl sur le d tecteur de mouvement r agit galement la lumi re du jour tant que celle ci ne d passe pas pr s de 20 000lx Orienter le d tecteur de mouvement Remarque Vous devez d...

Page 25: ...te et leurs horaires d ouverture vous pouvez contacter votre municipalit Garantie Le produit a t fabriqu selon des crit res de qualit stricts et contr l consciencieusement avant sa livraison En cas de...

Page 26: ...agina 28 Omvang van de levering Pagina 28 Algemene veiligheidsinstructies Pagina 28 Voor de montage Pagina 29 Montage Pagina 30 Ingebruikname Pagina 30 Bewegingsmelder instellen Pagina 30 Verlichtings...

Page 27: ...lle bedienings en veiligheids voorschriften vertrouwd Gebruik het product al leen zoals beschreven en voor de aangegeven toepassingsgebieden Overhandig alle documen ten bij doorgifte van het product a...

Page 28: ...t van het product 1 LED schijnwerper met bewegingsmelder 2 pluggen 8mm 2 schroeven 5 mm x 50 mm 1 montagebeugel 1 kabelverankering 2 tandveerringen 2 onderlegplaatjes 2 veerringen 2 borgmoeren 1 gebru...

Page 29: ...aanraakt Het product kan een grote hitte ontwikkelen 1 0m BRANDGEVAAR Monteer het product op een afstand van minimaal 1 0 m van verlichte materialen Een overmatige warmteontwikke ling kan tot brand le...

Page 30: ...be vestiging Open de aansluitbox 13 door met behulp van een kruiskopschroevendraaier de bevesti gingsschroeven 17 van de aansluitbox 13 los te draaien afb B De schroefverbinding van de kabel moet wor...

Page 31: ...r 9 los Draai de draairegelaar LUX 20 op de stand Richt de bewegingsmelder 10 in de centrale richting van het gewenste gebied Beweeg in het detectiegebied tot u met de prestaties van de bewegingsmelde...

Page 32: ...l van schade aan het product kunt u rechtmatig beroep doen op de verkoper van het product Deze wettelijke rechten worden door onze hierna vermelde garantie niet beperkt Op dit product verlenen wij 3 j...

Page 33: ...h dod vky Strana 35 V eobecn bezpe nostn upozorn n Strana 35 P ed mont Strana 36 Mont Strana 36 Uveden do provozu Strana 37 Nastaven pohybov ho senzoru Strana 37 Nastaven doby sv cen Strana 37 Nastave...

Page 34: ...kyny Pou vejte v robek jen popsa n m zp sobem a na uveden ch m stech P i p ed n v robku t et osob p edejte i v echny podklady Pou it ke stanoven mu elu Tento v robek je ur en k osv tlen vnit n ch a ve...

Page 35: ...1 mont n dr k 1 zakotven kabelu 2 ozuben podlo ky 2 podlo ky 2 p rov podlo ky 2 jist c rouby 1 n vod k obsluze V eobecn bezpe nostn upozorn n P ED PRVN M POU IT M V ROBKU SE SEZNAMTE SE V EMI BEZPE N...

Page 36: ...ebo v v p esto mal mno stv proudu K pln mu vypnut vypn te hlavn p vod elektrick ho proudu P ed mont Upozorn n Odstra te pln obalov materi l z v robku D le it P ipojen k elektrick s ti mus prov st kval...

Page 37: ...p vodn ho kabelu pouz dra P ipevn te tak zakotven kabelu 14 na p vodn m kabelu a zafixujte ho kle t mi obr B Spojte ho se svorkovnic 12 v p ipo jovac m boxu 13 Dbejte p itom pozor na ozna en ve svorko...

Page 38: ...ov sk ce Nepono ujte v robek v dn m p pad do vody nebo do jin ch tekutin V opa n m p pad m e doj t k po kozen ist te v robek m rn navlh enou tkaninou kter nepou t vl kna a jemn m istic m pro st edkem...

Page 39: ...pen Uscho vejte si dob e origin l pokladn stvrzenky Tuto stvrzenku budete pot ebovat jako doklad o za koupen Pokud se do 3 let od data zakoupen tohoto v robku vyskytne vada materi lu nebo v robn vada...

Page 40: ...gina 42 Indicaciones generales de seguridad P gina 42 Antes del montaje P gina 43 Montaje P gina 44 Puesta en funcionamiento P gina 45 C mo instalar el sensor de movimiento P gina 45 Ajustar el tiempo...

Page 41: ...anejo y de seguridad Utilice el producto nicamente como se describe a conti nuaci n y para las aplicaciones indicadas Ad junte igualmente toda la documentaci n en caso de entregar el producto a tercer...

Page 42: ...ie de proyecci n m x 15 5 x 17 5cm Altura de montaje aprox 1 8 2 5m Certificado por las organizaciones alemanas T V S D GS Contenido Compruebe siempre inmediatamente despu s de desembalar el producto...

Page 43: ...to si encuentra cualquier tipo de desperfecto Aseg rese antes del montaje de que la ten si n de red coincide con la tensi n de servi cio necesaria del producto 230V 50Hz No monte el producto si no se...

Page 44: ...soporte de montaje 2 como planti lla para marcar los orificios de perforaci n en la pared Aseg rese de que no haya ca bes de alimentaci n ni alambres en la zona de la pared escogida Haga ahora dos agu...

Page 45: ...X 20 de la parte inferior del sensor de movimiento 10 en el sentido de las agujas del reloj para au mentar el nivel de luz diurna En la posici n el sensor de movimiento reacciona nica mente por la noc...

Page 46: ...Para proteger el medio ambiente no tire el producto junto con la basura do m stica cuando ya no le sea til De s chelo en un contenedor de reciclaje Dir jase a la administraci n compe tente para obten...

Page 47: ...ta garant a no cubre aquellos com ponentes del producto sometidos a un desgaste normal y que por ello puedan considerarse pie zas de desgaste por ej las pilas Tampoco cu bre da os de componentes fr gi...

Page 48: ...do P gina 50 Indica es gerais de seguran a P gina 50 Antes da montagem P gina 51 Montagem P gina 52 Coloca o em funcionamento P gina 53 Regular o detector de movimentos P gina 53 Regular o per odo de...

Page 49: ...de utiliza o e de seguran a do pro duto Utilize o produto apenas como descrito e para as reas de aplica o indicadas Se trans mitir o artigo a terceiros entregue tamb m os res pectivos documentos Util...

Page 50: ...ca 1 8 2 5m Certificado pelo T V S D GS Material fornecido Ap s desembalar o aparelho verifique sempre o material fornecido quanto integridade bem como o estado do produto 1 Holofote LED com detetor d...

Page 51: ...30V 50Hz Se n o for este o caso n o monte o produto CUIDADO PERIGO DE QUEIMADU RAS Certifique se que o produto est desli gado e arrefe a no m nimo durante 15 minutos antes de tocar no mesmo O pro duto...

Page 52: ...que nenhum cabo el trico ou arame nessa rea da parede Fure agora dois furos de fixa o 8mm e introduza as buchas 3 nos furos Fixe o suporte de montagem 2 atrav s dos parafusos 1 e verifique o posicion...

Page 53: ...m cerca de 20lx Na posi o o detector de movi mentos reage tamb m com luz solar desde que aprox 20 000lx n o sejam superados Alinhar o detector de movimentos Nota Deve efetuar esta regula o ao escurece...

Page 54: ...eticu losamente testado antes da sua distribui o Em caso de falhas deste producto possui direitos le gais relativamente ao vendedor do producto Os seus direitos legais n o est o limitados pela ga rant...

Page 55: ...4167 Neckarsulm GERMANY Model No HG02407 Version 05 2017 Stand der Informationen Last Information Update Version des informations Stand van de informatie Stav informac Estado de las informaciones Esta...

Reviews: