background image

Sliding Gate Operator

User's Manual

Lockmaster DKC400UY

Lockmaster DKC400U

         Aleko AR1400

  www.Openers4less.com

Sales@Openers4less.com

              352.241.8259

Summary of Contents for Aleko AR1400

Page 1: ...Sliding Gate Operator User s Manual Lockmaster DKC400UY Lockmaster DKC400U Aleko AR1400 www Openers4less com Sales Openers4less com 352 241 8259...

Page 2: ...AL 2 OUTLINE 1 Important safety information 3 2 Main features 3 3 Main technical parameters 3 4 Working principle and main structure 4 5 Installation and adjustment 4 6 Connecting 7 7 Control 10 8 Che...

Page 3: ...DKC400UY...

Page 4: ...c8 4 9 Base plate for receiver limit switch sensor LockMaster tr3bp9 1 10 Base plate for control board LockMaster tr3bp10 1 11 Plastic clip LockMaster tr3pc11 4 12 Receiver LockMaster tr3rec12 1 13 La...

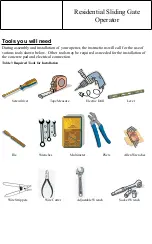
Page 5: ...the use of various tools shown below Other tools may be required as needed for the installation of the concrete pad and electrical connection Table 3 Required Tools for Installation Screwdriver Tape M...

Page 6: ...as access to it Be careful when in close proximity to moving parts where hands or fingers could be pinched Do not allow control devices to be placed so that a person can access them by reaching throug...

Page 7: ...switch on the motor automatically when the temperature is lower than 85 C 5 C 5 Installation and adjustment The DKC400 U Y rack driven gate operator operates by forcing a drive rack past a drive gear...

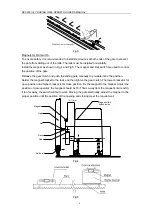
Page 8: ...is possible mount the gate operator on installation pad as shown in Fig 2 Check the operator and make sure it is lined up with the gate Nut Bolt Anchor Nut Spring washer Plain washer Gear Gate operat...

Page 9: ...e sliding gate manually to pre determine the position Solder the magnet bracket to the rack and then tighten the gear clutch The lower bracket is for open position and higher bracket is for close posi...

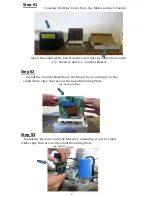
Page 10: ...ing Plate as shown below Step 3 Install the Receiver onto the Motor by mounting it on the small white clips that are on the small Mounting Plate as shown below Step 1 Unscrew the Blue Cover from the M...

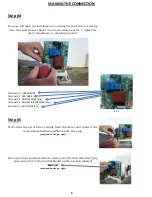
Page 11: ...1 RED WIRE Terminal 12 YELLOW WIRE any Terminal 13 YELLOW BLUE WIRE any Terminal 14 BLUE WIRE any Step 5 Next take the set of wires coming from the motor and connect the red and black wires anywhere o...

Page 12: ...Blue wires on it Connect the plug on to the Control Board on the section labeled LIMIT SWITCH as shown on the pic right Step 8 Find the wire coming from the bottom of the Motor that is GREEN YELLOW S...

Page 13: ...ature 12 5 Seconds 25 Seconds 45 Seconds only one dip switch should be ON The other two dip switch should be in the OFF position for the auto close feature to work correctly DI P 2 DI P 3 DI P 4 Direc...

Page 14: ...de compatible blue button on remote control transmitter The red and black wires are 24 volt power input The two yellow are the channel 1 the two white are channel 2 and the black wire is the antenna w...

Page 15: ...Residential Sliding Gate Operator Optional Equipment Installation Procedures O O O O O O O O O O O O Blue Brown Black White Grey Grey Black Black Green Brown Red Black...

Page 16: ...lose time of pedestrian See Set auto close function of pedestrian mode section The limit switch wire connector terminal block becomes loose Check the limit switch mode see table 1 DIP switch Connectin...

Page 17: ...2005 2009 LockMaster All Rights Reserved sales Openers4Less com www Openers4Less com...

Reviews: