background image

Operation Manual  


          Equipment 

                                                                                                Operation Manual 


Loctite

  EQ PU20 Digital Peristaltic Dispenser 

Part Number: 

2265279

Summary of Contents for 2265279

Page 1: ...Operation Manual Equipment Operation Manual Loctite EQ PU20 Digital Peristaltic Dispenser Part Number 2265279 ...

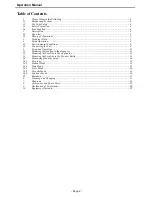
Page 2: ... 4 2 Connecting the Unit 9 5 Setup and Operation 12 5 1 Mounting the feedline to the dispenser 12 5 2 Mounting the Feedline to the Applicator 13 5 3 Mounting the Feedline to the Product Bottle 13 5 4 Dispensing Quantity Setup 14 5 4 1 Program 15 5 4 2 Manual Mode 15 5 4 3 Time Mode 15 5 4 4 Cycle Mode 16 5 4 5 Vacuum Mode 16 5 4 6 Continue Mode 16 5 5 Shutdown 17 6 Cleaning and Changing 17 7 Diagr...

Page 3: ...ctivities 1 2For Your Safety For safe and successful operation of the unit read these instructions completely If the instructions are not observed the manufacturer can assume no responsibility Be sure to retain this manual for future reference WARNING Never remove the cover of the unit without first switching the power off and unplugging the power cord WARNING Damage to the power cord or the housi...

Page 4: ...the dispenser in an area where it is directly exposed to sunlight Do not operate the dispenser where electrical noise is present Only use a neutral chemical for cleaning the dispenser Do not use alcohol benzene or thinner as it may damage the paint on the dispenser 1 4Item Supplied 1 PU20 Digital Peristaltic Dispenser 1 Manual Applicator 1 Operation Manual 1 Tip Adapter 1 6mm 1 Tip Adapter 2 0mm 1...

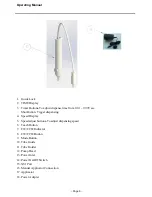
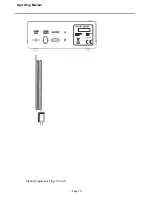
Page 5: ...Operating Manual Page 5 2 Description 2 1Overview ...

Page 6: ...Shot Button Tigger dispensing 4 Speed Display 5 Speed adjust buttons To adjust dispensing speed 6 Teach Button 7 CW CCW Indicator 8 CW CCW Button 9 Mode Button 10 Tube Guide 11 Tube Holder 12 Pump Head 13 Power Inlet 14 Power On Off Switch 15 XS1 Port 16 Manual Applicator Connection 17 Applicator 18 Power Adapter ...

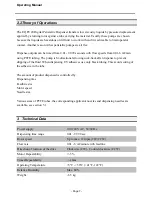
Page 7: ...ing suck back after dispense to prevent dripping of the fluid When dispensing UV adhesives use only black tubing This avoids curing of the adhesive in the tube The amount of product dispensed is controlled by Dispensing time Feedline size Motor speed Needle size Various sizes of PTFE tubes the corresponding applicator nozzles and dispensing needles are available see section 5 1 3 Technical Data Po...

Page 8: ...Operating Manual Page 8 ...

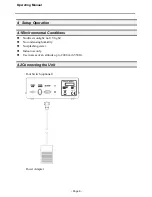
Page 9: ...Operation 4 1Environmental Conditions No direct sunlight no UV light No condensing humidity No splashing water Indoor use only Use in areas of an altitude up to 2000 m 6 550 ft 4 2Connecting the Unit Foot Switch optional Power Adapter ...

Page 10: ...Operating Manual Page 10 Manual Applicator Finger Switch ...

Page 11: ...Operating Manual Page 11 Caution Switch off the unit before connecting the finger switch ...

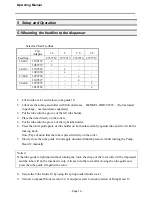
Page 12: ...rs 5 Put the tube into the groove of the right tube holder 6 Press the white guide plate of tube holder on both sides carefully against tube and fix it with the locking knob Note Pay attention that the tube is placed directly on the roller 7 Slowly close the tube guide 10 and apply downward thumb pressure whilst turning the Pump Head 12 manually Notice If the tube guide is tightened without turnin...

Page 13: ...y the product feedline should not be longer than 2 m Avoid kinking of the feedlines Ensure all fittings are secure and tight 5 2Mounting the Feedline to the Applicator 1 Pull the tube through the applicator and the applicator tip adapter 2 Mount the applicator tip adapter 3 Screw on the tip adapter 4 Cut the feed tube as right picture 5 Install the required dispensing needle 5 3Mounting the Feedli...

Page 14: ...rent parameters to be set and saved to suit different applications Manual mode Enables the operator to control the START STOP of the dispense cycle Time mode Enables fixed dispense time for each dispense cycle Cycle Mode This is the cycle wait time between dispense and vacuum Vacuum mode Enables the suck back at the end of the dispense cycle after the cycle wait time Continue mode Enables repeat c...

Page 15: ... via press SHOT button Finger Switch on applicator 17 or footswitch 5 4 3 Time Mode In Time Mode operator defines dispensing time then dispenser will run one cycle per initiation 1 Press MODE Button 9 switch to TIME mode TIME indictor on 2 Setup dispensing speed via speed adjustment button 5 3 Setup dispensing time as below 1 Press SET button for 2 seconds then edit dispensing time 2 Press MODE 9 ...

Page 16: ...ispenser via press SHOT button Finger Switch on applicator 17 or footswitch Press again cycling will be stopped 5 4 5 Vacuum Mode Vacuum will work with TIME and Cycle Operator will need to setup vacuum time Dispenser will run as TIME INTERVAL Time Vacuum Time Dispenser runs one cycle per trigger 1 Press MODE Button 9 switch to VACUUM mode TIME indictor on 2 Setup dispensing time as below 1 Press S...

Page 17: ...or 17 or footswitch Press again cycling will be stopped 5 5Shutdown Turn off the dispenser by Power On Off Switch 6 Cleaning and Changing Clean the roller with a dust free tissue or towel Lubricate the rollers of the pump head WITH A Silicone grease once or twice a week Lubrication will help prolong tube life Lifetime of the Feedline The PTFE tube should be replaced periodically The lifetime of th...

Page 18: ...Operating Manual Page 18 7 Diagrams XS1 START Interface ...

Page 19: ...3 2 20 m 1070735 Tubing clear ID 2 4 x 0 4 mm OD 3 2 20 m 1019162 Tubing black ID 1 7 x 0 4 mm OD 2 5 20 m 1070736 Tubing clear ID 1 7 x 0 4 mm OD 2 5 20 m 1109317 Tubing black ID 1 4 x 0 3 mm OD 2 0 20 m 1109318 Tubing clear ID 1 4 x 0 3 mm OD 2 0 20 m 1001830 Tubing black ID 1 0 x 0 3 mm OD 1 6 20 m 1109147 Tubing clear ID 1 0 x 0 3 mm OD 1 6 20 m 1087219 Needle Variety Kit 218288 Silicon Grease...

Page 20: ...Operating Manual Page 20 9 Declaration of Conformity ...

Page 21: ...Operating Manual Page 21 ...

Page 22: ...the Products including where products parts or attachments for use in connection with the Products are available from Henkel the use of products parts or attachments which are not manufactured by Henkel no claim shall be allowed No Products shall be returned to Henkel for any reason without prior written approval from Henkel Products shall be returned freight prepaid in accordance with instruction...

Page 23: ...Ecatepac de Morelos Edo de México Henkel Corporation Automotive Metals HQ 32100 Stephenson Hwy Madison Heights MI 48071 Henkel Ltda Rua Karl Huller 136 Jd Canhema 09941 410 Diadema SP Brazil www loctite com and designate trademarks of Henkel Corporation or its affiliates registered in the U S and elsewhere Henkel Corporation 2009 All rights reserved Data in this operation manual is subject to chan...

Reviews: